從Elasticsearch詳解Ambari與第三方軟體的整合(二)
上文已經簡單介紹了前因,這裡我們就最核心的內容:如何做,進行講解。
二. 整合實現過程詳解
Ambari下服務資源的定義結構如下圖所示:
|_ stacks
   |_ <stack_name>
      |_ <stack_version>
         metainfo.xml
         |_ hooks
         |_ repos
            repoinfo.xml
         |_ services
            |_ <service_name>
               metainfo.xml
               metrics.json
               |_ configuration
                  {configuration files}
               |_ package
                  {files, scripts, templates}
下面就以Elasticsearch服務的整合為例,對所有核心的實現內容逐一講解,elasticsearch整合專案定義結構如下圖所示:

1. metainfo.xml - 服務整體描述
首先,通過metainfo.xml檔案對elasticsearch這個服務進行一個標準的描述,完整檔案如下所示:
<?xml version="1.0"?>
<metainfo>
    <schemaVersion>2.0</schemaVersion>
    <services>
        <service>
            <name>ELASTICSEARCH</name>
            <displayName>Elasticsearch</displayName>
            <comment>A highly scalable open-source full-text search and analytics engine. Including storage, searching, and analyzing big volumes of data quickly and in near real time. </comment>
            <version>6.4.2</version>
            <components>
                <component>
                    <name>ELASTICSEARCH_MASTER</name>
                    <displayName>Elasticsearch Master</displayName>
                    <category>MASTER</category>
                    <cardinality>1+</cardinality>
                    <versionAdvertised>true</versionAdvertised>
                    <commandScript>
                        <script>scripts/es_master.py</script>
                        <scriptType>PYTHON</scriptType>
                        <timeout>1200</timeout>
                    </commandScript>
                    <logs>
                        <log>
                            <logId>elasticsearch_master</logId>
                            <primary>true</primary>
                        </log>
                    </logs>
                </component>
                <component>
                    <name>ELASTICSEARCH_SLAVE</name>
                    <displayName>Elasticsearch Slave</displayName>
                    <category>SLAVE</category>
                    <cardinality>0+</cardinality>
                    <versionAdvertised>true</versionAdvertised>
                    <commandScript>
                        <script>scripts/es_slave.py</script>
                        <scriptType>PYTHON</scriptType>
                        <timeout>1200</timeout>
                    </commandScript>
                    <logs>
                        <log>
                            <logId>elasticsearch_slave</logId>
                            <primary>true</primary>
                        </log>
                    </logs>
                </component>
            </components>
            <osSpecifics>
                <osSpecific>
                    <osFamily>any</osFamily>
                    <packages>
                        <package>
                            <name>elasticsearch-6.4.2</name>  <!-- Not using. Please make sure the os already contains all the dependencies. -->
                        </package>
                    </packages>
                </osSpecific>
            </osSpecifics>
            <commandScript>
                <script>scripts/service_check.py</script>
                <scriptType>PYTHON</scriptType>
                <timeout>300</timeout>
            </commandScript>

            <configuration-dependencies>
                <config-type>elasticsearch-config</config-type>
                <config-type>elasticsearch-env</config-type>
                <config-type>elasticsearch-log4j</config-type>
            </configuration-dependencies>

            <restartRequiredAfterChange>true</restartRequiredAfterChange>

            <quickLinksConfigurations>
                <quickLinksConfiguration>
                    <fileName>quicklinks.json</fileName>
                    <default>true</default>
                </quickLinksConfiguration>
            </quickLinksConfigurations>

        </service>
    </services>
</metainfo>
主要引數
=========================================================================================
定義服務的名稱,顯示名稱,描述,版本號等核心資訊:
<name>ELASTICSEARCH</name>
<displayName>Elasticsearch</displayName>
<comment>A highly scalable open-source full-text search and analytics engine. Including storage, searching, and analyzing big volumes of data quickly and in near real time. </comment>
<version>6.4.2</version>
=========================================================================================
定義服務的元件資訊,這裡針對elasticsearch的實現,分為了兩種元件:master和slave,這裡以master為例:
<component>
    <name>ELASTICSEARCH_MASTER</name>
    <displayName>Elasticsearch Master</displayName>
    <category>MASTER</category>
    <cardinality>1+</cardinality>
    <versionAdvertised>true</versionAdvertised>
    <commandScript>
        <script>scripts/es_master.py</script>
        <scriptType>PYTHON</scriptType>
        <timeout>1200</timeout>
    </commandScript>
    <logs>
        <log>
            <logId>elasticsearch_master</logId>
            <primary>true</primary>
        </log>
     </logs>
</component>
其中基礎資訊包括元件名稱(name),元件顯示名稱(displayname)。
其它的幾個較重要引數,包括:
1) category:描述元件是主服務、節點從服務或是客戶端。
| category 類別 | 預設生命週期命令實現 |
| MASTER | install, start, stop, configure, status |
| SLAVE | install, start, stop, configure, status |
| CLIENT | install, configure, status |
2)cardinality:描述元件的數量限制。
| cardinality格式 | 格式說明舉例 |
| 數字 | <cardinality>1</cardinality>:表示只能有一個 |
| 數字區間 | <cardinality>0-1</cardinality>:表示最少有零個,最多有一個 |
| 數字單增區間 | <cardinality>1+</cardinality>:表示最少有1個 |
| ALL | <cardinality>ALL</cardinality>:表示所有節點都需要 |
3)commandScript:元件生命週期命令的執行指令碼實現。
=========================================================================================
所支援的OS系統定義,以及需要安裝的軟體包(此處作者在指令碼實現過程中沒有執行依賴包安裝,預設各依賴均已具備):
<osSpecifics>
    <osSpecific>
        <osFamily>any</osFamily>
        <packages>
            <package>
                <name>elasticsearch-6.4.2</name>  <!-- Not using. Please make sure the os already contains all the dependencies. -->
            </package>
        </packages>
    </osSpecific>
</osSpecifics>
osFamily可定義如:redhat6,redhat7,ubuntu14,ubuntu16等。
package-name,即為yum install或apt-get install的軟體包名稱。
=========================================================================================
服務檢查的指令碼實現(注意,此py指令碼的命名要保持一致):
<commandScript>
    <script>scripts/service_check.py</script>
    <scriptType>PYTHON</scriptType>
    <timeout>300</timeout>
</commandScript>
=========================================================================================
配置檔案依賴,即服務安裝前需要填寫或修改的配置檔案:
<configuration-dependencies>
    <config-type>elasticsearch-config</config-type>
    <config-type>elasticsearch-env</config-type>
    <config-type>elasticsearch-log4j</config-type>
</configuration-dependencies>
=========================================================================================
修改配置後是否重啟(一般都為true):
<restartRequiredAfterChange>true</restartRequiredAfterChange>
=========================================================================================
介面快速連結的json指令碼實現(注意,此json指令碼的命名要保持一致):
<quickLinksConfigurations>
    <quickLinksConfiguration>
        <fileName>quicklinks.json</fileName>
        <default>true</default>
    </quickLinksConfiguration>
</quickLinksConfigurations>
其它引數
2. configuration - 服務配置項描述
configuration的目錄及內容如下圖所示(不包括original,這個是作者為了方便開發放入的原始配置檔案):

1)配置型別
這裡可以簡單分為兩種型別的配置檔案,及-env和其它。
1)-env.xml 配置檔案
env配置要求必須存在,主要描述安裝包路徑,使用者,組,pid檔案目錄,根目錄等。檔案內容此處擷取部分以作簡單舉例,如下圖所示:
    <property>
        <name>elasticsearch.download.url</name>
        <value></value>
        <display-name>Elasticsearch Download Url</display-name>
        <description>Elasticsearch package download url. The official download url is: https://artifacts.elastic.co/downloads/elasticsearch/elasticsearch-6.4.2.tar.gz</description>
    </property>

    <property>
        <name>elasticsearch.user</name>
        <value>elasticsearch</value>
        <display-name>Elasticsearch User</display-name>
        <property-type>USER</property-type>
        <description>Elasticsearch unix user.</description>
    </property>

    <property>
        <name>elasticsearch.group</name>
        <value>elasticsearch</value>
        <display-name>Elasticsearch Group</display-name>
        <property-type>GROUP</property-type>
        <description>Elasticsearch unix group.</description>
    </property>

    <property>
        <name>elasticsearch.base.dir</name>
        <value>/opt/elasticsearch</value>
        <display-name>Elasticsearch Base Directory</display-name>
        <description>Elasticsearch base directory.</description>
    </property>

    <property>
        <name>elasticsearch.pid.dir</name>
        <value>/var/run/elasticsearch</value>
        <display-name>Elasticsearch Pid Directory</display-name>
        <description>Elasticsearch pid file directory.</description>
    </property>
2)其它應用配置檔案
其它應用配置配置檔案即指應用本身所需的配置檔案,例如elasticsearch的核心配置檔案:elasticsearch.yml。但是我們在做實現的時候,並非要嚴格按照原始配置檔案的格式。例如,可以將elasticsearch.yml中的記憶體拆分為多個部門,如es-config-general.xml和es-config-network.xml等。在作者的實現中,作者將jvm.options的內容放入了-env配置檔案,然後-config.xml檔案對應elasticsearch.yml。
具體的配置對映實現方式,將在第三節package 中說明。大家只要知道,此處的配置檔案,就是為了在Ambari上安裝服務或是安裝服務後修改配置時展現配置並接受配置引數所實現的,如下圖內容:

2)配置格式
上面講了配置檔案的型別定義,下面詳細說下內容格式。
預設我們使用最簡單的格式,如下:
<property>
    <name>elasticsearch.base.dir</name>
    <value>/opt/elasticsearch</value>
</property>
但是上述格式,缺少了說明,且引數文字的顯示效果可能不是很好。我們可以新增<display-name>來替換<name>的顯示,以打達到更好的顯示效果;新增<description>來顯示說明或描述。
<property>
    <name>elasticsearch.base.dir</name>
    <value>/opt/elasticsearch</value>
    <display-name>Elasticsearch Base Directory</display-name>
    <description>Elasticsearch base directory.</description>
</property>
效果如圖所示:

預設情況下,<value>值不能為空,如果想允許值為空,可在<value-attributes>下新增<empty-value-valid>為true:
<property>
    <name>server.basePath</name>
    <value>none</value>
    <value-attributes>
        <empty-value-valid>true</empty-value-valid>
    </value-attributes>
    <display-name>Server Base Path</display-name>
</property>
<value-attributes>還支援一些常見的格式,例如boolean:
此處要注意,xml中boolean值的內容請填寫false或true,但是後續程式碼在獲取引數時,獲取的是boolean型別的False和True。
<property>
    <name>server.rewriteBasePath</name>
    <value>false</value>
    <value-attributes>
        <type>boolean</type>
        <overridable>false</overridable>
    </value-attributes>
    <display-name>Server Rewrite Base Path</display-name>
    <description>xxxx</description>
</property>
<value-attributes>針對密碼型別的支援:
<property>
    <name>zeppelin.ssl.keystore.password</name>
    <value>change me</value>
    <value-attributes>
        <type>password</type>
    </value-attributes>
    <property-type>PASSWORD</property-type>
    <description>Keystore password. Can be obfuscated by the Jetty Password tool</description>
</property>
<value-attributes>針對數字型別的支援,其中type可以為int,long等,minimum和maximum為可選引數用於給定範圍,unit為單位顯示等,例如:
<property>
    <name>ops.interval</name>
    <value>5000</value>
    <value-attributes>
        <type>int</type>
        <minimum>100</minimum>
        <maximum>50000</maximum>
        <unit>Milliseconds</unit>
        <increment-step>100</increment-step>
        <overridable>false</overridable>
    </value-attributes>
    <display-name>Ops Interval</display-name>
    <description>Set the interval in milliseconds to sample system and process performance metrics. Minimum is 100ms. Defaults to 5000.</description>
</property>
上述格式已然能滿足大部分需求了。當然,Ambari對此xml檔案的支援還包括很多其它引數,有興趣的童鞋可參考Ambari下的通用服務目錄下的配置:/var/lib/ambari-server/resources/common-services。
3. package - 服務互動程式碼實現
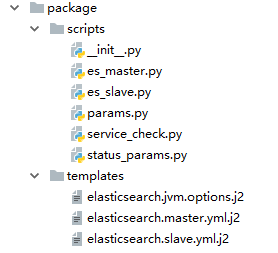
package的目錄及內容如下圖所示:

1) scripts - 指令碼實現
其中,params、service_check和status_params為必實現的指令碼,分別用於引數的獲取和加工、服務檢查、為服務檢查提供引數;es_master和es_slave是根據元件(component)區分的宣告週期實現指令碼,如下所示:
| 指令碼 | 具體實現 | 要求及說明 |
| params.py | 通過Script類的方法讀取之前configuration資料夾中.xml檔案定義的各個配置變數,有需要的話進行進一步加工,例如單位的新增,列表的解析,布林值的轉換等 | 指令碼名稱不可修改 |
| service_check.py | 可直接使用內建方法實現,具體請見原始碼 | 指令碼名稱要與metainfo.xml中定義的保持一致 |
| status_params.py | 引用pid檔案目錄及檔案引數即可 | 內容引數可以與params中的對應項保持一致(之所以獨立,是受ambari的檢查機制讀所限,其在做檢查時是不會走params的) |
| es_master.py/es_slave.py | 元件的install,start,stop等命令的實現 | 指令碼名稱要與metainfo.xml中定義的保持一致 |
具體內容,請參見原始碼,都是模式化的實現,很簡單。
2) templates - 配置模板
通過.xml對配置的定義,以及params.py對配置項的處理,以jinjia2為基礎的templates模板將最終完成配置對映到原始應用配置檔案的過程。例如:
在elasticsearch.master.yml.j2檔案中引用params中定義好的用於master節點的配置,如:
# ----------------------------------- Paths ------------------------------------
#
# Path to directory where to store the data (separate multiple locations by comma):
#
path.data: {{master_path_data}}
#
# Path to log files:
#
path.logs: {{master_path_logs}}
在configure方法的實現中,實現master模板和對應master配置檔案的替換:
configurations = params.config['configurations']['elasticsearch-config']
File(format("{es_master_conf_dir}/elasticsearch.yml"),
    content=Template("elasticsearch.master.yml.j2", configurations=configurations),
    owner=params.es_user,
    group=params.es_group
)
4. 其它資原始檔
1) quicklinks
基礎格式如下,只需改寫顯示名稱,元件名稱,對應的埠號即可。property請填寫.xml中定義的埠引數名稱(此處作者比較偷懶,直接走預設埠):
{
  "name": "default",
  "description": "default quick links configuration",
  "configuration": {
    "protocol": {
      "type":"http",
      "checks":[
      ]
    },
    "links": [
      {
        "name": "elasticsearch_ui",
        "label": "Elasticsearch UI",
        "requires_user_name": "false",
        "component_name": "ELASTICSEARCH_MASTER",
        "url":"%@://%@:%@",
        "port":{
          "http_property": "http_port",
          "http_default_port": "9200",
          "https_property": "http_port",
          "https_default_port": "9200",
          "regex": "\\w*:(\\d+)",
          "site": "elastic-config"
        }
      }
    ]
  }
}
2) alerts
通quicklinks一樣,作者犯懶,只實現了針對埠的簡單檢查。只需要改寫服務名稱,元件名稱,說明資訊,埠號即可。
{
  "ELASTICSEARCH": {
    "service": [],
    "ELASTICSEARCH_MASTER": [
      {
        "name": "elasticsearch_port",
        "label": "Elasticsearch Port",
        "description": "This host-level alert is triggered if the 9200 port is unreachable.",
        "interval": 1,
        "scope": "HOST",
        "source": {
          "type": "PORT",
          "uri": "{{elasticsearch-config/http.port}}",
          "default_port": 9200,
          "reporting": {
            "ok": {
              "text": "TCP OK - {0:.3f}s response on port {1}"
            },
            "warning": {
              "text": "TCP OK - {0:.3f}s response on port {1}",
              "value": 1.5
            },
            "critical": {
              "text": "Connection failed: {0} to {1}:{2}",
              "value": 5
            }
          }
        }
      }
    ]
  }
}
其它更為複雜的alerts.json配置同樣請參考Ambari(HDP)下內建Hadoop元件的配置:/var/lib/ambari-server/resources/common-services。
5. 關於監控
對於監控,作者在此只做下簡單說明。如果要求Ambari與第三方軟體整合實現監控,僅僅簡單實現metrics.json和widgets.json是不夠的。此兩個配置檔案,僅能實現介面監控圖表的顯示和圖示對應metrics資訊的關聯實現,但是不能實現具體資料的採集。這裡官網文件也僅以幾句話簡單帶過:

剛開始作者傻傻地以為有多智慧,只要json定義了採集項,採集資訊就能自動收集。實際上並不行,上圖的說明並不全。首選,要有采集的實現,將資料採集送給monitor。這個部分Ambari自己的Hadoop元件有專門的Hadoop sinks做了實現。而上述第一條所闡述的內容同樣需要自行通過指令碼或是程式碼實現將資訊推送至collector。之後第二條和第三條才是定義metrics和widgets。
另外Elasticsearch在6.3之後已經天然整合x-pack。用過x-pack的肯定都知道其秒級的監控實現。所以監控這塊其自身實現已然很強大了。具體內容在下一章節會進行簡單說明。
