
Python3詞雲之wordcloud入門
阿新 • • 發佈:2018-12-22
Python版本: python3.+
執行環境: Mac OS
IDE: pycharm
一 wordcloud簡介
wordcloud是基於Python的詞雲生成類庫,很好用,而且功能強大。
github:https://github.com/amueller/word_cloud
官方地址:https://amueller.github.io/word_cloud/
二 wordcloud使用方法
1 先來看一下WordCloud中的引數
def __init__(font_path=None, #字型 預設是none 在英文詞雲中可以不用設定, 若要顯示中文詞雲,則需要自定字型
width=400, height=200, margin=2, #生成詞雲畫布的寬(預設400)/高(預設200)/詞邊距(預設2)
ranks_only=None, #該引數實際上已經被廢除,但是為了向下相容,依然保留,但無效果
prefer_horizontal=.9, #橫縱比 預設0.9 其中各個引數的作用如下所示:
- font_path:字型 預設是none 在英文詞雲中可以不用設定, 若要顯示中文詞雲,則需要自定字型
- width, height, margin:生成詞雲畫布的寬(預設400)/高(預設200)/詞邊距(預設2)
- ranks_only:該引數實際上已經被廢除,但是為了向下相容,依然保留,但無效果
- prefer_horizontal:橫縱比 預設0.9; 當prefer_horizontal<1,且word不適應(當前空間)的時候,會把該詞旋轉
- mask:背景圖 預設None 引數是nd-array型別;當mask不為None 則width和height無效 被mask的形狀替代;除了白色塊(#FF or #FFFFFF),mask其他部位會被作為填充單詞的區域
- scale:預設值1 意義不明 暫不解釋
- color_func:預設None ; 重寫了colormap方法
- max_words:詞雲中詞的最大個數 預設 200 ;
- min_font_size:詞的字型大小的最小值 預設 4;
- stopwords:字串集合 預設None;當為None時,會預設呼叫 wordcloud庫內建的 STOPWORDS
- random_state:該引數會在color_func引數中被呼叫 預設 None;實際上的作用是作為隨機數的種子
- background_color:詞雲背景色 預設 black (黑色);
- max_font_size:最大字型大小 預設 None;當為None時 影象的 高 將會被作為最大字型大小
- font_step:字型的步長, 預設 1;當font_step>1時,可能會加快計算,但可能會產生更糟糕的適應
- mode:預設 RGB ;當mode=RGBA或者background_color為None時 會生成透明的背景
- relative_scaling:單詞頻率對字型大小的重要性 預設0.5; 影響詞頻對詞的大小
- regexp:正則表示式 預設None; 在process_text時會呼叫該正則表示式作為分詞依據,當為None時 使用r”\w[\w’]+”
- collocations:預設 True; 是否包括2個詞的搭配
- colormap:string 或者 matplotlib庫的colormap方法作為引數 預設 ‘viridis’;當color_func被指定是忽略該引數
- normalize_plurals:預設 True ;是否刪除英文單詞中的複數形式結尾的s
由於是博主的個人理解,有些引數並沒有理解透徹,若有錯,望指正
而常用的引數有以下幾個:
font_path           # 設定字型
background_color    # 背景顏色
max_words           # 詞雲顯示的最大詞數
mask                # 設定背景圖片
max_font_size       # 字型最大值
random_state        # 作為隨機數的種子
width,height,margin # 寬,高,詞邊距
生成圖雲主要有2個方法:
generate(str) #該方法能先進行分詞,再進行詞頻統計,最後生成詞雲,但是對中文的支援不太好...
generate_from_frequencies(dict)#根據詞頻來生成詞雲,對中文分詞,推薦使用該方法
2 簡單例項
我們以如下短文為例:
.S. President Donald Trump1 arrived in Beijing Wednesday afternoon, beginning his three-day state visit to China.
It is Trump's first visit to the country since he assumed the presidency2 in January. He is the first head of state to visit China since the landmark3 19th National Congress of the Communist Party of China.
During his stay in Beijing, Trump will hold talks with Chinese President Xi Jinping and meet with other Chinese leaders.
Xi and Trump will hold strategic communications on significant issues of common concern to build new consensus4, enhance mutual5 understanding and friendship, and promote bilateral6 relations in all spheres, according to Vice7 Foreign Minister Zheng Zeguang.
Apart from formal activities commensurate with a state visit, "informal interactions" will be arranged for the presidents of the two countries, Zheng said.
This is the third meeting between Xi and Trump following their first meeting at Mar-a-Lago, Florida in April and the second in Hamburg, Germany on the sidelines of the G20 summit in July.
This year marks the 45th anniversary of former U.S. President Richard Nixon's "ice-breaking" visit to China, which began the normalization8 of relations between the two countries.
text = """
.S. President Donald Trump1 arrived in Beijing Wednesday afternoon, beginning his three-day state visit to China.
It is Trump's first visit to the country since he assumed the presidency2 in January. He is the first head of state to visit China since the landmark3 19th National Congress of the Communist Party of China.
During his stay in Beijing, Trump will hold talks with Chinese President Xi Jinping and meet with other Chinese leaders.
Xi and Trump will hold strategic communications on significant issues of common concern to build new consensus4, enhance mutual5 understanding and friendship, and promote bilateral6 relations in all spheres, according to Vice7 Foreign Minister Zheng Zeguang.
Apart from formal activities commensurate with a state visit, "informal interactions" will be arranged for the presidents of the two countries, Zheng said.
This is the third meeting between Xi and Trump following their first meeting at Mar-a-Lago, Florida in April and the second in Hamburg, Germany on the sidelines of the G20 summit in July.
This year marks the 45th anniversary of former U.S. President Richard Nixon's "ice-breaking" visit to China, which began the normalization8 of relations between the two countries.
"""
mask_color_path = "bg_2.png" # 設定背景圖片路徑
font_path = '/Library/Fonts/華文黑體.ttf' # 為matplotlib設定中文字型路徑沒;路徑需要改成你本地的字型路徑,若是全英文,也可不設字型路徑
imgname1 = "en_WordCloud_DefautColors.png" # 儲存的圖片名字1(只按照背景圖片形狀)
imgname2 = "en_WordCloud_ColorsByImg.png" # 儲存的圖片名字2(顏色按照背景圖片顏色佈局生成)
width = 1000
height = 860
margin = 2
# 設定背景圖片
mask_coloring = imread(mask_color_path)
wc = WordCloud(font_path=font_path,
background_color="white", # 背景顏色
max_words=200, # 詞雲顯示的最大詞數
mask=mask_coloring, # 設定背景圖片
max_font_size=200, # 字型最大值
# random_state=42,
width=width, height=height, margin=margin,
)
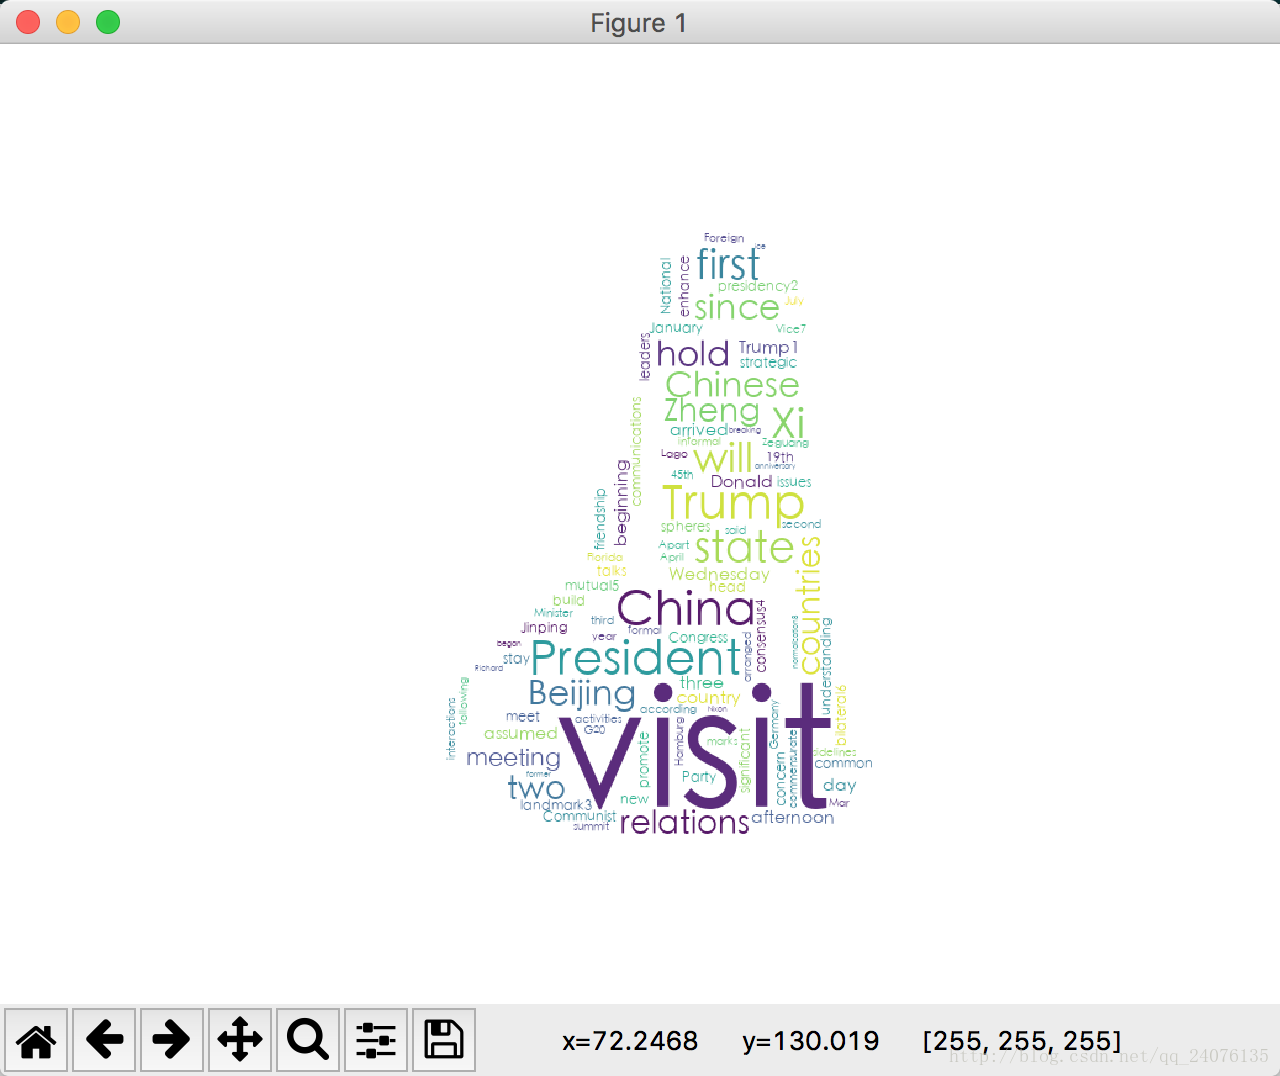
wc.generate(text)
plt.figure()
# 以下程式碼顯示圖片
# 繪製詞雲
plt.imshow(wc)
plt.axis("off")
plt.show()
# 儲存圖片
wc.to_file(imgname1)
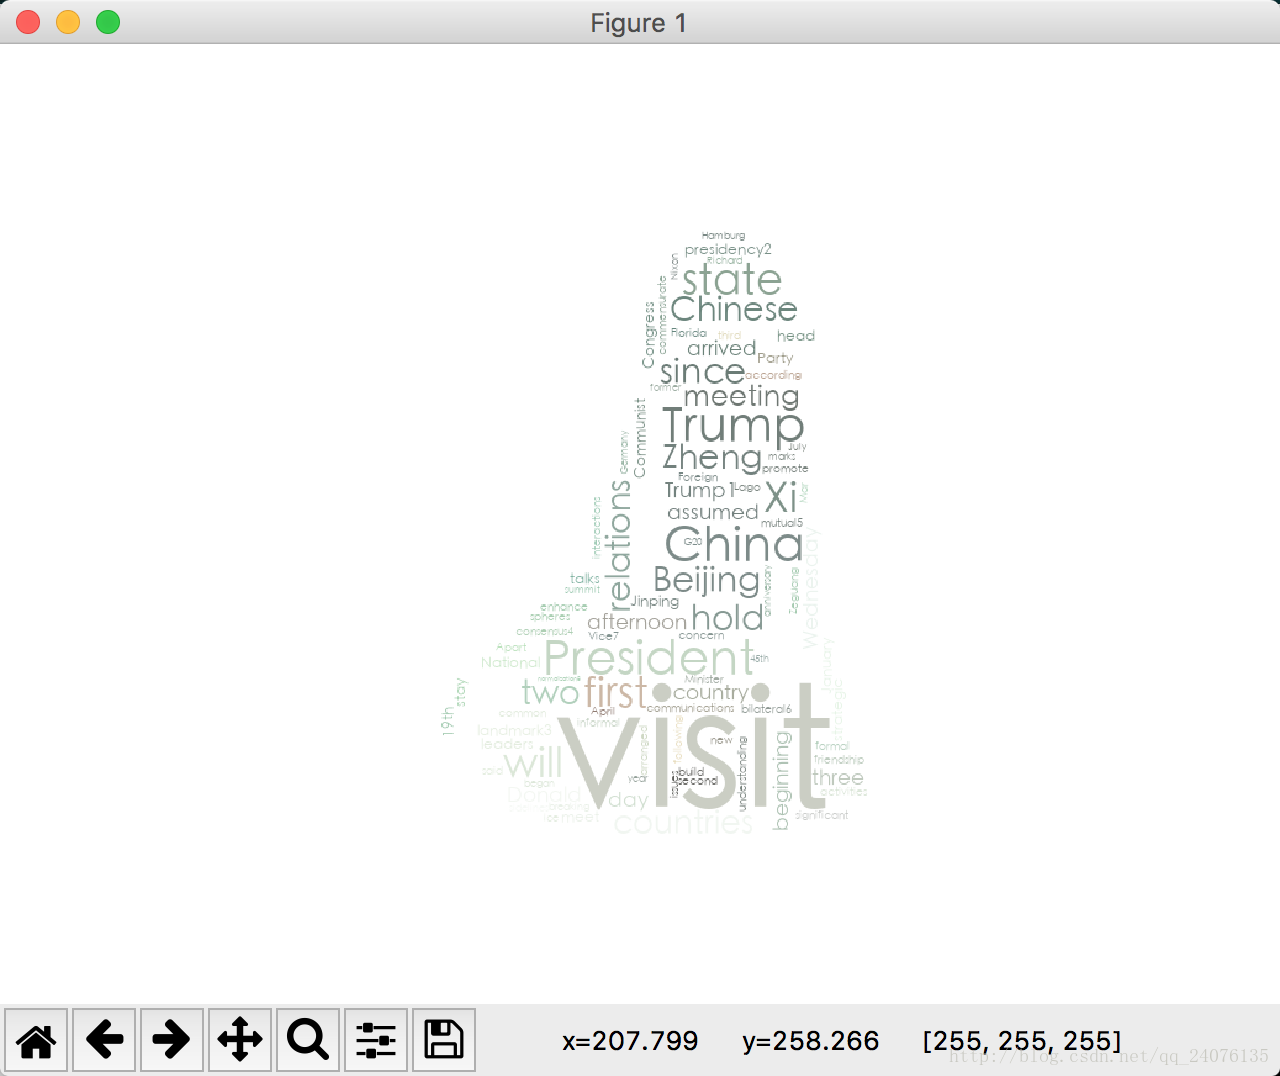
#獲得背景圖的顏色
img_color = ImageColorGenerator(mask_coloring)
wc.recolor(color_func=img_color)
plt.figure()
# 以下程式碼顯示圖片
# 繪製詞雲
plt.imshow(wc)
plt.axis("off")
plt.show()
# 儲存圖片
wc.to_file(imgname2)背景圖如下:

獲得的結果如下(預設字型顏色結果):
(按背景圖顏色結果):
三 小結
這是一個很簡單的wordcloud的入門內容,主要還是記錄自己的所學,在寫部落格的過程中,加深了對知識點的理解,還搞懂了一些原本沒注意的問題。 與君共勉 ^_^