建立windows下的第一個C++ XPCOM元件
本文翻譯自 Creating a C++ XPCOM component(連結為http://www.iosart.com/firefox/xpcom/),並嘗試建立自己的第一個XPCOM工程
這是一個step-by-step的入門教程,講述在Windows下建立,構建和註冊一個XPCOM 元件的過程。
本文涉及的sdk和原始碼可以從我的資源裡面下載。
建立元件
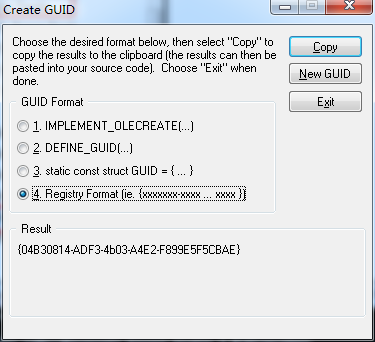
2. 為主介面建立GUID:
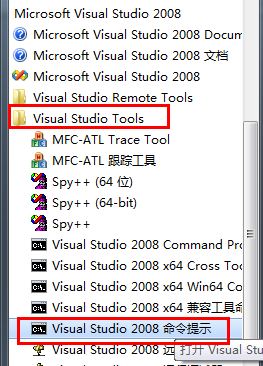
Windows下用guidgen (Visual Studio 2003/2005 工具->建立GUID)
3. 建立介面定義 檔案- IMyComponent.idl
a. 使用以下模板,新增方法和屬性給介面。b. 填入剛生成的GUID
#include "nsISupports.idl"
[scriptable, uuid(你的GUID)]
interface IMyComponent : nsISupports
{
  long Add(in long a, in long b);
};
4. 用介面定義檔案生成介面標頭檔案和型別庫(typelib)檔案
a. 使用Gecko SDK中的xpidl 工具. xpidl在Gecko SDK主目錄的bin/下(注意執行前需要將glib-1.2.dll,libIDL-0.6.dll拷貝到bin目錄下,這些庫包含在buildtools\windows\bin\x86下。)
b. 注意要將下列命令中的_DIR_替換為Gecko SDK主目錄下的idl目錄路徑
c. xpidl -m header -I_DIR_ IMyComponent.idl (IMyComponent.h最好拷貝到bin目錄下面,否則填寫完整路徑,會建立IMyComponent.h)
d. xpidl -m typelib -I_DIR_ IMyComponent.idl (同上,會建立IMyComponent.xpt)
e. 生成的IMyComponent.h,IMyComponent.xpt在與.idl同一目錄下目錄下。
5. 介面標頭檔案IMyComponent.h中包含了模板,用於構建你自己元件頭和實現檔案。你可以拷貝粘帖這些模板,只要修改元件名就可以了。
6. 建立你的元件的標頭檔案 -MyComponent.h
#pragma once

#ifndef _MY_COMPONENT_H_
#define _MY_COMPONENT_H_
//加入 #include "IMyComponent.h" 以包含介面的定義
#include "IMyComponent.h"
#define MY_COMPONENT_CONTRACTID "@mydomain.com/XPCOMSample/MyComponent;1"//契約ID
#define MY_COMPONENT_CLASSNAME "A Simple XPCOM Sample"
#define MY_COMPONENT_CID  {0xb7b04070, 0x45fc, 0x4635,{ 0xb2, 0x19, 0x7a, 0x17, 0x2f, 0x80, 0x6b, 0xee } }


class MyComponent:public IMyComponent
{
public:
	NS_DECL_ISUPPORTS
		NS_DECL_IMYCOMPONENT
		MyComponent(void);
	~MyComponent(void);
};
#endif
7. MyComponent.cpp
#include "MyComponent.h"

NS_IMPL_ISUPPORTS1(MyComponent, IMyComponent)

MyComponent::MyComponent(void)
{
}

MyComponent::~MyComponent(void)
{
}

NS_IMETHODIMP MyComponent::Add(PRInt32 a, PRInt32 b, PRInt32 *_retval)
{
	*_retval = a + b;
	return NS_OK;
}
8. MyComponentModule.cpp
#include "nsIGenericFactory.h"
#include "MyComponent.h"

NS_GENERIC_FACTORY_CONSTRUCTOR(MyComponent)

static nsModuleComponentInfo components[] =
{
	{
		MY_COMPONENT_CLASSNAME,
		MY_COMPONENT_CID,
		MY_COMPONENT_CONTRACTID,
		MyComponentConstructor,
	}
};

NS_IMPL_NSGETMODELE("MyComponentsModule", components)
9. 建立makefiles或者工程
a. 你可以根據例子 裡提供的模板去定製你的makefile.
b. 或者,你可以建立一個Visual C++工程,進行一些簡單的設定就可以了。
從例子程式構建
1. 從這裡 下載示例程式碼,解壓到本地。
2. 編輯makefile
a. makefile位於示例程式碼的src目錄下。
b. Makefile用於Linux, MyComponent.mak用於Windows.
c. 編輯makefile, 改變 GECKO_SDK_PATH 變數指向你的Gecko SDK 目錄。
3. 構建示例程式
a. 開啟命令列或shell(Windows下cmd, Linux下tcsh, bash等)
b. 切換到示例程式碼的目錄。
c. Linux下鍵入make, MyComponent.so將被建立。
d. Windows下鍵入 nmake /f MyComponent.mak. Debug\MyComponent.dll將建立, 注意,如果提示缺少nspr4.lib, plc4.lib, plds4.lib, 下載gecko-sdk-i586-pc-msvc-1.8b1.zip解壓後在lib資料夾下。Mozilla的檔案太亂了,1.7和1.8的SDK檔案都不全,所以只能1.7和1.8都下載~
e. 或者用 nmake /f "MyComponent.mak" CFG="MyComponent - Win32 Release" 建立release版的,Release\MyComponent.dll 將被建立
4. 註冊新元件到Mozilla中
a. 拷貝 MyComponent.so/MyComponent.dll和IMyComponent.xpt 到Mozilla的components目錄。在Windows下這個目錄一般在 C:\Program Files\Mozilla Firefox\components. Linux下~/firefox/components (或~/mozilla/components)
b. 執行Gecko SDK 提供的regxpcom註冊新元件,你可以用 regxpcom -x components路徑 來註冊,或者在Mozilla安裝路徑下建立.autoreg,讓它自動註冊。
c. 刪除Mozilla配置目錄下的 xpti.dat 和compreg.dat. Windows配置目錄在C:\Documents and Settings\USERNAME\Application Data\Mozilla\Firefox\Profiles\default.???, Linux下的在~/.mozilla/firefox/default.???下。
5. 測試新元件
a. 重啟Mozilla 或 Firefox
b. 開啟 示例程式碼裡的MyComponentsTest.html, 點"GO"按鈕
c. 如果一切正常,你可以看到 “3+4=7”.
連結和資源:
參考資料:
http://www.cnblogs.com/phinecos/archive/2008/04/25/1171614.html


