【Android】_UI設計_登入頁面(記住密碼)
阿新 • • 發佈:2018-12-23
目標: Android記住密碼和自動登入介面的實現(SharedPreferences),具有一定的參考價值,感興趣的小夥伴們可以參考一下。
登入頁面設計(記住密碼版)
(一) SharedPreferences用法
- SharedPreferences介紹:
SharedPreferences是Android平臺上一個輕量級的儲存類,主要是儲存一些常用的配置引數,它是採用xml檔案存放資料的,檔案存放在"/data/data/shared_prefs"目錄下。- SharedPreferences的用法:
由於SharedPreferences是一個介面,而且在這個接口裡沒有提供寫入資料和讀取資料的能力。但它是通過其Editor介面中的一些方法來操作SharedPreference的,用法見下面程式碼:- Context.getSharedPreferences(String name,int mode)來得到一個SharedPreferences例項
name:是指檔名稱,不需要加字尾.xml,系統會自動為我們新增上。
mode:是指定讀寫方式,其值有三種,分別為:Context.MODE_PRIVATE:指定該SharedPreferences資料只能被本應用程式讀、寫
Context.MODE_WORLD_READABLE:指定該SharedPreferences資料能被其他應用程式讀,但不能寫
Context.MODE_WORLD_WRITEABLE:指定該SharedPreferences資料能被其他應用程式讀寫。
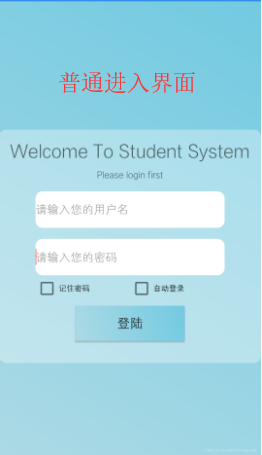
效果實現圖:
只有 使用者名稱為“student”且密碼為“123456”才能登入!
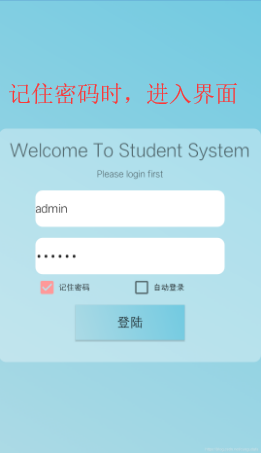
我們平常進入登入介面都要求我們輸入使用者名稱和密碼,記住密碼後,進入介面就有不用手動輸入,如圖:


(二) 登入頁面Demo
- 新建AndroidStudio專案

(三)具體的編碼實現
- 佈局介面採用巢狀的模式,在底色上加上半透明樣式,有木有高階感,activity_remeber_Pwd.xml:
<?xml version="1.0" encoding="utf-8"?>
<RelativeLayout remeberPwdActivity
package com.example.cungu.myapplication4;

import android.content.Intent;
import android.preference.PreferenceManager;
import android.support.v7.app.ActionBar;
import android.support.v7.app.AppCompatActivity;
import android.os.Bundle;
import android.content.SharedPreferences;
import android.text.Editable;
import android.text.InputType;
import android.text.TextWatcher;
import android.view.View;
import android.view.View.OnClickListener;
import android.widget.ArrayAdapter;
import android.widget.AutoCompleteTextView;
import android.widget.Button;
import android.widget.CheckBox;
import android.widget.EditText;
import android.widget.Toast;

public class remeberPwdActivity extends AppCompatActivity {

    private SharedPreferences pref;
    private SharedPreferences.Editor editor;

    private EditText accountEdit;
    private EditText passwordEdit;
    private Button login;
    private CheckBox savePassword;
    private CheckBox autoLogin;

    @Override
    protected void onCreate(Bundle savedInstanceState) {
        super.onCreate(savedInstanceState);
        setContentView(R.layout.activity_remeber_pwd);

        pref = PreferenceManager.getDefaultSharedPreferences(this);
        accountEdit = (EditText) findViewById(R.id.account);
        passwordEdit = (EditText) findViewById(R.id.password);
        savePassword = (CheckBox) findViewById(R.id.savePassword);
        autoLogin = (CheckBox) findViewById(R.id.autologin);
        login = (Button) findViewById(R.id.login);
        passwordEdit.setInputType(InputType.TYPE_CLASS_TEXT
                | InputType.TYPE_TEXT_VARIATION_PASSWORD);//隱式密碼
        boolean isRemember = pref.getBoolean("savePassword", false);

        if (isRemember) {
            // 將賬號和密碼都設定到文字框中,下一次進入不如再輸密碼啦
            String account = pref.getString("account", "");
            String password = pref.getString("password", "");
            accountEdit.setText(account);
            passwordEdit.setText(password);
            savePassword.setChecked(true);
        }

        login.setOnClickListener(new OnClickListener() {
            @Override
            public void onClick(View v) {
                String account = accountEdit.getText().toString();
                String password = passwordEdit.getText().toString();
                if (account.equals("student") && password.equals("123456")) {
                    editor = pref.edit();
                    if (savePassword.isChecked()) { // 檢查複選框是否被選中
                        editor.putBoolean("savePassword", true);
                        editor.putString("account", account);
                        editor.putString("password", password);
                    } else {
                        editor.clear();
                    }
                    editor.commit();
                    Toast.makeText(remeberPwdActivity.this, "Login Success!", Toast.LENGTH_SHORT).show();
                    //Intent intent = new Intent(remeberPwdActivity.this, MainActivity.class);//跳轉
                    //startActivity(intent);
                    finish();
                } else {
                    Toast.makeText(remeberPwdActivity.this, "account or password is invalid", Toast.LENGTH_SHORT).show();
                }
            }
        });
    }
}
- 佈局樣式:
本次為了優化介面引入內容較多,Drawable下:
| No. | xml檔案 | 樣式 |
|---|---|---|
| 1 | background_button_div.xml | button藍色背景 |
| 2 | background_login.xml | 登入框漸變藍背景 |
| 3 | background_login_div.xml | 登入框圓角半透明背景 |
| 4 | edit_login_div.xml | 編輯框圓角半透明背景 |
- button藍色背景——background_button_div.xml:
<?xml version="1.0" encoding="UTF-8"?>
<shape xmlns:android="http://schemas.android.com/apk/res/android" >

    <solid android:color="#FF72CAE1" />
    <!--
  設定圓角
  注意:	bottomRightRadius是左下角而不是右下角  bottomLeftRadius右下角
    -->
    <corners
        android:bottomLeftRadius="10dp"
        android:bottomRightRadius="10dp"
        android:topLeftRadius="10dp"
        android:topRightRadius="10dp" />
</shape>
- 登入框漸變藍背景——background_login.xml:
<?xml version="1.0" encoding="utf-8"?>
<shape xmlns:android="http://schemas.android.com/apk/res/android" >

<gradient
    android:angle="45"
    android:endColor="#FF72CAE1"
    android:startColor="#FFACDAE5" />
</shape>
- 登入框圓角半透明背景——background_login_div.xml:
<?xml version="1.0" encoding="UTF-8"?>
<shape xmlns:android="http://schemas.android.com/apk/res/android" >

    <solid android:color="#55FFFFFF" />
    <!--
  設定圓角
  注意:	bottomRightRadius是左下角而不是右下角  bottomLeftRadius右下角
    -->
    <corners
        android:bottomLeftRadius="10dp"
        android:bottomRightRadius="10dp"
        android:topLeftRadius="10dp"
        android:topRightRadius="10dp" />

</shape>
- 編輯框圓角半透明背景——edit_login_div.xml:
<?xml version="1.0" encoding="UTF-8"?>
<shape xmlns:android="http://schemas.android.com/apk/res/android" >

    <solid android:color="#FFFFFF" />
    <!--
  設定圓角
  注意:	bottomRightRadius是左下角而不是右下角  bottomLeftRadius右下角
    -->
    <corners
        android:bottomLeftRadius="10dp"
        android:bottomRightRadius="10dp"
        android:topLeftRadius="10dp"
        android:topRightRadius="10dp" />

</shape>
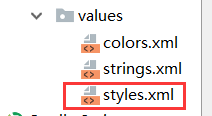
- 隱藏上邊框:修改styles.xml程式碼為:


<style name="AppTheme" parent="Theme.AppCompat.Light.NoActionBar">
大功告成!
