
Android碎片(Fragment)的小祕密
碎片(Fragment)是一種可以嵌入在活動中的UI片段。Android3.0開始引入的碎片(Fragment),其最主要的目的是為了給大螢幕手持裝置提供更加靈活和動態的UI設計,在平板應用方向運用非常廣泛。
碎片(Fragment)和活動(Activity)是有著緊密的聯絡。雖然各自有自己的佈局和生命週期,關鍵是碎片要嵌入到活動中才能更好的展現自己呀!所以他們還是要發生關係的( .........)。碎片和活動之間的關係主要發生在生命週期的聯絡和相互之間的通風報信(
 )。
)。
說實話,我們和碎片相依為命卻互不相識( )。
)。


作為帥比的程式設計師,任之所責正式開始。一陰一陽之謂道也,一靜一動之未睡也(呃呃呃....不好意思打錯字了,碎也、碎也、碎也)。碎片的靜態和動態使用方式。
靜態召喚碎片:
思路是,第一步新建兩個佈局,程式碼如下:
<?xml version="1.0" encoding="utf-8"?>
<LinearLayout xmlns:android="http://schemas.android.com/apk/res/android"
    android:layout_width="match_parent"
    android:layout_height="match_parent"
    android:background="#00f">

    <Button
        android:id="@+id/button"
        android:layout_width="match_parent"
        android:layout_height="wrap_content"
        android:text="靜態碎片"/>

</LinearLayout>
<?xml version="1.0" encoding="utf-8"?>
<LinearLayout xmlns:android="http://schemas.android.com/apk/res/android"
    android:layout_width="match_parent"
    android:layout_height="match_parent"
    android:background="#00fff0">

    <TextView
        android:layout_width="match_parent"
        android:layout_height="wrap_content"
        android:text="靜態碎片"
        android:id="@+id/textView" />
</LinearLayout>
第二步新建兩個類用於載入佈局:建議使用V4的碎片public class LeftFragment extends Fragment {
@Override
public View onCreateView(LayoutInflater inflater,
ViewGroup container,
Bundle savedInstanceState) {
View view=inflater.inflate(
R.layout.layout_left_fragment,container,false);
return view;
}
}public class RightFragment extends Fragment {
@Override
public View onCreateView(LayoutInflater inflater,
ViewGroup container,
Bundle savedInstanceState) {
View view=inflater.inflate(
R.layout.layout_right_fragment,container,false);
return view;
}
}第三步是在主佈局中靜態使用碎片,要注意佈局權重的問題和name記得加上包名。<?xml version="1.0" encoding="utf-8"?>
<LinearLayout xmlns:android="http://schemas.android.com/apk/res/android"
xmlns:tools="http://schemas.android.com/tools"
android:layout_width="match_parent"
android:layout_height="match_parent"
android:orientation="horizontal"
tools:context="com.example.dell.myfragment.MainActivity">
<fragment
android:id="@+id/left_fragment"
android:layout_weight="1"
android:layout_width="0dp"
android:layout_height="match_parent"
android:name="com.example.dell.myfragment.LeftFragment"/>
<fragment
android:id="@+id/right_fragment"
android:layout_weight="1"
android:layout_width="0dp"
android:layout_height="match_parent"
android:name="com.example.dell.myfragment.RightFragment"/>
</LinearLayout>平板效果圖: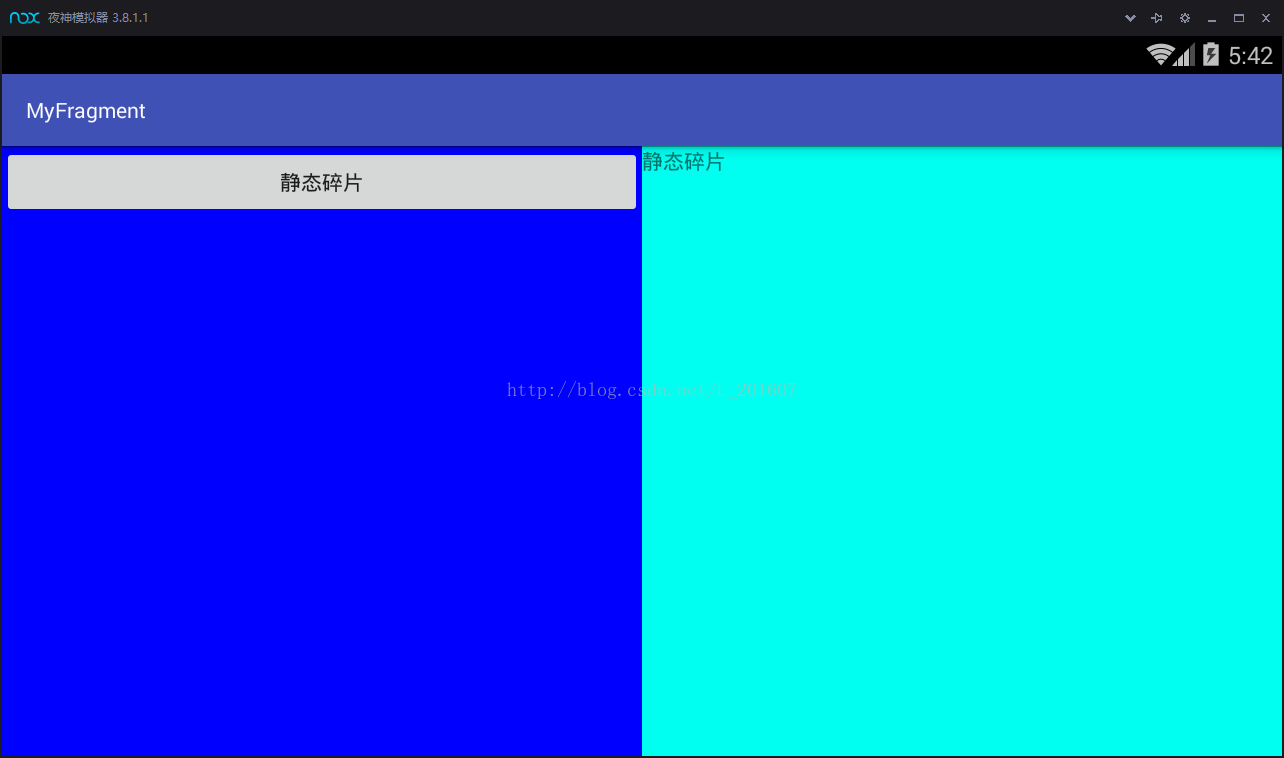
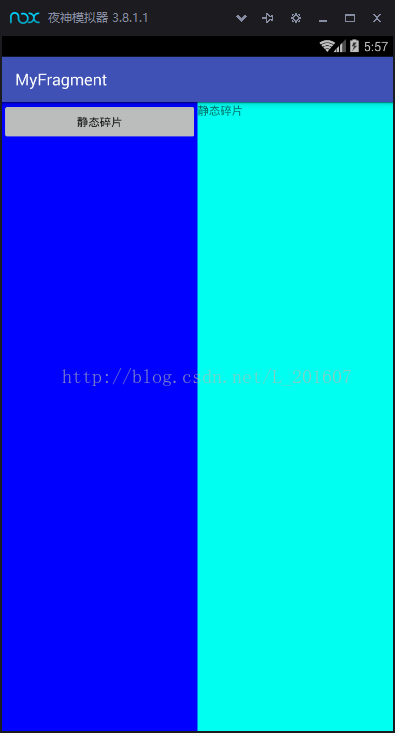
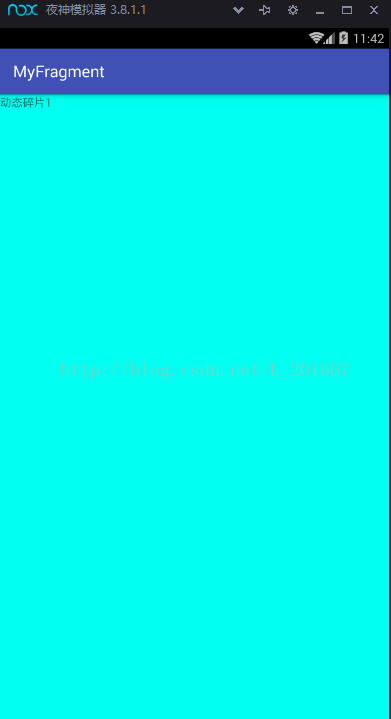
來看下手機效果圖:
動態召喚碎片:靜態使用碎片是在主佈局中新增的碎片,那麼動態使用碎片則是在活動中(java.xml)新增碎片。步驟:
1.建立待新增碎片例項。
2.獲取FragmentManager,在活動中可以直接呼叫getSupportFragmentManager()方法得到。
3.開啟一個事務,通過呼叫beginTransaction方法來開啟。
4.向容器內新增或替換碎片,一般使用replace()方法實現,需要傳入容器的id和待新增的碎片例項。
5.提交事務,呼叫commit()方法來完成。
事務重要的方法:主要的操作都是FragmentTransaction的方法
FragmentTransaction transaction = fm.benginTransatcion();//開啟一個事務
transaction.add()
往Activity中新增一個Fragment
transaction.remove()
從Activity中移除一個Fragment,如果被移除的Fragment沒有新增到回退棧(回退棧後面會詳細說),這個Fragment例項將會被銷燬。
transaction.replace()
使用另一個Fragment替換當前的,實際上就是remove()然後add()的合體~
transaction.hide()
隱藏當前的Fragment,僅僅是設為不可見,並不會銷燬
transaction.show()
顯示之前隱藏的Fragment
detach()
會將view從UI中移除,和remove()不同,此時fragment的狀態依然由FragmentManager維護。
attach()
重建view檢視,附加到UI上並顯示。
transatcion.commit()//提交一個事務
程式碼如下:
<?xml version="1.0" encoding="utf-8"?>
<LinearLayout xmlns:android="http://schemas.android.com/apk/res/android"
    xmlns:tools="http://schemas.android.com/tools"
    android:layout_width="match_parent"
    android:layout_height="match_parent"
    android:orientation="horizontal"
    tools:context="com.example.dell.myfragment.MainActivity">

    <fragment
        android:id="@+id/left_fragment"
        android:layout_weight="1"
        android:layout_width="0dp"
        android:layout_height="match_parent"
        android:name="com.example.dell.myfragment.LeftFragment"/>

    <FrameLayout
        android:id="@+id/move_fragment"
        android:layout_weight="1"
        android:layout_width="0dp"
        android:layout_height="match_parent">

    </FrameLayout>
</LinearLayout>
public class MainActivity extends AppCompatActivity
implements View.OnClickListener{
private Button rightBotton;
private Button topBotton;
private Button downBotton;
@Override
protected void onCreate(Bundle savedInstanceState) {
super.onCreate(savedInstanceState);
setContentView(R.layout.activity_main);
initLayout();
}
public void initLayout(){
rightBotton=(Button) findViewById(R.id.button1);
topBotton=(Button) findViewById(R.id.button2);
downBotton=(Button) findViewById(R.id.button3);
rightBotton.setOnClickListener(this);
topBotton.setOnClickListener(this);
downBotton.setOnClickListener(this);
}
@Override
public void onClick(View v) {
switch (v.getId()){
case R.id.button1:
FragmentManager fragmentManager=
getSupportFragmentManager();
FragmentTransaction transaction=
fragmentManager.beginTransaction();
RightFragment rightFragment=new RightFragment();
transaction.add(R.id.move_fragment,rightFragment);
transaction.commit();
break;
case R.id.button2:
FragmentManager fragmentManager1=
getSupportFragmentManager();
FragmentTransaction transaction1=
fragmentManager1.beginTransaction();
TopFragment topFragment=new TopFragment();
transaction1.add(R.id.move_fragment,topFragment);
transaction1.commit();
break;
case R.id.button3:
FragmentManager fragmentManager2=
getSupportFragmentManager();
FragmentTransaction transaction2=
fragmentManager2.beginTransaction();
DownFragment downFragment=new DownFragment();
transaction2.add(R.id.move_fragment,downFragment);
transaction2.commit();
break;
}
}
} 佈局的話,這裡只貼出了主佈局,改變了的主佈局,大夥看得出來,博主有新增了兩個佈局,和靜態的寫法一樣,不囉嗦。值得注意的是,這裡我們使用的add()這個方法來動態新增碎片,其實也可以使用replace()方法來實現。咱們需要注意FragmentTransaction中add和replace方法的區別。- add()方法是把Fragment新增到ViewGroup中,通過該方法可以新增多個Fragment。第一個引數是容器ViewGroup,第二個是要新增的fragment。
- replace()方法會把ViewGroup中的原有Fragment先remove掉然後再add新Fragment。
使用add方法可以避免再次建立Fragment例項,一般情況是建議使用add方法,並配合FragmentTransaction的show和hide方法來使用。
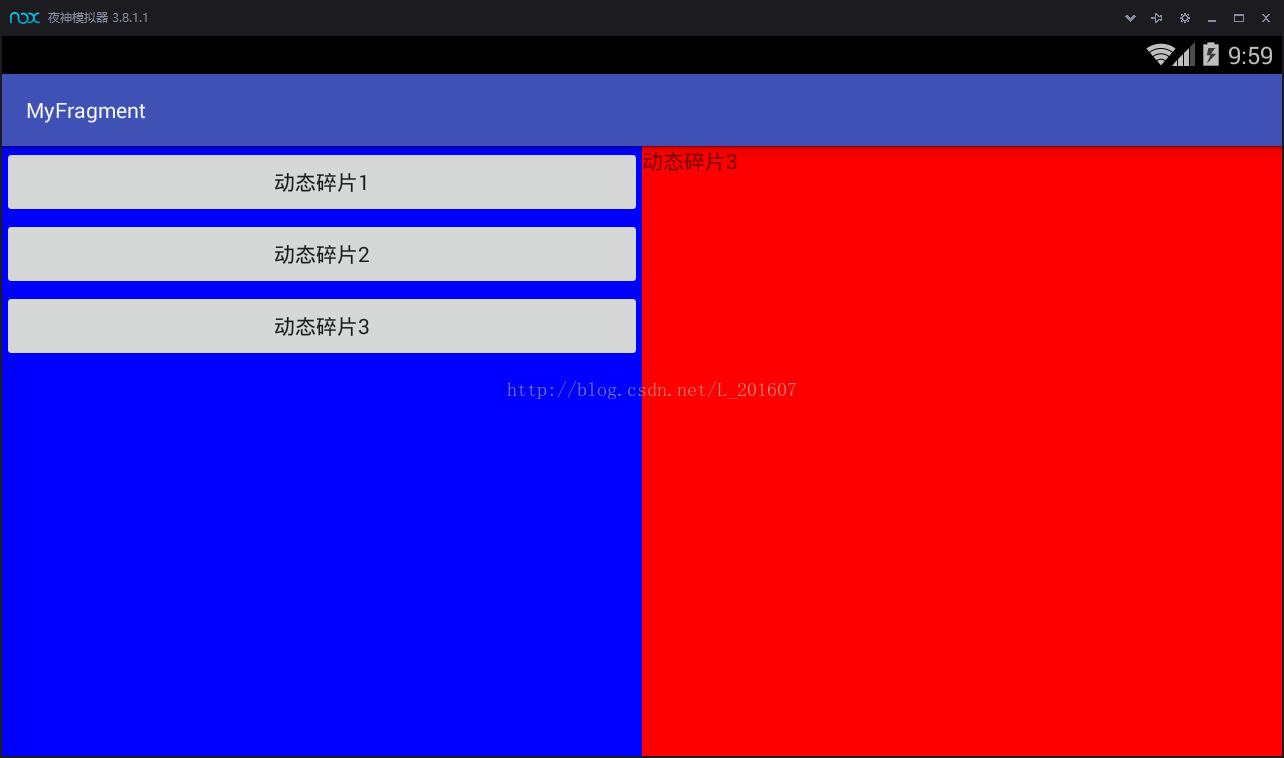
手機效果圖:
大家發現了吧!這平板電腦的效果圖倒好看了,手機效果圖看著有點彆扭呀!咋辦呢?只需改下主佈局就好了,請看程式碼:
activity_main.xml<?xml version="1.0" encoding="utf-8"?>
<LinearLayout xmlns:android="http://schemas.android.com/apk/res/android"
xmlns:tools="http://schemas.android.com/tools"
android:layout_width="match_parent"
android:layout_height="match_parent"
android:orientation="horizontal"
tools:context="com.example.dell.myfragment.MainActivity">
<FrameLayout
android:id="@+id/move_fragment"
android:layout_width="match_parent"
android:layout_height="match_parent">
<fragment
android:id="@+id/left_fragment"
android:layout_width="match_parent"
android:layout_height="match_parent"
android:name="com.example.dell.myfragment.LeftFragment"/>
</FrameLayout>
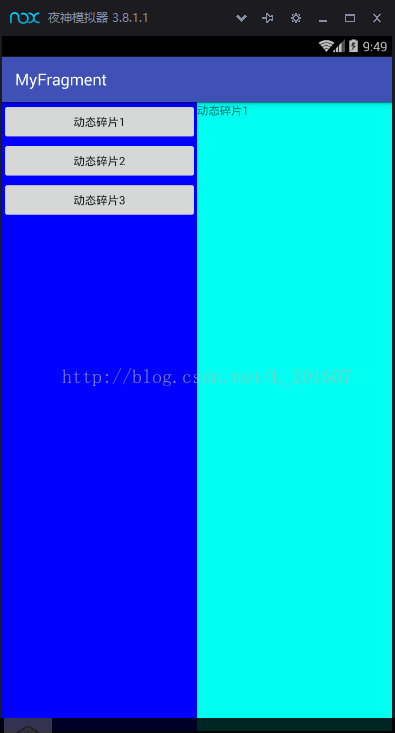
</LinearLayout>效果圖上:

怎麼樣!還行吧!點按鈕動態碎片1之後,就跳到了另外一個碎片中去了,是不是有點像活動的頁面跳轉,別說,還真像。值得稱讚的是,在動態碎片1碎片中又可以退回來繼續點選動態碎片2、3按鈕到各個碎片中去。不瞞大家說,除了改掉上面的主佈局外,還稍微改了一些地方,改變的地方一樣,所以只貼出一部分,程式碼如下:
MainActivity.javacase R.id.button1:
FragmentManager fragmentManager=
getSupportFragmentManager();
FragmentTransaction transaction=
fragmentManager.beginTransaction();
RightFragment rightFragment=new RightFragment();
// transaction.add(R.id.move_fragment,rightFragment);
transaction.replace(R.id.move_fragment,rightFragment);
transaction.addToBackStack(null);
transaction.commit();
break;至於為什麼把add()方法換成了replace()方法,他們各有千秋呀,大夥回頭上去再看下,上面有詳細介紹。細心的朋友回發現,
怎麼多出了一行程式碼transaction.addToBackStack(null);
哈哈哈哈!被發現了,既然這樣,只好老實交代咯!在呼叫commit()之前,可以用addToBackStack()把事務新增到一個後退棧中,這個後退棧屬於所在的activity。有了它,就可以在使用者按下返回鍵時,返回到fragment執行事務最初的地方,演示瞭如何用一個fragment代替另一個fragment,同時在後退棧中儲存被代替的fragment的狀態。簡單的說,這就是在碎片中模擬還回棧。
不要高興的太早,問題來了,既然現在可以做到讓平板電腦上的碎片美美的展現,也能讓手機上的碎片風騷起來,關鍵是,在平板上,我們寫的是一樣程式碼,在手機上執行的碎片又是另一樣程式碼(還需要改佈局),其實還有呀,平板電腦和手機的螢幕那是有大小區別呀!平板上雙頁模式那叫美,手機上單頁模式那叫騷。那咱們能不能只寫一次程式碼,既能根據螢幕的大小尺寸來決定到底要雙頁模式還是要單頁模式呢?
巧了,特麼還真有這個辦法。使用限定符(Qualifiers)來實現。以動態新增碎片為例,靜態的太簡單(大家要學會舉一反三,已是老生常談)兩個步驟:
1.主佈局不變,上面剛剛改過的那個,activity_main.xml。 額,還是貼出來吧!
<?xml version="1.0" encoding="utf-8"?>
<LinearLayout xmlns:android="http://schemas.android.com/apk/res/android"
    xmlns:tools="http://schemas.android.com/tools"
    android:layout_width="match_parent"
    android:layout_height="match_parent"
    android:orientation="horizontal"
    tools:context="com.example.dell.myfragment.MainActivity">

    <FrameLayout
        android:id="@+id/move_fragment"
        android:layout_width="match_parent"
        android:layout_height="match_parent">

        <fragment
        android:id="@+id/left_fragment"
        android:layout_width="match_parent"
        android:layout_height="match_parent"
        android:name="com.example.dell.myfragment.LeftFragment"/>

    </FrameLayout>

</LinearLayout>2.第二步(重點),在res目錄下新建layout_large資料夾,在這個資料夾中新建一個佈局,也叫做 activity_main.xml,程式碼如下:
<?xml version="1.0" encoding="utf-8"?>
<LinearLayout xmlns:android="http://schemas.android.com/apk/res/android"
    android:layout_width="match_parent"
    android:layout_height="match_parent"
    android:orientation="horizontal">

    <fragment
        android:id="@+id/left_fragment"
        android:layout_weight="1"
        android:layout_width="0dp"
        android:layout_height="match_parent"
        android:name="com.example.dell.myfragment.LeftFragment"/>

    <FrameLayout
        android:id="@+id/move_fragment"
        android:layout_weight="1"
        android:layout_width="0dp"
        android:layout_height="match_parent">

    </FrameLayout>

</LinearLayout>
程式碼中是不是發現了什麼?是不是沒看到large在那,large有咋作用呀,等等,小夥子別急,layout/activity_main佈局中只包含一個碎片,即單頁模式;layout_large/activity_main佈局是有權重設定的,就是平分螢幕(螢幕太大),即雙頁模式。其中large就是一個限定符。那些螢幕被認為是large的裝置就會自動載入layout_large資料夾下的佈局,而小螢幕的裝置則還是會載入layout檔案下的佈局。還有一種限定符,是小寬度限定符喲!一樣的,很簡單,在res目錄下新建資料夾,然後在這個資料夾下新建一個layout_sw600dp佈局。這意味著,當程式執行在螢幕寬度大於600dp的裝置上時,會載入layout_sw600dp/activity_main佈局,當程式執行在螢幕寬度小於600dp的裝置上時,則仍然載入預設的layout/activity_main佈局。效果圖就不貼出來了,平板的是雙頁模式,手機是單頁模式,上面有圖。
/**
 * 是時候說Android碎片的小祕密了(他們是有點關係,只是不是很親密)
 * Android碎片的小祕密其實是告訴我們,如何在活動中呼叫碎片的方法,
 * 或者在碎片中呼叫活動裡方法。
 * 為了解決碎片和活動之間的通訊,FragmentManager提供了一個類似於
 * findViewById()的方法,專門用於從佈局中獲取碎片的例項,程式碼如下:
 */
RightFragment rightFragment=(RightFragment)
        getSupportFragmentManager()
                .findFragmentById(R.id.left_fragment);
//呼叫FragmentManager的findFragmentById方法,
// 可以在活動中得到相應碎片的例項,
// 然後就可以輕鬆的呼叫碎片裡的方法。
/**
 * 碎片中都可以呼叫getActivity()方法來得到和當前相關聯的活動例項。
 */
MainActivity activity=(MainActivity) getActivity();
碎片的生命週期(我的小心臟喲):
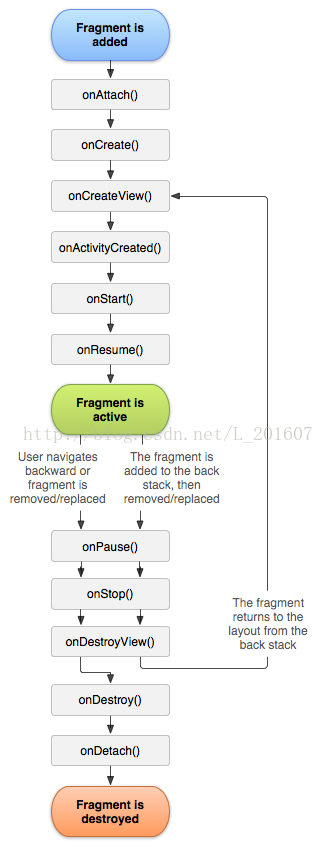
碎片的生命週期和活動的生命週期很像。都有四種狀態,執行狀態、暫停狀體、停止狀態、銷燬狀態。
fragments的大部分狀態都和activitie很相似,但fragment有一些新的狀態。
- onAttached() —— 當fragment和activity關聯之後,呼叫這個方法。
- onCreateView() —— 建立fragment中的檢視的時候,呼叫這個方法。
- onActivityCreated() —— 當activity的onCreate()方法被返回之後,呼叫這個方法。
- onDestroyView() —— 當fragment中的檢視被移除的時候,呼叫這個方法。
- onDetach() —— 當fragment和activity分離的時候,呼叫這個方法。
來圖片直觀一點:
Activity和Fragment生命週期對比圖如下:
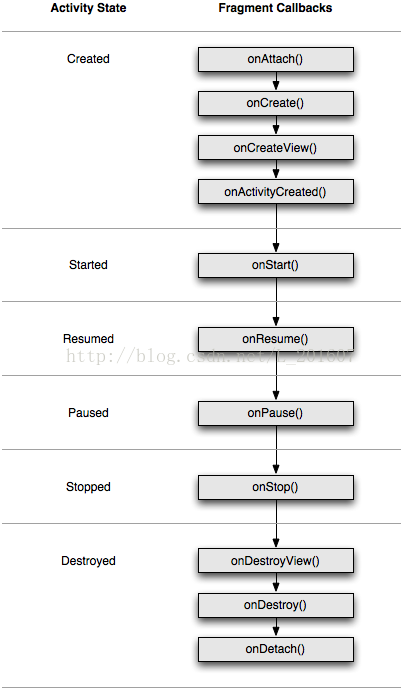
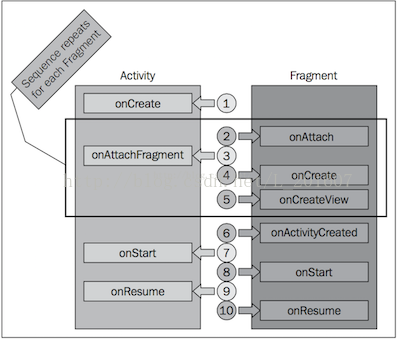
最後一張王牌:
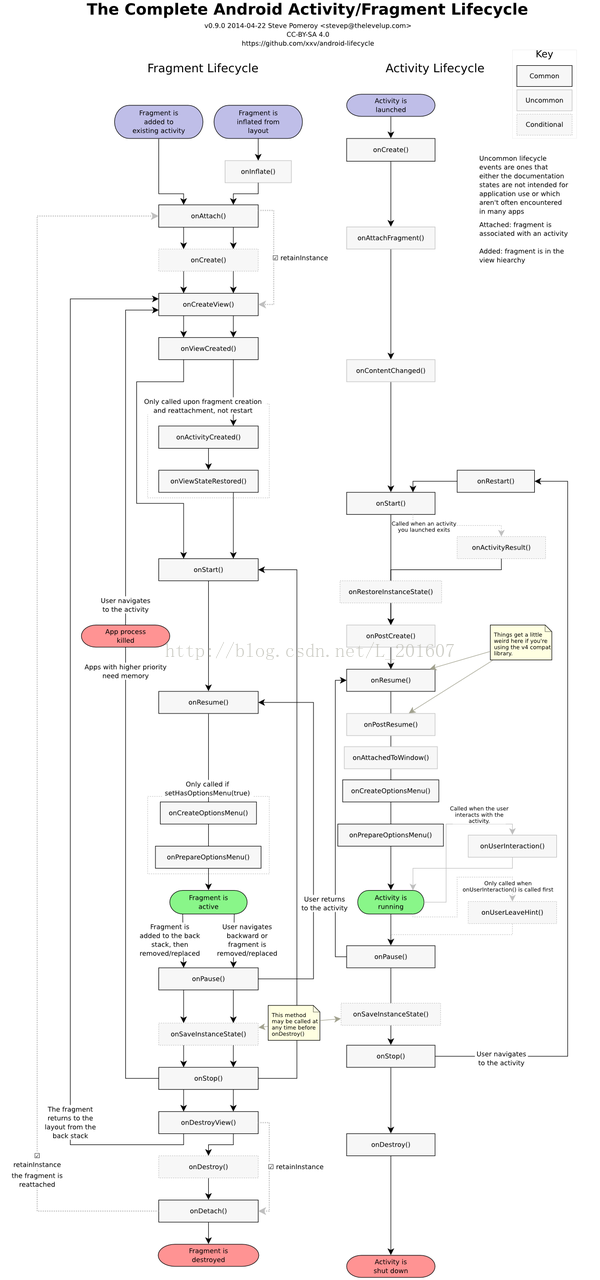
解析:
1.當一個fragment被建立的時候,它會經歷以下狀態.。
- onAttach()
- onCreate()
- onCreateView()
- onActivityCreated()
2.當這個fragment對使用者可見的時候,它會經歷以下狀態。
- onStart()
- onResume()
3.當這個fragment進入“後臺模式”的時候,它會經歷以下狀態。
- onPause()
- onStop()
4.當這個fragment被銷燬了(或者持有它的activity被銷燬了),它會經歷以下狀態。
- onPause()
- onStop()
- onDestroyView()
- onDetach()
5.就像activitie一樣,在以下的狀態中,可以使用Bundle物件儲存一個fragment的物件。
- onCreate()
- onCreateView()
- onActivityCreated()
鬆口氣吧!
感覺還沒說完,碎片還生了幾個娃娃(派生類),瞭解下吧!碎片的這些派生類跟其他的控制元件啊元件啊有一腿,比如ListFragment和ViewPager:
通常我們會繼承系統內建的fragment的三個派生類:
DialogFragment
對話方塊式的Fragments。可以把fragmentdialog併入到到activity的返回棧中,使使用者能再返回到這個對話方塊。
ListFragment
顯示一個列表控制元件,就像ListActivity類,它提供了很多管理列表的方法,onListItemClick和setListAdapter等。
PreferenceFragment
顯示一個Preference物件組成的列表,類似PreferenceActivity,主要用來建立設定介面。