用LinearLayout和RelativeLayout分別實現簡單的登陸介面
LinearLayout是最簡單也是最常用的一種佈局方式,它根據orientation 屬性值,將包含的所有控制元件或佈局物件排列在同一個方向:水平或垂直,在這種佈局中,所有的控制元件都是依序排列成一條線。線上性佈局中的控制元件允許有自己的margins和gravity屬性。
LinearLayout.LayoutParams用來定義針LinearLayout佈局的專用屬性,它包括以下內容:
1)android:layout_weight用於在LinearLayout中把所有子View排布之後的剩餘空間按照它們的layout_weight分配給各個擁有這個屬性的View。
2)android:layout_gravity用於設定元件自身在父元件中的對齊方式。
寫一個登陸介面吧.超級簡單
<?xml version="1.0" encoding="utf-8"?>
<LinearLayout xmlns:android="http://schemas.android.com/apk/res/android"
    xmlns:tools="http://schemas.android.com/tools"
    android:layout_width="match_parent"
    android:layout_height="match_parent"
    android:orientation="vertical">

    <TextView
        android:layout_width="match_parent"
        android:layout_height="wrap_content"
        android:textSize="20sp"
        android:layout_marginLeft="130dp"
        android:layout_marginTop="50dp"
        android:text="登陸介面" />

    <LinearLayout
        android:layout_width="match_parent"
        android:layout_height="wrap_content"
        android:orientation="horizontal">

        <TextView
            android:layout_width="wrap_content"
            android:layout_height="wrap_content"
            android:layout_marginLeft="60dp"
            android:text="使用者名稱"/>

        <EditText
            android:id="@+id/userNameEtext"
            android:layout_width="wrap_content"
            android:layout_height="wrap_content"
            android:layout_marginLeft="15dp"
            android:singleLine="true"
            android:hint="請輸入賬號"/>

    </LinearLayout>
    <LinearLayout
        android:layout_width="match_parent"
        android:layout_height="wrap_content"
        android:orientation="horizontal">

        <TextView
            android:layout_width="wrap_content"
            android:layout_height="wrap_content"
            android:layout_marginLeft="60dp"
            android:text="密碼"/>

        <EditText
            android:id="@+id/passwordEtext"
            android:layout_width="wrap_content"
            android:layout_height="wrap_content"
            android:layout_marginLeft="33dp"
            android:minWidth="100dp"
            android:singleLine="true"
            android:hint="******"
           />

    </LinearLayout>

    <LinearLayout
        android:layout_width="match_parent"
        android:layout_height="wrap_content"
        android:orientation="horizontal">

        <Button
            android:layout_width="wrap_content"
            android:layout_height="wrap_content"
            android:layout_marginLeft="60dp"
            android:text="登陸"/>

        <Button
            android:layout_width="wrap_content"
            android:layout_height="wrap_content"
            android:layout_marginLeft="15dp"
            android:hint="取消"/>

    </LinearLayout>
</LinearLayout>
RelativeLayout的子控制元件會根據它們所設定的參照控制元件和引數進行相對佈局。參照控制元件可以是父控制元件,也可以是其它子控制元件。
針對父控制元件的佈局屬性,如下所示。
android:layout_alignParentTop:為true,將該控制元件的頂部與其父控制元件的頂部對齊;
android:layout_alignParentBottom :為true,將該控制元件的底部與其父控制元件的底部對齊;
android:layout_alignParentLeft:為true,將該控制元件的左部與其父控制元件的左部對齊;
android:layout_alignParentRight:為true,將該控制元件的右部與其父控制元件的右部對齊;
android:layout_centerHorizontal: 為true,將該控制元件的置於水平居中;
android:layout_centerVertical: 為true,將該控制元件的置於垂直居中;
android:layout_centerInParent: 為true,將該控制元件的置於父控制元件的中央;
針對其它控制元件的屬性,如下所示。
android:layout_above: 將該控制元件的底部置於指定ID的控制元件之上;
android:layout_below :將該控制元件的底部置於指定ID的控制元件之下;
android:layout_toLeftOf:將該控制元件的右邊緣與指定ID的控制元件左邊緣對齊;
android:layout_toRightOf: 將該控制元件的左邊緣與指定ID的控制元件右邊緣對齊;
android:layout_alignBaseline: 將該控制元件的baseline與指定ID的baseline對齊;
android:layout_alignTop: 將該控制元件的頂部邊緣與指定ID的頂部邊緣對齊;
android:layout_alignBottom: 將該控制元件的底部邊緣與指定ID的底部邊緣對齊;
android:layout_alignLeft: 將該控制元件的左邊緣與指定ID的左邊緣對齊;
android:layout_alignRight:將該控制元件的右邊緣與指定ID的右邊緣對齊;
注意,不能在RelativeLayout容器本身和它的子元素之間產生迴圈依賴,比如說,不能將RelativeLayout的高設定成為WRAP_CONTENT的時候將子元素的高設定成為ALIGN_PARENT_BOTTOM。
<?xml version="1.0" encoding="utf-8"?>
<RelativeLayout xmlns:android="http://schemas.android.com/apk/res/android"
    android:layout_width="match_parent"
    android:layout_height="match_parent">

    <TextView
        android:id="@+id/loginTextView"
        android:layout_width="wrap_content"
        android:layout_height="wrap_content"
        android:textSize="20sp"
        android:layout_marginTop="60dp"
        android:layout_marginLeft="130dp"
        android:text="登陸介面" />
    <TextView
        android:id="@+id/usernameTtext"
        android:layout_width="wrap_content"
        android:layout_height="wrap_content"
        android:layout_below="@id/loginTextView"
        android:layout_marginTop="15dp"
        android:layout_marginLeft="60dp"
        android:text="使用者名稱" />
    <EditText
        android:id="@+id/usernameEtext"
        android:layout_width="wrap_content"
        android:layout_height="wrap_content"
        android:layout_below="@id/loginTextView"
        android:layout_toRightOf="@id/usernameTtext"
        android:layout_alignBaseline="@id/usernameTtext"
        android:layout_marginLeft="15dp"
        android:singleLine="true"
        android:hint="請輸入使用者名稱"/>
    <TextView
        android:layout_width="wrap_content"
        android:layout_height="wrap_content"
        android:id="@+id/passWordTtext"
        android:layout_alignLeft="@id/usernameTtext"
        android:layout_below="@id/usernameTtext"
        android:layout_marginTop="15dp"
        android:text="密碼" />
    <EditText
        android:id="@+id/passWordEtext"
        android:layout_width="wrap_content"
        android:layout_height="wrap_content"
        android:layout_below="@id/usernameEtext"
        android:layout_alignLeft="@id/usernameEtext"
        android:layout_alignRight="@id/usernameEtext"
        android:layout_alignBaseline="@id/passWordTtext"
        android:inputType="textPassword"
         android:hint="******"/>
    <Button
        android:id="@+id/loginBtn"
        android:layout_width="wrap_content"
        android:layout_height="wrap_content"
        android:layout_marginTop="15dp"
        android:layout_marginLeft="50dp"
        android:layout_below="@id/passWordTtext"
        android:text="登陸"/>
    <Button
        android:id="@+id/resetBtn"
        android:layout_toRightOf="@id/loginBtn"
        android:layout_marginLeft="25dp"
        android:layout_alignBaseline="@id/loginBtn"
        android:layout_width="wrap_content"
        android:layout_height="wrap_content"
        android:text="取消"/>
</RelativeLayout>
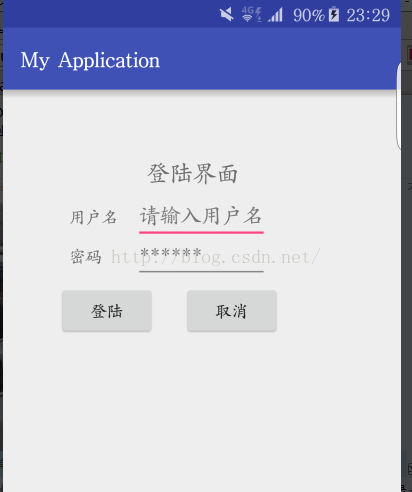
執行截圖