
CoordinatorLayout高階用法-自定義Behavior
在新的support design中,CoordinatorLayout可以說是最重要的一個控制元件了,CoordinatorLayout給我們帶來了一種新的事件的處理方式——behavior,你是不是還記得我們在使用CoordinatorLayout的時候,一些子view需要一段,
app:layout_behavior="@string/appbar_scrolling_view_behavior"這樣的xml配置?當時我們不知道這是幹嘛的,直接照用就行了,後來發現這玩意是一個類!而且我們還可以自定義!所以,今天這篇部落格我們首先來學習一下如何自定義Behavior,之後的部落格可能會看一下CoordinatorLayout是怎麼處理這個Behavior的。
認識Behavior
Behavior是CoordinatorLayout的一個抽象內部類
public abstract static class Behavior<V extends View> {
      public Behavior() {
      }

      public Behavior(Context context, AttributeSet attrs) {
      }
      ...
}有一個泛型是指定的我們應用這個Behavior的View的型別,例如上面的appbar_scrolling_view_behavior對應的字串其實是android.support.design.widget.AppBarLayout$ScrollingViewBehavior
ScrollingViewBehavior內部類指定的泛型是View,所以理論上這個Behavior我們任何的View都可以使用,我們在自定義的時候,如果不是特殊的行為,也可以直接指定泛型View。
在自定義Behavior的時候,我們需要關心的兩組四個方法,為什麼分為兩組呢?看一下下面兩種情況
- 某個view監聽另一個view的狀態變化,例如大小、位置、顯示狀態等
- 某個view監聽CoordinatorLayout裡的滑動狀態
對於第一種情況,我們關心的是:
layoutDependsOn和onDependentViewChanged方法,
對於第二種情況,我們關心的是:
onStartNestedScroll
onNestedPreScroll方法。 對於這幾個方法什麼意思,我們需要幹什麼,稍候我們就能瞭解到。
初步自定義
現在我們就來根據第一種情況嘗試自定義一個Behavior,這裡我們實現一個簡單的效果,讓一個View根據另一個View上下移動。
首先我們來自定義一個Behavior,起名為DependentBehavior
public class DependentBehavior extends CoordinatorLayout.Behavior<View> {

    public DependentBehavior(Context context, AttributeSet attrs) {
        super(context, attrs);
    }

    @Override
    public boolean layoutDependsOn(CoordinatorLayout parent, View child, View dependency) {
        return super.layoutDependsOn(parent, child, dependency);
    }

    @Override
    public boolean onDependentViewChanged(CoordinatorLayout parent, View child, View dependency) {
        ViewCompat.offsetLeftAndRight();
        return super.onDependentViewChanged(parent, child, dependency);
    }
}注意一下,帶有引數的這個構造必須要過載,因為在CoordinatorLayout裡利用反射去獲取這個Behavior的時候就是拿的這個構造。我們覆寫了兩個方法layoutDependsOn和onDependentViewChanged,這兩個方法的引數都是一樣的,解釋一下,第一個不用說,就是當前的CoordinatorLayout,第二個引數是我們設定這個Behavior的View,第三個是我們關心的那個View。如何知道關心的哪個呢?layoutDependsOn的返回值決定了一切!
這裡我們關心一個TextView好了,所以layoutDependsOn可以這麼寫,
@Override
public boolean layoutDependsOn(CoordinatorLayout parent, View child, View dependency) {
    return dependency instanceof TextView;
}現在設定好了關心誰,接下來就是在這個View狀態發生變化的時候,我們現在的View該做些什麼了,恩,這裡肯定是在onDependentViewChanged做工作了。我們的任務就是獲取dependency距離底部的距離,並且設定給child,很簡單。
@Override
public boolean onDependentViewChanged(CoordinatorLayout parent, View child, View dependency) {
    int offset = dependency.getTop() - child.getTop();
    ViewCompat.offsetTopAndBottom(child, offset);
    return true;
}
首先我們先獲取兩個View的top值的差,然後讓child的位置位移一下就ok啦,如此簡單,那這個簡單的Behavior如何用呢?
<android.support.design.widget.CoordinatorLayout
    xmlns:android="http://schemas.android.com/apk/res/android"
    xmlns:app="http://schemas.android.com/apk/res-auto"
    xmlns:tools="http://schemas.android.com/tools"
    android:layout_width="match_parent"
    android:layout_height="match_parent"
    android:fitsSystemWindows="true"
    tools:context="org.loader.mybehavior.MainActivity">

    <TextView
        android:id="@+id/depentent"
        android:layout_width="100dp"
        android:layout_height="100dp"
        android:background="#FFFF0000"
        android:gravity="center"
        android:textColor="@android:color/white"
        android:layout_gravity="top|left"
        android:text="depentent"/>

    <TextView
        android:layout_width="100dp"
        android:layout_height="100dp"
        android:background="#FF00FF00"
        android:gravity="center"
        android:textColor="@android:color/white"
        android:layout_gravity="top|right"
        app:layout_behavior="org.loader.mybehavior.DependentBehavior"
        android:text="auto"/>

</android.support.design.widget.CoordinatorLayout>注意,第二個TextView我們設定了app:layout_behavior="org.loader.mybehavior.DependentBehavior"
值正好是我們定義的那個DependentBehavior。
final TextView depentent = (TextView) findViewById(R.id.depentent);
depentent.setOnClickListener(new View.OnClickListener() {
    @Override
    public void onClick(View v) {
        ViewCompat.offsetTopAndBottom(v, 5);
    }
});
在Activity中,我們每次點選第一個TextView都會去改變一下它的位置,下面讓我們來看看另一個TextView的位置改變了沒有。

Scroll Behavior
在學會了如何自定義Behavior後,我們接著來實現上面說的第二種情況-滑動。為了演示這種Behavior的定義,我們還是來做個無用功,讓一個ScrollView跟隨另一個ScrollView滑動。恩,先來看看效果吧,
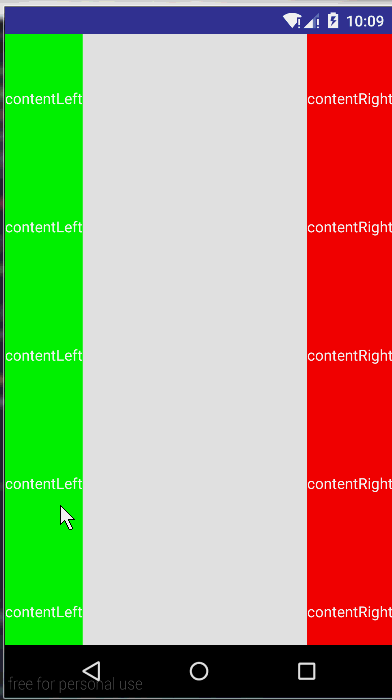
從效果中我們可以看出,第二個ScrollView明顯是是在跟隨第一個進行滑動,現在就讓我們用自定義Behavior的形式實現它。
建立一個Behavior,起名叫ScrollBehavior,
public class ScrollBehavior extends CoordinatorLayout.Behavior<View> {

    public ScrollBehavior(Context context, AttributeSet attrs) {
        super(context, attrs);
    }

    @Override
    public boolean onStartNestedScroll(CoordinatorLayout coordinatorLayout, View child, View directTargetChild, View target, int nestedScrollAxes) {
        return super.onStartNestedScroll(coordinatorLayout, child, directTargetChild, target, nestedScrollAxes);
    }

    @Override
    public void onNestedPreScroll(CoordinatorLayout coordinatorLayout, View child, View target, int dx, int dy, int[] consumed) {
        super.onNestedPreScroll(coordinatorLayout, child, target, dx, dy, consumed);
    }

    @Override
    public boolean onNestedPreFling(CoordinatorLayout coordinatorLayout, View child, View target, float velocityX, float velocityY) {
        return super.onNestedPreFling(coordinatorLayout, child, target, velocityX, velocityY);
    }
}和你想的一樣,我們覆寫了onStartNestedScroll和onNestedPreScroll方法,但是除了這兩個方法外,我們還覆寫了onNestedPreFling方法,這個方法是幹嘛的? 估計大家已經猜出來了,這裡是處理fling動作的,你想想,我們在滑動鬆開手的時候,ScrollView是不是還繼續滑動一會,那我們也需要讓跟隨的那個ScrollView也要繼續滑動一會,這種效果,onNestedPreFling就派上用場了。
好,接下來我們來實現程式碼,首先來看看onStartNestedScroll,這裡的返回值表明這次滑動我們要不要關心,我們要關心什麼樣的滑動?當然是y軸方向上的。
@Override
public boolean onStartNestedScroll(CoordinatorLayout coordinatorLayout, View child, View directTargetChild, View target, int nestedScrollAxes) {
    return (nestedScrollAxes & ViewCompat.SCROLL_AXIS_VERTICAL) != 0;
}現在我們準備好了關心的滑動事件了,那如何讓它滑動起來呢?還是要看onNestedPreScroll的實現
@Override
public void onNestedPreScroll(CoordinatorLayout coordinatorLayout, View child, View target, int dx, int dy, int[] consumed) {
    super.onNestedPreScroll(coordinatorLayout, child, target, dx, dy, consumed);
    int leftScrolled = target.getScrollY();
    child.setScrollY(leftScrolled);
}
也很簡單,讓child的scrollY的值等於目標的scrollY的值就ok啦,那fling呢?更簡單,
@Override
public boolean onNestedFling(CoordinatorLayout coordinatorLayout, View child, View target, float velocityX, float velocityY, boolean consumed) {
    ((NestedScrollView) child).fling((int)velocityY);
    return true;
}
直接將現在的y軸上的速度傳遞傳遞給child,讓他fling起來就ok了。
定義好了Behavior,就得在xml中使用了,使用方法和前面的一樣。
<?xml version="1.0" encoding="utf-8"?>
<android.support.design.widget.CoordinatorLayout xmlns:android="http://schemas.android.com/apk/res/android"
    xmlns:app="http://schemas.android.com/apk/res-auto"
    android:layout_width="match_parent"
    android:layout_height="match_parent"
    android:fitsSystemWindows="true"
    android:orientation="vertical">

    <android.support.v4.widget.NestedScrollView
        android:layout_gravity="left"
        android:layout_width="wrap_content"
        android:background="#FF00FF00"
        android:layout_height="match_parent">

        <LinearLayout
            android:layout_width="wrap_content"
            android:layout_height="wrap_content"
            android:orientation="vertical">
            <TextView
                android:layout_width="wrap_content"
                android:layout_height="wrap_content"
                android:paddingTop="50dp"
                android:paddingBottom="50dp"
                android:textColor="@android:color/white"
                android:text="contentLeft"/>


        </LinearLayout>

    </android.support.v4.widget.NestedScrollView>

    <android.support.v4.widget.NestedScrollView
        android:layout_gravity="right"
        android:layout_width="wrap_content"
        android:background="#FFFF0000"
        android:layout_height="match_parent"
        app:layout_behavior="org.loader.mybehavior.ScrollBehavior">

        <LinearLayout
            android:layout_width="wrap_content"
            android:layout_height="wrap_content"
            android:orientation="vertical">
            <TextView
                android:layout_width="wrap_content"
                android:layout_height="wrap_content"
                android:paddingTop="50dp"
                android:paddingBottom="50dp"
                android:textColor="@android:color/white"
                android:text="contentRight"/>

        </LinearLayout>

    </android.support.v4.widget.NestedScrollView>

</android.support.design.widget.CoordinatorLayout>第二個ScrollView的layout_behavior我們指定為org.loader.mybehavior.ScrollBehavior,現在就可以看到上面的效果了。