React Native 關於介面導航
本篇文章只講解基礎用法,如果你想了解更多,請戳這裡->戳我。
簡介
react-navigation主要包括導航,底部tab,頂部tab,側滑等,功能很強大,而且體驗接近原生。今天我們介紹的元件分別為:
- 導航 -> StackNavigator
- 底部或者頂部
tab-> TabNavigator - 側滑 -> DrawerNavigator
DrawerNavigator
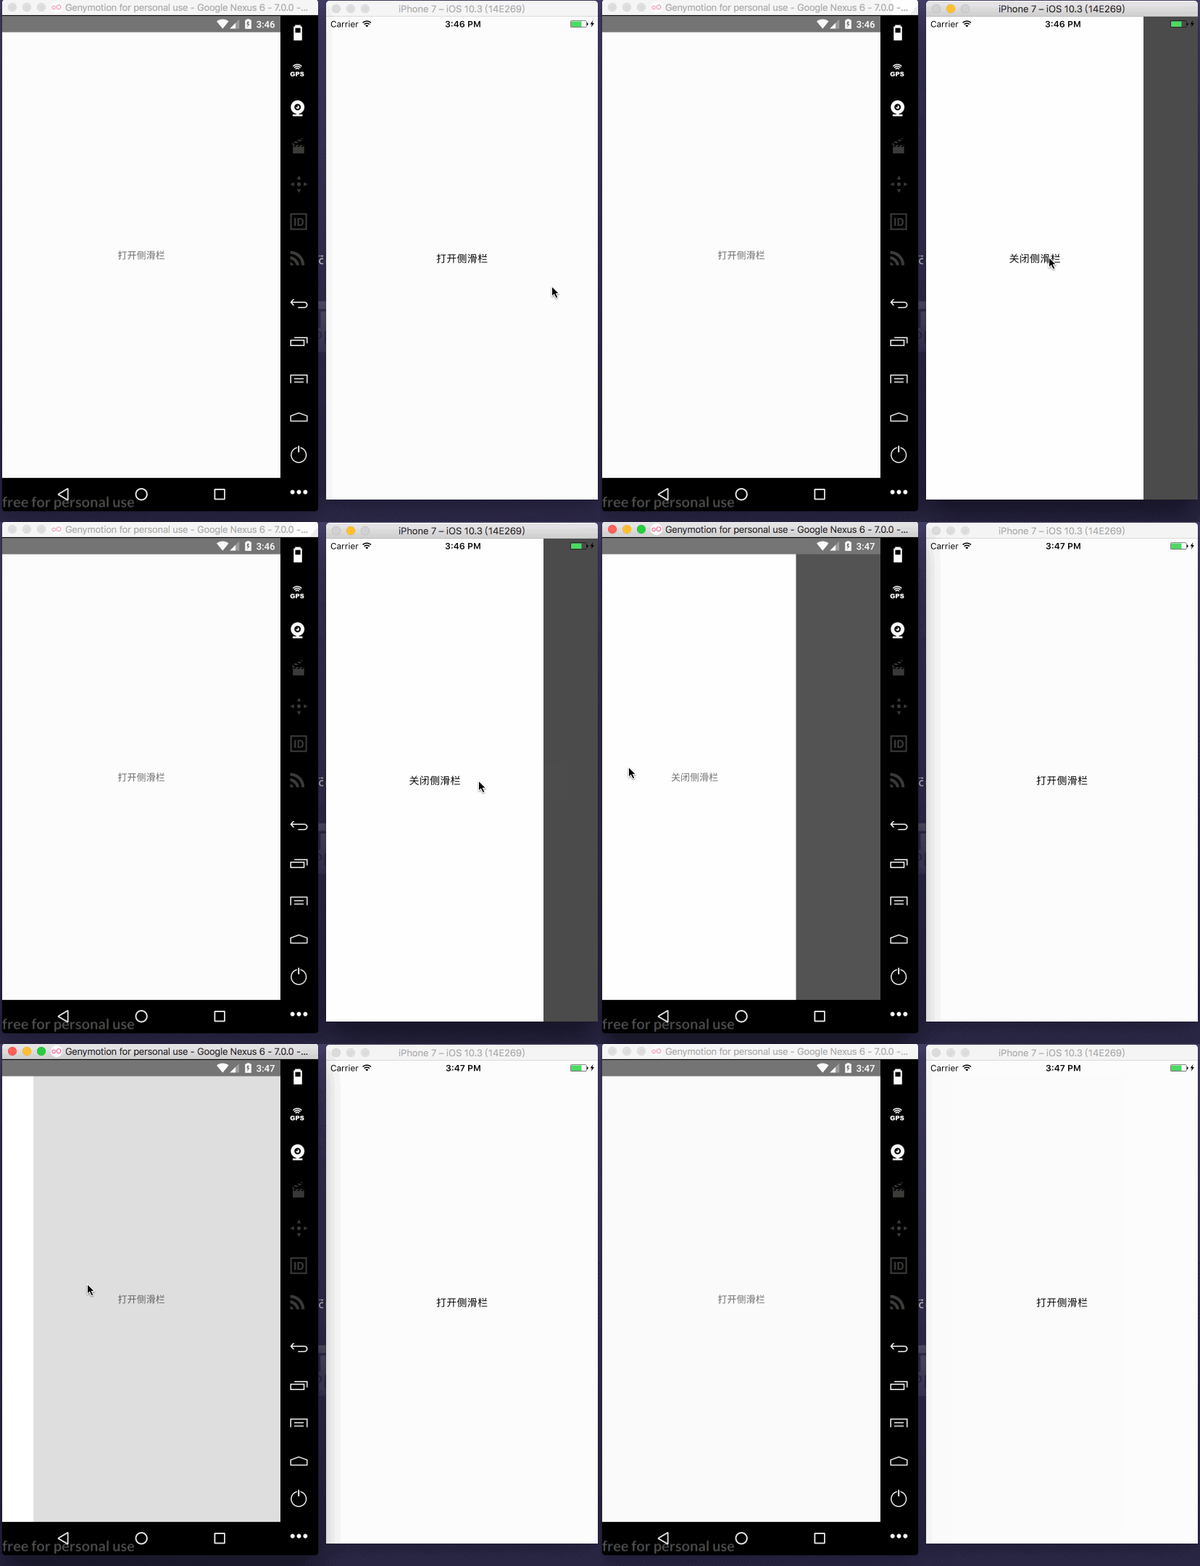
先來看看執行效果:

這裡,我們定義三個介面,一個為根介面,一個主介面,一個側滑介面,分別如下:
側滑介面DrawerLeftPage.js:
|
import React, {Component}
from
'react';
import {
View,
Text,
TouchableOpacity,
StyleSheet,
Image
}
from
'react-native' |
這個介面很簡單,我們定義了一個按鈕,點選按鈕的時候,關閉側滑頁,這裡關閉的引數為DrawerClose,通過props屬性可以拿到當前navigation。另外我們又定義了一個靜態屬性,來配置側滑顯示的具體屬性。注意,此屬性名一定要寫成navigationOptions。
navigationOptions主要有以下引數:
title:通用標題,當你不寫drawerLabel時,使用此引數作為側滑標題,通常都不寫drawerLabel:側滑標題drawerIcon:側滑的標題圖示,這裡會回傳兩個引數,{focused: boolean, tintColor: string},focused表示是否是選中狀態,tintColor表示選中的顏色,這個顏色是我們自己在根檢視定義的。當然,你也可以使用其他的元件來作為圖示,比如Text。
主介面 DrawerHomePage.js
| import React, {Component} from 'react'; import { View, Text, TouchableOpacity, StyleSheet, Image } from 'react-native'; export default class DrawerHomePage extends Component { static navigationOptions = { drawerLabel: '首頁', drawerIcon:({tintColor}) => { return ( <Image source= {require(' ../ images/ home@ 3x.png')} style= {[{width:24,height:24},{tintColor:tintColor}]} /> ); }, }; render() { return( <View style={styles.container}> <TouchableOpacity onPress={()=>{ //點選開啟抽屜 this.props.navigation.navigate('DrawerOpen') }}> <Text>開啟側滑欄 </Text> </TouchableOpacity> </View> ); } } const styles = StyleSheet.create({ container: { flex:1, justifyContent:'center', alignItems:'center' } }); |
這個介面和上一個介面基本一樣,只是這裡的點選事件為開啟抽屜,傳的引數為DrawerOpen。
開啟側滑:this.props.navigation.navigate('DrawerOpen')
關閉側滑:this.props.navigation.navigate('DrawerClose')
根檢視 DrawerPage.js
| import React, {Component} from 'react'; import { StyleSheet, View } from 'react-native'; import DrawerHomePage from './DrawerHomePage'; import DrawerLeftPage from './DrawerLeftPage'; import {DrawerNavigator} from 'react-navigation'; const Drawer = DrawerNavigator( { Home:{ screen:DrawerHomePage, }, Left:{ screen:DrawerLeftPage } }, { drawerWidth: 300, drawerPosition: 'left', } ); export default class DrawerPage extends Component { render() { return( <Drawer/> ); } } const styles = StyleSheet.create({ container: { flex: 1, justifyContent: 'center', alignItems: 'center' } }); |
這裡我們從react-navigation匯入側滑元件DrawerNavigator,這裡我們定義一個常量Drawer,主要來配置側滑的各種引數。首先,看DrawerNavigator的構造方法:DrawerNavigator(RouteConfigs, DrawerNavigatorConfig)
這裡接收兩個引數,一個為頁面路由配置,一個為顯示的配置,我們分別來看,
RouteConfigs:
這裡你可以配置所有的介面,例如,當前例子配置了兩個介面:Home和Left,指定介面分別為DrawerHomePage和DrawerLeftPage。你還可以配置其他介面,這些配置的介面都將顯示在側滑欄上。
DrawerNavigatorConfig:
drawerWidth: 側滑欄的寬度,如果你不想寫死,可以使用Dimensions獲取螢幕的寬度,動態計算drawerPosition: 側滑的方向,left和right,預設leftcontentComponent: 這個就比較重要了,可以自定義側滑頁,我們等會詳細說。contentOptions: 主要配置側滑欄條目的屬性,只對DrawerItems,例如我們剛才寫的例子,就可以通過這個屬性來配置顏色,背景色等。其主要屬性有:items: 這個我也沒弄清是什麼意思,不影響activeItemKey: 定義當前選中的頁面的keyactiveTintColor: 選中條目狀態的文字顏色activeBackgroundColor: 選中條目的背景色inactiveTintColor: 未選中條目狀態的文字顏色inactiveBackgroundColor: 未選中條目的背景色onItemPress: 選中條目的回撥,這個引數屬性為函式,會將當前路由回撥過去style: 定義條目的顏色labelStyle: 定義條目文字的顏色
例如:
| { drawerWidth: 300, drawerPosition: 'left', contentOptions:{ activeTintColor: '#e91e63', items:[ "Home"], activeItemKey: 'abc', activeBackgroundColor: 'yellow', inactiveTintColor: 'blue', inactiveBackgroundColor: 'red', onItemPress:((route)=>{ console.log(route); }), labelStyle:{ fontSize: 30 }, style:{ marginRight: 30 } } } |
如此,DrawerNavigator的基本用法我們已經搞的差不多了,但是,這還不能滿足我們的日常開發,因為我們的側滑介面可不是這個樣子的。
剛才還有個引數沒有介紹,就是contentComponent,他就是用來自定義側滑介面的。
上面的例子有一個問題,加入我們的item比較多,但是側滑頁面並不能滑動,這時,就要使用contentComponent來自定義介面,如下:
| //匯入DrawerItems 因為系統的條目就是DrawerItems import {DrawerNavigator,DrawerItems} from 'react-navigation'; { drawerWidth: 300, drawerPosition: 'left', //ScrollView作為我們的側滑介面,內部依然是DrawerItems contentComponent:((props)=>{ return( <ScrollView style={styles.container} > <DrawerItems {...props}/> </ScrollView> )}) } |
執行效果如下:

當然,我們完全可以自定義側滑介面,並且不使用DrawerItems條目。如下:
| import DrawerHomePage from './DrawerHomePage'; import DrawerLeftPage from './DrawerLeftPage'; import {DrawerNavigator} from 'react-navigation'; //自定義側滑介面 const CustomDrawerContentComponent = (props)=>{ return( <DrawerLeftPage style={styles.container} {...props} /> ); }; const Drawer = DrawerNavigator( { Home:{ screen:DrawerHomePage, } }, { drawerWidth:300, drawerPosition:'left', contentComponent:(CustomDrawerContentComponent) } ); export default class DrawerPage extends Component { render() { return( <Drawer/> ); } } const styles = StyleSheet.create({ container: { flex:1 } }); |
我們這裡定義了一個常量,返回DrawerLeftPage作為我們的側滑介面,在DrawerLeftPage中就可以隨意定製了。注意,一定要將props傳遞到下一個介面,否則通過props拿不到navigation。最終執行效果:

好了,DrawerNavigator我們已經瞭解完了。
StackNavigator
這個元件就比較麻煩了,我們先來看他的建構函式:StackNavigator(RouteConfigs, StackNavigatorConfig)
RouteConfigs:
它主要是來配置頁面路由的,類似與Android的Manifest.xml,所有的介面都必須配置在裡面。如下:
| { First:{ screen:FirstNavigation, navigationOptions:({ title: '首頁' }) }, Second:{ screen:SecondNavigation, navigationOptions:({navigation}) => ({ title: "第二個介面" }) } } |
這裡我們配置了首頁和第二個頁面,並且配置了標題引數。當然,如果你不想在路由裡面配置頁面的引數,你也可以在頁面中配置,需要在頁面中定義一個靜態常量navigationOptions,和DrawerNavigator的使用方法類似。我們來看看navigationOptions有哪些可以配置的引數:
title: 這個即可以作為頭部標題,也可以作為返回標題和Tab標題header: 自定義導航條,系統的導航條會隱藏headerTitle: 標題headerBackTitle: 回退標題headerTruncatedBackTitle: 當回退標題不能顯示的時候顯示此屬性的標題,比如回退標題太長了headerRight: 定義導航欄右邊檢視headerLeft: 定義導航欄左邊檢視headerStyle: 定義導航欄的樣式,比如背景色等headerTitleStyle: 定義標題的樣式headerBackTitleStyle: 定義返回標題的樣式headerTintColor: 定義導航條的tintColor,會覆蓋headerTitleStyle中的顏色gesturesEnabled: 定義是否能側滑返回,iOS預設true,Android預設false
示例如下:
| static navigationOptions=({ title: '首頁', header:( <View style={{width:Dimensions.get('window').width,height:64,backgroundColor:'red'}}/> ), headerTitle:( <View style={{width:60,height:20,backgroundColor:'red'}}/> ), headerBackTitle:'哈哈哈哈哈', headerTruncatedBackTitle:'你好', headerRight:( <View> <Text>right</Text> </View> ), headerLeft:( <View> <Text>left</Text> </View> ), headerStyle: { backgroundColor:'yellow' }, headerTitleStyle:{ color:'red' }, headerBackTitleStyle:{ tintColor:'#789' }, headerTintColor:'#956', gesturesEnabled:false }); |
StackNavigatorConfig
這個引數主要是配置整個路由的,包括跳轉動畫,跳轉方式等。先來看看它有哪些引數:
initialRouteName: 初始化哪個介面為根介面,如果不配置,預設使用RouteConfigs中的第一個頁面當做根介面initialRouteParams: 初始化根介面引數,主要是給根檢視傳遞一些引數,通過this.props.navigation.state.params可以取到navigationOptions: 配置預設的navigationOptionspaths: 官方意思是覆蓋已經配置的路由,可是我沒有試出來效果mode: 跳轉方式,一種是card,預設的,在iOS上是從右到左跳轉,在Android上是從下到上,都是使用原生系統的預設跳轉方式。一種是modal,只針對iOS平臺,模態跳轉。headerMode: 跳轉過程中,導航條的動畫效果,有三個值,float表示會漸變,類似於iOS的原生效果,screen表示沒有漸變。none表示隱藏導航條cardStyle: 可以統一定義介面的顏色,例如背景色transitionConfig:配置頁面跳轉的動畫onTransitionStart: 頁面跳轉動畫即將開始的回撥onTransitionEnd: 頁面跳轉動畫結束的回撥
| static stackNavigatorConfig = ({ initialRouteName: 'First', initialRouteParams:{ data: 'haha' }, navigationOptions:{ headerTintColor: 'red' }, mode: 'card', headerMode: 'screen', cardStyle:({backgroundColor: 'blue'}), onTransitionStart:((route)=>{ console.log( '開始動畫'); }), onTransitionEnd:((route)=>{ console.log( '結束動畫'); }), transitionConfig:(()=>({ //因為ios 的導航動畫預設是從左到右,所以,這裡配置一下動畫,使用react-navigation已經實現的從左到右的動畫, //適配Android,不過,需要匯入動畫 //import CardStackStyleInterpolator from 'react-navigation/src/views/CardStackStyleInterpolator'; screenInterpolator:CardStackStyleInterpolator.forHorizontal, })) }); |
Navigation Prop
瞭解完路由配置以後,我們再來看看元件的屬性,
