
七天學會ASP.NET MVC (五)——Layout頁面使用和使用者角色管理
本文參考自:http://www.codeproject.com/Articles/1000435/Learn-MVC-Project-in-days-Day
轉載請註明出處:葡萄城官網,葡萄城為開發者提供專業的開發工具、解決方案和服務,賦能開發者。

系列文章
目錄
實驗22——新增頁尾
實驗23——實現使用者角色管理
實驗24——實現專案外觀一致性
實驗25——使用Action 過濾器讓頁首和頁尾程式碼更有效
總結
實驗22——新增頁尾
在本實驗中,我們會在Employee 頁面新增頁尾,通過本實驗理解分部檢視。
什麼是“分部檢視”?
從邏輯上看,分部檢視是一種可重用的檢視,不會直接顯示,包含於其他檢視中,作為其檢視的一部分來顯示。用法與使用者控制元件類似,但不需要編寫後臺程式碼。
1. 建立分部檢視的 ViewModel
右擊 ViewModel 資料夾,新建 FooterViewModel 類,如下:
1: public class FooterViewModel
2: {
3: public string CompanyName { get; set; }
4: public string Year { get; set; }
5: }
2. 建立分部檢視
右擊“~/Views/Shared”資料夾,選擇新增->檢視。
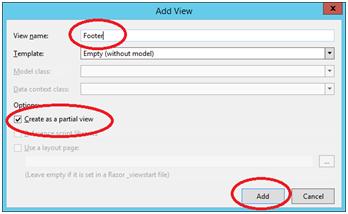
輸入View 名稱”Footer”,選擇複選框“Create as a partial view”,點選新增按鈕。
注意:View中的Shared 共享資料夾是為每個控制器都可用的資料夾,不是某個特定的控制器所屬。
3. 在分部View 中顯示資料
開啟Footer.cshtml,輸入以下HTML 程式碼。
1: @using WebApplication1.ViewModels
2:
3: @model FooterViewModel
4:
5: <div style="text-align:right;background-color: silver;color: darkcyan;border: 1px solid gray;margin-top:2px;padding-right:10px;">
6:
7: @Model.CompanyName © @Model.Year
8:
9: </div>
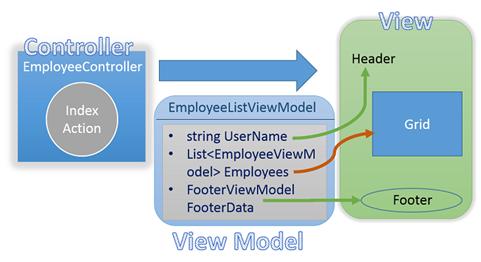
4. 在Main ViewModel 中包含Footer 資料
開啟 EmployeeListViewModel 類,新增新屬性,儲存 Footer資料,如下:
1: public class EmployeeListViewModel
2: {
3: public List<EmployeeViewModel> Employees { get; set; }
4:
5: public string UserName { get; set; }
6:
7: public FooterViewModel FooterData { get; set; }//New Property
8: }
在本實驗中Footer會作為Index View的一部分顯示,因此需要將Footer的資料傳到Index View頁面中。Index View 是EmployeeListViewModel的強型別View,因此Footer需要的所有資料都應該封裝在EmployeeListViewModel中。
5. 設定Footer 資料
開啟 EmployeeController ,在Index action 方法中設定FooterData 屬性值,如下:
1: public ActionResult Index()
2: {
3: ...
4: ...
5: employeeListViewModel.FooterData = new FooterViewModel();
6: employeeListViewModel.FooterData.CompanyName = "StepByStepSchools";//Can be set to dynamic value
7: employeeListViewModel.FooterData.Year = DateTime.Now.Year.ToString();
8: return View("Index", employeeListViewModel);
9: }
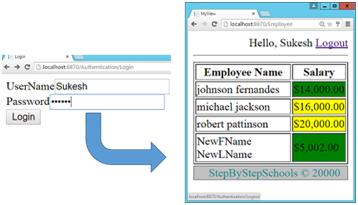
6. 顯示Footer
開啟Index.cshtml 檔案,在Table 標籤後顯示Footer 分部View,如下:
1: </table>
2: @{
3: Html.RenderPartial("Footer", Model.FooterData);
4: }
5: </div>
6: </body>
7: </html>
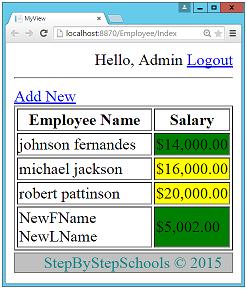
7. 執行,開啟Index View

關於實驗22
Html.Partial的作用是什麼?與Html.RenderPartial區別是什麼?
與Html.RenderPartial作用相同,Html.Partial會在View 中用來顯示分部View。
Html.RenderPartial會將分部View的結果直接寫入HTTP 響應流中,而 Html.Partial會返回 MvcHtmlString值。
什麼是MvcHtmlString,為什麼 Html.Partial返回的是MvcHtmlString 而不是字串?
根據MSDN規定,”MvcHtmlString”代表了一個 HTML編碼的字串,不需要二次編碼。程式碼如下:
1: @{
2: string MyString = "My Simple String";
3: }
4: @MyString
以上程式碼會轉換為:

Razor顯示了全部的內容,許多人會認為已經看到加粗的字串,是Razor Html在顯示內容之前將內容編碼,這就是為什麼使用純內容來代替粗體。
當不適用razor編碼時,使用 MvcHtmlString,MvcHtmlString是razor的一種表示,即“字串已經編碼完畢,不需要其他編碼”。
如:
1: @{
2: string MyString = "My Simple String";
3: }
4: @MvcHtmlString.Create(MyString)
輸出:

Html.RenderAction 和 Html.Action兩者之間有什麼不同?更推薦使用哪種方法?
Html.RenderAction會將Action 方法的執行結果直接寫入HTTP 響應請求流中,而 Html.Action會返回MVC HTML 字串。更推薦使用Html.RenderAction,因為它更快。當我們想在顯示前修改action執行的結果時,推薦使用Html.Action。
實驗23——實現使用者角色管理
在實驗23中我們將實現管理員和非管理員登入的功能。需求很簡單:非管理員使用者沒有建立新Employee的許可權。實驗23會幫助大家理解MVC提供的Session 和Action過濾器。
因此我們將實驗23分為兩部分:
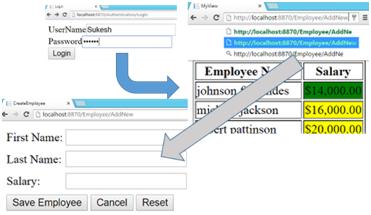
第一部分:非管理員使用者登入時,隱藏 Add New 連結
1. 建立標識使用者身份的列舉型別
右擊Model 資料夾,選擇新增新專案。選擇“Code File”選項。
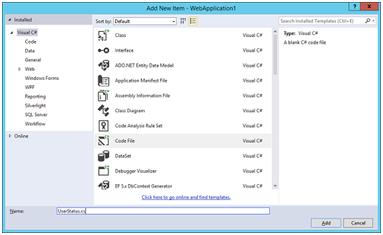
輸入“UserStatus”名,點選新增。
“Code File”選項會建立一個“.cs”檔案.
創UserStatus列舉型別,如下:
1: namespace WebApplication1.Models
2: {
3: public enum UserStatus
4: {
5: AuthenticatedAdmin,
6: AuthentucatedUser,
7: NonAuthenticatedUser
8: }
9: }
2. 修改業務層功能
刪除 IsValidUser函式,建立新函式“GetUserValidity“,如下:
1: public UserStatus GetUserValidity(UserDetails u)
2: {
3: if (u.UserName == "Admin" && u.Password == "Admin")
4: {
5: return UserStatus.AuthenticatedAdmin;
6: }
7: else if (u.UserName == "Sukesh" && u.Password == "Sukesh")
8: {
9: return UserStatus.AuthentucatedUser;
10: }
11: else
12: {
13: return UserStatus.NonAuthenticatedUser;
14: }
15: }
3. 修改DoLogin action方法
開啟 AuthenticationController, 修改DoLogin action:
1: [HttpPost]
2: public ActionResult DoLogin(UserDetails u)
3: {
4: if (ModelState.IsValid)
5: {
6: EmployeeBusinessLayer bal = new EmployeeBusinessLayer();
7: //New Code Start
8: UserStatus status = bal.GetUserValidity(u);
9: bool IsAdmin = false;
10: if (status==UserStatus.AuthenticatedAdmin)
11: {
12: IsAdmin = true;
13: }
14: else if (status == UserStatus.AuthentucatedUser)
15: {
16: IsAdmin = false;
17: }
18: else
19: {
20: ModelState.AddModelError("CredentialError", "Invalid Username or Password");
21: return View("Login");
22: }
23: FormsAuthentication.SetAuthCookie(u.UserName, false);
24: Session["IsAdmin"] = IsAdmin;
25: return RedirectToAction("Index", "Employee");
26: //New Code End
27: }
28: else
29: {
30: return View("Login");
31: }
32: }
在上述程式碼中,已經出現Session 變數來識別使用者身份。
什麼是Session?
Session是Asp.Net的特性之一,可以在MVC中重用,可用於暫存使用者相關資料,session變數週期是穿插於整個使用者生命週期的。
4. 移除存在的 AddNew 連結
開啟“~/Views/Employee”資料夾下 Index.cshtml View,移除”Add New“超連結。
<!-- Remove following line from Index.cshtml -->

<a  href="/Employee/AddNew">Add New</a>
5. 建立分部View
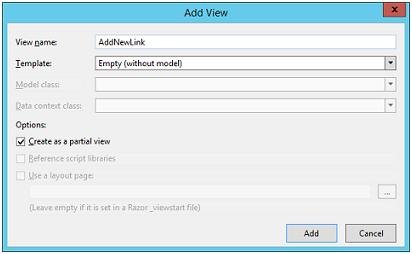
右擊“~/Views/Employee”資料夾,選擇新增View,設定View名稱”“AddNewLink”“,選中”Create a partial View“複選框。
6. 輸入分部View的內容
在新建立的分部檢視中輸入以下內容:
<a href="/Employee/AddNew">Add New</a>
7. 新建 Action 方法
開啟 EmployeeController,新建Action 方法”GetAddNewLink“,如下:
1: public ActionResult GetAddNewLink()
2: {
3: if (Convert.ToBoolean(Session["IsAdmin"]))
4: {
5: return Partial View("AddNewLink");
6: }
7: else
8: {
9: return new EmptyResult();
10: }
11: }
8. 顯示 AddNew 連結
開啟 Index.html,輸入以下程式碼:
1: <a href="/Authentication/Logout">Logout</a>
2: </div>
3: <hr />
4: @{
5: Html.RenderAction("GetAddNewLink");
6: }
7: <div>
8: <table border="1">
9: <tr>
Html.RenderAction 執行Action 方法,並將結果直接寫入響應流中。
9. 執行
測試1
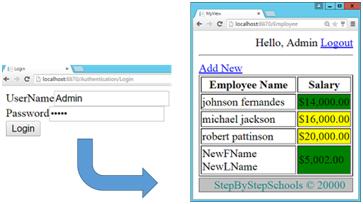
測試2
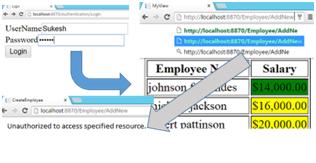
第二部分: 直接URL 安全
以上實驗實現了非管理員使用者無法導航到AddNew連結。這樣還不夠,如果非管理員使用者直接輸入AddNew URL,則會直接跳轉到此頁面。
非管理員使用者還是可以直接訪問AddNew方法,為了解決這個問題,我們會引入MVC action 過濾器。Action 過濾器使得在action方法中新增一些預處理和後處理的邏輯判斷問題。在整個實驗中,會注重ActionFilters預處理的支援和後處理的功能。
1. 安裝過濾器
新建資料夾Filters,新建類”AdminFilter“。
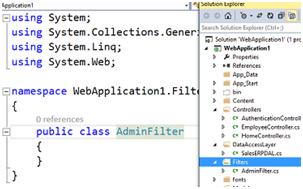
2. 建立過濾器
通過繼承 ActionFilterAttribute ,將 AdminFilter類升級為”ActionFilter“,如下:
1: public class AdminFilter:ActionFilterAttribute
2: {
3:
4: }
注意:使用”ActionFilterAttribute “需要在檔案頂部輸入”System.Web.Mvc“。
3. 新增安全驗證邏輯
在ActionFliter中重寫 OnActionExecuting方法:
1: public override void OnActionExecuting(ActionExecutingContext filterContext)
2: {
3: if (!Convert.ToBoolean(filterContext.HttpContext.Session["IsAdmin"]))
4: {
5: filterContext.Result = new ContentResult()
6: {
7: Content="Unauthorized to access specified resource."
8: };
9: }
10: }
4. 繫結過濾器
在AddNew和 SaveEmployee方法中繫結過濾器,如下:
1: [AdminFilter]
2: public ActionResult AddNew()
3: {
4: return View("CreateEmployee",new Employee());
5: }
6: ...
7: ...
8: [AdminFilter]
9: public ActionResult SaveEmployee(Employee e, string BtnSubmit)
10: {
11: switch (BtnSubmit)
12: {
13: case "Save Employee":
14: if (ModelState.IsValid)
15: {
16: EmployeeBusinessLayer empBal = new EmployeeBusinessLayer();
17: ....
18: ....
5. 執行
關於實驗23
可以通過瀏覽器直接呼叫GetAddNewLink方法嗎?
可以直接呼叫,也可直接停止”GetAddNewLink“的執行。
Html.Action有什麼作用?
與Html.RenderAction作用相同,Html.Action會執行action 方法,並在View中顯示結果。
語法:
1: @Html.Action("GetAddNewLink");
Html.RenderAction 和 Html.Action兩者之間有什麼不同?更推薦使用哪種方法?
Html.RenderAction會將Action 方法的執行結果直接寫入HTTP 響應請求流中,而 Html.Action會返回MVCHTMLString。更推薦使用Html.RenderAction,因為它更快。當我們想在顯示前修改action執行的結果時,推薦使用Html.Action。
什麼是 ActionFilter ?
與AuthorizationFilter類似,ActionFilter是ASP.NET MVC過濾器中的一種,允許在action 方法中新增預處理和後處理邏輯。
實驗24——實現專案外觀的一致性
在ASP.NET能夠保證外觀一致性的是母版頁的使用。MVC卻不同於ASP.NET,在RAZOR中,母版頁稱為佈局頁面。
在開始實驗之前,首先來了解佈局頁面
1. 帶有歡迎訊息的頁首
2. 帶有資料的頁尾
最大的問題是什麼?
帶有資料的頁尾和頁首作為ViewModel的一部分傳從Controller傳給View。
現在最大的問題是在頁首和頁尾移動到佈局頁面後,如何將資料從View傳給Layout頁面。
解決方案——繼承
可使用繼承原則,通過實驗來深入理解。
1. 建立ViewModel基類
在ViewModel 資料夾下新建ViewModel 類 ”BaseViewModel“,如下:
1: public class BaseViewModel
2: {
3: public string UserName { get; set; }
4: public FooterViewModel FooterData { get; set; }//New Property
5: }
BaseViewModel可封裝佈局頁所需要的所有值。
2. 準備 EmployeeListViewModel
刪除EmployeeListViewModel類的 UserName和 FooterData屬性,並繼承 BaseViewModel:
1: public class EmployeeListViewModel:BaseViewModel
2: {
3: public List<EmployeeViewModel> Employees { get; set; }
4: }
3. 建立佈局頁面
右擊shared資料夾,選擇新增>>MVC5 Layout Page。輸入名稱”MyLayout“,點選確認
1: <!DOCTYPE html>
2:
3: <html>
4: <head>
5: <meta name="viewport" content="width=device-width" />
6: <title>@ViewBag.Title</title>
7: </head>
8: <body>
9: <div>
10: @RenderBody()
11: </div>
12: </body>
13: </html>
4. 將佈局轉換為強型別佈局
1: @using WebApplication1.ViewModels
2: @model BaseViewModel
5. 設計佈局頁面
在佈局頁面新增頁首,頁尾和內容,內容,三部分,如下:
1: <html>
2: <head>
3: <meta name="viewport" content="width=device-width" />
4: <title>@RenderSection("TitleSection")</title>
5: @RenderSection("HeaderSection",false)
6: </head>
7: <body>
8: <div style="text-align:right">
9: Hello, @Model.UserName
10: <a href="/Authentication/Logout">Logout</a>
11: </div>
12: <hr />
13: <div>
14: @RenderSection("ContentBody")
15: </div>
16: @Html.Partial("Footer",Model.FooterData)
17: </body>
18: </html>
如上所示,佈局頁面包含三部分,TitleSection, HeaderSection 和 ContentBody,內容頁面將使用這些部分來定義合適的內容。
6. 在 Index View中繫結佈局頁面
開啟Index.cshtml,在檔案頂部會發現以下程式碼:
1: @{
2: Layout = null;
3: }
修改:
1: @{
2: Layout = "~/Views/Shared/MyLayout.cshtml";
3: }
7.設計Index View
- 從Index View中去除頁首和頁尾
- 在Body標籤中複製保留的內容,並存放在某個地方。
- 複製Title標籤中的內容
- 移除View中所有的HTML 內容,確保只移動了HTML,@model 且沒有移動layout語句
- 在複製的內容中定義TitleSection和 Contentbody
完整的View程式碼如下:
1: @using WebApplication1.ViewModels
2: @model EmployeeListViewModel
3: @{
4: Layout = "~/Views/Shared/MyLayout.cshtml";
5: }
6:
7: @section TitleSection{
8: MyView
9: }
10: @section ContentBody{
11: <div>
12: @{
13: Html.RenderAction("GetAddNewLink");
14: }
15: <table border="1">
16: <tr>
17: <th>Employee Name</th>
18: <th>Salary</th>
19: </tr>
20: @foreach (EmployeeViewModel item in Model.Employees)
21: {
22: <tr>
23: <td>@item.EmployeeName</td>
24: <td style="background-color:@item.SalaryColor">@item.Salary</td>
25: </tr>
26: }
27: </table>
28: </div>
29: }
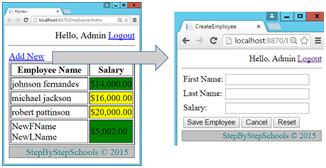
8. 執行
9. 在 CreateEmployee 中繫結佈局頁面
開啟 Index.cshtml,修改頂部程式碼:
1: @{
2: Layout = "~/Views/Shared/MyLayout.cshtml";
3: }
10. 設計 CreateEmployee View
與第7步中的程式類似,定義 CreateEmployee View中的Section ,在本次定義中只新增一項,如下:
1: @using WebApplication1.Models
2: @model Employee
3: @{
4: Layout = "~/Views/Shared/MyLayout.cshtml";
5: }
6:
7: @section TitleSection{
8: CreateEmployee
9: }
10:
11: @section HeaderSection{
12: <script src="~/Scripts/Validations.js"></script>
13: <script>
14: function ResetForm() {
15: document.getElementById('TxtFName').value = "";
16: document.getElementById('TxtLName').value = "";
17: document.getElementById('TxtSalary').value = "";
18: }
19: </script>
20: }
21: @section ContentBody{
22: <div>
23: <form action="/Employee/SaveEmployee" method="post" id="EmployeeForm">
24: <table>
25: <tr>
26: <td>
27: First Name:
28: </td>
29: <td>
30: <input type="text" id="TxtFName" name="FirstName" value="@Model.FirstName" />
31: </td>
32: </tr>
33: <tr>
34: <td colspan="2" align="right">
35: @Html.ValidationMessage("FirstName")
36: </td>
37: </tr>
38: <tr>
39: <td>
40: Last Name:
41: </td>
42: <td>
43: <input type="text" id="TxtLName" name="LastName" value="@Model.LastName" />
44: </td>
45: </tr>
46: <tr>
47: <td colspan="2" align="right">
48: @Html.ValidationMessage("LastName")
49: </td>
50: </tr>
51:
52: <tr>
53: <td>
54: Salary:
55: </td>
56: <td>
57: <input type="text" id="TxtSalary" name="Salary" value="@Model.Salary" />
58: </td>
59: </tr>
60: <tr>
61: <td colspan="2" align="right">
62: @Html.ValidationMessage("Salary")
63: </td>
64: </tr>
65:
66: <tr>
67: <td colspan="2">
68:
69: <input type="submit" name="BtnSubmit" value="Save Employee" onclick="return IsValid();" />
70: <input type="submit" name="BtnSubmit" value="Cancel" />
71: <input type="button" name="BtnReset" value="Reset" onclick="ResetForm();" />
72: </td>
73: </tr>
74: </table>
75: </div>
76: }
11. 執行
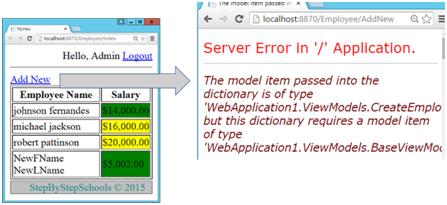
Index View是 EmployeeListViewModel型別的強View型別,是 BaseViewModel的子類,這就是為什麼Index View可一直髮揮作用。CreateEmployee View 是CreateEmployeeViewModel的強型別,並不是BaseViewModel的子類,因此會出現以上錯誤。
12. 準備 CreateEmployeeViewModel
使CreateEmployeeViewModel 繼承 BaseViewModel,如下:
1: public class CreateEmployeeViewModel:BaseViewModel
2: {
3: ...
13. 執行
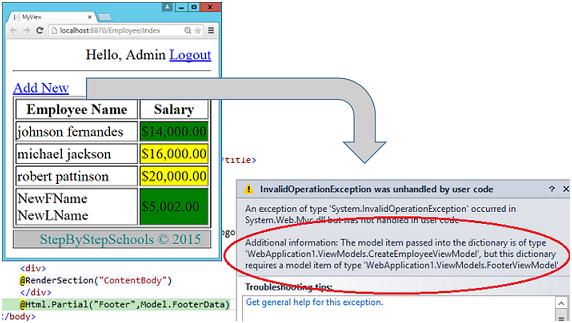
報錯,該錯誤好像與步驟11中的錯誤完全不同,出現這些錯誤的根本原因是未初始化AddNew action方法中的Header和Footer資料。
14. 初始化Header和Footer 資料
修改AddNew方法:
1: public ActionResult AddNew()
2: {
3: CreateEmployeeViewModel employeeListViewModel = new CreateEmployeeViewModel();
4: employeeListViewModel.FooterData = new FooterViewModel();
5: employeeListViewModel.FooterData.CompanyName = "StepByStepSchools";//Can be set to dynamic value
6: employeeListViewModel.FooterData.Year = DateTime.Now.Year.ToString();
7: employeeListViewModel.UserName = User.Identity.Name; //New Line
8: return View("CreateEmployee", employeeListViewModel);
9: }
15. 初始化 SaveEmployee中的Header和 FooterData
1: public ActionResult SaveEmployee(Employee e, string BtnSubmit)
2: {
3: switch (BtnSubmit)
4: {
5: case "Save Employee":
6: if (ModelState.IsValid)
7: {
8: ...
9: }
10: else
11: {
12: CreateEmployeeViewModel vm = new CreateEmployeeViewModel();
13: ...
14: vm.FooterData = new FooterViewModel();
15: vm.FooterData.CompanyName = "StepByStepSchools";//Can be set to dynamic value
16: vm.FooterData.Year = DateTime.Now.Year.ToString();
17: vm.UserName = User.Identity.Name; //New Line
18: return View("CreateEmployee", vm); // Day 4 Change - Passing e here
19: }
20: case "Cancel":
21: return RedirectToAction("Index");
22: }
23: return new EmptyResult();
24: }
16. 執行

關於實驗24
RenderBody 有什麼作用?
之前建立了Layout 頁面,包含一個Razor語句如:
1: @Html.RenderBody()
首先我們先來了RenderBody是用來做什麼的?
在內容頁面,通常會定義Section,宣告Layout頁面。但是奇怪的是,Razor允許定義在Section外部定義一些內容。所有的非section內容會使用RenderBody函式來渲染,下圖能夠更好的理解:

佈局是否可巢狀?
可以巢狀,建立Layout頁面,可使用其他存在的Layout頁面,語法相同。
是否需要為每個View定義Layout頁面?
會在View資料夾下發現特殊的檔案“__ViewStart.cshtml”,在其內部的設定會應用所有的View。
例如:在__ViewStart.cshtml中輸入以下程式碼,並給所有View 設定 Layout頁面。
1: @{
2: Layout = "~/Views/Shared/_Layout.cshtml";
3: }
是否在每個Action 方法中需要加入Header和Footer資料程式碼?
不需要,可在Action 過濾器的幫助下刪除重複的程式碼。
是否強制定義了所有子View中的Section?
是的,如果Section定義為需要的section,預設的值會設定為true。如下
1: @RenderSection("HeaderSection",false) // Not required
2: @RenderSection("HeaderSection",true) // required
3: @RenderSection("HeaderSection") // required
實驗25——使用Action Fliter讓Header和Footer資料更有效
在實驗23中,我們已經知道了使用 ActionFilter的一個優點,現在來看看使用 ActionFilter的其他好處
1. 刪除Action 方法中的冗餘程式碼
刪除Index,AddNew, SaveEmployee方法中的Header和Footer資料程式碼。
Header程式碼如:
1: bvm.UserName = HttpContext.Current.User.Identity.Name;
Footer程式碼如:
1: bvm.FooterData = new FooterViewModel();
2: bvm.FooterData.CompanyName = "StepByStepSchools";//Can be set to dynamic value
3: bvm.FooterData.Year = DateTime.Now.Year.ToString();
2.建立HeaderFooter 過濾器
在Filter資料夾下新建類”HeaderFooterFilter“,並通過繼承ActionFilterAttribute類升級為Action Filter
3. 升級ViewModel
重寫 HeaderFooterFilter類的 OnActionExecuted方法,在該方法中獲取當前View Model ,並繫結Header和Footer資料。
1: public class HeaderFooterFilter : ActionFilterAttribute
2: {
3: public override void OnActionExecuted(ActionExecutedContext filterContext)
4: {
5: ViewResult v = filterContext.Result as ViewResult;
6: if(v!=null) // v will null when v is not a ViewResult
7: {
8: BaseViewModel bvm = v.Model as BaseViewModel;
9: if(bvm!=null)//bvm will be null when we want a view without Header and footer
10: {
11: bvm.UserName = HttpContext.Current.User.Identity.Name;
12: bvm.FooterData = new FooterViewModel();
13: bvm.FooterData.CompanyName = "StepByStepSchools";//Can be set to dynamic value
14: bvm.FooterData.Year = DateTime.Now.Year.ToString();
15: }
16: }
17: }
18: }
4. 繫結過濾器
在Index中,AddNew,SaveEmployee的action 方法中繫結 HeaderFooterFilter
1: [HeaderFooterFilter]
2: public ActionResult Index()
3: {
4: EmployeeListViewModel employeeListViewModel = new EmployeeListViewModel();
5: ...
6: }
7: ...
8: [AdminFilter]
9: [HeaderFooterFilter]
10: public ActionResult AddNew()
11: {
12: CreateEmployeeViewModel employeeListViewModel = new CreateEmployeeViewModel();
13: //employeeListViewModel.FooterData = new FooterViewModel();
14: //employeeListViewModel.FooterData.CompanyName = "StepByStepSchools";
15: ...
16: }
17: ...
18: [AdminFilter]
19: [HeaderFooterFilter]
20: public ActionResult SaveEmployee(Employee e, string BtnSubmit)
21: {
22: switch (BtnSubmit)
23: {
24: ...
5. 執行
總結
本文主要介紹了ASP.NET MVC中頁首頁尾的新增和Layout頁面的使用,並實現了使用者角色分配及Action Filter的使用,下一節中我們將是最難和最有趣的一篇,請持續關注吧!
在學習了本節Layout頁面及使用者角色管理之後,你是否也躍躍欲試想要進行MVC開發?不妨試試 這款輕量級控制元件,它與Visual Studio無縫整合,完全與MVC6和ASP.NET 5.0相容,將大幅提高工作效率.
相關閱讀: