Asp.Net MVC4入門指南(6):驗證編輯方法和編輯檢視
在本節中,您將開始修改為電影控制器所新加的操作方法和檢視。然後,您將新增一個自定義的搜尋頁。
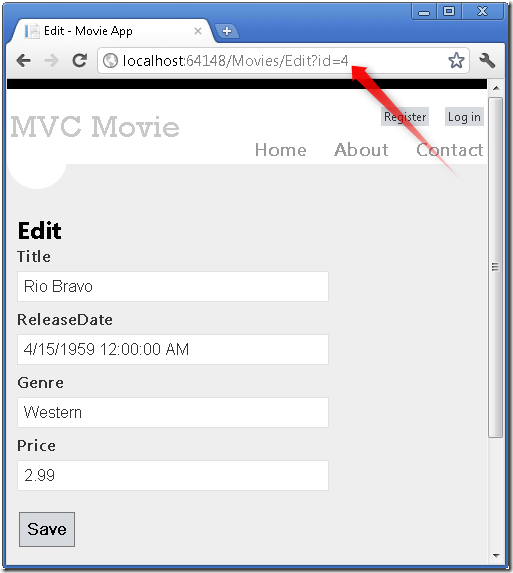
在瀏覽器位址列裡追加/Movies, 瀏覽到Movies頁面。並進入編輯(Edit)頁面。
Edit(編輯)連結是由Views\Movies\Index.cshtml檢視中的Html.ActionLink方法所生成的:
@Html.ActionLink("Edit", "Edit", new { id=item.ID })
Html物件是一個Helper, 以屬性的形式, 在System.Web.Mvc.WebViewPage基類上公開。 ActionLink是一個幫助方法,便於動態生成指向Controller中操作方法的HTML 超連結連結。ActionLink
<a>Edit Me</a>)。第二個引數是要呼叫的操作方法的名稱。最後一個引數是一個匿名物件,用來生成路由資料 (在本例中,ID 為 4 的)。
在上圖中所生成的連結是http://localhost:xxxxx/Movies/Edit/4預設的路由 (在App_Start\RouteConfig.cs 中設定) 使用的 URL 匹配模式為: {controller}/{action}/{id}。因此,ASP.NET 將http://localhost:xxxxx/Movies/Edit/4轉化到Movies 控制器中Edit操作方法,引數ID等於 4 的請求。檢視App_Start\RouteConfig.cs
public static void RegisterRoutes(RouteCollection routes) { routes.IgnoreRoute("{resource}.axd/{*pathInfo}"); routes.MapRoute( name: "Default", url: "{controller}/{action}/{id}", defaults: new { controller = "Home", action = "Index", id= UrlParameter.Optional } ); }
您還可以使用QueryString來傳遞操作方法的引數。例如,URL: http://localhost:xxxxx/Movies/Edit?ID=4還會將引數ID為 4的請求傳遞給Movies控制器的Edit操作方法。
開啟Movies控制器。如下所示的兩個Edit操作方法。
//

// GET: /Movies/Edit/5


public ActionResult Edit(int id = 0)

{
     Movie movie = db.Movies.Find(id);
     if (movie == null)
     {
         return HttpNotFound();
     }
     return View(movie);

}


//

// POST: /Movies/Edit/5


[HttpPost]

public ActionResult Edit(Movie movie)

{
     if (ModelState.IsValid)
     {
         db.Entry(movie).State = EntityState.Modified;
         db.SaveChanges();
         return RedirectToAction("Index");
     }
     return View(movie);

}
注意,第二個Edit操作方法的上面有HttpPost屬性。此屬性指定了Edit方法的過載,此方法僅被POST 請求所呼叫。您可以將HttpGet屬性應用於第一個編輯方法,但這是不必要的,因為它是預設的屬性。(操作方法會被隱式的指定為HttpGet屬性,從而作為HttpGet方法。)
HttpGet Edit方法會獲取電影ID引數、 查詢影片使用Entity Framework 的Find方法,並返回到選定影片的編輯檢視。如果不帶引數呼叫Edit 方法,ID 引數被指定為預設值 零。如果找不到一部電影,則返回HttpNotFound 。當VS自動建立編輯檢視時,它會檢視Movie類併為類的每個屬性建立用於Render的<label>和<input>的元素。下面的示例為自動建立的編輯檢視:
@model MvcMovie.Models.Movie


@{
     ViewBag.Title = "Edit";

}


<h2>Edit</h2>


@using (Html.BeginForm()) {
     @Html.ValidationSummary(true)


     <fieldset>
         <legend>Movie</legend>


         @Html.HiddenFor(model => model.ID)


         <div class="editor-label">
             @Html.LabelFor(model => model.Title)
         </div>
         <div class="editor-field">
             @Html.EditorFor(model => model.Title)
             @Html.ValidationMessageFor(model => model.Title)
         </div>


         <div class="editor-label">
             @Html.LabelFor(model => model.ReleaseDate)
         </div>
         <div class="editor-field">
             @Html.EditorFor(model => model.ReleaseDate)
             @Html.ValidationMessageFor(model => model.ReleaseDate)
         </div>


         <div class="editor-label">
             @Html.LabelFor(model => model.Genre)
         </div>
         <div class="editor-field">
             @Html.EditorFor(model => model.Genre)
             @Html.ValidationMessageFor(model => model.Genre)
         </div>


         <div class="editor-label">
             @Html.LabelFor(model => model.Price)
         </div>
         <div class="editor-field">
             @Html.EditorFor(model => model.Price)
             @Html.ValidationMessageFor(model => model.Price)
         </div>


         <p>
             <input type="submit" value="Save" />
         </p>
     </fieldset>

}


<div>
     @Html.ActionLink("Back to List", "Index")

</div>


@section Scripts {
     @Scripts.Render("~/bundles/jqueryval")

}
注意,檢視模板在檔案的頂部有 @model MvcMovie.Models.Movie 的宣告,這將指定檢視期望的模型型別為Movie。
自動生成的程式碼,使用了Helper方法的幾種簡化的 HTML 標記。 Html.LabelFor 用來顯示欄位的名稱("Title"、"ReleaseDate"、"Genre"或"Price")。 Html.EditorFor 用來呈現 HTML <input>元素。Html.ValidationMessageFor 用來顯示與該屬性相關聯的任何驗證訊息。
執行該應用程式,然後瀏覽URL,/Movies。單擊Edit連結。在瀏覽器中檢視頁面原始碼。HTML Form中的元素如下所示:
<form action="/Movies/Edit/4" method="post">    <fieldset>
         <legend>Movie</legend>


         <input data-val="true" data-val-number="The field ID must be a number." data-val-required="The ID field is required." id="ID" name="ID" type="hidden" value="4" />


         <div class="editor-label">
             <label for="Title">Title</label>
         </div>
         <div class="editor-field">
             <input class="text-box single-line" id="Title" name="Title" type="text" value="Rio Bravo" />
             <span class="field-validation-valid" data-valmsg-for="Title" data-valmsg-replace="true"></span>
         </div>


         <div class="editor-label">
             <label for="ReleaseDate">ReleaseDate</label>
         </div>
         <div class="editor-field">
             <input class="text-box single-line" data-val="true" data-val-date="The field ReleaseDate must be a date." data-val-required="The ReleaseDate field is required." id="ReleaseDate" name="ReleaseDate" type="text" value="4/15/1959 12:00:00 AM" />
             <span class="field-validation-valid" data-valmsg-for="ReleaseDate" data-valmsg-replace="true"></span>
         </div>


         <div class="editor-label">
             <label for="Genre">Genre</label>
         </div>
         <div class="editor-field">
             <input class="text-box single-line" id="Genre" name="Genre" type="text" value="Western" />
             <span class="field-validation-valid" data-valmsg-for="Genre" data-valmsg-replace="true"></span>
         </div>


         <div class="editor-label">
             <label for="Price">Price</label>
         </div>
         <div class="editor-field">
             <input class="text-box single-line" data-val="true" data-val-number="The field Price must be a number." data-val-required="The Price field is required." id="Price" name="Price" type="text" value="2.99" />
             <span class="field-validation-valid" data-valmsg-for="Price" data-valmsg-replace="true"></span>
         </div>


         <p>
             <input type="submit" value="Save" />
         </p>
     </fieldset>

</form>
被<form> HTML 元素所包括的 <input> 元素會被髮送到,form的action屬性所設定的URL:/Movies/Edit。單擊Edit按鈕時,from資料將會被髮送到伺服器。
處理 POST 請求
下面的程式碼顯示了Edit操作方法的HttpPost處理:
[HttpPost]

public ActionResult Edit(Movie movie)

{
     if (ModelState.IsValid)
     {
         db.Entry(movie).State = EntityState.Modified;
         db.SaveChanges();
         return RedirectToAction("Index");
     }
     return View(movie);

}
ASP.NET MVC 模型繫結 接收form所post的資料,並轉換所接收的movie請求資料從而建立一個Movie物件。ModelState.IsValid方法用於驗證提交的表單資料是否可用於修改(編輯或更新)一個Movie物件。如果資料是有效的電影資料,將儲存到資料庫的Movies集合(MovieDBContext instance)。通過呼叫MovieDBContext的SaveChanges方法,新的電影資料會被儲存到資料庫。資料儲存之後,程式碼會把使用者重定向到MoviesController類的Index操作方法,頁面將顯示電影列表,同時包括剛剛所做的更新。
如果form傳送的值不是有效的值,它們將重新顯示在form中。Edit.cshtml檢視模板中的Html.ValidationMessageFor Helper將用來顯示相應的錯誤訊息。
注意,為了使jQuery支援使用逗號的非英語區域的驗證 ,需要設定逗號(",")來表示小數點,你需要引入globalize.js並且你還需要具體的指定cultures/globalize.cultures.js檔案 (地址在https://github.com/jquery/globalize) 在 JavaScript 中可以使用 Globalize.parseFloat。下面的程式碼展示了在"FR-FR" Culture下的 Views\Movies\Edit.cshtml 檢視:
@section Scripts {
     @Scripts.Render("~/bundles/jqueryval")
     <script src="~/Scripts/globalize.js"></script>
     <script src="~/Scripts/globalize.culture.fr-FR.js"></script>
     <script>
         $.validator.methods.number = function (value, element) {
             return this.optional(element) ||
                 !isNaN(Globalize.parseFloat(value));
         }
         $(document).ready(function () {
             Globalize.culture('fr-FR');
         });
     </script>
     <script>
         jQuery.extend(jQuery.validator.methods, {
             range: function (value, element, param) {
                 //Use the Globalization plugin to parse the value
                 var val = $.global.parseFloat(value);
                 return this.optional(element) || (
                     val >= param[0] && val <= param[1]);
             }
         });


     </script>

}
十進位制欄位可能需要逗號,而不是小數點。作為臨時的修復,您可以向專案根 web.config 檔案新增的全球化設定。下面的程式碼演示設定為美國英語的全球化文化設定。
  <system.web>
     <globalization culture ="en-US" />
     <!--elements removed for clarity-->
   </system.web>
所有HttpGet方法都遵循類似的模式。它們獲取影片物件 (或物件集合,如Index裡的物件集合),並將模型傳遞給檢視。Create方法將一個空的Movie物件傳遞給建立檢視。建立、 編輯、 刪除或以其它方式修改資料的方法都是HttpPost方法。使用HTTP GET 方法來修改資料是存在安全風險,在ASP.NET MVC Tip #46 – Don’t use Delete Links because they create Security Holes的Blog中有完整的敘述。在 GET 方法中修改資料還違反了 HTTP 的最佳做法和Rest架構模式, GET 請求不應更改應用程式的狀態。換句話說,執行 GET 操作,應該是一種安全的操作,沒有任何副作用,不會修改您持久化的資料。
新增一個搜尋方法和搜尋檢視
在本節中,您將新增一個搜尋電影流派或名稱的SearchIndex操作方法。這將可使用/Movies/SearchIndex URL。該請求將顯示一個 HTML 表單,其中包含輸入的元素,使用者可以輸入一部要搜尋的電影。當用戶提交窗體時,操作方法將獲取使用者輸入的搜尋條件並在資料庫中搜索。
顯示 SearchIndex 窗體
通過將SearchIndex操作方法新增到現有的MoviesController類開始。該方法將返回一個檢視包含一個 HTML 表單。如下程式碼:
public ActionResult SearchIndex(string searchString)

{
     var movies = from m in db.Movies
                  select m;

     if (!String.IsNullOrEmpty(searchString))
     {
         movies = movies.Where(s => s.Title.Contains(searchString));
     }

     return View(movies);

}
SearchIndex方法的第一行建立以下的LINQ查詢,以選擇看電影:
var movies = from m in db.Movies
                  select m;
查詢在這一點上,只是定義,並還沒有執行到資料上。
如果searchString引數包含一個字串,可以使用下面的程式碼,修改電影查詢要篩選的搜尋字串:
    if (!String.IsNullOrEmpty(searchString))
     {
         movies = movies.Where(s => s.Title.Contains(searchString));
     }
上面s => s.Title 程式碼是一個Lambda 表示式。Lambda 是基於方法的LINQ查詢,(例如上面的where查詢)在上面的程式碼中使用了標準查詢引數運算子的方法。當定義LINQ查詢或修改查詢條件時(如呼叫Where 或OrderBy方法時,不會執行 LINQ 查詢。相反,查詢執行會被延遲,這意味著表示式的計算延遲,直到取得實際的值或呼叫ToList方法。在SearchIndex示例中,SearchIndex 檢視中執行查詢。有關延遲的查詢執行的詳細資訊,請參閱Query Execution.
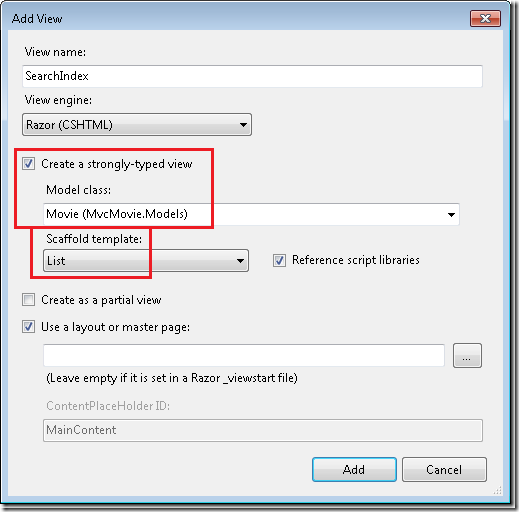
現在,您可以實現SearchIndex檢視並將其顯示給使用者。在SearchIndex方法內單擊右鍵,然後單擊新增檢視。在新增檢視對話方塊中,指定你要將Movie物件傳遞給檢視模板作為其模型類。在框架模板列表中,選擇列表,然後單擊新增.
當您單擊新增按鈕時,建立了Views\Movies\SearchIndex.cshtml檢視模板。因為你選中了框架模板的列表,Visual Studio 將自動生成列表檢視中的某些預設標記。框架模版建立了 HTML 表單。它會檢查Movie類,併為類的每個屬性建立用來展示的<label>元素。下面是生成的檢視:
@model IEnumerable<MvcMovie.Models.Movie>


@{
     ViewBag.Title = "SearchIndex";

}


<h2>SearchIndex</h2>


<p>
     @Html.ActionLink("Create New", "Create")

</p>

<table>
     <tr>
         <th>
             Title
         </th>
         <th>
             ReleaseDate
         </th>
         <th>
             Genre
         </th>
         <th>
             Price
         </th>
         <th></th>
     </tr>


@foreach (var item in Model) {
     <tr>
         <td>
             @Html.DisplayFor(modelItem => item.Title)
         </td>
         <td>
             @Html.DisplayFor(modelItem => item.ReleaseDate)
         </td>
         <td>
             @Html.DisplayFor(modelItem => item.Genre)
         </td>
         <td>
             @Html.DisplayFor(modelItem => item.Price)
         </td>
         <td>
             @Html.ActionLink("Edit", "Edit", new { id=item.ID }) |
             @Html.ActionLink("Details", "Details", new { id=item.ID }) |
             @Html.ActionLink("Delete", "Delete", new { id=item.ID })
         </td>
     </tr>

}


</table>
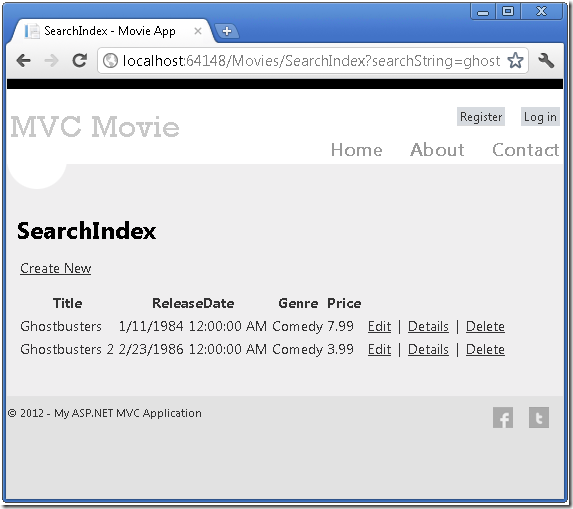
執行該應用程式,然後轉到 /Movies/SearchIndex。追加查詢字串到URL如?searchString=ghost。顯示已篩選的電影。
如果您更改SearchIndex方法的簽名,改為引數id,在Global.asax檔案中設定的預設路由將使得: id引數將匹配{id}佔位符。
{controller}/{action}/{id}
原來的SearchIndex方法看起來是這樣的:
public ActionResult SearchIndex(string searchString)

{
     var movies = from m in db.Movies
                  select m;

     if (!String.IsNullOrEmpty(searchString))
     {
         movies = movies.Where(s => s.Title.Contains(searchString));
     }

     return View(movies);

}
修改後的SearchIndex方法將如下所示:
public ActionResult SearchIndex(string id)

{
     string searchString = id;
     var movies = from m in db.Movies
                  select m;

     if (!String.IsNullOrEmpty(searchString))
     {
         movies = movies.Where(s => s.Title.Contains(searchString));
     }

     return View(movies);

}
您現在可以將搜尋標題作為路由資料 (部分URL) 來替代QueryString。
但是,每次使用者想要搜尋一部電影時, 你不能指望使用者去修改 URL。所以,現在您將新增 UI頁面,以幫助他們去篩選電影。如果您更改了的SearchIndex方法來測試如何傳遞路由繫結的 ID 引數,更改它,以便您的SearchIndex方法採用字串searchString引數:
public ActionResult SearchIndex(string searchString)

{
      var movies = from m in db.Movies
                   select m;

     if (!String.IsNullOrEmpty(searchString))
     {
         movies = movies.Where(s => s.Title.Contains(searchString));
     }

     return View(movies);

}
開啟Views\Movies\SearchIndex.cshtml檔案,並在 @Html.ActionLink("Create New", "Create")後面,新增以下內容:
@using (Html.BeginForm()){
          <p> Title: @Html.TextBox("SearchString")<br />
          <input type="submit" value="Filter" /></p>
         }
下面的示例展示了新增後, Views\Movies\SearchIndex.cshtml 檔案的一部分:
@model IEnumerable<MvcMovie.Models.Movie>


@{
     ViewBag.Title = "SearchIndex";

}


<h2>SearchIndex</h2>


<p>
     @Html.ActionLink("Create New", "Create")

      @using (Html.BeginForm()){
          <p> Title: @Html.TextBox("SearchString") <br />
          <input type="submit" value="Filter" /></p>
         }

</p>
Html.BeginForm Helper建立開放<form>標記。Html.BeginForm Helper將使得, 在使用者通過單擊篩選按鈕提交窗體時,窗體Post本Url。執行該應用程式,請嘗試搜尋一部電影。
SearchIndex沒有HttpPost 的過載方法。你並不需要它,因為該方法並不更改應用程式資料的狀態,只是篩選資料。
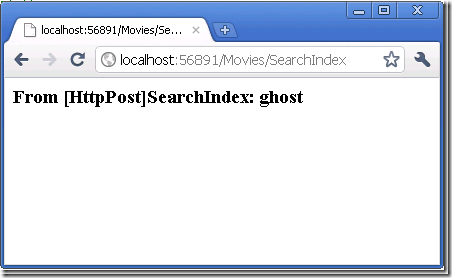
您可以新增如下的HttpPost SearchIndex 方法。在這種情況下,請求將進入HttpPost SearchIndex方法,HttpPost SearchIndex方法將返回如下圖的內容。
[HttpPost]

public string SearchIndex(FormCollection fc, string searchString)

{
     return "<h3> From [HttpPost]SearchIndex: " + searchString + "</h3>";

}
但是,即使您新增此HttpPost SearchIndex 方法,這一實現其實是有侷限的。想象一下您想要新增書籤給特定的搜尋,或者您想要把搜尋連結傳送給朋友們,他們可以通過單擊看到一樣的電影搜尋列表。請注意 HTTP POST 請求的 URL 和GET 請求的URL 是相同的(localhost:xxxxx/電影/SearchIndex)— — 在 URL 中沒有搜尋資訊。現在,搜尋字串資訊作為窗體欄位值,傳送到伺服器。這意味著您不能在 URL 中捕獲此搜尋資訊,以新增書籤或傳送給朋友。
解決方法是使用過載的BeginForm ,它指定 POST 請求應新增到 URL 的搜尋資訊,並應該路由到 HttpGet SearchIndex 方法。將現有的無引數BeginForm 方法,修改為以下內容:
@using (Html.BeginForm("SearchIndex","Movies",FormMethod.Get))
現在當您提交搜尋,該 URL 將包含搜尋的查詢字串。搜尋還會請求到 HttpGet SearchIndex操作方法,即使您也有一個HttpPost SearchIndex方法。
按照電影流派新增搜尋
如果您添加了HttpPost 的SearchIndex方法,請立即刪除它。
接下來,您將新增功能可以讓使用者按流派搜尋電影。將SearchIndex方法替換成下面的程式碼:
public ActionResult SearchIndex(string movieGenre, string searchString)

{
     var GenreLst = new List<string>();

     var GenreQry = from d in db.Movies
                    orderby d.Genre
                    select d.Genre;
     GenreLst.AddRange(GenreQry.Distinct());
     ViewBag.movieGenre = new SelectList(GenreLst);

     var movies = from m in db.Movies
                  select m;

     if (!String.IsNullOrEmpty(searchString))
     {
         movies = movies.Where(s => s.Title.Contains(searchString));
     }

     if (string.IsNullOrEmpty(movieGenre))
         return View(movies);
     else
     {
         return View(movies.Where(x => x.Genre == movieGenre));
     }


}
這版的SearchIndex方法將接受一個附加的movieGenre引數。前幾行的程式碼會建立一個List物件來儲存資料庫中的電影流派。
下面的程式碼是從資料庫中檢索所有流派的 LINQ 查詢。
var GenreQry = from d in db.Movies
                    orderby d.Genre
                    select d.Genre;
該程式碼使用泛型 List集合的 AddRange方法將所有不同的流派,新增到集合中的。(使用 Distinct修飾符,不會新增重複的流派 -- 例如,在我們的示例中添加了兩次喜劇)。該程式碼然後在ViewBag物件中儲存了流派的資料列表。
下面的程式碼演示如何檢查movieGenre引數。如果它不是空的,程式碼進一步指定了所查詢的電影流派。
 if (string.IsNullOrEmpty(movieGenre))
         return View(movies);
     else
     {
         return View(movies.Where(x => x.Genre == movieGenre));
     }
在SearchIndex 檢視中新增選擇框支援按流派搜尋
在TextBox Helper之前新增 Html.DropDownList Helper到Views\Movies\SearchIndex.cshtml檔案中。新增完成後,如下面所示:
<p>
     @Html.ActionLink("Create New", "Create")
     @using (Html.BeginForm("SearchIndex","Movies",FormMethod.Get)){
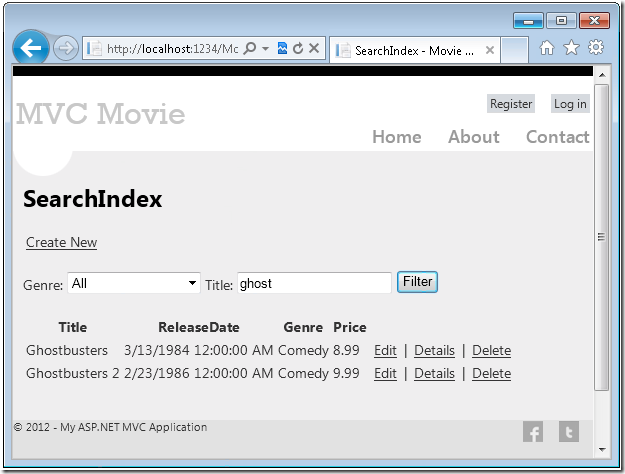
          <p>Genre: @Html.DropDownList("movieGenre", "All")
            Title: @Html.TextBox("SearchString")
          <input type="submit" value="Filter" /></p>
         }

</p>
執行該應用程式並瀏覽 /Movies/SearchIndex。按流派、 按電影名,或者同時這兩者,來嘗試搜尋。
在這一節中您修改了CRUD 操作方法和框架所生成的檢視。您建立了一個搜尋操作方法和檢視,讓使用者可以搜尋電影標題和流派。在下一節中,您將看到如何將屬性新增到Movie模型,以及如何新增一個初始設定並自動建立一個測試資料庫。以上建立搜尋方法和檢視的示例是為了幫助大家更好的掌握MVC的知識,在進行MVC開發時,開發工具也可以大大幫助提高工具效率。使用 ComponentOne Studio ASP.NET MVC這款輕量級控制元件,在效率大幅提高的同時,還能滿足使用者的所有需求。
--------------------------------------------------------------------------------------------------------------------
譯者注:
本系列共9篇文章,翻譯自Asp.Net MVC4 官方教程,由於本系列文章言簡意賅,篇幅適中,從一個示例開始講解,全文最終完成了一個管理影片的小系統,非常適合新手入門Asp.Net MVC4,並由此開始開發工作。9篇文章為:
1. Asp.Net MVC4 入門介紹
2. 新增一個控制器
3. 新增一個檢視
4. 新增一個模型
5. 從控制器訪問資料模型
6. 驗證編輯方法和編輯檢視
7. 給電影表和模型新增新欄位
8. 給資料模型新增校驗器
9. 查詢詳細資訊和刪除記錄
10.第三方控制元件Studio for ASP.NET Wijmo MVC4 工具應用
相關閱讀:


