
python——資料操作
MySQL資料庫操作
連線資料庫
import pymysql
#連線資料庫
conn=pymysql.connect(host="127.0.0.1",user="root",passwd="shenjun",db="s12day")
cur=conn.cursor()#建立遊標
#操作資料庫,插入資料
reCount=cur.execute('insert into students(name,sex,age,tel,nal) values(%s,%s,%s,%s,%s)',('jack','man',22,'15455','USA'))
reCount=cur.execute('insert into students(name,sex,age,tel,nal) values(%s,%s,%s,%s,%s)' 查詢資料
import pymysql
conn=pymysql.connect(host="127.0.0.1",user="root",passwd="shenjun",db="s12day")
cur=conn.cursor()
reCount=cur.execute("select * from students")
# res=cur.fetchone()#(1, 'Jorocco', 'man', 25, '151515', None) 返回的是第一條資料 插入資料
import pymysql
conn = pymysql.connect 事務回滾
import pymysql
conn=pymysql.connect(host="127.0.0.1",user="root",passwd="shenjun",db="s12day")
cur=conn.cursor()
reCount=cur.execute('insert into students(name,sex,age,tel,nal) values(%s,%s,%s,%s,%s)',('jack','man',22,'15455','USA'))
reCount=cur.execute('insert into students(name,sex,age,tel,nal) values(%s,%s,%s,%s,%s)',('Morocco','woma',23,'15455','USA'))
# conn.rollback()#回滾下這兩條資料就不會插入表中,當你再插入新的資料時它的ID往後順延兩個

conn.commit()#之前資料寫到日誌裡了,但還沒真正寫到資料庫,只有經歷這一步才真正的寫到資料庫裡了
cur.close()
conn.close()
redis
redis是一個key-value儲存系統。和Memcached類似,它支援儲存的value型別相對更多,包括string(字串)、list(連結串列)、set(集合)、zset(sorted set –有序集合)和hash(雜湊型別)。這些資料型別都支援push/pop、add/remove及取交集並集和差集及更豐富的操作,而且這些操作都是原子性的。在此基礎上,redis支援各種不同方式的排序。與memcached一樣,為了保證效率,資料都是快取在記憶體中。區別的是redis會週期性的把更新的資料寫入磁碟或者把修改操作寫入追加的記錄檔案,並且在此基礎上實現了master-slave(主從)同步。
redis的操作
redis的連線
import redis
r=redis.Redis(host='192.168.49.128')#連線redis
r.set("id","20170812",ex=3)#儲存資料時效性為3秒,
print(r.get("name").decode())#獲取key為name的屬性
print(r.get("id").decode())
import redis
pool=redis.ConnectionPool(host='192.168.49.128',port=6379)#建立一個連線池,避免過多的開銷
r=redis.Redis(connection_pool=pool)#連線redis
r.set("id","20170812")
r.setrange("id",2,"AA")#將id的值從2開始用"AA"替換
print(r.getrange("id",3,4))#獲取id值的第三個到第四個位元組的值,從0開始
print(r.get("id").decode())
r.set("ID",2017021)
print(r.strlen("name"))# 返回name對應值的位元組長度(一個漢字3個位元組)
print(r.incr("ID",1))#自增 name對應的值,當name不存在時,則建立name=amount,否則,則自增,amount,自增數(必須是整數)
print(r.decr("ID",1))#自減 name對應的值,當name不存在時,則建立name=amount,否則,則自減, amount,自減數(整數)
print(r.append("name","ok"))# 在redis name對應的值後面追加內容
#print(r.keys())redis的列表操作
import redis
pool=redis.ConnectionPool(host="192.168.49.128")
r=redis.Redis(connection_pool=pool)
#r.lpush("number",11,22,33)# 在name對應的list中新增元素,每個新的元素都新增到列表的最左邊 儲存順序為: 33,22,11
# rpush(name, values) 表示從右向左操作
#r.lpushx("number",34)# 在name對應的list中新增元素,只有name已經存在時,值新增到列表的最左邊
#r.linsert("number","BEFORE",11,90)#在name對應的列表的某一個值前或後插入一個新值
# name,redis的name
    # where,BEFORE或AFTER
    # refvalue,標杆值,即:在它前後插入資料
    # value,要插入的資料
#r.lset("number",3,"shenjun")# 對name對應的list中的某一個索引位置重新賦值
# 引數:
    # name,redis的name
    # index,list的索引位置
    # value,要設定的值
#r.lrem("number",33,10)# 在name對應的list中刪除指定的值,注意刪除的都是33
# 引數:
    # name,redis的name
    # value,要刪除的值
    # num,  num=0,刪除列表中所有的指定值;
           # num=2,從前到後,刪除2個;
           # num=-2,從後向前,刪除2個
#print(r.lpop("number"))# 在name對應的列表的左側獲取第一個元素並在列表中移除,返回值則是第一個元素 rpop(name) 表示從右向左操作
#r.ltrim("number",1,15)# 在name對應的列表中移除沒有在start-end索引之間的值
# 引數:
    # name,redis的name
    # start,索引的起始位置
    # end,索引結束位置
#r.rpoplpush("number","number1")# 從一個列表取出最右邊的元素,同時將其新增至另一個列表的最左邊,列表不存在就建立
# 引數:
    # src,要取資料的列表的name
    # dst,要新增資料的列表的name
#r.brpoplpush("number","number1",1)#從一個列表的右側移除一個元素並將其新增到另一個列表的左側
# 引數:
    # src,取出並要移除元素的列表對應的name
    # dst,要插入元素的列表對應的name
    # timeout,當src對應的列表中沒有資料時,阻塞等待其有資料的超時時間(秒),0 表示永遠阻塞
#r.blpop(("number","number1"),1)# 將多個列表排列,按照從左到右去pop對應列表的元素
# 引數:
    # keys,redis的name的集合
    # timeout,超時時間,當元素所有列表的元素獲取完之後,阻塞等待列表內有資料的時間(秒), 0 表示永遠阻塞
# 更多:
    # r.brpop(keys, timeout),從右向左獲取資料
print(r.lindex("number",3))#在name對應的列表中根據索引獲取列表元素
print(r.llen("number"))#name對應的list元素的個數
print(r.lrange("number",0,-1))
redis的集合操作
import redis
pool=redis.ConnectionPool(host="192.168.49.128")
r=redis.Redis(connection_pool=pool)
r.sadd("set1",12,3,45,67,67)# name對應的集合中新增元素
r.sadd("set2",121,3,45,67,23)
# r.sadd("dest",1,2)
# print(r.sdiff("set2","set1"))#在第一個name對應的集合中且不在其他name對應的集合的元素集合,即在set2中而不在set1中的元素的集合
# print(r.sdiffstore("dest","set1","set2"))#相當於把sdiff獲取的值加入到dest對應的集合中,如有存在dest則會覆蓋它
# print(r.smembers("dest"))# 獲取name對應的集合的所有成員
#print(r.sinter("set1","set2"))# 獲取多一個name對應集合的並集
#print(r.sinterstore("new","set1","set2"))# 獲取多個name對應集合的交集,再講其加入到dest對應的集合中,返回的是新集合的長度
#print(r.sismember("set1",90))# 檢查value是否是name對應的集合的成員
#print(r.smove("set1","set2",12))#將集合set1中的12移動到集合set2中
#print(r.spop("set1"))# 從集合的右側(尾部)移除一個成員,並將其返回
#print(r.srandmember("set2",3))# 從name對應的集合中隨機獲取 numbers 個元素並返回
#r.srem("set1",67)# 在name對應的集合中刪除某些值
#print(r.sunion("set1","set2"))# 獲取多個name對應的集合的並集
#print(r.sunionstore("newSet","set1","set2"))# 獲取多個name對應的集合的並集並存儲到newSet中

#print(r.scard("dest"))
#print(r.scard("set1"))#獲取name對應的集合中元素個數
import redis
pool=redis.ConnectionPool(host="192.168.49.128")
r=redis.Redis(connection_pool=pool)
r.zadd("orderedSet",n1=11,n2=22,n3=23,n4=45)# 在name對應的有序集合中新增元素
#print(r.zcard("orderedSet"))# 獲取name對應的有序集合元素的數量
#print(r.zcount("orderedSet",5,33))# 獲取name對應的有序集合中分數 在 [min,max] 之間的個數
#print(r.zincrby("orderedSet","n1",2))# 自增name對應的有序集合的 value 對應的分數
'''
#print(r.zrange("orderedSet",0,2,desc=True,withscores=True))
# 按照索引範圍獲取name對應的有序集合的元素
# 引數:
# name,redis的name
# start,有序集合索引起始位置(非分數)
# end,有序集合索引結束位置(非分數)
# desc,排序規則,預設按照分數從小到大排序
# withscores,是否獲取元素的分數,預設只獲取元素的值
# score_cast_func,對分數進行資料轉換的函式
# 更多:
# 從大到小排序
# zrevrange(name, start, end, withscores=False, score_cast_func=float)
# 按照分數範圍獲取name對應的有序集合的元素
# zrangebyscore(name, min, max, start=None, num=None, withscores=False, score_cast_func=float)
# 從大到小排序
# zrevrangebyscore(name, max, min, start=None, num=None, withscores=False, score_cast_func=float)
'''
#print(r.zrank("orderedSet","n2"))# 獲取某個值在 name對應的有序集合中的排行(從 0 開始) zrevrank從大到小排序
#r.zrem("orderedSet","n1")# 刪除name對應的有序集合中值是values的成員
#print(r.zremrangebyrank("orderedSet",1,5))# 根據排行範圍刪除
#r.zremrangebyscore("orderedSet", 23, 45)#根據分數範圍刪除
#print(r.zscore("orderedSet","n3"))# 獲取name對應有序集合中 value 對應的分數
#print(r.zinterstore("zset1",("orderedSet","zset2"),aggregate="MAX"))# 獲取兩個有序集合的交集並放入dest集合,如果遇到相同值不同分數,則按照aggregate進行操作
# aggregate的值為: SUM MIN MAX
print(r.zunionstore("zset1",("orderedSet","zset2"),aggregate="MAX"))# 獲取兩個有序集合的並集,如果遇到相同值不同分數,則按照aggregate進行操作
# aggregate的值為: SUM MIN MAXredis的雜湊操作
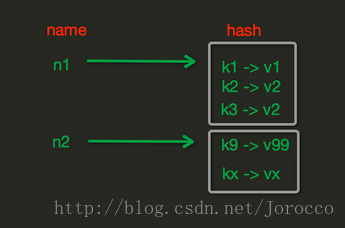
import redis
r=redis.Redis(host="192.168.49.128")
'''
雜湊單個設定
'''
# r.hset("stu",id,2013112314)#name對應的hash中設定一個鍵值對(不存在,則建立;否則,修改)
# print(r.hget("stu",id))# 在name對應的hash中獲取根據key獲取value
'''
雜湊批量設定
'''
# r.hmset("stu",{'s1':'13','s2':'14'})# 在name對應的hash中批量設定鍵值對
# print(r.hmget("stu",'s1','s2'))# 在name對應的hash中獲取多個key的值
# print(r.hgetall("stu"))#獲取name對應hash的所有鍵值
# print(r.hlen("stu"))# 獲取name對應的hash中鍵值對的個數
# print(r.hkeys("stu"))# 獲取name對應的hash中所有的key的值
# print(r.hvals("stu"))# 獲取name對應的hash中所有的value的值
# print(r.hexists("stu","s1"))# 檢查name對應的hash是否存在當前傳入的key
# r.hdel("stu",id)# 將name對應的hash中指定key的鍵值對刪除
# print(r.hincrby("stu","s1",2))#自增name對應的hash中的指定key的值,不存在則建立key=amount
'''
增量迭代式獲取資料,對於資料大的資料非常有用,hscan可以實現分片的獲取資料,並非一次性將資料全部獲取完,從而放置記憶體被撐爆
'''
cursor1,data1=r.hscan("stu",match="s2")
cursor2,data2=r.hscan("stu",cursor=cursor1)
print(cursor2,data2)
redis的其他模組操作
import redis
pool=redis.ConnectionPool(host="192.168.49.128")
r=redis.Redis(connection_pool=pool)
#r.delete("stu")#根據name刪除redis中的任意資料型別
print(r.exists("stu"))#檢測redis的name是否存在
print(r.keys(pattern="*"))#根據* ?等萬用字元匹配獲取redis的name
r.expire("stu",1)# 為某個name設定超時時間
r.rename("set1","集合")# 重新命名
#r.move("stu","db")#將redis的某個值移動到指定的db下
r.randomkey()#隨機獲取一個redis的name(不刪除)
print(r.type("number"))
redis的廣播
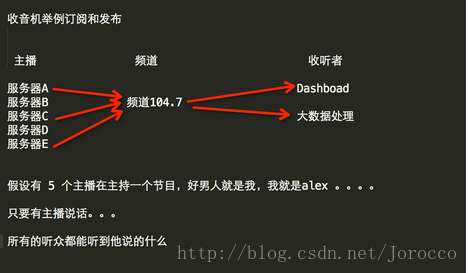
redis的模組框架
import redis


class RedisHelper:

    def __init__(self):
        self.__conn = redis.Redis(host='192.168.49.128')
        self.chan_sub = 'fm104.5'#訂閱頻道
        self.chan_pub = 'fm88.7'#釋出頻道

    def public(self, msg):
        self.__conn.publish(self.chan_pub, msg)
        return True

    def subscribe(self):
        pub = self.__conn.pubsub()#開啟收音機
        pub.subscribe(self.chan_sub)#調到那個臺
        pub.parse_response()#準備聽
        return pub
redis的釋出方(在安裝有redis的虛擬機器上)
import redis
r=redis.Redis()
r.publish("fm104.5","what the fuck")
redis的訂閱方
from redis_helper import RedisHelper

obj = RedisHelper()
redis_sub = obj.subscribe()

while True:
    msg= redis_sub.parse_response()#聽
    print(msg)
RabbitMQ
傳送端
import pika

connection = pika.BlockingConnection(pika.ConnectionParameters(
               host="192.168.49.128"))#阻塞式連線
channel = connection.channel()#生成一個管道

#宣告queue
channel.queue_declare(queue='hello')#在管道里面建立一個佇列

#n RabbitMQ a message can never be sent directly to the queue, it always needs to go through an exchange.
channel.basic_publish(exchange='',
                      routing_key='hello',
                      body='Hello World!')#在管道里面傳送資料,exchange是路由轉發,為空就是預設路由,routing_key是建立的佇列
print(" [x] Sent 'Hello World!'")
connection.close()
接收端
import pika

connection = pika.BlockingConnection(pika.ConnectionParameters(
               host="192.168.49.128"))
channel = connection.channel()


#You may ask why we declare the queue again ‒ we have already declared it in our previous code.
# We could avoid that if we were sure that the queue already exists. For example if send.py program
#was run before. But we're not yet sure which program to run first. In such cases it's a good
# practice to repeat declaring the queue in both programs.
channel.queue_declare(queue='hello')#channel.queue_declare(queue='hello',durable=True)這就是訊息持久化,即使rabbitMQ重啟也不會丟失訊息,接收端也要這樣寫

def callback(ch, method, properties, body):#固定寫法
    print(" [x] Received %r" % body)

channel.basic_consume(callback,
                      queue='hello',
                      no_ack=True)#準備接收,callback是回撥函式,當接收任務的時候會自動呼叫回撥函式

print(' [*] Waiting for messages. To exit press CTRL+C')
channel.start_consuming()#接收任務
釋出訂閱
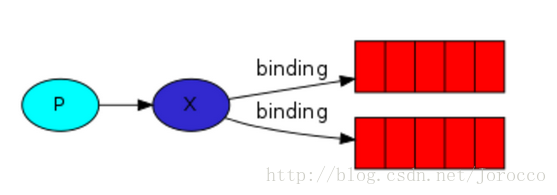
釋出訂閱和簡單的訊息佇列區別在於,釋出訂閱會將訊息傳送給所有的訂閱者,而訊息佇列中的資料被消費一次便消失。所以,RabbitMQ實現釋出和訂閱時,會為每一個訂閱者建立一個佇列,而釋出者釋出訊息時,會將訊息放置在所有相關佇列中。
exchange type = fanout
釋出方
import pika
import sys

connection = pika.BlockingConnection(pika.ConnectionParameters(
         host="192.168.49.128"))
channel = connection.channel()

channel.exchange_declare(exchange='logs',
                         exchange_type='fanout')#宣告exchange,fanout是發給所有人

message = ' '.join(sys.argv[1:]) or "info: Hello World!"
channel.basic_publish(exchange='logs',
                      routing_key='',
                      body=message)
print(" [x] Sent %r" % message)
connection.close()
訂閱方
import pika

connection = pika.BlockingConnection(pika.ConnectionParameters(
        host="192.168.49.128"))
channel = connection.channel()

channel.exchange_declare(exchange='logs',
                         exchange_type="fanout")
result = channel.queue_declare(exclusive=True) #不指定queue名字,rabbit會隨機分配一個名字,exclusive=True會在使用此queue的消費者斷開後,自動將queue刪除
queue_name = result.method.queue

channel.queue_bind(exchange='logs',
                   queue=queue_name)#繫結queue到exchange上

print(' [*] Waiting for logs. To exit press CTRL+C')

def callback(ch, method, properties, body):
    print(" [x] %r" % body)

channel.basic_consume(callback,
                      queue=queue_name,
                      no_ack=True)

channel.start_consuming()
關鍵字傳送
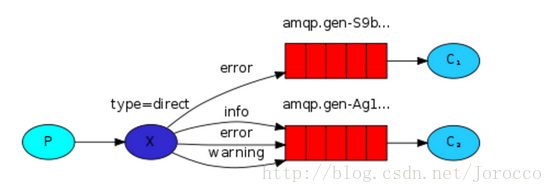
exchange type = direct
之前事例,傳送訊息時明確指定某個佇列並向其中傳送訊息,RabbitMQ還支援根據關鍵字傳送,即:佇列繫結關鍵字,傳送者將資料根據關鍵字傳送到訊息exchange,exchange根據 關鍵字 判定應該將資料傳送至指定佇列。
釋出方
import pika
import sys

connection = pika.BlockingConnection(pika.ConnectionParameters(
        host="192.168.49.128"))
channel = connection.channel()

channel.exchange_declare(exchange='direct_logs',
                         exchange_type='direct')

severity = sys.argv[1] if len(sys.argv) > 1 else 'info'
message = ' '.join(sys.argv[2:]) or 'Hello World!'
channel.basic_publish(exchange='direct_logs',
                      routing_key=severity,
                      body=message)
print(" [x] Sent %r:%r" % (severity, message))
connection.close()
訂閱方
import pika
import sys

connection = pika.BlockingConnection(pika.ConnectionParameters(
        host='localhost'))
channel = connection.channel()

channel.exchange_declare(exchange='direct_logs',
                         exchange_type='direct')

result = channel.queue_declare(exclusive=True)
queue_name = result.method.queue

severities = sys.argv[1:]
if not severities:
    sys.stderr.write("Usage: %s [info] [warning] [error]\n" % sys.argv[0])
    sys.exit(1)

for severity in severities:
    channel.queue_bind(exchange='direct_logs',
                       queue=queue_name,
                       routing_key=severity)

print(' [*] Waiting for logs. To exit press CTRL+C')

def callback(ch, method, properties, body):
    print(" [x] %r:%r" % (method.routing_key, body))

channel.basic_consume(callback,
                      queue=queue_name,
                      no_ack=True)

channel.start_consuming()
模糊匹配
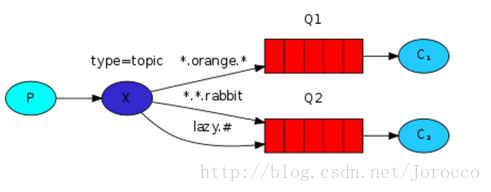
exchange type = topic
在topic型別下,可以讓佇列繫結幾個模糊的關鍵字,之後傳送者將資料傳送到exchange,exchange將傳入”路由值“和 ”關鍵字“進行匹配,匹配成功,則將資料傳送到指定佇列。
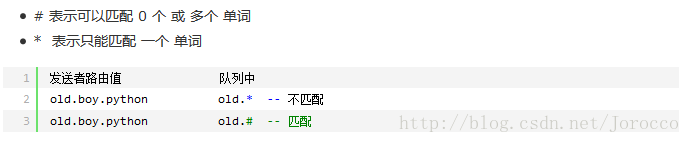
匹配規則
釋出方
import pika
import sys

connection = pika.BlockingConnection(pika.ConnectionParameters(
        host="192.168.49.128"))
channel = connection.channel()

channel.exchange_declare(exchange='topic_logs',
                         exchange_type='topic')

routing_key = sys.argv[1] if len(sys.argv) > 1 else 'anonymous.info'
message = ' '.join(sys.argv[2:]) or 'Hello World!'
channel.basic_publish(exchange='topic_logs',
                      routing_key=routing_key,
                      body=message)
print(" [x] Sent %r:%r" % (routing_key, message))
connection.close()
訂閱方
import pika
import sys

connection = pika.BlockingConnection(pika.ConnectionParameters(
       host="192.168.49.128"))
channel = connection.channel()

channel.exchange_declare(exchange='topic_logs',
                         exchange_type='topic')

result = channel.queue_declare(exclusive=True)
queue_name = result.method.queue

binding_keys = sys.argv[1:]
if not binding_keys:
    sys.stderr.write("Usage: %s [binding_key]...\n" % sys.argv[0])
    sys.exit(1)

for binding_key in binding_keys:
    channel.queue_bind(exchange='topic_logs',
                       queue=queue_name,
                       routing_key=binding_key)

print(' [*] Waiting for logs. To exit press CTRL+C')

def callback(ch, method, properties, body):
    print(" [x] %r:%r" % (method.routing_key, body))

channel.basic_consume(callback,
                      queue=queue_name,
                      no_ack=True)

channel.start_consuming()