
Dynamic iTerm profiles for AWS autoscaling groups
Autoscaling groups. Ahhh…they are so AWS-ome!. But as I grew fond of being able to access my servers easily and fast using iTerm profiles with my old VDC, I felt working with this kind of constant machine creation and termination a little bit odd. Every time I wanted to access any server to do anything via SSH, I had to update the list of servers, get their addresses, execute the ssh command (and frequently deal with the man-in-the-middle warning due to the constant changes), and that was clearly calling for an improvement.
So, being keen of productivity enhancements as I am, I started to work in a solution. Fortunately, and thanks to the amazing Dynamic Profiles feature of iTerm, it was rather easy to do, so now I can work on my servers almost like I did in my pre-AWS life. Basically, the plan was like this:
- Write a script to update my /etc/hosts with my EC2 instances so I can access the servers by name instead of IP (this step would not be necessary if I only wanted to do the dynamic profiles thing, but it felt useful for the future).
- Write a script to create the dynamic profiles configuration after the former instances (following the instructions in iTerm’s Dynamic Profiles).
- Create a cron job to do steps 1 and 2 so I was constantly in sync with my AWS EC2 instances.
Well, I know what you’re thinking. Why not merging steps 1 and 2 in a single script? Well, I did it, but, for the sake of clarity, I preferred to separate the two concepts here.
Getting ready
Some of my machines are unique instances for their given group, and they also provide a static public IP address, so all this should not be applicable to them. But it seemed easier to put all the machines in the same bag and perform the whole operation to make thing easier. So every EC2 instance iTerm2 profile will be managed by means of this process.
In order for all this to work, some preparation must be done in advance. First, all my instances are called after its group. So, every webapp instance is called “webapp”, every “radius” instance is called “radius” and so on. This way, I can sort them easy-peasy.
Second, I have configured a profile with all my preferences (colors, etc.) and called it “Bastión AWS”. It is linked to my bastion machine, the only one I can access via public address, and I will stay unchanged forever. This profile will serve as a template to build my dynamic profiles easier, without having to specify every single detail. Again, please follow iTerm’s documentation on creating profiles.
Third, your /etc/hosts file needs to include two lines that will wrap all the EC2 dynamic instances. This is crucial, since all the process will not work if this lines are not placed inside /etc/hosts:
# AWS EC2#
And last, you need the AWS Python SDK installed on your machine. All you have to do is follow the instructions in the Boto3 Quickstart page, and you are good to go.
Getting it done
For the script, I decided to use some python. I hate bash, and although I agree it is sometimes the right thing to do, and it can be useful in certain situations, I’d rather write a script in a more maintainable and friendly language to get the same results. It is surely a good candidate for some improvements, but, hey! it is only my third Python script ever! Here’s the code:
The updateTerm function handles the most important part. After the EC2 instances are retrieved by the getEC2Instances function, and the /etc/hosts file is updated by updateHosts, updateTerm creates a file with all the dynamic profiles configuration. This file must be located in ~/Library/Application Support/iTerm2/DynamicProfiles/, as the iTerm documentation dictates. With a burst of creativity I called mine “aws”. Clever, huh?
The script takes advantage of some of the coolest things of iTerm. First, you can assign certain tags to each profile configuration so you can sort them and find them easily in iTerm’s Profiles menu. I chose to assign every one of them the tag “AWS” (clever again :-D) and some of them, just the ones corresponding to groups with more than one instance, are tagged with the group name too. This will create a new submenu under “Profiles” with only those instances related to that group. This way if I want to access any of my webapp servers, I can go to “iTerm > Profiles > AWS” or “iTerm > Profiles > webapp”. Just for the sake of it.
The second cool thing in iTerm is “badges”. I put a badge in every profile with its short name (like webapp1, webapp2, etc) so I can see it as a watermark in my terminal window:


I placed my script in /usr/local/bin/update-aws-hosts and gave it the proper permissions so I could run it from the console whenever I want (check the #!/usr/local/bin/python line at the start).
Testing it
Well, so I run sudo update-aws-hosts from my iTerm window, and… voila! now my /etc/hosts file contains all the EC2 instances references I need:
127.0.0.1 localhost
#docker mysql192.168.1.165 mysql1.local192.168.1.165 mysql2.local192.168.1.165 mysql3.local
# AWS EC2172.18.xxx.xx aws.bastion172.18.xxx.xx aws.radius1172.18.xxx.xxx aws.ha_balancer-001172.18.xxx.xxx aws.proxy172.18.xxx.xxx aws.ha_balancer-000172.18.xxx.xxx aws.webapp2172.18.xxx.xxx aws.dataminer172.18.xxx.xxx aws.elasticsearch172.18.xxx.xxx aws.radius2172.18.xxx.xxx aws.webapp1172.18.xxx.xxx aws.slave172.18.xxx.xxx aws.vpn#...
And if I check my iTerm Profiles, I can see this:

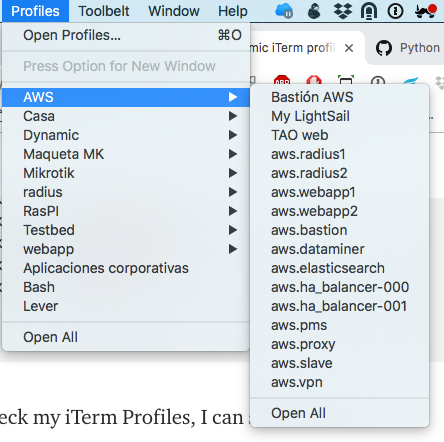
All my instances are there, categorized under the AWS Tag and some of them can also be found under the group tag (webapp, radius). How cool is that?
Making it automatic
Well, not cool enough. As I said before, I want to be in sync with my infrastructure, so, lets make this automatic. In *nix systems like MacOsX it can be easily done with the help of a little crontab. MacOsX replaced the crontab in favor of its launchd daemon a while ago, but, I just prefer cron. Maybe I spend too much time dwelling in Linux servers…
So simply edit your root user crontab (remember, the scripts changes /etc/hosts, so it needs to be run by a privileged user)
sudo crontab -e
And add this line:
* * * * * /usr/local/bin/python /usr/local/bin/update_aws_hosts 2&>1 > /tmp/awshosts
This will run the script every minute. If you think this is a little too much, feel free to change it to every 5 minutes, or the time you guess is best for your infrastructure. As you can see, I redirect all the script output to /tmp/awshosts just to check if everything works fine. If it does, you should see the list of instances in /tmp/awshosts
Note: My python interpreter is located in /usr/local/bin. Again, feel free to change the crontab to fit your environment.
I hope you find this little trick useful if you work with AWS, and you are an iTerm lover like me. And if you find a way to make this better, I will love to hear from you!