
Angular Router Series: Pillar 2 — Navigation
These events are very useful for studying or debugging the router. You could easily tap into them to display a loading message during navigation as well.
Let’s run through a navigation to /users
Navigation Start
events: NavigationStart
In our sample application, the user starts by clicking on the following link:
Whenever the router detects a click on a router link directive, it starts the navigation cycle. There are imperative means of starting a navigation as well, such as the Router Service’s navigate
navigateByUrl methods.Previously, there could be multiple navigations running simultaneously (hence the need for a navigation id), but with this change, there can be only one navigation at a time.
URL Matching, and Redirects
events: RoutesRecognized

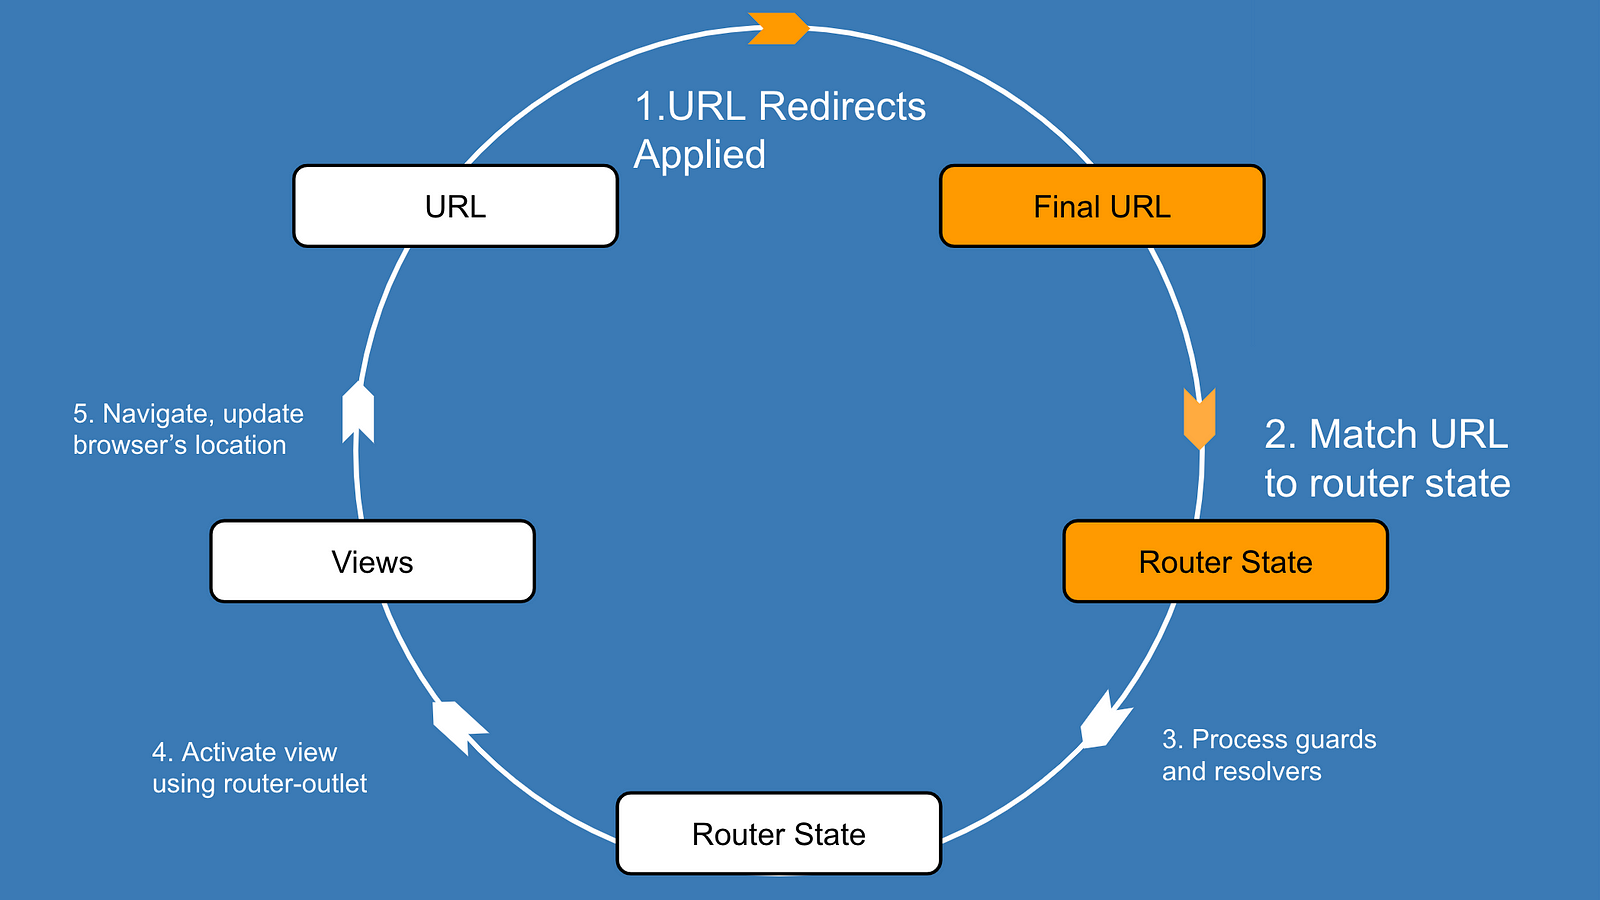
The router starts by doing a depth-first search through the array of router configurations ( ROUTES in our example), and trying to match the URL /users to one of the path properties in the router configurations, while applying any redirects along the way. If you’d like to know about this process in detail, I’ve written about it here.
In our case, there are no redirects to worry about, and the URL /users will match the following configuration in ROUTES:
{ path: 'users', component: UsersComponent, ... }If the matched path requires a lazy loaded module, it will be loaded at this point.
The router emits a RoutesRecognized event to signal that it has found a match for the URL, and a component to navigate to (UsersComponent). This answers the router’s first question, “What should I navigate to?”. But not so fast, the router has to make sure that it is allowed to navigate to this new component.
Enter route guards.
Route Guards
events: GuardsCheckStart, GuardsCheckEnd

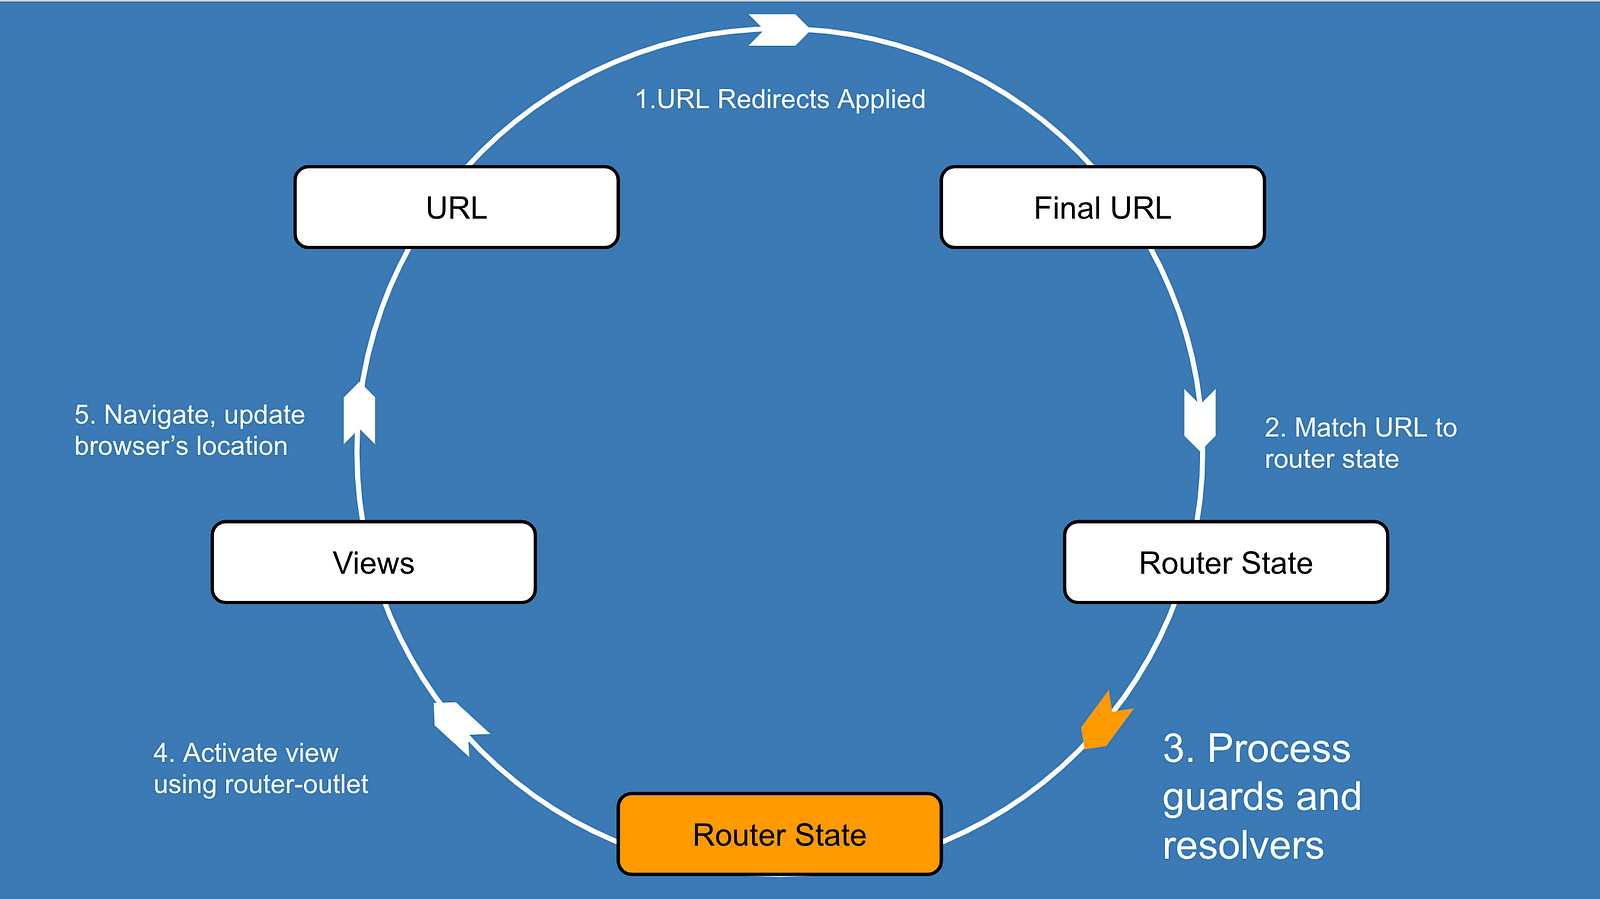
Route guards are boolean functions that the router uses to determine if it can perform a navigation. As developers, we use guards to control whether a navigation can occur or not. In our sample application, we use a canActivate guard to check if a user is logged in by specifying it in the route configuration.
{ path: 'users', ..., canActivate: [CanActivateGuard] }The guard function is shown below.
This guard passes the login query parameter to an auth service (auth.service.ts in the example app).
If the call to isAuthorized(route.queryParams.login) returns true, the guard passes successfully. Otherwise, the guard fails, and the router emits a NavigationCancel event, and aborts the entire navigation.
Other guards include canLoad (should a module be lazily-loaded or not), canActivateChild, and canDeactivate (which is useful for preventing a user from navigating away from a page, for instance, when filling out a form).
Guards are similar to services, they are registered as providers and are injectable. The router will run guards every time there is a change to the URL.
The canActivate guard is run before any data is fetched for the route, since there is no reason to fetch data for a route that shouldn’t be activated. Once the guard has passed, the router has answered its second question, “Should I perform this navigation?”. The router can now prefetch any data using route resolvers.
Route Resolvers
events: ResolveStart, ResolveEnd
Route resolvers are functions that we can use to prefetch data during navigation, before the router has rendered anything. Similar to guards, we specify a resolver in the route configuration, using the resolve property:
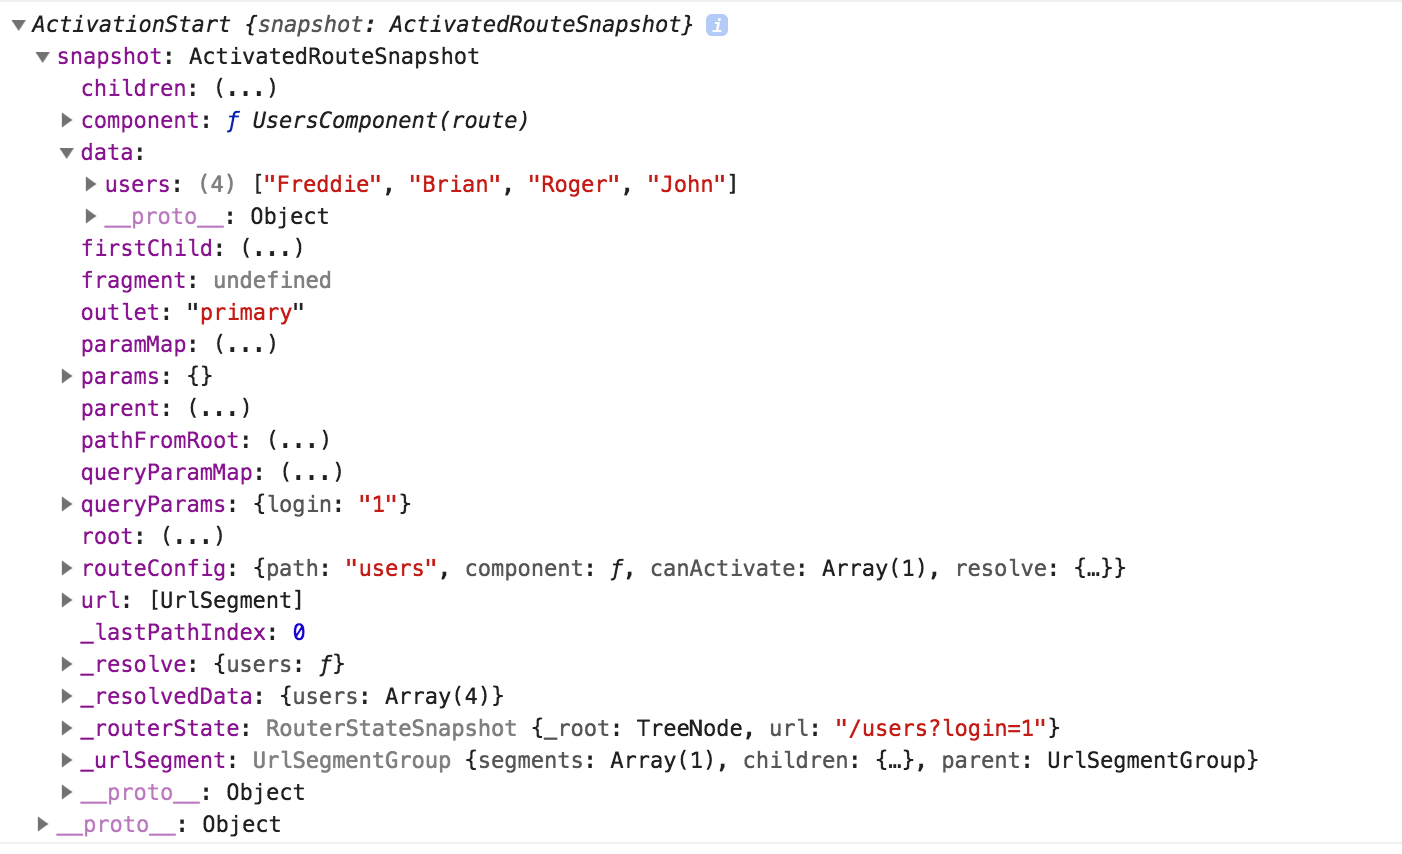
{ path: 'users', ..., resolve: { users: UserResolver } }Once the router has matched a URL to a path, and all guards have passed, it will call the resolve method defined in the UserResolver class to fetch data. The router stores the results on the ActivatedRoute service’s data object, under the key users. This information can be read by subscribing to the ActivatedRoute service’s data observable.
activatedRouteService.data.subscribe(data => data.users);
The ActivatedRoute service is used inside of the UsersComponent, to retrieve data from the resolver.
Resolvers let us prefetch component data during routing. This technique can be used to avoid displaying partially loaded templates to the user by prefetching any data. Remember, a component’s template will be visible to the user during OnInit, so fetching any data that needs to be rendered in that lifecycle hook can lead to a partial page load.
However, it is often better to just let a page partially load. When done well, it will increase the user’s perceived performance of the site. The decision of whether or not to prefetch data is up to you, but it’s usually best to have a partial page load with a nice loading animation instead of using resolvers.
Internally, the router has a runResolve method which will execute the resolver, and store its results on the ActivatedRoute snapshot.
Once the router has processed all resolvers, the next step is to start rendering components using the appropriate router outlets.
Activating Routes
events: ActivationStart, ActivationEnd, ChildActivationStart, ChildActivationEnd

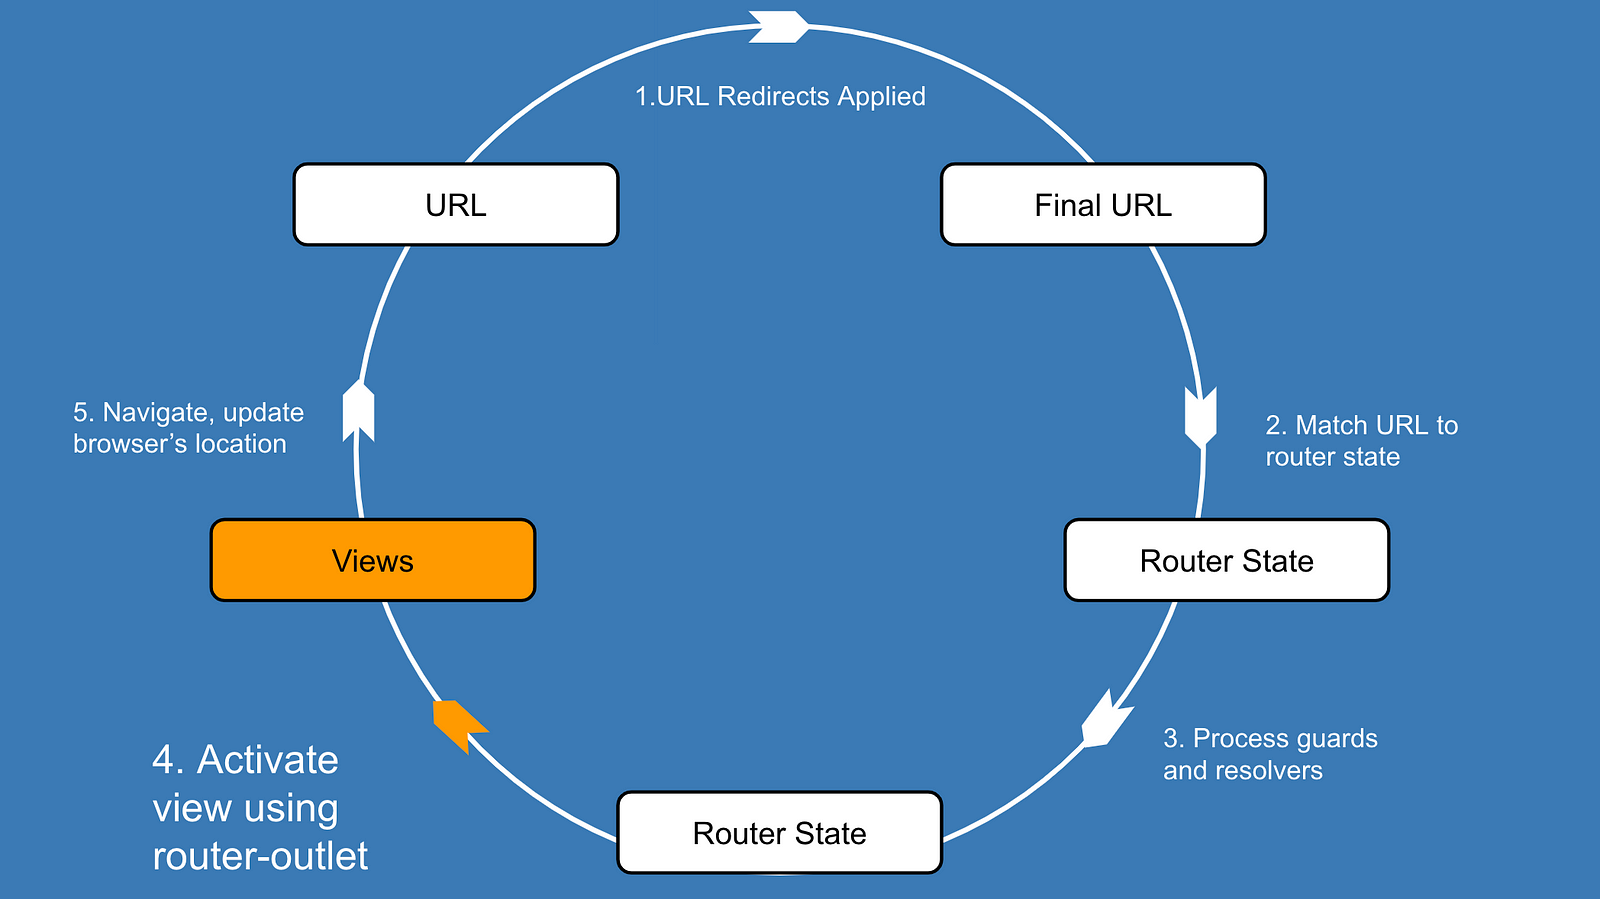
Now it’s time to activate the components, and display them using a<router-outlet>. The router can extract the information it needs about the component from the tree of ActivatedRouteSnapshots that it built during the previous steps of the navigation cycle.

If you are unfamiliar with the process of creating dynamic components in Angular, there are great explanations here and here.All of the magic happens within the router’s activateWith function:
Don’t stress the details, I’ll summarize the main points of the code here:
- On Line 9, A ComponentFactoryResolver is used to create an instance of the
UsersComponent. The router pulls this information off of the ActivatedRouteSnapshot in line 7. - On line 12, the component is actually created.
locationis a ViewContainerRef for the<router-outlet>that is being targeted. If you’ve ever wondered why the rendered content is placed as a sibling to the<router-outlet>as opposed to inside of it, the details can be found by following the details inside of . - After the component is created and activated,
activateChildRoutes(not shown) is called. This is done to account for any nested<router-outlet>, known as child routes.
The router will render a component on the screen. If the rendered component has any nested <router-outlet> elements, the router will go through and render those as well.
Updating the URL

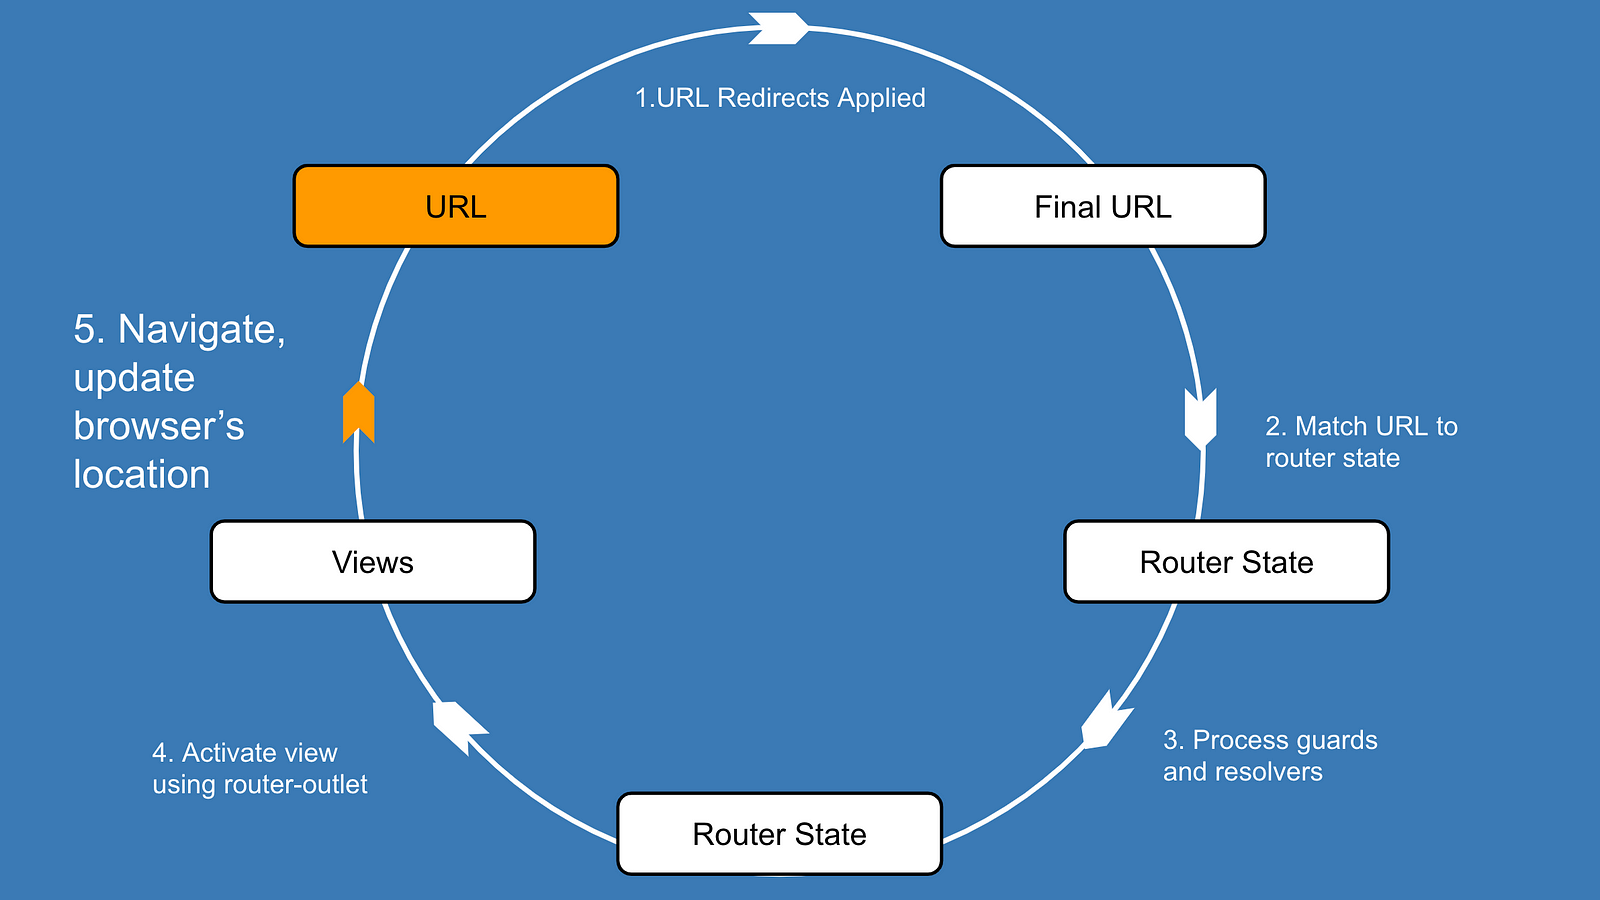
The last step in the navigation cycle is to update the URL to /users.
The router is now ready to listen for another URL change, and start the cycle all over again.