Creating a basic CRUD web app with Vue, Vuetify, and Butterfly Server .NET


Creating a basic CRUD web app with Vue, Vuetify, and Butterfly Server .NET
Nearly every web app has to handle basic CRUD operations (Create, Read, Update, and Delete). In this post, we’ll show how to do these basic CRUD operations building a simple contact manager with a Vue.js/Vuetify front end and a
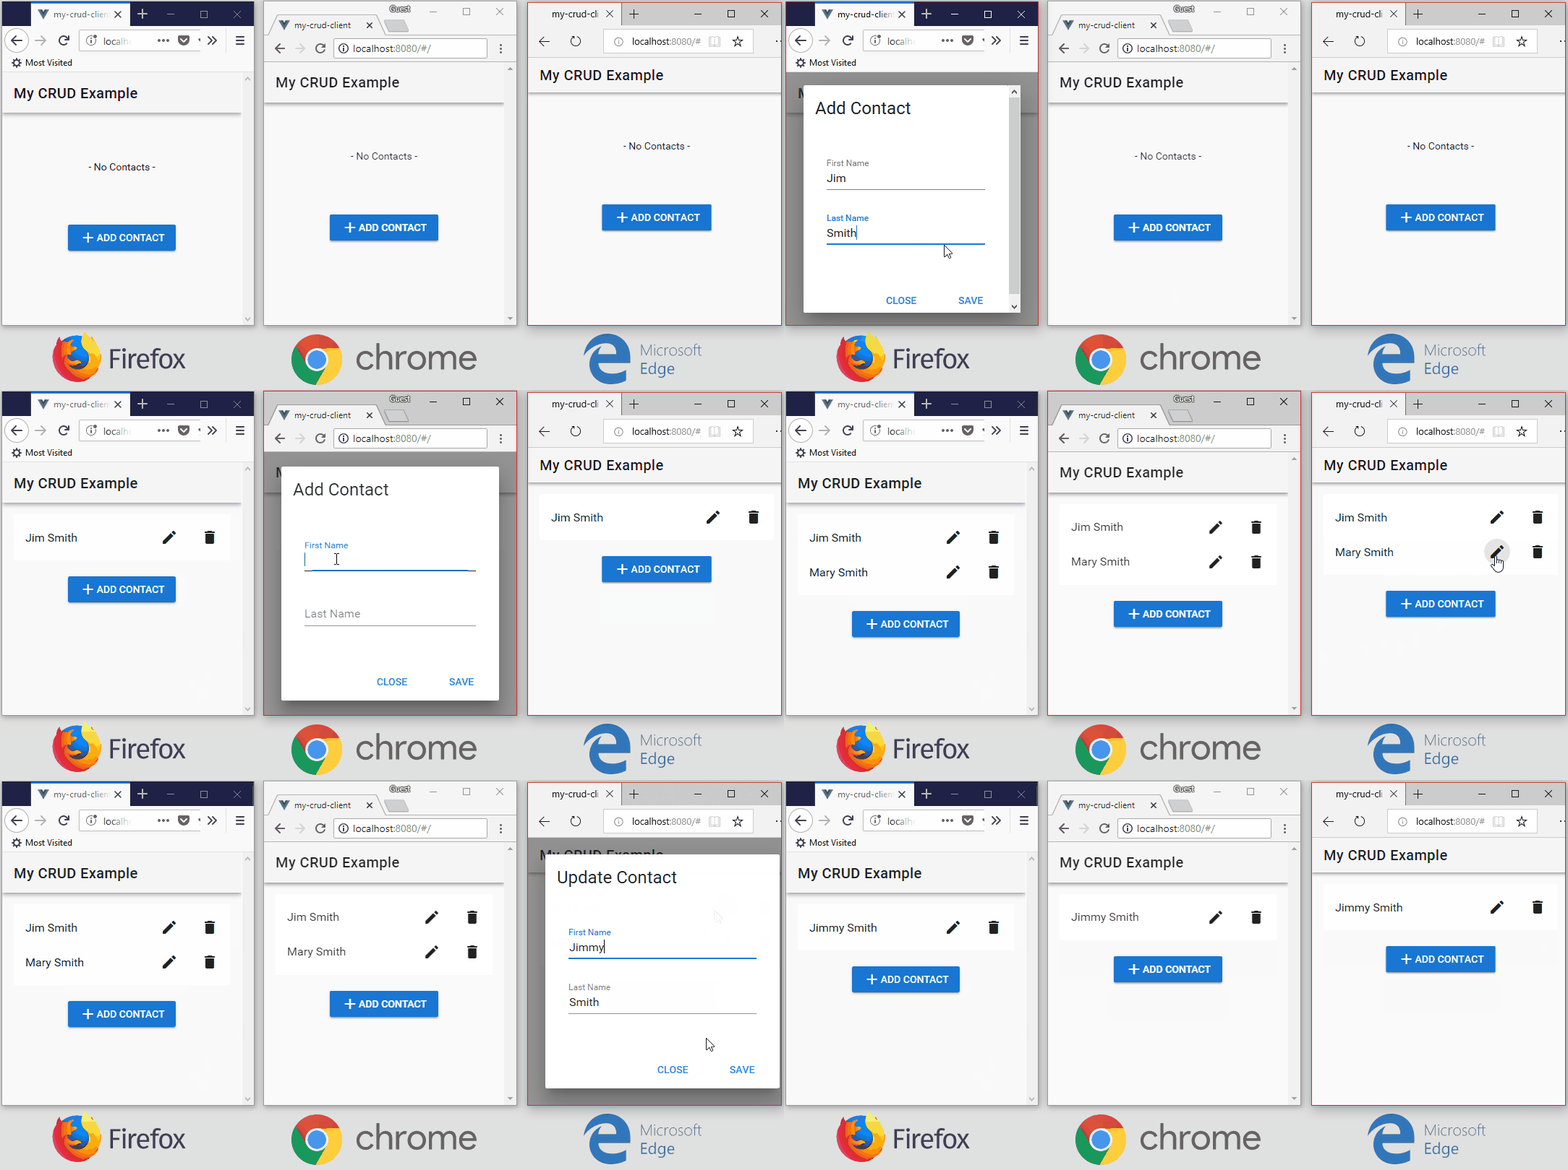
The end result looks like this…


This assumes you have Visual Studio and npm installed already.
Just Let Me Try It
Prefer to skip the step-by-step instructions?
Run this in a terminal or command prompt…
cd butterfly-server-dotnet\Butterfly.Example.Cruddotnet run -vm
Run this in a second terminal or command prompt…
cd butterfly-server-dotnet\Butterfly.Example.Crud\wwwnpm installnpm run devYou should see http://localhost:8080/ open in a browser. Try opening a second browser instance at http://localhost:8080/. Notice that changes are automatically synchronized between the two browser instances.
Or follow the instructions below to build your app from scratch.
Creating the Server
We will use Butterfly Server .NET to create our server. The server will have two key responsibilities…
- Define a Web API that allows adding, updating, and deleting contacts
- Define a Subscription API that allows retrieving a list of contacts and allows receiving any changes to our list of contacts
So, let’s get started…
- Create a new .NET Core Console App project in Visual Studio
- In Package Manager Console, execute
Install-Package Butterfly.EmbedIO
Now, we have a project created and we have the excellent EmbedIO web server installed that will handle our Web API and Subscription API requests.
Next, let’s create a basic skeleton for Program.cs that starts the EmbedIO web server listening on port 8000…
using System;using System.Linq;using System.Threading.Tasks;
using Butterfly.Core.Util;
using Dict = System.Collections.Generic.Dictionary<string, object>;
namespace MyCrudApp { class Program { static void Main(string[] args) { using (var ctx = new Butterfly.EmbedIO.EmbedIOContext("http://+:8000/")) { // Create database // Define Web API // Define Subscription API// Start the web server and wait ctx.Start(); Console.ReadLine(); } } }}
Now, let’s setup a MemoryDatabase to store all our contacts.
Note: We could have also used a MySQL, Postgres, SQLite, or MS SQL Server database with minimal changes to our code.
// Create databasevar database = new Butterfly.Core.Database.Memory.MemoryDatabase();database.CreateFromSqlAsync(@"CREATE TABLE contact ( id VARCHAR(50) NOT NULL, first_name VARCHAR(40) NOT NULL, last_name VARCHAR(40) NOT NULL, PRIMARY KEY(id));").Wait();database.SetDefaultValue("id", table => $"{table.Abbreviate()}_{Guid.NewGuid().ToString()}");The above code will…
- Create a contact table
- Define a default value for the id field with values like c_a7329696-a334–4118–88be-e773bb78d2e2
Next, let’s define our Web API…
// Define the Web APIctx.WebApi.OnPost("/api/contact/insert", async (req, res) => { var record = await req.ParseAsJsonAsync<Dict>(); await database.InsertAndCommitAsync<string>("contact", record);});ctx.WebApi.OnPost("/api/contact/update", async (req, res) => { var record = await req.ParseAsJsonAsync<Dict>(); await database.UpdateAndCommitAsync("contact", record);});ctx.WebApi.OnPost("/api/contact/delete", async (req, res) => { var id = await req.ParseAsJsonAsync<string>(); await database.DeleteAndCommitAsync("contact", id);});The above code will handle API requests as follows…
- When a POST request to /api/contact/insert is received, parse a record from the body as JSON, and use this record to insert a new record in the contact table
- When a POST request to /api/contact/update is received, parse a record from the body as JSON, and use this record to update an existing record in the contact table
- When a POST request to /api/contact/delete is received, parse an id from the body as JSON, and use this id to delete an existing record in the contact table
Finally, let’s define our Subscription API…
// Define the Subscription APIctx.SubscriptionApi.OnSubscribe( "all-contacts", (vars, channel) => database.CreateAndStartDynamicViewAsync( "SELECT * FROM contact", dataEventTransaction => channel.Queue(dataEventTransaction) ));
The above code…
- Defines an all-contacts channel that clients can subscribe
- When clients subscribe to the all-contacts channel, the handler creates a DynamicView that initially sends all the contact records to the client and then continues to send any changes to the contact records to the client
Note: Under the hood, the Subscription API is using WebSockets to push data to the client. Clients are expected to maintain an open WebSocket to the server. This happens automatically when clients use butterfly-client.
That’s it for the server side.
Creating the Client
Let’s use npm and vue-cli to create our client project…
# Install vue-cli (skip if already installed)npm install -g vue-cli
# Create a skeleton vuetifyjs/pwa project# (accept all the defaults)vue init vuetifyjs/pwa my-crud-client
# Install the necessary npm packagescd my-crud-clientnpm installnpm install butterfly-client
Next, disable eslint by commenting out this section in build/webpack.base.conf.js…
/*{ test: /\.(js|vue)$/, loader: 'eslint-loader', enforce: 'pre', include: [resolve('src'), resolve('test')], options: { formatter: require('eslint-friendly-formatter') }},*/Next, edit config/index.js to replace proxyTable: {} with…
proxyTable: { '/api': { target: 'http://localhost:8000/', changeOrigin: true, }, '/ws': { target: 'http://localhost:8000/', changeOrigin: true, ws: true, }}The above changes will allow the node dev server to proxy API and WebSocket requests to our running Butterfly Server .NET.
Next, edit src/main.js to add this import…
import { ArrayDataEventHandler, WebSocketChannelClient } from 'butterfly-client'Next, edit src/main.js to replace the existing new Vue() call with…
new Vue({ el: '#app', router, components: { App }, template: '<App/>', data() { return { channelClient: null, channelClientState: null, } }, methods: { callApi(url, rawData) { return fetch(url, { method: 'POST', body: JSON.stringify(rawData), mode: 'no-cors' }); }, subscribe(options) { let self = this; self.channelClient.subscribe({ channel: options.channel, vars: options.vars, handler: new ArrayDataEventHandler({ arrayMapping: options.arrayMapping, onInitialEnd: options.onInitialEnd, onChannelMessage: options.onChannelMessage }), }); }, unsubscribe(key) { let self = this; self.channelClient.unsubscribe(key); }, }, beforeMount() { let self = this; let url = `ws://${window.location.host}/ws`; self.channelClient = new WebSocketChannelClient({ url, onStateChange(value) { self.channelClientState = value; } }); self.channelClient.connect(); },})The above code…
- Creates a WebSocketChannelClient instance that maintains a WebSocket connection to our Butterfly Server .NET
- Defines a callApi() method that our client can use to invoke API calls
- Defines subscribe() and unsubscribe() methods that our client can use to subscribe/unsubscribe to specific channels on our Butterfly Server .NET
Next, edit src/App.vue to contain…
<template> <v-app> <v-content> <v-toolbar> <v-toolbar-title>My CRUD Example</v-toolbar-title> <v-spacer /> </v-toolbar> <router-view v-if="$root.channelClientState=='Connected'"/> <div class="px-5 py-5 text-xs-center" v-else> <v-progress-circular indeterminate color="primary"/> <span class="pl-2 title"> {{ $root.channelClientState }}... </span> </div> </v-content> </v-app></template>The above template will cause the main content of our page to show a loading indicator until our WebSocketChannelClient has successfully connected to our Butterfly Server .NET.
Next, edit src/components/HelloWorld.vue to contain…
<template> <v-container fluid> <!-- Contact List --> <v-list v-if="contacts.length>0"> <v-list-tile v-for="contact in contacts" :key="contact.id"> <v-list-tile-content> <v-list-tile-title> {{ contact.first_name }} {{ contact.last_name }} </v-list-tile-title> </v-list-tile-content> <v-list-tile-action> <v-btn icon @click="showDialog(true, contact)"> <v-icon>edit</v-icon> </v-btn> </v-list-tile-action> <v-list-tile-action> <v-btn icon @click="remove(contact.id)"> <v-icon>delete</v-icon> </v-btn> </v-list-tile-action> </v-list-tile> </v-list> <v-flex class="px-5 py-5 text-xs-center" v-else> - No Contacts - </v-flex> <!-- Add Contact Button --> <v-flex class="text-xs-center py-3"> <v-btn @click="showDialog(true)" color="primary"> <v-icon>add</v-icon> Add Contact </v-btn> </v-flex> <!-- Contact Dialog --> <v-dialog v-model="dialogShow" persistent max-width="500px"> <v-card> <v-card-title> <span class="headline" v-if="dialogId">Update Contact</span> <span class="headline" v-else>Add Contact</span> </v-card-title> <v-card-text> <v-container grid-list-md> <v-layout wrap> <v-flex xs12 sm6> <v-text-field label="First Name" v-model="dialogFirstName" required/> </v-flex> <v-flex xs12 sm6> <v-text-field label="Last Name" v-model="dialogLastName" required> </v-text-field> </v-flex> </v-layout> </v-container> </v-card-text> <v-card-actions> <v-spacer></v-spacer> <v-btn color="blue darken-1" flat @click="showDialog(false)">Close</v-btn> <v-btn color="blue darken-1" flat @click="save">Save</v-btn> </v-card-actions> </v-card> </v-dialog> </v-container></template><script> export default { data () { return { contacts: [], dialogShow: false, dialogId: null, dialogFirstName: null, dialogLastName: null, } }, methods: { showDialog(show, item) { this.dialogShow = show; this.dialogId = (item || {}).id; this.dialogFirstName = (item || {}).first_name; this.dialogLastName = (item || {}).last_name; }, save() { let data = { first_name: this.dialogFirstName, last_name: this.dialogLastName, }; let apiUrl; if (this.dialogId) { apiUrl = '/api/contact/update'; data.id = this.dialogId; } else { apiUrl = '/api/contact/insert'; } let self = this; this.$root.callApi(apiUrl, data) .then(res => self.dialogShow = false); }, remove(id) { this.$root.callApi('/api/contact/delete', id); }, }, mounted() { this.$root.subscribe({ channel: 'all-contacts', arrayMapping: { contact: this.contacts, }, }); }, destroyed() { this.$root.unsubscribe('all-contacts'); } }</script>So, the new HelloWorld.vue above…
- Subscribes to the all-contacts channel when the component is mounted (synchronizing all contact records on the server to a local contacts array)
- Unsubscribes to the all-contacts channel when the component is destroyed
- Shows the Contact dialog when the user clicks the Add Contact button
- Shows the Contact dialog when the user clicks the edit icon on a contact
- Invokes either /api/contact/insert or /api/contact/update when the user presses the Save button in the dialog passing the appropriate data
- Invokes /api/contact/delete when the user presses the delete icon on a contact
Trying It
In Visual Studio, run MyCrudApp. This will start the server and open a browser instance to http://localhost:8080/.
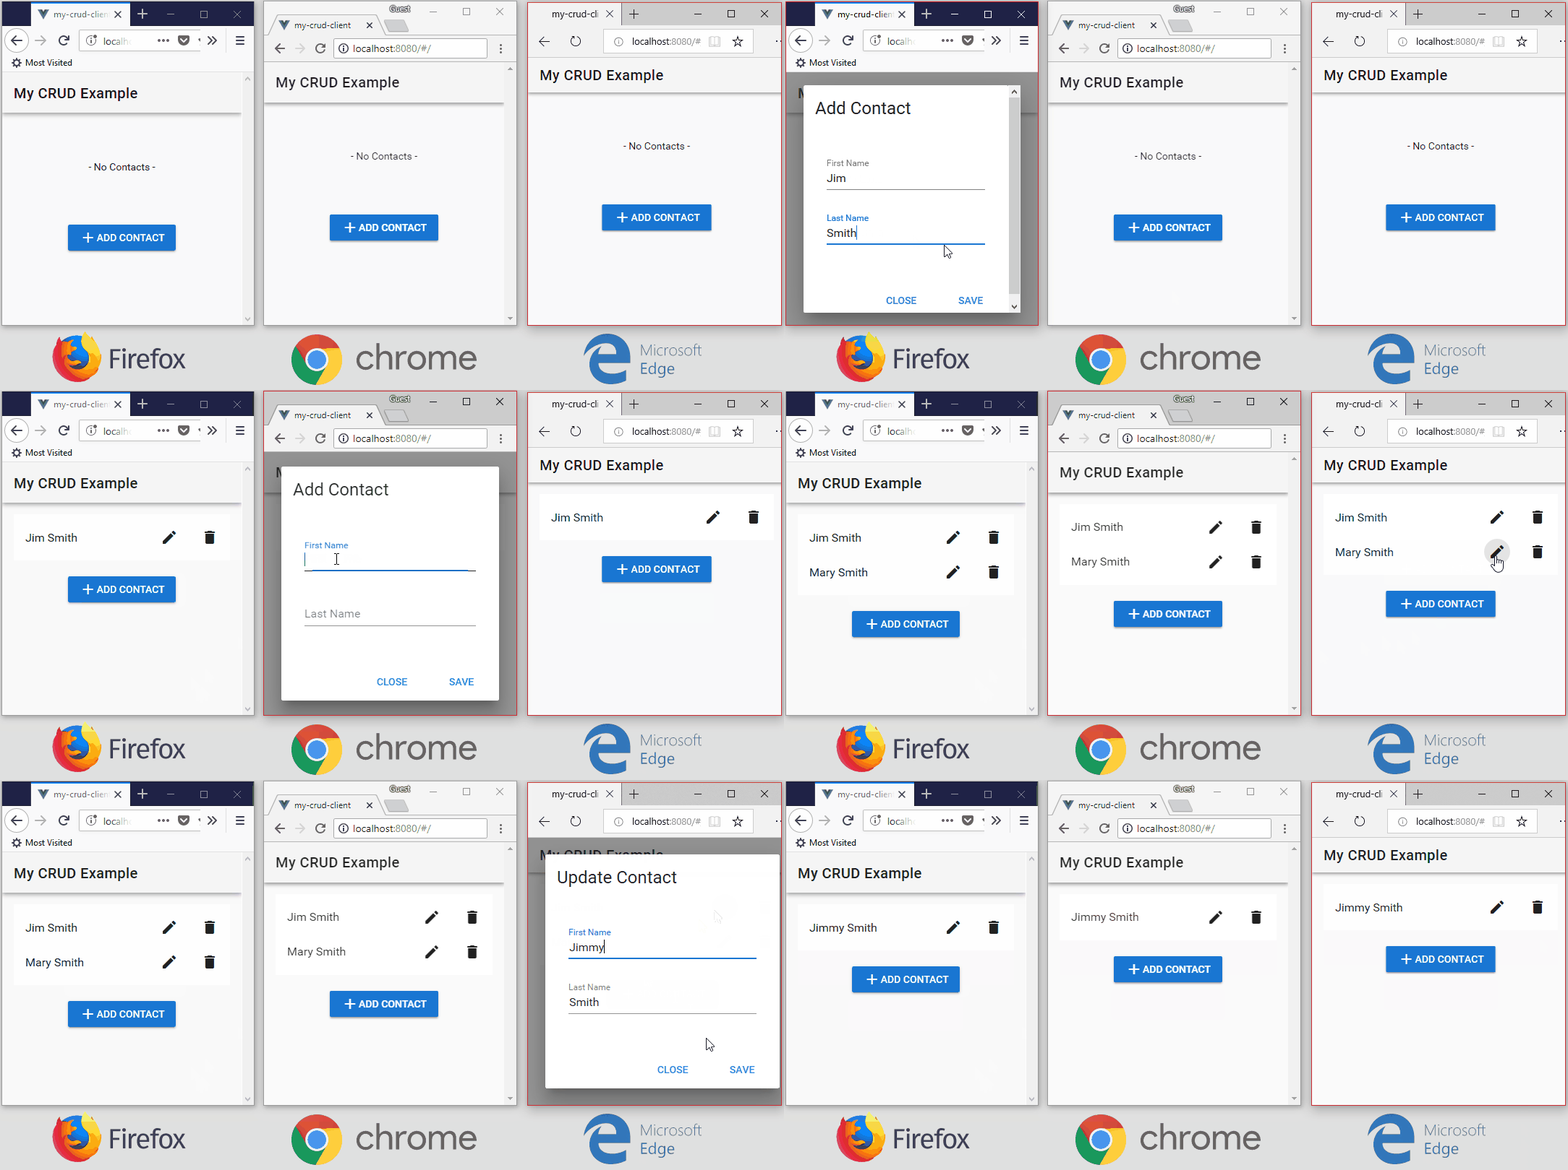
You can even open multiple browsers to http://localhost:8080/ and see how Butterfly Server .NET keeps all the connected clients synchronized…


That’s it. You’re off to a good start building a CRUD web app with Vue.js and Butterfly Server .NET.
Summary
Butterfly Server .NET allows you to build much more complex web apps where the clients automatically stay synchronized with the server. See https://butterflyserver.io for more information.
