
Kafka環境搭建(單機)
KafKa環境搭建(單機)
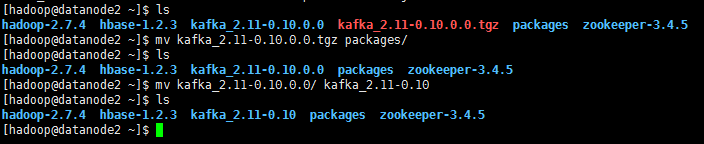
1.上傳kafka_2.11-0.10.0.0.tgz到software下面
2.解壓kafka_2.11-0.10.0.0.tgz(並將kafka安裝包放到別的資料夾中,統一管理。可以不理)
tar -zxvf kafka_2.11-0.10.0.0.tgz
![]()
3.將kafka_2.11-0.10.0.0修改成kafka_2.11-0.10
mv kafka_2.11-0.10.0.0 kafka_2.11-0.10
4.修改server.properties
cd kafka_2.11-0.10/config/
vi server.properties
log.dirs=/home/hadoop/kafka_2.11-0.10/kafka-logs
num.partitions=2
zookeeper.connect=namenode:2181,datanode1:2181,datanode2:2181


![]()
5. 啟動kafka服務
bin/kafka-server-start.sh config/server.properties &
![]()
看到INFO [Kafka Server 0], started (kafka.server.KafkaServer)啟動成功

6. 建立topic(重新開啟一個終端或是ctrl+c返回)
bin/kafka-topics.sh --create --zookeeper namenode:2181 --replication-factor 1 --partition 2 --topic test

看到create topic "test"便是建立topic成功
![]()
7.檢視日誌
cd kafka-logs/test-0
ll

8.列出topic
cd ..
cd ..
bin/kafka-topics.sh --list --zookeeper namenode:2181
看到名為test的topic

9.向topic裡寫入日誌
bin/kafka-console-producer.sh --broker-list localhost:9092 --topic test
this is a message:1
this is a message:3
this is a message:3

10.檢視kafka日誌檔案大小(重新開啟一個終端或者是ctrl+c返回)
ll kafka-logs//test-0
ll kafka-logs//test-1

11.檢視資料(datanode2上執行)
bin/kafka-console-consumer.sh --zookeeper namenode:2181 --topic test --from-beginning
![]()
看到之前輸入的資料,那麼kafka就搭建完成了(注kafka接收是沒有順序的)
this is a message:1
this is a message:3
this is a message:3

12.檢視某個topic的結構
bin/kafka-topics.sh --describe --zookeeper datanode2:2181 --topic test

13.檢視所有topic的結構
bin/kafka-topics.sh --describe --zookeeper datanode2:2181
