
[Deep Learning Lab] Episode-1: Fashion-MNIST
I prefer to use Tensorflow and Keras for my works. In the “Deep Learning Lab” series, I would like to choose Keras, which gives you an opportunity to understand how the code works even if you have minimum/no knowledge of the subject -well, not tell a lie; it needs to know a bit about Python, and also to follow the literature-.
Importing the libraries.
from __future__ import print_function
import keras
from keras.datasets import fashion_mnist
from keras.models import Sequential
from keras.layers import Dense, Dropout, Activation, Flatten
from keras.layers import Conv2D, MaxPooling2D
from keras.utils import print_summary
from keras.optimizers import Adam
from keras.regularizers import l2
import os
Initializing the parameters.
batch_size = 32 # You can try 64 or 128 if you'd like to
num_classes = 10
epochs = 100 # loss function value will be stabilized after 93rd epoch
# To save the model:
save_dir = os.path.join(os.getcwd(), 'saved_models')
model_name = 'keras_fashion_mnist_trained_model.h5'
Thanks to Keras, we can load the dataset easily.
(x_train, y_train), (x_test, y_test) = fashion_mnist.load_data()We need to reshape the data since the images in the dataset are grayscaled.
x_train = x_train.reshape(x_train.shape[0], x_train.shape[1], x_train.shape[2], 1)
x_test = x_test.reshape(x_test.shape[0], x_test.shape[1], x_test.shape[2], 1)
input_shape = (28, 28, 1)
We also need to convert the labels in the dataset into categorical matrix structure from 1-dim numpy array structure.
y_train = keras.utils.to_categorical(y_train, num_classes)
y_test = keras.utils.to_categorical(y_test, num_classes)
Enough for preprocessing. It should be :).
Now let’s build our model.
model = Sequential()
model.add(Conv2D(32, (3, 3), padding='same', kernel_regularizer=l2(0.01), input_shape=input_shape))
model.add(Activation('relu'))
model.add(Conv2D(32, (5, 5), kernel_regularizer=l2(0.01)))
model.add(Activation('relu'))
model.add(MaxPooling2D(pool_size=(2, 2)))
model.add(Dropout(0.25))
model.add(Conv2D(64, (3, 3), padding='same', kernel_regularizer=l2(0.01)))
model.add(Activation('relu'))
model.add(Conv2D(64, (5, 5), kernel_regularizer=l2(0.01)))
model.add(Activation('relu'))
model.add(MaxPooling2D(pool_size=(2, 2)))
model.add(Dropout(0.25))
model.add(Flatten())
model.add(Dense(512))
model.add(Activation('relu'))
model.add(Dropout(0.5))
model.add(Dense(num_classes))
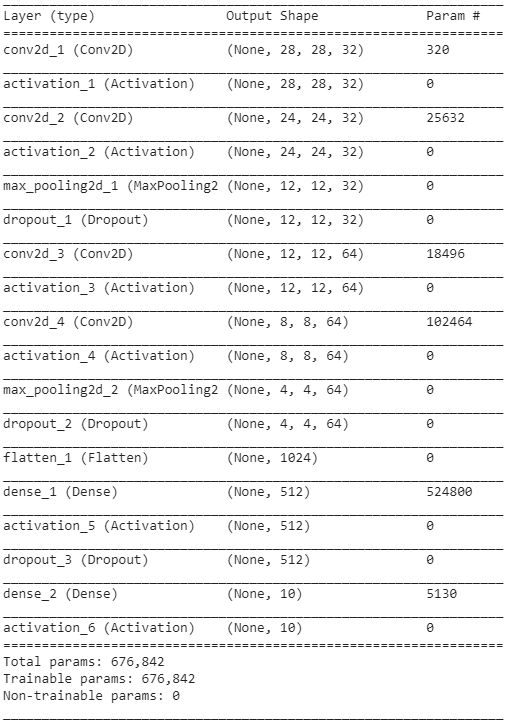
model.add(Activation('softmax'))The summary of this model could be seen below:

I used Adam (Adaptive Moment Estimation) algorithm to optimize the weights during the backpropagation. Just left the parameters default as specified in the relevant article.
opt = Adam(lr=0.001, beta_1=0.9, beta_2=0.999, epsilon=None, decay=0.0, amsgrad=False)Not enough preprocessing… We forgot to normalize the images in the dataset -LUL-.
x_train = x_train.astype('float32')
x_test = x_test.astype('float32')
x_train /= 255
x_test /= 255
We are now ready to compile our model. The categorical crossentropy function has been picked out as a loss function because we have more than 2 labels and already prepared the labels in the categorical matrix structure.
model.compile(loss='categorical_crossentropy',
              optimizer=opt,
              metrics=['accuracy'])
We are ready to train our model. GO GO GO!
model.fit(x_train, y_train,
              batch_size=batch_size,
              epochs=epochs,
              validation_data=(x_test, y_test),
              shuffle=True)
Wuhuuu! We learn a bit fast. It is very smart, isn’t it?