樸素貝葉斯(NaiveBayes)針對小資料集中文文字分類預測
阿新 • • 發佈:2018-12-30
轉自相國大人的部落格,
http://blog.csdn.net/github_36326955/article/details/54891204
做個筆記
程式碼按照1 2 3 4的順序進行即可:
1.py(corpus_segment.py)
#!/usr/bin/env python
# -*- coding: UTF-8 -*-
"""
@version: python2.7.8
@author: XiangguoSun
@contact: [email protected]
@file: corpus_segment.py
@time: 2017/2/5 15:28
@software: PyCharm
"""
import sys
import os
import jieba
# 配置utf-8輸出環境
reload(sys)
sys.setdefaultencoding('utf-8')
# 儲存至檔案
def savefile(savepath, content):
    with open(savepath, "wb") as fp:
        fp.write(content)
    '''
    上面兩行是python2.6以上版本增加的語法,省略了繁瑣的檔案close和try操作
    2.5版本需要from __future__ import with_statement
    新手可以參考這個連結來學習http://zhoutall.com/archives/325
    '''
# 讀取檔案
def readfile(path):
    with open(path, "rb") as fp:
        content = fp.read()
    return content

def corpus_segment(corpus_path, seg_path):
    '''
    corpus_path是未分詞語料庫路徑
    seg_path是分詞後語料庫儲存路徑
    '''
    catelist = os.listdir(corpus_path)  # 獲取corpus_path下的所有子目錄
    '''
    其中子目錄的名字就是類別名,例如:
    train_corpus/art/21.txt中,'train_corpus/'是corpus_path,'art'是catelist中的一個成員
    '''

    # 獲取每個目錄(類別)下所有的檔案
    for mydir in catelist:
        '''
        這裡mydir就是train_corpus/art/21.txt中的art(即catelist中的一個類別)
        '''
        class_path = corpus_path + mydir + "/"  # 拼出分類子目錄的路徑如:train_corpus/art/
        seg_dir = seg_path + mydir + "/"  # 拼出分詞後存貯的對應目錄路徑如:train_corpus_seg/art/

        if not os.path.exists(seg_dir):  # 是否存在分詞目錄,如果沒有則建立該目錄
            os.makedirs(seg_dir)

        file_list = os.listdir(class_path)  # 獲取未分詞語料庫中某一類別中的所有文字
        '''
        train_corpus/art/中的
        21.txt,
        22.txt,
        23.txt
        ...
        file_list=['21.txt','22.txt',...]
        '''
        for file_path in file_list:  # 遍歷類別目錄下的所有檔案
            fullname = class_path + file_path  # 拼出檔名全路徑如:train_corpus/art/21.txt
            content = readfile(fullname)  # 讀取檔案內容
            '''此時,content裡面存貯的是原文字的所有字元,例如多餘的空格、空行、回車等等,
            接下來,我們需要把這些無關痛癢的字元統統去掉,變成只有標點符號做間隔的緊湊的文字內容
            '''
            content = content.replace("\r\n", "")  # 刪除換行
            content = content.replace(" ", "")#刪除空行、多餘的空格
            content_seg = jieba.cut(content)  # 為檔案內容分詞
            savefile(seg_dir + file_path, " ".join(content_seg))  # 將處理後的檔案儲存到分詞後語料目錄

    print "中文語料分詞結束!!!"

'''
如果你對if __name__=="__main__":這句不懂,可以參考下面的文章
http://imoyao.lofter.com/post/3492bc_bd0c4ce
簡單來說如果其他python檔案呼叫這個檔案的函式,或者把這個檔案作為模組
匯入到你的工程中時,那麼下面的程式碼將不會被執行,而如果單獨在命令列中
執行這個檔案,或者在IDE(如pycharm)中執行這個檔案時候,下面的程式碼才會執行。
即,這部分程式碼相當於一個功能測試。
如果你還沒懂,建議你放棄IT這個行業。
'''
if __name__=="__main__":
    #對訓練集進行分詞
    corpus_path = "/home/appleyuchi/PycharmProjects/MultiNB/csdn_blog/54891204_tenwhy/chinese_text_classification-master/train/"  # 未分詞分類語料庫路徑
    seg_path = "/home/appleyuchi/PycharmProjects/MultiNB/csdn_blog/54891204_tenwhy/chinese_text_classification-master/train_corpus_seg/"  # 分詞後分類語料庫路徑,本程式輸出結果
    corpus_segment(corpus_path,seg_path)

    #對測試集進行分詞
    corpus_path = "/home/appleyuchi/PycharmProjects/MultiNB/csdn_blog/54891204_tenwhy/chinese_text_classification-master/answer/"  # 未分詞分類語料庫路徑
    seg_path = "/home/appleyuchi/PycharmProjects/MultiNB/csdn_blog/54891204_tenwhy/chinese_text_classification-master/test_corpus_seg/"  # 分詞後分類語料庫路徑,本程式輸出結果
    corpus_segment(corpus_path,seg_path)
2.py(corpus2Bunch.py)
#!/usr/bin/env python
# -*- coding: UTF-8 -*-
"""
@version: python2.7.8
@author: XiangguoSun
@contact: [email protected]
@file: corpus2Bunch.py
@time: 2017/2/7 7:41
@software: PyCharm
"""
import sys
reload(sys)
sys.setdefaultencoding('utf-8')
import os#python內建的包,用於進行檔案目錄操作,我們將會用到os.listdir函式
import cPickle as pickle#匯入cPickle包並且取一個別名pickle
'''
事實上python中還有一個也叫作pickle的包,與這裡的名字相同了,無所謂
關於cPickle與pickle,請參考博主另一篇博文:
python核心模組之pickle和cPickle講解
http://blog.csdn.net/github_36326955/article/details/54882506
本檔案程式碼下面會用到cPickle中的函式cPickle.dump
'''
from sklearn.datasets.base import Bunch
#這個您無需做過多瞭解,您只需要記住以後匯入Bunch資料結構就像這樣就可以了。
#今後的博文會對sklearn做更有針對性的講解


def _readfile(path):
    '''讀取檔案'''
    #函式名前面帶一個_,是標識私有函式
    # 僅僅用於標明而已,不起什麼作用,
    # 外面想呼叫還是可以呼叫,
    # 只是增強了程式的可讀性
    with open(path, "rb") as fp:#with as句法前面的程式碼已經多次介紹過,今後不再註釋
        content = fp.read()
    return content

def corpus2Bunch(wordbag_path,seg_path):
    catelist = os.listdir(seg_path)# 獲取seg_path下的所有子目錄,也就是分類資訊
    #建立一個Bunch例項
    bunch = Bunch(target_name=[], label=[], filenames=[], contents=[])
    bunch.target_name.extend(catelist)
    '''
    extend(addlist)是python list中的函式,意思是用新的list(addlist)去擴充
    原來的list
    '''
    # 獲取每個目錄下所有的檔案
    for mydir in catelist:
        class_path = seg_path + mydir + "/"  # 拼出分類子目錄的路徑
        file_list = os.listdir(class_path)  # 獲取class_path下的所有檔案
        for file_path in file_list:  # 遍歷類別目錄下檔案
            fullname = class_path + file_path  # 拼出檔名全路徑
            bunch.label.append(mydir)
            bunch.filenames.append(fullname)
            bunch.contents.append(_readfile(fullname))  # 讀取檔案內容
            '''append(element)是python list中的函式,意思是向原來的list中新增element,注意與extend()函式的區別'''
    # 將bunch儲存到wordbag_path路徑中
    with open(wordbag_path, "wb") as file_obj:
        pickle.dump(bunch, file_obj)
    print "構建文字物件結束!!!"

if __name__ == "__main__":#這個語句前面的程式碼已經介紹過,今後不再註釋
    #對訓練集進行Bunch化操作:
    wordbag_path = "/home/appleyuchi/PycharmProjects/MultiNB/csdn_blog/54891204_tenwhy/chinese_text_classification-master/train_word_bag/train_set.dat"  # Bunch儲存路徑,程式輸出
    seg_path = "/home/appleyuchi/PycharmProjects/MultiNB/csdn_blog/54891204_tenwhy/chinese_text_classification-master/train_corpus_seg/"  # 分詞後分類語料庫路徑,程式輸入
    corpus2Bunch(wordbag_path, seg_path)

    # 對測試集進行Bunch化操作:
    wordbag_path = "/home/appleyuchi/PycharmProjects/MultiNB/csdn_blog/54891204_tenwhy/chinese_text_classification-master/test_word_bag/test_set.dat"  # Bunch儲存路徑,程式輸出
    seg_path = "/home/appleyuchi/PycharmProjects/MultiNB/csdn_blog/54891204_tenwhy/chinese_text_classification-master/test_corpus_seg/"  # 分詞後分類語料庫路徑,程式輸入
    corpus2Bunch(wordbag_path, seg_path)
3.py(TFIDF_space.py)
#!/usr/bin/env python
# -*- coding: UTF-8 -*-
"""
@version: python2.7.8
@author: XiangguoSun
@contact: [email protected]
@file: TFIDF_space.py
@time: 2017/2/8 11:39
@software: PyCharm
"""
import sys
reload(sys)
sys.setdefaultencoding('utf-8')

from sklearn.datasets.base import Bunch
import cPickle as pickle
from sklearn.feature_extraction.text import TfidfVectorizer

def _readfile(path):
    with open(path, "rb") as fp:
        content = fp.read()
    return content

def _readbunchobj(path):
    with open(path, "rb") as file_obj:
        bunch = pickle.load(file_obj)
    return bunch

def _writebunchobj(path, bunchobj):
    with open(path, "wb") as file_obj:
        pickle.dump(bunchobj, file_obj)

def vector_space(stopword_path,bunch_path,space_path,train_tfidf_path=None):

    stpwrdlst = _readfile(stopword_path).splitlines()
    bunch = _readbunchobj(bunch_path)
    tfidfspace = Bunch(target_name=bunch.target_name, label=bunch.label, filenames=bunch.filenames, tdm=[], vocabulary={})

    if train_tfidf_path is not None:
        trainbunch = _readbunchobj(train_tfidf_path)
        tfidfspace.vocabulary = trainbunch.vocabulary
        vectorizer = TfidfVectorizer(stop_words=stpwrdlst, sublinear_tf=True, max_df=0.5,vocabulary=trainbunch.vocabulary)
        tfidfspace.tdm = vectorizer.fit_transform(bunch.contents)

    else:
        vectorizer = TfidfVectorizer(stop_words=stpwrdlst, sublinear_tf=True, max_df=0.5)
        tfidfspace.tdm = vectorizer.fit_transform(bunch.contents)
        tfidfspace.vocabulary = vectorizer.vocabulary_

    _writebunchobj(space_path, tfidfspace)
    print "tf-idf詞向量空間例項建立成功!!!"

if __name__ == '__main__':

    # stopword_path = "/home/appleyuchi/PycharmProjects/MultiNB/csdn_blog/54891204/chinese_text_classification-master/train_word_bag/hlt_stop_words.txt"#輸入的檔案
    # bunch_path = "train_word_bag/train_set.dat"#輸入的檔案
    # space_path = "train_word_bag/tfdifspace.dat"#輸出的檔案
    # vector_space(stopword_path,bunch_path,space_path)
    #
    # bunch_path = "test_word_bag/test_set.dat"#輸入的檔案
    # space_path = "test_word_bag/testspace.dat"
    # train_tfidf_path="train_word_bag/tfdifspace.dat"
    # vector_space(stopword_path,bunch_path,space_path,train_tfidf_path)

    stopword_path = "/home/appleyuchi/PycharmProjects/MultiNB/csdn_blog/54891204_tenwhy/chinese_text_classification-master/train_word_bag/hlt_stop_words.txt"#輸入的檔案

    train_bunch_path = "/home/appleyuchi/PycharmProjects/MultiNB/csdn_blog/54891204_tenwhy/chinese_text_classification-master/train_word_bag/train_set.dat"#輸入的檔案
    space_path = "/home/appleyuchi/PycharmProjects/MultiNB/csdn_blog/54891204_tenwhy/chinese_text_classification-master/train_word_bag/tfidfspace.dat"#輸出的檔案
    vector_space(stopword_path,train_bunch_path,space_path)

    train_tfidf_path = "/home/appleyuchi/PycharmProjects/MultiNB/csdn_blog/54891204_tenwhy/chinese_text_classification-master/train_word_bag/tfidfspace.dat"  # 輸入的檔案,由上面生成
    test_bunch_path = "/home/appleyuchi/PycharmProjects/MultiNB/csdn_blog/54891204_tenwhy/chinese_text_classification-master/test_word_bag/test_set.dat"#輸入的檔案
    test_space_path = "/home/appleyuchi/PycharmProjects/MultiNB/csdn_blog/54891204_tenwhy/chinese_text_classification-master/test_word_bag/testspace.dat"#輸出的檔案

    vector_space(stopword_path,test_bunch_path,test_space_path,train_tfidf_path)
4.py(NBayes_Predict.py)
#!/usr/bin/env python
# -*- coding: UTF-8 -*-
"""
@version: python2.7.8
@author: XiangguoSun
@contact: [email protected]
@file: NBayes_Predict.py
@time: 2017/2/8 12:21
@software: PyCharm
"""
import sys
reload(sys)
sys.setdefaultencoding('utf-8')

import cPickle as pickle
from sklearn.naive_bayes import MultinomialNB  # 匯入多項式貝葉斯演算法


# 讀取bunch物件
def _readbunchobj(path):
    with open(path, "rb") as file_obj:
        bunch = pickle.load(file_obj)
    return bunch

# 匯入訓練集
trainpath = "/home/appleyuchi/PycharmProjects/MultiNB/csdn_blog/54891204_tenwhy/chinese_text_classification-master/train_word_bag/tfidfspace.dat"
train_set = _readbunchobj(trainpath)

# 匯入測試集
testpath = "/home/appleyuchi/PycharmProjects/MultiNB/csdn_blog/54891204_tenwhy/chinese_text_classification-master/test_word_bag/testspace.dat"
test_set = _readbunchobj(testpath)

# 訓練分類器:輸入詞袋向量和分類標籤,alpha:0.001 alpha越小,迭代次數越多,精度越高
clf = MultinomialNB(alpha=0.01).fit(train_set.tdm, train_set.label)

# 預測分類結果
predicted = clf.predict(test_set.tdm)

for flabel,file_name,expct_cate in zip(test_set.label,test_set.filenames,predicted):
    if flabel != expct_cate:
        print file_name,": 實際類別:",flabel," -->預測類別:",expct_cate

print "預測完畢!!!"

# 計算分類精度:
from sklearn import metrics
def metrics_result(actual, predict):
    print '精度:{0:.3f}'.format(metrics.precision_score(actual, predict,average='weighted'))
    print '召回:{0:0.3f}'.format(metrics.recall_score(actual, predict,average='weighted'))
    print 'f1-score:{0:.3f}'.format(metrics.f1_score(actual, predict,average='weighted'))

metrics_result(test_set.label, predicted)
大概說下用法:
一、上面四個程式碼依次執行即可
二、要注意資料的存放方式要和轉載的部落格中一樣,資料夾的名字就是類別名字,程式碼會進行自動識別。
三、每次跑完一遍流程,跑下一次程式前,train_corpus_seg和test_corpus_seg兩個資料夾要全部刪除,不然上次殘留的結果會影響這次的預測。
同樣地,如果更換中文資料集,這兩個資料夾也要刪除,總之,執行以上程式碼的第一步驟就是檢查這兩個資料夾下面是不是空的。(當然如果是第一次執行以上四個程式碼,沒有生成這兩個資料夾,自然是不用檢查的)
另外,他這篇部落格的優點是,可以針對小資料集(資料條數不到1000,十折交叉驗證),預測概率可以達到60%~70%
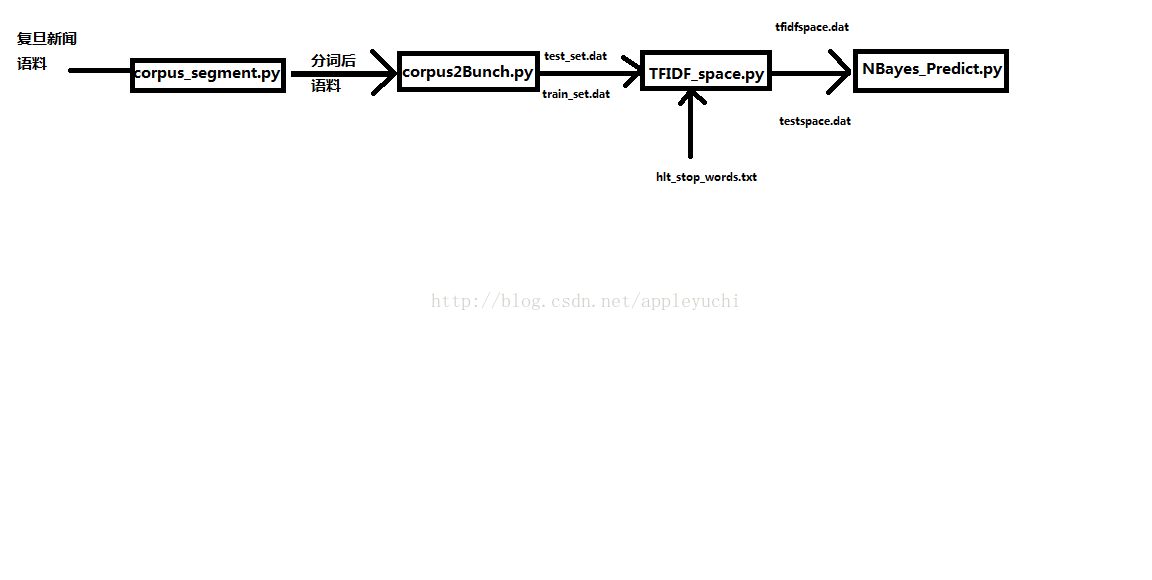
程式之間的輸入輸出關係圖