
從無到有構建Angular2 後臺管理系統的前端架構
最近公司的專案需求,需要設計一套後臺管理系統的前端框架,我使用了Angular-cli構建Angualr2的模板,並按照需求,添加了ng2-charts/ng2-smart-table/file-upload等ng2的外掛,專案的原始碼地址在:https://github.com/taoziUncle/ng2-admin-master
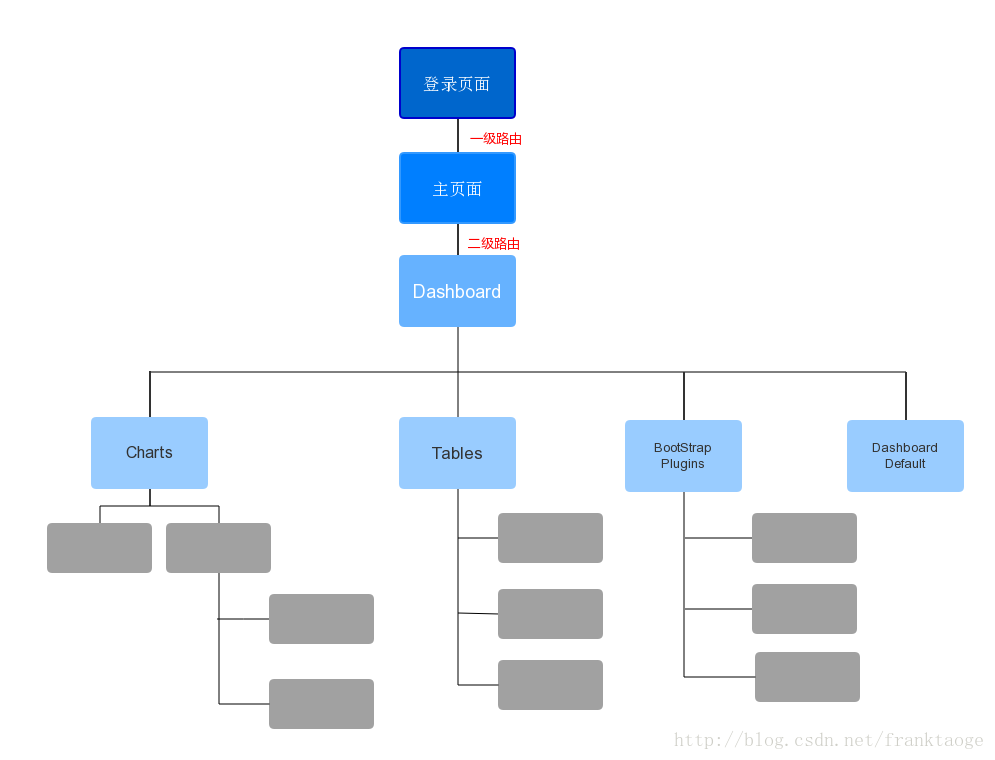
專案的結構如下:
一、自動化構建ng2專案
使用
node--version   //檢視node版本
npm -v //檢視npm版本
2、安裝angular-cli
npm install -g @angular/cli2.1、構建ng專案ng new my-app 應用程式碼位於src資料夾中。 所有的Angular元件、模板、樣式、圖片以及你的應用所需的任何東西都在那裡。 這個資料夾之外的檔案都是為構建應用提供支援用的。
| 檔案 | 用途 |
|---|---|
| node_modules/... | Node.js建立了這個資料夾,並且把package.json中列舉的所有第三方模組都放在其中。 |
| angular-cli.json | Angular-CLI的配置。 在這個檔案中,你可以設定一系列預設值,還能配置當構件專案時應該排除哪些檔案。 要了解更多,請參閱Angular-CLI的官方文件。 |
| package.json | npm配置檔案,其中列出了專案使用到的第三方依賴包。 你還可以在這裡新增自己的自定義指令碼。 |
| src | 專案所在目錄 |
2.2、執行ng專案cd my-app
ng serve 或者 npm start2.3、打包釋出ng build目錄中就會出現dist資料夾,可以看到裡面就是打包後的檔案,包含一些html、js等檔案
二、ng2 模組化結構
1、Module 模組
Angular 應用是模組化的,並且 Angular 有自己的模組系統,它被稱為 Angular 模組或 NgModules。
每個 Angular 應用至少有一個模組(根模組),習慣上命名為AppModule。
根模組在一些小型應用中可能是唯一的模組,大多數應用會有很多特性模組,每個模組都是一個內聚的程式碼塊專注於某個應用領域、工作流或緊密相關的功能。
NgModule是一個裝飾器函式,它接收一個用來描述模組屬性的元資料物件。其中最重要的屬性是:

- declarations - 宣告本模組中擁有的檢視類。 Angular 有三種檢視類:元件、指令和管道。
- exports - declarations 的子集,可用於其它模組的元件模板。
- imports - 本模組宣告的元件模板需要的類所在的其它模組。
- providers - 服務的建立者,並加入到全域性服務列表中,可用於應用任何部分。
- bootstrap - 指定應用的主檢視(稱為根元件),它是所有其它檢視的宿主。只有根模組才能設定bootstrap屬性。
2、Component 元件
元件負責控制螢幕上的一小塊區域,我們稱之為檢視。
在下方的示例程式碼中,component主要負責三件事:
- 從ng2模組庫中匯入Component,OnInit。
- 定義了元件的模板templateUrl。
- 操作模板中的資料,類似於angular1的controller。
import { Component,OnInit} from '@angular/core';

@Component({
  selector: 'app-root',
  templateUrl: './app.component.html'
})
export class AppComponent implements OnInit{
    title="";
    ngOnInit(){
        this.title = "Navigation";
    };

}
3、Template 模板
通過元件的自帶的模板來定義元件檢視。模板以 HTML 形式存在,告訴 Angular 如何渲染元件。
以上的結構ng2最基本的模組化結構,在用@angular/cli構建的專案中已經自帶了這些。三、新增第一層Route
1、新建路由模組app.routing.ts,示例程式碼如下
import {Routes, RouterModule} from '@angular/router';
import {AnalysisComponent} from './module/view.analysis';
import {LoginComponent} from './login/login.component';
const appRoutes:Routes = [
  {
    path: '',
    component: LoginComponent
  },
  {
    path: 'content',
    component: AnalysisComponent
  },
  {
    path: '**',
    component: LoginComponent
  }
];
export const routing = RouterModule.forRoot(appRoutes);
2、在根模組檔案app.mudule.ts中引入路由
import {routing}        from './app.routing';
@NgModule({
  declarations: [
    ...
  ],
  imports: [
    routing,
    ...
  ],
  providers: [
    ...
  ],
  bootstrap: [AppComponent]
})
3、頁面內使用路由進行跳轉
<a routerLink="/content" class="btn btn-primary">
    Back to Dashboard
</a>
四、新增新頁面
- 1、新建component檔案和html檔案,並將html檔案引入到component元件中。
- 2、將新建的component元件引入到路由中,並配置路由引數。
- 3、將新建的component元件引入到對應的mudule檔案,這裡是app.module.ts檔案
五、新增二級路由(難點:坑多慎行)
由於專案需求,使用者登入後進入主頁面,點選主頁面的模組進入到後臺dashboard頁面,dashboard頁面擁有自己獨立的navigation,因此需要建立子路由。
1、建立新的Child Module with Route,並引入到主Module中
如專案中的dashboard.mudule.ts2、新建一組component、html 並將html引入到component中
如專案中的
    dashboard.component.ts
    dashboard.component.html
3、將新建的component引入到子模組(Child Module)中
import { DashboardComponent } from './dashboard.component';
@NgModule({
  imports: [
      ...

  ],
  declarations: [
    DashboardComponent,
     ...
  ],
  providers: []
})
4、在子模組(Child Module)中配置路由
const tablesRoutes: Routes = [
    {
        path:'main/:id',
        component:NavComponent,
        children: [
           { path: '', component: DashboardComponent },
           { path: 'dashboard', component: DashboardComponent }
        ]
}]
注意:一定要新增一組path: '';否則會報錯
5、新建nav.component.ts檔案設定導航,並配置已新增的路由路徑。
this.dashboard = "/main/"+this.para+"/dashboard"
    this.routers = [
      {
        href: this.dashboard,
        name: "Dashboard",
        type: false
      }
    ];
6、在nav.component.html檔案中實現跳轉。
<a routerLink="{{dashboard}}"><span> Dashboard </span></a>六、二級路由層新增新頁面(重點)
之所以說這部分是重點,因為絕大多數的頁面新增都在這一層,第一層路由中的頁面很少,只作為匯入層。而第二層路由是使用者到達Dashboard之後,所有頁面的顯示。
以charts為例:
1、在app資料夾內新建charts資料夾
2、在charts資料夾內新建linecharts資料夾
3、在linecharts資料夾內新建一組元件和模板,如lineCharts.component.ts和lineCharts.component.html,並將html繫結在component元件內。
lineCharts.component.ts 檔案內:

@Component({
  selector: 'app-charts',
  templateUrl: './lineCharts.component.html',
})
4、在二級路由檔案內新增lineCharts的路由
(1)imporant lineCharts component
import { lineChartsComponent } from '../charts/lineCharts/lineCharts.component';

(2)config Routs for lineCharts
const tablesRoutes: Routes = [
    {
        path:'main/:id',
        component:NavComponent,
        children: [
           { path: '', component: DashboardComponent },
           { path: 'dashboard', component: DashboardComponent },
           { path: 'lineCharts', component: lineChartsComponent }
        ]
    }
]

(3)declare lineChartsComponent
@NgModule({
  imports: [
      ...
  ],
  declarations: [
    lineChartsComponent,
    ...
  ],
  providers: []
})
5、nav.Component.ts導航元件內新增lineCharts路由
export class NavComponent implements OnInit {
(1)宣告lineCharts變數
    public lineCharts = "";
    ngOnInit() {
(2)將lineCharts路由路徑命名給變數this.lineCharts
        this.lineCharts = "/main/"+this.para+"/lineCharts";
    ...
(3)從介面獲取this.routers的值,示例程式碼如下:
    this.routers = [
      {
        href: this.dashboard,
        name: "Dashboard",
        type: false
      },
      {
        href: 'charts',
        name: "Charts",
        type: true,
        child: [
          {href: this.lineCharts, name: "Line Charts"},
          ...
        ]
      },
      ...
    ];
  };
}
6、lineCharts.component.ts中配置active時狀態
ngOnInit(){
        this.parent.setActiveByPath("charts",this.parent.lineCharts);
    };
由於nav.component.html中已經配置好動態獲取導航的方法,現在導航已經可以顯示在導航欄上,並可完成跳轉。
七、新增外掛(必看)
原則:ng2能解決的事別麻煩外人
在ng2-admin-master框架中,已經集成了三個外掛供使用:
由於一般的ng2專案中只有一個根module,因此所有的ng2外掛的官方說明都是針對只有一個根module的,在多級路由的專案中就會有坑出現,因此這一部分標為‘必看’,以ng2-smart-table為例:
1.按照ng2-smart-table官網的介紹下載:
npm install --save ng2-smart-table2.新增到二級module中,注意不是根module
import { Ng2SmartTableModule } from 'ng2-smart-table';

// ...

@NgModule({
  imports: [
    // ...

    Ng2SmartTableModule,

    // ...
  ],
  declarations: [ ... ]
})
// ...
3.在相應的元件中就可以直接使用了
八 bug修復
1 解決build後angular2頁面重新整理後報404錯誤辦法:
配置app.module.ts
import {PathLocationStrategy, LocationStrategy} from '@angular/common';

@NgModule({
  declarations: [AppCmp],
  bootstrap: [AppCmp],
  imports: [BrowserModule, routes],
  providers: [{provide: LocationStrategy, useClass: HashLocationStrategy]
]);
2 build後base路徑修復
解決方案: 在package.json檔案的scripts中新增命令:
"build":"ng build --base-href ./"

–base-href後面替換成打包後的base路徑

執行:
npm run build