CentOS 7安裝Oracle 11gR2以及設定自啟動(2)
6、建立表空間和使用者授權
(1)、連線資料庫
$ sqlplus / as sysdba

(2)、建立資料庫表空間
語法:
create tablespace 表空間名
datafile ‘實體地址(相當於檔案路徑)’
size初始大小(單位M)
autoextend on next每次自增的大小(單位M)
maxsize unlimited (此關鍵字用於不限制表空間大小)
SQL> create tablespace test1_teblespace
datafile '/usr/oracle/oradata/orcl/test1_teblespace.dbf'
size 500M
autoextend on next 100M
maxsize unlimited;

(3)、建立使用者並指定表空間
語法:
create user 使用者名稱 identified by 口令[即密碼] default tablespace 表空間名;
SQL> create user test1 identified by test1 default tablespace test1_teblespace;

(4)、給使用者授予許可權
語法:
grant 許可權1, 許可權2, 許可權3…… to 使用者名稱
SQL> grant connect,resource,dba to test1;

(5)、刪除表空間
語法:
drop tablespace 表空間名 including contents and datafiles cascade constraints;
SQL> drop tablespace test1_teblespace including contents and datafiles cascade constraints;

including contents   刪除表空間中的內容,如果刪除表空間之前表空間中有內容,而未加此引數,表空間無法刪除。
including datafiles  刪除表空間中的資料檔案
cascade constraints  同時刪除表空間中表的外來鍵參照
(6)、刪除使用者
語法:
drop user 使用者名稱 cascade;
最後這個級聯特別有用(刪除使用者以及所有關聯的資料庫物件)
SQL> drop user test1 cascade;

四、 設定資料庫自啟動
方法一:
1、安裝好Oracle資料庫後: 執行 dbstart和dbshut
$ dbshut
$ dbstart

錯誤原因:dbstart和dbshut指令碼檔案中ORACLE_HOME_LISTNER的設定有問題
分別開啟兩個檔案修改如下內容
ORACLE_HOME_LISTNER=$1
修改為:
ORACLE_HOME_LISTNER=$ORACLE_HOME
$ vim $ORACLE_HOME/bin/dbstart

$ vi $ORACLE_HOME/bin/dbshut

修改後儲存退出,問題解決
2、Linux啟動時自動啟動Oracle監聽和例項
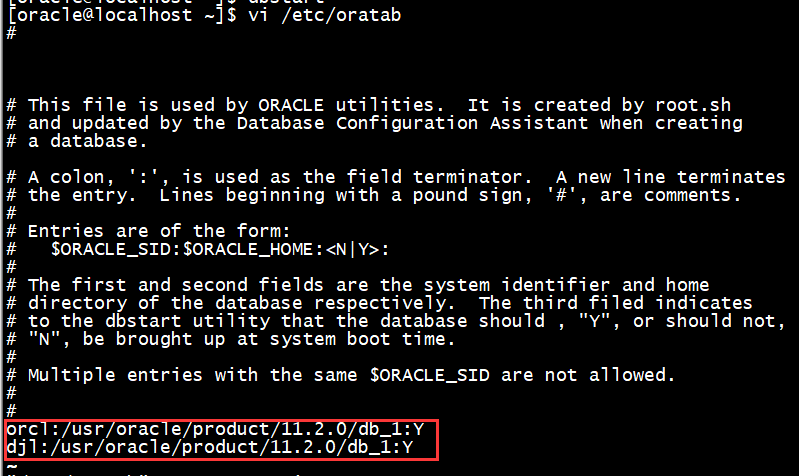
第一步:修改/etc/oratab檔案
找到:   orcl:/usr/oracle/product/11.2.0/db_1:N
修改為: orcl:/usr/oracle/product/11.2.0/db_1:Y
(這個路徑跟安裝路徑有關,$ORACLE_SID:$ORACLE_HOME:<N|Y>)
$ vi /etc/oratab

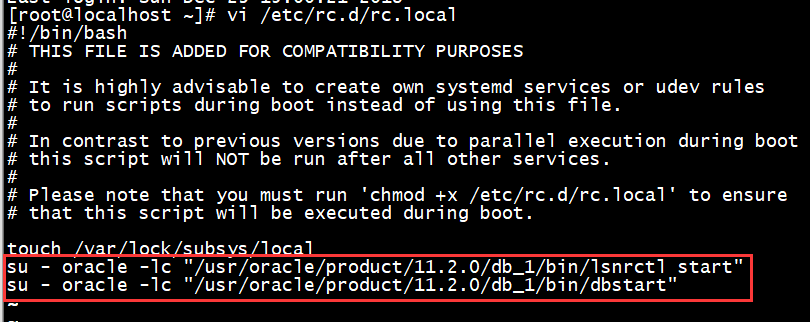
第二步:把lsnrctl start和dbstart新增到rc.local檔案中:
root許可權執行
# vi /etc/rc.d/rc.local
新增:
su - oracle -lc "/usr/oracle/product/11.2.0/db_1/bin/lsnrctl start"
su - oracle -lc "/usr/oracle/product/11.2.0/db_1/bin/dbstart"

說明:
第一行為開機啟動資料庫監聽服務,第二行為開機啟動資料庫。(路徑跟安裝路徑相關)。
注意:CentOs7中/etc/rc.d/rc.local不會開機執行,需新增執行許可權。
檢視/etc/rc.d/rc.local的許可權
# ll /etc/rc.d/rc.local

新增執行許可權
# chmod +x /etc/rc.d/rc.local

3、重啟電腦後檢視是否自啟動成功
# reboot
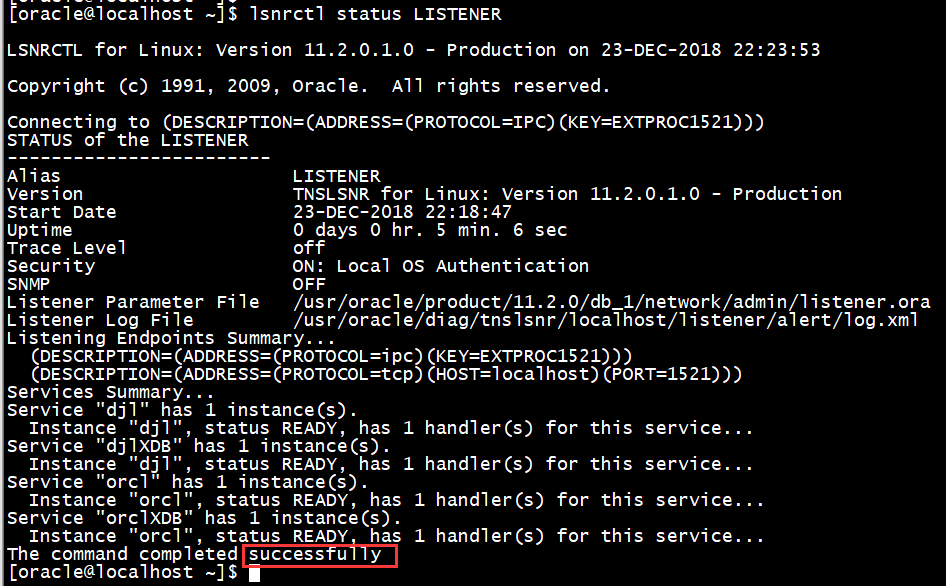
檢視監聽是否自啟動成功
$ lsnrctl status LISTENER

檢視Oracle服務狀態
$ ps -aux | grep oracle

4、oracle的啟動或關閉管理
啟動
$ dbstart

關閉
$ dbshut

方法二:
1、修改/etc/oratab檔案
找到:   orcl:/usr/oracle/product/11.2.0/db_1:N
修改為: orcl:/usr/oracle/product/11.2.0/db_1:Y
(這個路徑跟安裝路徑有關,$ORACLE_SID:$ORACLE_HOME:<N|Y>)
2、新建oracle自啟動服務指令碼
[[email protected] oracle]# vi /etc/init.d/oracle
將以下指令碼複製到檔案中,儲存退出(:wq)
#!/bin/sh
# chkconfig: 2345 61 61
# description: Oracle 11g R2 AutoRun Servimces
# /etc/init.d/oracle
#
# Run-level Startup script for the Oracle Instance, Listener, and
# Web Interface
export ORACLE_BASE=/usr/oracle                                          #oracle安裝位置
export ORACLE_HOME=$ORACLE_BASE/product/11.2.0/db_1                     #Oracle安裝路徑
export ORACLE_SID=orcl
export PATH=$PATH:$ORACLE_HOME/bin
ORA_OWNR="oracle"
# if the executables do not exist -- display error
if [ ! -f $ORACLE_HOME/bin/dbstart -o ! -d $ORACLE_HOME ]
then
echo "Oracle startup: cannot start"
exit 1
fi
# depending on parameter -- startup, shutdown, restart
# of the instance and listener or usage display
case "$1" in
start)
# Oracle listener and instance startup
su $ORA_OWNR -lc $ORACLE_HOME/bin/dbstart
echo "Oracle Start Succesful!OK."
;;
stop)
# Oracle listener and instance shutdown
su $ORA_OWNR -lc $ORACLE_HOME/bin/dbshut
echo "Oracle Stop Succesful!OK."
;;
reload|restart)
$0 stop
$0 start
;;
*)
echo $"Usage: `basename $0` {start|stop|reload|reload}"
exit 1
esac
exit 0
3、檢查指令碼能否執行
[[email protected] oracle]# /etc/init.d/oracle start            #啟動oracle指令碼
[[email protected] oracle]# /etc/init.d/oracle stop             #關閉oracle指令碼
[[email protected] oracle]# /etc/init.d/oracle restart          #重啟oracle指令碼
4、新增執行許可權並建立連結
更改oracle指令碼的執行許可權
[[email protected] oracle]# chmod a+x /etc/init.d/oracle
建立連結
將啟動指令碼新增到系統服務並設定自啟動
[[email protected] oracle]# chkconfig --add oracle
當這個命令被執行的時候,會去指令碼檔案oracle中尋找# chkconfig: 2345 61 61這行註釋,並解析這行註釋,根據解析結果分別在
/etc/rc.d/rc2.d
/etc/rc.d/rc3.d
/etc/rc.d/rc4.d
/etc/rc.d/rc5.d
中建立符號連線檔案S61oracle,此檔案在系統啟動時根據執行級別執行,此檔案是指向/etc/init.d/oracle檔案。啟動時系統向此檔案傳送一個start引數,執行oracle檔案中的start分支。另外還會在
/etc/rc.d/rc0.d
/etc/rc.d/rc1.d
/etc/rc.d/rc6.d
中建立符號連線檔案K61oracle,此檔案在系統關閉時執行,此檔案也指向/etc/init.d/oracle檔案,關閉時系統向此檔案傳送一個stop引數,執行oracle檔案中的stop分支。
# chkconfig: 2345 61 61
# 表明指令碼應該在執行級 2, 3, 4, 5 啟動,啟動優先權為61,停止優先權為 61。
修改服務執行等級(雖然腳本里寫過,但還是重新設定一下),可以自行設定oracle指令碼的執行級別
[[email protected] oracle]# chkconfig --level 2345 oracle on
說明:設定oracle指令碼在執行級別為2、3、4、5時,都是on(開啟)狀態,off為關閉
檢視oracle自動啟動設定
[[email protected] oracle]# chkconfig –list oracle
Oracle   0:off 1:off 2:on 3:on 4:on 5:on 6:off
等級0表示:表示關機
等級1表示:單使用者模式
等級2表示:無網路連線的多使用者命令列模式
等級3表示:有網路連線的多使用者命令列模式
等級4表示:不可用
等級5表示:帶圖形介面的多使用者模式
等級6表示:重新啟動
手動建立符號連結檔案(執行效果和執行chkconfig --add oracle是一樣,作為知識筆記記錄,可以不執行)
[[email protected] oracle]# ln –s /etc/rc.d/init.d/oracle /etc/rc0.d/K61oracle
[[email protected] oracle]# ln –s /etc/rc.d/init.d/oracle /etc/rc1.d/K61oracle
[[email protected] oracle]# ln –s /etc/rc.d/init.d/oracle /etc/rc2.d/S61oracle
[[email protected] oracle]# ln –s /etc/rc.d/init.d/oracle /etc/rc3.d/S61oracle
[[email protected] oracle]# ln –s /etc/rc.d/init.d/oracle /etc/rc4.d/S61oracle
[[email protected] oracle]# ln –s /etc/rc.d/init.d/oracle /etc/rc5.d/S61oracle
[[email protected] oracle]# ln –s /etc/rc.d/init.d/oracle /etc/rc6.d/K61oracle
5、oracle的啟動或關閉管理
啟動
[[email protected] oracle]# service oracle start
停止
[[email protected] oracle]# service oracle stop
重啟
[[email protected] oracle]# service oracle restart
參考部落格
CentOS 7安裝Oracle 11gR2以及設定自啟動
https://www.cnblogs.com/VoiceOfDreams/p/8308601.html
