
Flink原始碼系列——指標監測
1、Metric簡介
Flink對於指標監測有一套自己的實現,指標的統計方式有四種,這些指標都實現了Metric這個介面,而Metric這個介面只是一個標識,本身並沒有定義如何方法介面,部分子類的繼承關係如下所示。
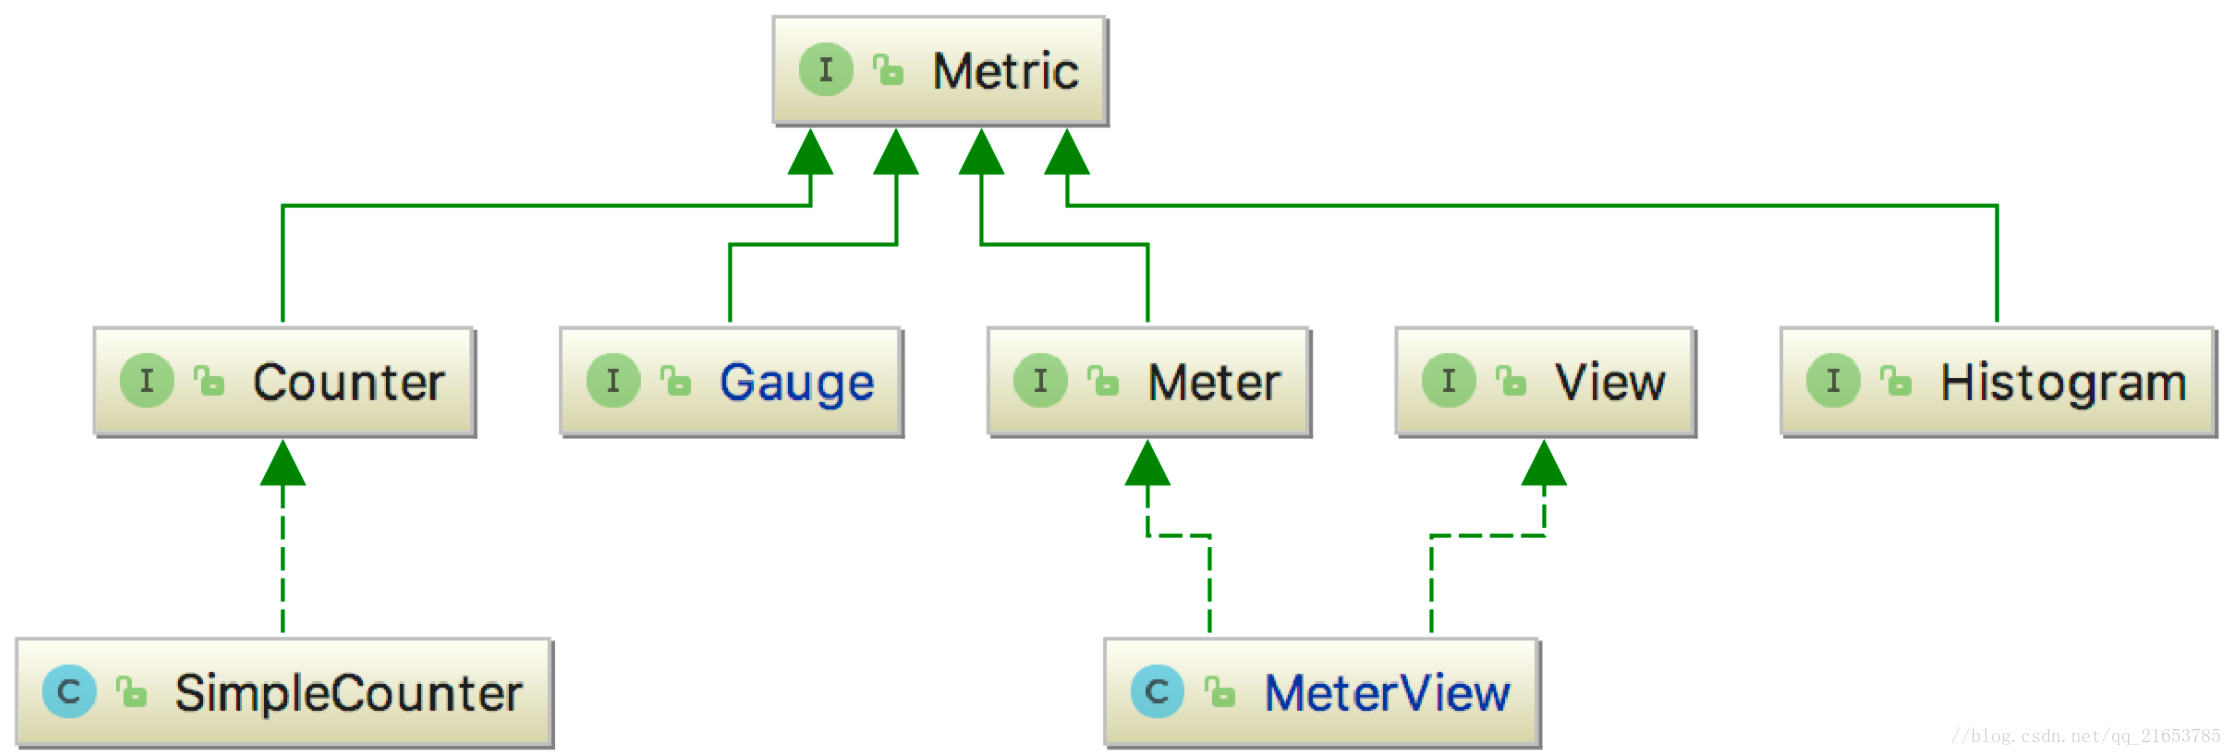
從圖中可以看出,Metric這個介面有四個直接子類,分別是:
Gauge —— 最簡單的度量指標,只是簡單的返回一個值,比如返回一個佇列中當前元素的個數;
Counter —— 計數器,在一些情況下,會比Gauge高效,比如通過一個AtomicLong變數來統計一個佇列的長度;
Meter —— 吞吐量的度量,也就是一系列事件發生的速率,例如TPS;
Histogram —— 度量值的統計結果,如最大值、最小值、平均值,以及分佈情況等。
以MeterView為例,分析一個Metric的具體實現。MeterView還實現View介面,實現View介面的類,表示其會定期的執行update方法,進行資料的更新。
public class MeterView implements Meter, View {
/** 底層使用的計算器 */
private final Counter counter;
/** 計算平均值的事件跨度 */
private final int timeSpanInSeconds;
/** 包含歷史資料的迴圈陣列 */
private final long[] values;
/** 當前時間在陣列中的索引 */ 從類的屬性變數中可以看出,MeterView是在一個Counter計數器的基礎之上,封裝了一層,從而實現事件每秒的平均速率。以values這個長整型的陣列,作為環形陣列,實現對最新的歷史資料的儲存。
在建構函式中,會對入參timeSpanInSeconds這個時間跨度進行修正,使其剛好是UPDATE_INTERVAL_SECONDS的整數倍,另外values陣列的長度是timeSpanInSeconds對UPDATE_INTERVAL_SECONDS倍數,再加上1,這樣這個陣列的最新資料和最老的資料之間的時間間隔就剛好是timeSpanInSeconds。
假設values陣列的長度為n,則:
1、索引n-1處的統計值,和索引0處的統計值,時間間隔就是timeSpanInSeconds;
2、由於是環形陣列,所以索引0處的統計值,和索引1處的統計值的時間間隔就是timeSpanInSeconds;
3、所以索引i處的統計值,和索引(i+1)%n處的統計值,時間間隔是timeSpanInSeconds;
這個邏輯理清楚了,對update方法的邏輯也就清楚了。
2、MetricGroup
為了便於對Metric進行方便的管理和區分,可以對Metric進行分組,MetricGroup就是用來實現這個功能的。
MetricGroup的相關子類的繼承關係如下所示。
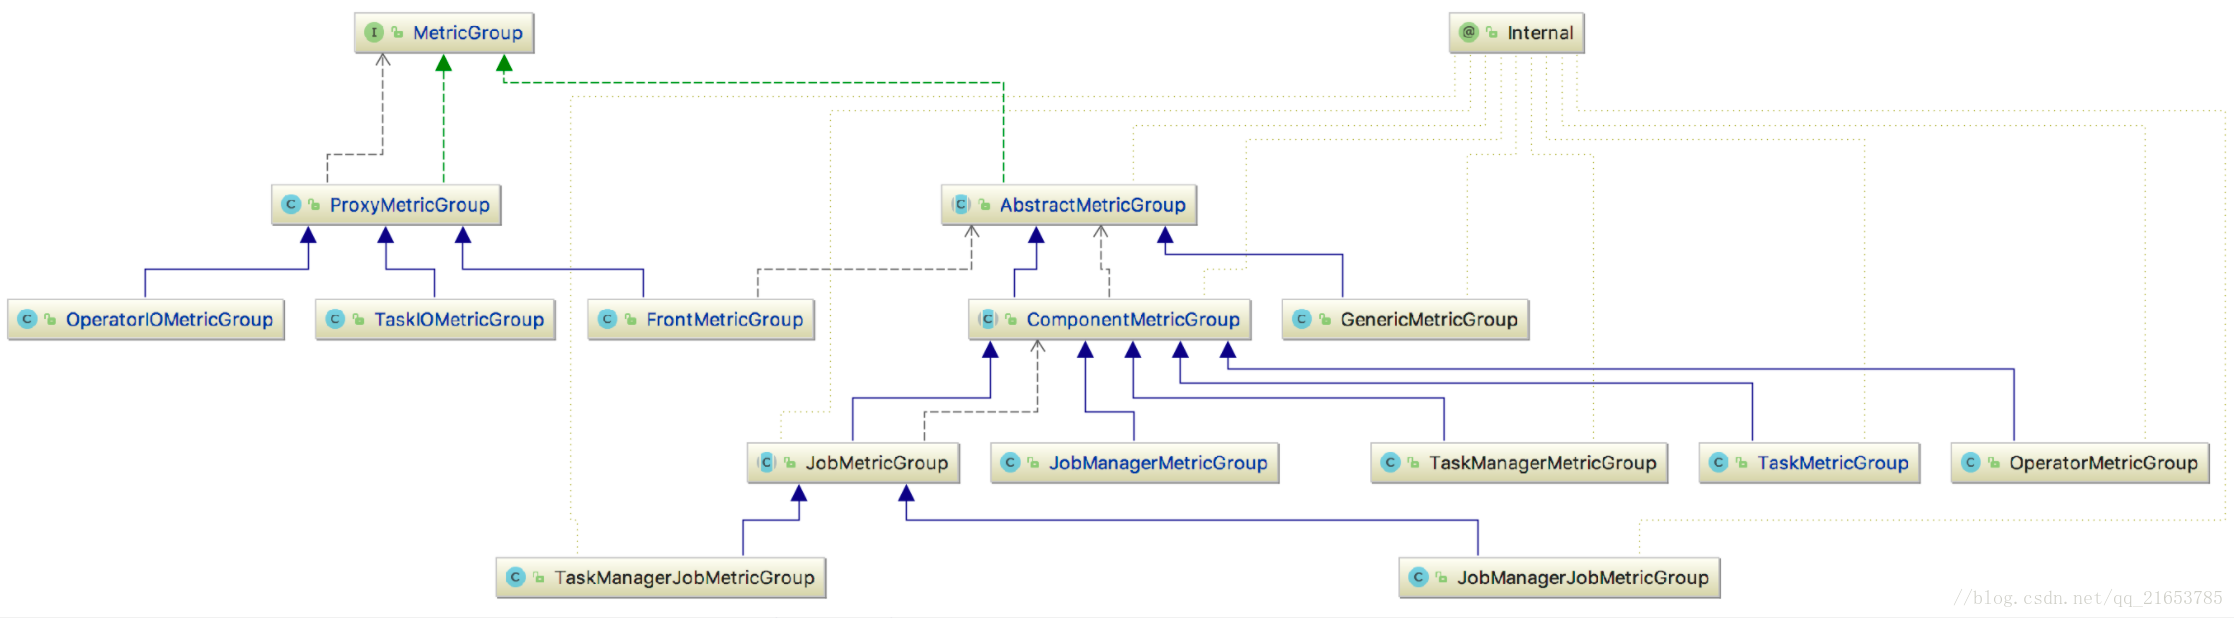
1、ProxyMetricGroup —— 這是一個代理類,就是把新Metric或者新的子MetricGroup的註冊,委託給代理MetricGroup進行處理;
2、AbstractMetricGroup —— 對新增Metric和子MetricGroup的相關方法進行了實現;
在AbstractMetricGroup中有這些屬性
protected final A parent;
private final Map<String, Metric> metrics = new HashMap<>();
private final Map<String, AbstractMetricGroup> groups = new HashMap<>();
parent —— 用來儲存這個MetricGroup的父MetricGroup
metrics —— 這個map,是用來儲存當前MetricGroup中註冊的Metric;
groups —— 這個map,是用來儲存當前MetricGroup中註冊子MetricGroup;
通過這個資料結構可以看出,在MetricGroup中,可以建立一個樹狀的結構,用來儲存和歸類相關的Metric。
3、MetricReporter
MetricReporter是用來向外披露Metric的監測結果的介面。
由於MetricReporter的子類在例項化時,都是通過反射機制,所以對於其實現子類,需要有一個公共,無參的建構函式,這個介面的定義如下:
public interface MetricReporter {
   void open(MetricConfig config);
   void close();
   void notifyOfAddedMetric(Metric metric, String metricName, MetricGroup group);
   void notifyOfRemovedMetric(Metric metric, String metricName, MetricGroup group);
}
open —— 由於子類都是用無參建構函式,通過反射進行例項化,所以相關初始化的工作都是放在這裡進行的,並且這個方法需要在例項化後,就需要呼叫該方法進行相關初始化的工作;
close —— 這裡就是在關閉時,進行資源回收等相關操作的;
notifyOfAddedMetric —— 當有一個新的Metric註冊時,會呼叫該方法來通知MetricReporter;
notifyOfRemovedMetric —— 當有一個Metric被移除時,通過這個方法來通知MetricReporter;
4、MetricRegistry
MetricGroup是用來對Metric進行分組管理,MetricReporter是用來對外披露Metric,而MetricRegistry就是這兩者之間的橋樑,通過MetricRegistry,就可以讓MetricReporter感知到在MetricGroup中的Metric發生的變化情況。
對於MetricRegistry這個介面,其實現為MetricRegistryImpl,而其在例項化時,建構函式的入參是一個MetricRegistryConfiguration例項。
4.1、MetricRegistryConfiguration
MetricRegistryConfiguration顧名思義,就是MetricRegistry的相關配置引數,主要有三個屬性,如下:
/** flink中不同元件的範圍格式 */
private final ScopeFormats scopeFormats;

/** 字串的分隔符,這是一個全域性的分隔符 */
private final char delimiter;

/** 配置中每個reporter的名稱和其對應的配置物件的列表 */
private final List<Tuple2<String, Configuration>> reporterConfigurations;
這些屬性,都是從配置引數中獲取而來,邏輯如下:
public static MetricRegistryConfiguration fromConfiguration(Configuration configuration) {
   /** 獲取scopeFormats */
   ScopeFormats scopeFormats;
   try {
      scopeFormats = ScopeFormats.fromConfig(configuration);
   } catch (Exception e) {
      LOG.warn("Failed to parse scope format, using default scope formats", e);
      scopeFormats = ScopeFormats.fromConfig(new Configuration());
   }

   /** 獲取分隔符 */
   char delim;
   try {
      delim = configuration.getString(MetricOptions.SCOPE_DELIMITER).charAt(0);
   } catch (Exception e) {
      LOG.warn("Failed to parse delimiter, using default delimiter.", e);
      delim = '.';
   }

   /** 獲取MetricReporter相關的配置資訊,MetricReporter的配置格式是 metrics.reporters = foo, bar */
   final String definedReporters = configuration.getString(MetricOptions.REPORTERS_LIST);
   List<Tuple2<String, Configuration>> reporterConfigurations;

   if (definedReporters == null) {
      /** 如果沒有配置,則返回空集合 */
      reporterConfigurations = Collections.emptyList();
   } else {
      /** 按模式匹配分割,如上述的配置,則namedReporters={"foo", "bar"} */
      String[] namedReporters = splitPattern.split(definedReporters);

      reporterConfigurations = new ArrayList<>(namedReporters.length);

      for (String namedReporter: namedReporters) {
         /**
          * 這裡是獲取一個代理配置物件,就是在原來配置物件的基礎上,在查詢key時,需要加上這裡配置的字首,
          * 如 metrics.reporter.foo. ,這樣就可以獲取特定reporter的配置
          */
         DelegatingConfiguration delegatingConfiguration = new DelegatingConfiguration(
            configuration,
            ConfigConstants.METRICS_REPORTER_PREFIX + namedReporter + '.');

         reporterConfigurations.add(Tuple2.of(namedReporter, (Configuration) delegatingConfiguration));
      }
   }

   return new MetricRegistryConfiguration(scopeFormats, delim, reporterConfigurations);
}
4.1.1 ScopeFormat
上述的ScopeFormats也是配置物件中獲取的,如下:
public static ScopeFormats fromConfig(Configuration config) {
   String jmFormat = config.getString(MetricOptions.SCOPE_NAMING_JM);
   String jmJobFormat = config.getString(MetricOptions.SCOPE_NAMING_JM_JOB);
   String tmFormat = config.getString(MetricOptions.SCOPE_NAMING_TM);
   String tmJobFormat = config.getString(MetricOptions.SCOPE_NAMING_TM_JOB);
   String taskFormat = config.getString(MetricOptions.SCOPE_NAMING_TASK);
   String operatorFormat = config.getString(MetricOptions.SCOPE_NAMING_OPERATOR);

   return new ScopeFormats(jmFormat, jmJobFormat, tmFormat, tmJobFormat, taskFormat, operatorFormat);
}
這裡就需要介紹ScopeFormat,其類繼承關係如下:

從圖中可以看出,Flink中的每個元件,都有對應的格式。
首先看下ScopeFormat中的主要屬性物件:
/** 這是原生格式,比如 <host>.jobmanager ,如果為空,則是 <empty> */
private final String format;

/** format按照分割符分割後的陣列,如 template= {"<host>", "jobmanager”},被<>包裹的元素,是變數元素 */
private final String[] template;

/** 這是template陣列中,變數元素的索引,如"<host>"是變數,在template中的索引是0,則 templatePos = {0} */
private final int[] templatePos;

/** 這個是template中變數元素對應的真實的值,在values陣列中的位置,詳見 建構函式 和 #bindVariables方法 */
private final int[] valuePos;
這裡以JobManagerScopeFormat為例進行分析說明,在ScopeFormats中,預設傳給JobManagerScopeFormat的建構函式的入參值是 .jobmanager 。
則JobManagerScopeFormat的構造過程如下:
/** format的預設值是 <host>.jobmanager */
public JobManagerScopeFormat(String format) {
   super(format, null, new String[] {
      SCOPE_HOST
   });
}
接著看起父類ScopeFormat的構造過程:
/** 接上面,入參值為 format="<host>.jobmanager" ,parent=null , variables={"<host>"} */
protected ScopeFormat(String format, ScopeFormat parent, String[] variables) {
   checkNotNull(format, "format is null");

   /** 將format這個字串分割, rawComponents = {"<host>", "jobmanager"} */
   final String[] rawComponents = format.split("\\" + SCOPE_SEPARATOR);

   /** 根據rawComponents的第一個元素是為"*",來判斷是否要繼承父組的範圍 */
   final boolean parentAsPrefix = rawComponents.length > 0 && rawComponents[0].equals(SCOPE_INHERIT_PARENT);
   if (parentAsPrefix) {
      /** 需要繼承父組的範圍,而父組有是null,則丟擲異常 */
      if (parent == null) {
         throw new IllegalArgumentException("Component scope format requires parent prefix (starts with '"
            + SCOPE_INHERIT_PARENT + "'), but this component has no parent (is root component).");
      }

      /** 如果以 "*." 開頭,則format至少需要有3個字元,否則就是無效字元,設定為 "<empty>" */
      this.format = format.length() > 2 ? format.substring(2) : "<empty>";

      String[] parentTemplate = parent.template;
      int parentLen = parentTemplate.length;

      /** 將父組的範圍和自身的範圍,合併到一起 */
      this.template = new String[parentLen + rawComponents.length - 1];
      System.arraycopy(parentTemplate, 0, this.template, 0, parentLen);
      System.arraycopy(rawComponents, 1, this.template, parentLen, rawComponents.length - 1);
   }
   else {
      /** 不需要繼承父組的範圍,則直接賦值,format="<host>.jobmanager",template={"<host>", "jobmanager"} */
      this.format = format.isEmpty() ? "<empty>" : format;
      this.template = rawComponents;
   }

   /** 將 variables={"<host>"} 轉換為map {"<host>" -> 0} */
   HashMap<String, Integer> varToValuePos = arrayToMap(variables);
   List<Integer> templatePos = new ArrayList<>();
   List<Integer> valuePos = new ArrayList<>();

   for (int i = 0; i < template.length; i++) {
      final String component = template[i];
      /** 檢查當前這個元件是否是一個變數 */
      if (component != null && component.length() >= 3 &&
            component.charAt(0) == '<' && component.charAt(component.length() - 1) == '>') {
         /** 這是一個變數,則從上面的map中,獲取其索引 */
         Integer replacementPos = varToValuePos.get(component);
         if (replacementPos != null) {
            templatePos.add(i);
            valuePos.add(replacementPos);
         }
      }
   }

   this.templatePos = integerListToArray(templatePos);
   this.valuePos = integerListToArray(valuePos);
}
經過這個構造過程,ScopeFormat中的四個屬性的值如下:
format = “.jobmanager”
template = {“”, “jobmanager”}
templatePos = {0}
valuePos = {0}
對於JobManagerScopeFormat來說,構建一個具體的範圍陣列的邏輯如下:
public String[] formatScope(String hostname) {
   /** 獲取template陣列的一份拷貝,深拷貝 */
   final String[] template = copyTemplate();
   final String[] values = { hostname };
   /** 使用hostname替換掉template中索引為0的元素<host> */
   return bindVariables(template, values);
}

protected final String[] copyTemplate() {
   String[] copy = new String[template.length];
   System.arraycopy(template, 0, copy, 0, template.length);
   return copy;
}

/** 在結合這個邏輯,就知道ScopeFormat中的屬性valuePos的作用了 */
protected final String[] bindVariables(String[] template, String[] values) {
   final int len = templatePos.length;
   for (int i = 0; i < len; i++) {
      template[templatePos[i]] = values[valuePos[i]];
   }
   return template;
}
4.2 MetricRegistryImpl
在獲取了MetricRegistryConfiguration例項後,在看MetricRegistryImpl的建構函式的實現邏輯。
this.executor = Executors.newSingleThreadScheduledExecutor(new ExecutorThreadFactory("Flink-MetricRegistry"));這裡給executor這個屬性,設定了一個單執行緒可排程的執行器。
接下來主要看下對MetricReporter相關的初始化工作。
/** 變數配置中配置的reporter的配置 */
for (Tuple2<String, Configuration> reporterConfiguration: reporterConfigurations) {
   String namedReporter = reporterConfiguration.f0;
   /** reporterConfig是Configuration的子類DelegatingConfiguration,會肯定定義的字首來找key */
   Configuration reporterConfig = reporterConfiguration.f1;

   /** 獲取MetricReporter的具體實現子類的全限定型別,配置的key如:metrics.reporter.foo.class */
   final String className = reporterConfig.getString(ConfigConstants.METRICS_REPORTER_CLASS_SUFFIX, null);
   if (className == null) {
      LOG.error("No reporter class set for reporter " + namedReporter + ". Metrics might not be exposed/reported.");
      continue;
   }

   try {
      /** 獲取配置的定期執行的時間間隔,key的格式如:metrics.reporter.foo.interval */
      String configuredPeriod = reporterConfig.getString(ConfigConstants.METRICS_REPORTER_INTERVAL_SUFFIX, null);
      TimeUnit timeunit = TimeUnit.SECONDS;
      long period = 10;

      if (configuredPeriod != null) {
         try {
            String[] interval = configuredPeriod.split(" ");
            period = Long.parseLong(interval[0]);
            timeunit = TimeUnit.valueOf(interval[1]);
         }
         catch (Exception e) {
            LOG.error("Cannot parse report interval from config: " + configuredPeriod +
                  " - please use values like '10 SECONDS' or '500 MILLISECONDS'. " +
                  "Using default reporting interval.");
         }
      }

      /** 例項化MetricReporter的子類 */
      Class<?> reporterClass = Class.forName(className);
      MetricReporter reporterInstance = (MetricReporter) reporterClass.newInstance();

      /** 構造MetricConfig的例項,並把reporterConfig中的配置key-value都新增到metricConfig中 */
      MetricConfig metricConfig = new MetricConfig();
      reporterConfig.addAllToProperties(metricConfig);
      LOG.info("Configuring {} with {}.", reporterClass.getSimpleName(), metricConfig);
      /** 這裡就是reporter進行初始化操作的地方 */
      reporterInstance.open(metricConfig);

      /** 如果reporter實現了Scheduled介面,則通過executor進行定期排程執行,執行時間間隔就是上面獲取的時間間隔 */
      if (reporterInstance instanceof Scheduled) {
         LOG.info("Periodically reporting metrics in intervals of {} {} for reporter {} of type {}.", period, timeunit.name(), namedReporter, className);
         /** 將reporter封裝成一個task,並排程定期更新執行 */
         executor.scheduleWithFixedDelay(
               new MetricRegistryImpl.ReporterTask((Scheduled) reporterInstance), period, period, timeunit);
      } else {
         LOG.info("Reporting metrics for reporter {} of type {}.", namedReporter, className);
      }
      /** 將reporter新增到集合中 */
      reporters.add(reporterInstance);

      /** 獲取reporter定製化的分隔符,如果沒有設定,則設定為全域性分割符 */
      String delimiterForReporter = reporterConfig.getString(ConfigConstants.METRICS_REPORTER_SCOPE_DELIMITER, String.valueOf(globalDelimiter));
      if (delimiterForReporter.length() != 1) {
         LOG.warn("Failed to parse delimiter '{}' for reporter '{}', using global delimiter '{}'.", delimiterForReporter, namedReporter, globalDelimiter);
         delimiterForReporter = String.valueOf(globalDelimiter);
      }
      this.delimiters.add(delimiterForReporter.charAt(0));
   }
   catch (Throwable t) {
      LOG.error("Could not instantiate metrics reporter {}. Metrics might not be exposed/reported.", namedReporter, t);
   }
}
其中Schedule介面,只有一個report介面。
public interface Scheduled {
   void report();
}
實現Scheduled介面的reporter,表示其需要被定期排程執行,定期執行的就是其report方法,沒有實現Scheduled介面的reporter方法,是不會被定期排程的。
1、Slf4jReporter這個MetricReporter的子類就實現了Scheduled介面,而其report方法,就是將註冊的Metric的資訊列印到日誌裡;
2、JMXReporter這個子類是沒有實現Scheduled介面的,但可以通過JMX服務來獲取註冊的Metric的資訊。
4.3、新增Metric的過程
Metric的新增邏輯的入口在AbstractMetricGroup的addMetric方法中,邏輯如下:
protected void addMetric(String name, Metric metric) {
   if (metric == null) {
      LOG.warn("Ignoring attempted registration of a metric due to being null for name {}.", name);
      return;
   }
   /** 只有group仍然開啟的情況下, 才新增這個metric */
   synchronized (this) {
      if (!closed) {
         /**
          * 在沒有進行"contains"校驗下, 立即進行put操作, 來優化常見的情況(沒有碰撞)
          * 碰撞的情況後面會處理。
          */
         Metric prior = metrics.put(name, metric);

         /** 檢查與其他度量名稱的衝突 */
         if (prior == null) {
            /** 這個名字還沒有其他指標,也就是與註冊在當前group下的metric沒有名稱衝突 */

            if (groups.containsKey(name)) {
               /** 與註冊在group下的子groups的名稱由衝突,這裡給出warn日誌, 而不是fail, 因為metrics是工具, 當使用錯誤時, 不應該使得程式失敗 */
               LOG.warn("Name collision: Adding a metric with the same name as a metric subgroup: '" +
                     name + "'. Metric might not get properly reported. " + Arrays.toString(scopeComponents));
            }

            /** 這裡就是橋樑起作用的地方 */
            registry.register(metric, name, this);
         }
         else {
            /** 有碰撞, 放回原來的metric */
            metrics.put(name, prior);

            LOG.warn("Name collision: Group already contains a Metric with the name '" +
                  name + "'. Metric will not be reported." + Arrays.toString(scopeComponents));
         }
      }
   }
}
上述邏輯就是把Metric註冊到當前Group中,接著看呼叫了MetricRegistry的register裡的邏輯。
public void register(Metric metric, String metricName, AbstractMetricGroup group) {
   synchronized (lock) {
      if (isShutdown()) {
         LOG.warn("Cannot register metric, because the MetricRegistry has already been shut down.");
      } else {
         if (reporters != null) {
            /** 通知所有的reporters,註冊了一個metric,以及對應的metricName,group */
            for (int i = 0; i < reporters.size(); i++) {
               MetricReporter reporter = reporters.get(i);
               try {
                  if (reporter != null) {
                     /**
                      * 這裡會將group,以及這個reporter在reporters這個列表中的索引,一起封裝到FrontMetricGroup這個代理類中
                      * 這裡封裝索引的目的,是可以通過 #getDelimiter 方法,獲取這個reporter配置的特製分隔符
                      */
                     FrontMetricGroup front = new FrontMetricGroup<AbstractMetricGroup<?>>(i, group);
                     /** 然後呼叫reporter的介面方法,通知reporter */
                     reporter.notifyOfAddedMetric(metric, metricName, front);
                  }
               } catch (Exception e) {
                  LOG.warn("Error while registering metric.", e);
               }
            }
         }
         try {
            /** 如果queryService不為null,則也通知它 */
            if (queryService != null) {
               MetricQueryService.notifyOfAddedMetric(queryService, metric, metricName, group);
            }
         } catch (Exception e) {
            LOG.warn("Error while registering metric.", e);
         }
         try {
            /** 如果metric實現了View介面,則將其新增到定期更新的viewUpdater中 */
            if (metric instanceof View) {
               if (viewUpdater == null) {
                  viewUpdater = new ViewUpdater(executor);
               }
               viewUpdater.notifyOfAddedView((View) metric);
            }
         } catch (Exception e) {
            LOG.warn("Error while registering metric.", e);
         }
      }
   }
}
從上述邏輯,可以看出MetricRegistry所起的橋樑作用了,它會再依次通知配置的各個reporter,前面已經介紹過AbstractReporter這個抽象子類實現。
4.4、View介面
View介面的定義如下:
public interface View {
   /** metrics更新的間隔 */
   int UPDATE_INTERVAL_SECONDS = 5;

   /** 被定期呼叫進行metric更新的方法 */
   void update();
}
實現了View介面的Metric,需要定期的呼叫update方法,進行狀態的更新,而這個定期更新的功能是通過ViewUpdater實現的,其建構函式中,就是在executor中添加了一個定期執行的task。
public ViewUpdater(ScheduledExecutorService executor) {
   executor.scheduleWithFixedDelay(new ViewUpdaterTask(lock, toAdd, toRemove), 5, UPDATE_INTERVAL_SECONDS, TimeUnit.SECONDS);
}
新增一個Metric時,通知viewUpdater時的邏輯如下:
public void notifyOfAddedView(View view) {
   synchronized (lock) {
      toAdd.add(view);
   }
}
就是想toAdd這個Set中新增一個新的元素,通過lock這個鎖來實現同步。
而ViewUpdaterTask的run方法中,就會呼叫註冊的Metric的update方法,同時更新幾個Set。邏輯如下:
public void run() {
   for (View toUpdate : this.views) {
      toUpdate.update();
   }

   synchronized (lock) {
      views.addAll(toAdd);
      toAdd.clear();
      views.removeAll(toRemove);
      toRemove.clear();
   }
}
4.5、MetricQueryService
在MetricRegistryImpl中有一個屬性queryService,是一個ActorRef,對應的具體實現是MetricQueryService。在MetricQueryService中也維護了註冊的各種Metric,並且也是從MetricRegistry那裡接受Metric的新增和刪除的訊息。
/** 用來接收Metric新增的訊息 */
public static void notifyOfAddedMetric(ActorRef service, Metric metric, String metricName, AbstractMetricGroup group) {
   service.tell(new AddMetric(metricName, metric, group), null);
}

/** 用於接收Metric刪除的訊息 */
public static void notifyOfRemovedMetric(ActorRef service, Metric metric) {
   service.tell(new RemoveMetric(metric), null);
}
MetricQueryService在接收到這類訊息後,會在onReceive方法中根據不同的訊息型別進行相應的處理,新增和刪除Metric就是在四類Metric對應的map屬性上進行相應的新增刪除操作。以此來實現對Metric資訊的維護。
onReceive方法中還會接收到一類訊息,叫CreateDump訊息,接收到這個訊息後,就會把當前所有的Metric資料進行序列化操作,得到一個MetricDumpSerialization.MetricSerializationResult序列化後的結果例項,併發送給請求者。
對於Metric的序列化和反序列化的實現都在MetricDumpSerialization這個類中。
1、通過MetricDumpSerializer進行序列化,序列化後的結果為MetricSerializationResult;
2、通過MetricDumpDeserializer進行反序列化,反序列化後的結果為MetricDump;