YUV420儲存為BMP和JPG圖片
阿新 • • 發佈:2018-12-31
網上大多數關於YUV420的資料都是關於YUV420P的,很少有YUV420SP的,因為YUV420SP的UV是交錯存放的,處理起來相對麻煩點,但是YUV420SP也是一種常見格式,因此,在這裡,我將關於YUV420SP格式資料的處理總結下,方便有需要的同志。
一、YUV420格式資料介紹
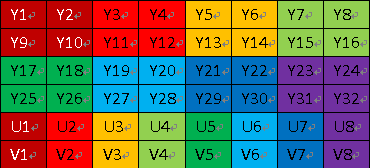
YUV,分為三個分量,“Y”表示明亮度,也就是灰度值;“U"和”V"表示的則是色度,作用是描述影像色彩飽和度,用於指定畫素的顏色。YUV主流的取樣方式有三種:YUV4:4:4,YUV4:2:2,YUV4:2:0,這裡主要介紹下YUV420。 在YUV420中,一個畫素點對應一個Y,一個2X2的小方塊對應一個U和V。對於所有YUV420影象,它們的Y值排列是完全相同的,因為只有Y的影象就是灰度影象。YUV420又分為YUV420SP與YUV420P這兩種,這兩種格式的Y分佈是相同的,區別在於UV:YUV420p它是先把U存放完後,再存放V,也就是說UV它們是連續的;而YUV420sp它是UV、UV這樣交替存放的。(他們的記憶體分佈圖如下,左是YUV420sp,右是YUV420p)

二、從YUV記憶體中取資料組方法
注意YUV是每四個Y對應一個UV,並且YUV420P和YUV420SP的UV的存放格式不同,取法也不同,總的來說,YUV420P的取法簡單,YUV420SP的取法相對複雜點。
1、YUV420SP
for(int j=0;j<DataHeight;j++)
{
    for(int i=0;i<DataWidth;i++)
    {
        y=ybase[i + j * DataWidth];// 每四個y對應一個uv
        u=ubase[j/2 * DataWidth+(i/2)*2];
        v=ubase[j/2 * DataWidth+(i/2)*2+1];  //一定要注意是u+1
    }
}
2、YUV420P
for(int j=0;j<DataHeight;j++)
{
    for(int i=0;i<DataWidth;i++)
    {
        //yyyyyy ... uuuu ...vvv
        y=ybase[i + j * DataWidth];
        u=ubase[j/2 * DataWidth/2+(i/2)];
        v=vbase[j/2 * DataWidth/2+(i/2)];
    }
} 三、YUV420轉換為RGB資料
1、轉換公式
R=Y+1.4075*(V-128)
G=Y-0.3455*(U-128) – 0.7169*(V-128)
B=Y+1.779*(U-128)
2.轉換方法
YUV420SP
for(int j=0;j<DataHeight;j++)
{
    for(int i=0;i<DataWidth;i++)
    {
        unsigned char r,g,b;
        y=ybase[i + j * DataWidth];
        u=ubase[j/2 * DataWidth+(i/2)*2];
        v=ubase[j/2 * DataWidth+(i/2)*2+1];

        b=(unsigned char)(y+1.779*(u- 128));
        g=(unsigned char)(y-0.7169*(v - 128)-0.3455*(u - 128));
        r=(unsigned char)(y+ 1.4075*(v - 128));*/
    }
}
YUV420P
for(int j=0;j<DataHeight;j++)
{
    for(int i=0;i<DataWidth;i++)
    {
        unsigned char r,g,b;

        y=ybase[i + j * DataWidth];
        u=ubase[j/2 * DataWidth/2+(i/2)];
        v=vbase[j/2 * DataWidth/2+(i/2)];

        b=(unsigned char)(y+1.779*(u- 128));
        g=(unsigned char)(y-0.7169*(v - 128)-0.3455*(u - 128));
        r=(unsigned char)(y+ 1.4075*(v - 128));*/
    }
}
四、RGB資料儲存為圖片
注意rgb資料儲存為bmp和jpg時的不同,將RBG資料儲存為bmp時,資料是逆序存放,並且不是rgb,而是bgr;當將rgb資料儲存為jpg時,則不用,不用逆序,資料也還是rgb。1、儲存為BMP圖片
2、儲存為JPG圖片
儲存為JPG圖片要用到一個開運庫,libjpeg,或者libjpeg-turbo,我用的是libjpeg,網上關於這兩個開源庫的資料很多,可以從這個下載編譯好的包,LIBJPEG包
封裝的儲存方法如下:
int rgb2jpeg(const char * filename, unsigned char* rgbData,int image_width,int image_height,int quality)
{
    struct jpeg_compress_struct jpeg;  //identify a compress object
    struct jpeg_error_mgr jerr;  //error information

    jpeg.err = jpeg_std_error(&jerr);
    jpeg_create_compress(&jpeg);  //init compress object

    FILE* pFile;
    fopen_s(&pFile,filename,"wb" );
    if( !pFile )  return 0;
    jpeg_stdio_dest(&jpeg, pFile);

    //compress param set,i just did a simple param set
    jpeg.client_data=(void*)&pFile;
    jpeg.image_width = image_width;
    jpeg.image_height = image_height;
    jpeg.input_components  = 3;
    jpeg.in_color_space = JCS_RGB;
    jpeg_set_defaults(&jpeg);
    //// 指定亮度及色度質量
    jpeg.q_scale_factor[0] = jpeg_quality_scaling(100);
    jpeg.q_scale_factor[1] = jpeg_quality_scaling(100);
    //// 影象取樣率,預設為2 * 2
    jpeg.comp_info[0].v_samp_factor = 2;
    jpeg.comp_info[0].h_samp_factor = 2;
    //// set jpeg compress quality
    jpeg_set_quality(&jpeg, quality, TRUE);  //100 is the highest

    //start compress
    jpeg_start_compress(&jpeg, TRUE);

    JSAMPROW row_pointer[1];

    //from up to down ,set every pixel
    for( unsigned int i=0;i<jpeg.image_height;i++ )
    {
        row_pointer[0] = rgbData+i*jpeg.image_width*3;
        jpeg_write_scanlines( &jpeg,row_pointer,1 );
    }
    //stop compress
    jpeg_finish_compress(&jpeg);

    fclose( pFile );
    pFile = NULL;
    jpeg_destroy_compress(&jpeg);
    return 0;
}
五、YUV資料儲存為JPG
網上有不少關於YUV420資料儲存為JPG的程式碼和部落格,但是我用他們的程式碼,老是不成功,不是執行不起來,就是效果不好,不過還是表示萬分感謝。
1、YUV420SP
int yuv420p_to_jpeg(const char * filename, const char* pdata,int image_width,int image_height, int quality)
{
    struct jpeg_compress_struct cinfo;
    struct jpeg_error_mgr jerr;
    cinfo.err = jpeg_std_error(&jerr);
    jpeg_create_compress(&cinfo);

    FILE * outfile;    // target file
    if ((outfile = fopen(filename, "wb")) == NULL) {
        fprintf(stderr, "can't open %s\n", filename);
        exit(1);
    }
    jpeg_stdio_dest(&cinfo, outfile);

    cinfo.image_width = image_width;  // image width and height, in pixels
    cinfo.image_height = image_height;
    cinfo.input_components = 3;    // # of color components per pixel
    cinfo.in_color_space = JCS_YCbCr;  //colorspace of input image
    jpeg_set_defaults(&cinfo);
    jpeg_set_quality(&cinfo, quality, TRUE );

    //////////////////////////////
    //  cinfo.raw_data_in = TRUE;
    cinfo.jpeg_color_space = JCS_YCbCr;
    cinfo.comp_info[0].h_samp_factor = 2;
    cinfo.comp_info[0].v_samp_factor = 2;
    /////////////////////////

    jpeg_start_compress(&cinfo, TRUE);

    JSAMPROW row_pointer[1];

    unsigned char *yuvbuf;
    if((yuvbuf=(unsigned char *)malloc(image_width*3))!=NULL)
        memset(yuvbuf,0,image_width*3);

    unsigned char *ybase,*ubase;
    ybase=pdata;
    ubase=pdata+image_width*image_height;
    int j=0;
    while (cinfo.next_scanline < cinfo.image_height)
    {
        int idx=0;
        for(int i=0;i<image_width;i++)
        {
            yuvbuf[idx++]=ybase[i + j * image_width];
            yuvbuf[idx++]=ubase[j/2 * image_width+(i/2)*2];
            yuvbuf[idx++]=ubase[j/2 * image_width+(i/2)*2+1];
        }
        row_pointer[0] = yuvbuf;
        jpeg_write_scanlines(&cinfo, row_pointer, 1);
        j++;
    }
    jpeg_finish_compress(&cinfo);
    jpeg_destroy_compress(&cinfo);
    fclose(outfile);
    return 0;
}
2、YUV420P
其實YUV420P和YUV420SP主要區別就是取資料方式不同,前面對於YUV420P如何取資料已經講得很清楚了,YUV420P儲存為JPG只需要在上面YUV420SP儲存為JPG的基礎上改改取資料方法就好了。
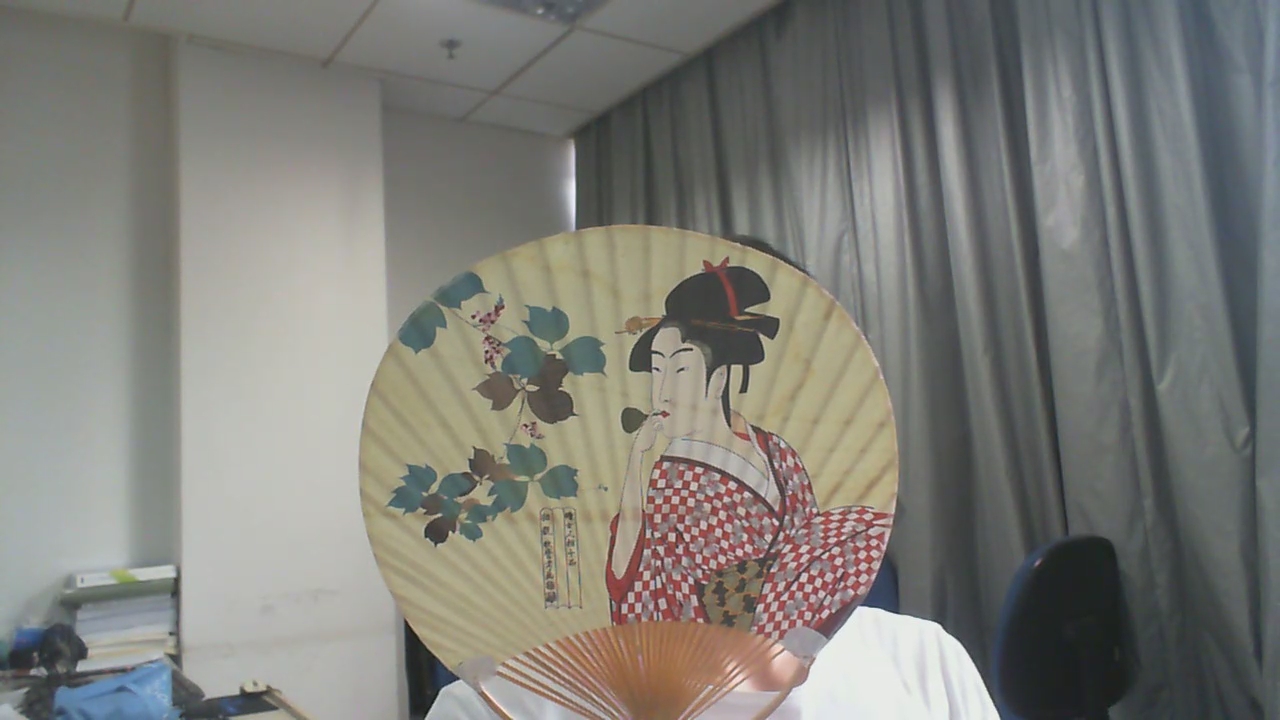
效果:
這是一張1280X720的圖片,大小385kb,因為是USB攝像頭,所以圖片質量感覺不是很高,總的來說效果不錯!
六、YUV420SP 與 YUV420P相互轉換
知道了YUV420SP以及YUV420P的記憶體格式後,互相轉換就不是難事了。
1、YUV420SP TO YUV420P
int yuv420sp_to_yuv420p(unsigned char * yuv420sp,unsigned char* yuv420p,int width,int height)
{
    if(yuv420sp==NULL)
        return;
    int i=0,j=0;
    //Y
    for(i=0;i<width*height;i++)
    {
        yuv420p[i]=yuv420sp[i];
    }
    //U
    for(int j=0,i=0;j<width*height/2;j+=2,i++)
    {
        yuv420p[i + width*height] = yuv420sp[j+width*height];
    }

    //V
    for(i=0,j=1,j<width*height/2;j+=2,i++)
    {
        yuv420p[i+width*height*5/4] = yuv420sp[j+width*height];
    }
}
2、YUV420P TO YUV420SP
int yuv420p_to_yuv420sp(unsigned char * yuv420p,unsigned char* yuv420sp,int width,int height)
{
    if(yuv420p==NULL)
        return;
    int i=0,j=0;
    //Y
    for(i=0;i<width*height;i++)
    {
        yuv420sp[i]=yuv420p[i];
    }

    int m=0,n=0;
    for(int j=0;j<width*height/2;j++)
    {
        if(j%2==0)
           yuv420sp[j+width*height]=yuv420p[m++];
        else
           yuv420sp[j+width*height]=yuv420p[n++];
    }
}
