
無人駕駛之車輛檢測與跟蹤
阿新 • • 發佈:2018-12-31
整個專案原始碼:GitHub
整個專案資料集:車輛資料集、無車輛資料集
引言
本次分享主要介紹,如何對道路上的汽車進行識別與跟蹤。這裡我們實現一個簡單的demo。後續我們還會對前面的程式碼及功能進行重構,從而進一步豐富我們的功能。
專案軟體框架
下圖是車輛檢測的實現流程圖:
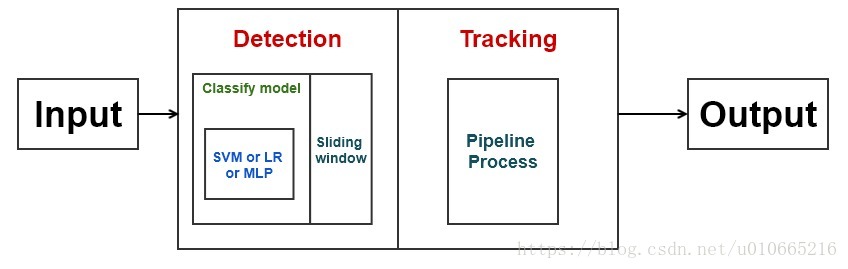
具體內容如下:
- 在有標籤的訓練資料集上進行Histogram of Oriented Gradients(HOG)特徵提取
- Normalize 這些特徵,並隨機化資料集
- 訓練線性SVM分類器
- 實現一個滑動視窗技術,並使用訓練好的分類器在圖片中尋找車輛
- 實現一個流處理機制,並通過一幀一幀地建立迴圈檢測的熱圖來去除異常值及跟蹤車輛
- 為檢測到的車輛估計一個邊界框
Features
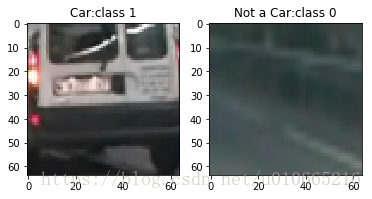
本專案,我們使用一些有標籤的訓練資料:汽車圖片、無汽車圖片,訓練資料在all資料夾中可以找到
有汽車地圖片標籤為1,無汽車的圖片標籤為0
我們先讀取資料,看下資料的分佈
# import libs
import glob
import matplotlib.image as mpimg
import numpy as np
from skimage.feature import hog
import cv2
import matplotlib.pyplot as plt
from sklearn.svm import Dataset size:Cars 2826 | NotCars 8968
DataSet is not balance
接下來我們分別隨機選取一張有汽車及無汽車的圖片
# random choose
rand_car = np.random.choice(len(cars))
rand_notcar = np.random.choice(len(notcars))
this_car = mpimg.imread(cars[rand_car])
this_notcar = mpimg.imread(notcars[rand_notcar])

print('The size of car is {}'.format(len(this_car)))
print('The size of notcar is {}'.format(len(this_notcar)))
plt.figure(1)
plt.subplot(121)
plt.title('Car:class 1')
plt.imshow(this_car)
plt.subplot(122)
plt.title('Not a Car:class 0')
plt.imshow(this_notcar)
plt.show()
The size of car is 64
The size of notcar is 64
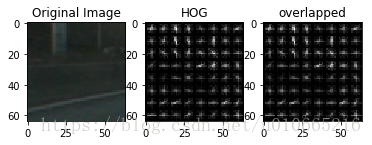
HOG feature extraction
接下來,我們來提取Histogram of oriented Gradients(HOG)特徵。
有關HOG特徵相關的資訊,大家可以參考:HOG
提取HOG特徵的基本步驟如下:
- 第一階段為了減少影象亮度的影響需要對圖片做一個全域性的歸一化。
- 第二階段計算影象的一階導數,從而捕捉影象的輪廓及紋理資訊。
- 第三階段旨在產生對區域性影象內容敏感的編碼(cell)
- 第四階段,歸一化(block)
- 最後將HOG descriptor 轉化成分類器需要的特徵向量
##
def get_hog_features(img,orient,pix_per_cell,cell_per_block,vis=False,feature_vec=True):
    '''
    function:Extract HOG image and HOG features of a given image
    orient: number of bins for the orientation
    pix_per_cell: size of a cell
    cell_per_block: nber of cells per block
    vis(Boolean) :visualize the HOG image
    feature_vec(Boolean):return the features as a feature vector
    By default,the function uses transform_sqrt(apply power law compression to normalize the image before processing)
    '''
    if vis == True:
        features,hog_image = hog(img,orientations=orient,
                                pixels_per_cell=(pix_per_cell,pix_per_cell),
                                cells_per_block = (cell_per_block,cell_per_block),
                                transform_sqrt=True,
                                visualise=vis,feature_vector=feature_vec)
        return features,hog_image
    else:
        features = hog(img,orientations=orient,
                       pixels_per_cell=(pix_per_cell,pix_per_cell),
                      cells_per_block=(cell_per_block,cell_per_block),
                      transform_sqrt=True,
                      visualise=vis,feature_vector=feature_vec)
        return features

def bin_spatial(img,size=(32,32)):
    '''
    Binned Color Feature
    img:original image
    size:target size of the image
    output:feature vector
    '''
    features = cv2.resize(img,size).ravel()
    #print(cv2.resize(img,size).shape)(8,8,3)=>192
    return features

def color_hist(img,nbins=32,bins_range=(0,256)):
    '''
    Color histogram features for each channel of the original image
    img: original image
    nbins: number of bins of the histogram
    output:concatenate feature vector
    '''
    channel1_hist = np.histogram(img[:,:,0],bins=nbins,range=bins_range)
    channel2_hist = np.histogram(img[:,:,1],bins=nbins,range=bins_range)
    channel3_hist = np.histogram(img[:,:,2],bins=nbins,range=bins_range)
    #Concatenate the histograms into a sigle feature vector
    hist_features = np.concatenate((channel1_hist[0],channel2_hist[0],channel3_hist[0]))#48
    #print(channel1_hist)
    # Return the individual histograms into a single feature vector
    return hist_features

def extract_features(imgs,color_space="RGB",spatial_size=(32,32),
                    hist_bins=32,orient=9,
                    pix_per_cell=8,cell_per_block=2,hog_channel=0,
                    spatial_feat=True,hist_feat=True,hog_feat=True,
                    hog_vis=False):
    '''
    Feature extractor:extract features from a list of images
    The function calls bin_spatial(),color_hist() and get_hog_features
    '''
    #create a list to append feature vectors to
    features = []
    # Iterate through the list of images
    for file in imgs:
        file_features = []
        # Read in each one by one
        image = mpimg.imread(file)
        if hog_vis == False:
            image = image.astype(np.float32)/255
        # apply color conversion if other than 'RGB'
        # color conversion
        if color_space in ['HSV','LUV','HLS','YUV','YCrCb']:
            feature_image = cv2.cvtColor(image,eval('cv2.COLOR_RGB2'+color_space))
        else: feature_image = np.copy(image)
        # Image size: add all pixels of reduced image as vector
        if spatial_feat == True:
            spatial_features = bin_spatial(feature_image,size=spatial_size)
            #print('spatial features shape:',spatial_features.shape)
            file_features.append(spatial_features)
        # Histogram of reduced image: add histogram as a vector
        if hist_feat == True:
            hist_features = color_hist(feature_image,nbins=hist_bins)
            file_features.append(hist_features)
        #HOG of reduced image: add HOG as feature vector
        if hog_feat == True:# Call get_hog_features() with vis=False ,feature_vec = True
            if hog_channel == 'ALL':
                hog_features = []
                for channel in range(feature_image.shape[2]):
                    if hog_vis:
                        hog_feature,hog_image = get_hog_features(feature_image[:,:,channel],
                                                                orient,pix_per_cell,cell_per_block,
                                                                vis=True,feature_vec=True)
                        #print(cv2.cvtColor(image,cv2.COLOR_RGB2GRAY).dtype)
                        res = cv2.addWeighted(cv2.cvtColor(image,cv2.COLOR_RGB2GRAY),0.1,
                                              ((hog_image/np.max(hog_image))*255).astype(np.float32),0.1,0.0)
                        # Plot the examples
                        fig = plt.figure()
                        plt.title(channel)
                        plt.subplot(131)
                        plt.imshow(image,cmap='gray')
                        plt.title('Original Image')
                        plt.subplot(132)
                        plt.imshow(hog_image,cmap='gray')
                        plt.title('HOG')
                        plt.subplot(133)
                        plt.imshow(res,cmap='gray')
                        plt.title('overlapped')
                        plt.show()
                    else:
                        hog_feature = get_hog_features(feature_image[:,:,channel],
                                                      orient,pix_per_cell,cell_per_block,
                                                      vis=False,feature_vec=True)
                    #print('hog feature shape:',hog_feature.shape)
                    hog_features.append(hog_feature)
                hog_features = np.ravel(hog_features)
            else:
                hog_features = get_hog_features(feature_image[:,:,hog_channel],orient,
                                               pix_per_cell,cell_per_block,vis=False,feature_vec = True)
            #Append the new feature vector to the features list
            #print('hog features shape:',hog_features.shape)
            file_features.append(hog_features)
        features.append(np.concatenate(file_features))
        #print(np.concatenate(file_features).shape)
    # return list of feature vectors
    return features
Settings for feature extraction
color_space = 'YCrCb'  # ['RGB','HSV','LUV','HLS','YUV',''YCrCb']
orient = 12#HOG orientations
pix_per_cell = 8#HOG pixels per cell
cell_per_block = 2 #HOG cells per block
hog_channel = 'ALL'  # ['0','1','ALL']
spatial_size = (8,8) #Spatial binning dimensions
hist_bins = 16  #Number of histogram bins
hist_range = bins_range = (0,256)
spatial_feat = True #spatial features
hist_feat = False # histogram features
hog_feat = True # hog features
Visualization of Hog Image
# randomly select example
rand_img = np.random.choice(np.arange(0,len(notcars),1))

print('Image adress:',notcars[rand_img])
feat = extract_features([notcars[rand_img]],color_space=color_space,
                        spatial_size=spatial_size,hist_bins=hist_bins,
                        orient=orient,pix_per_cell=pix_per_cell,
                        cell_per_block=cell_per_block,
                        hog_channel=hog_channel,spatial_feat=spatial_feat,
                        hist_feat=hist_feat,hog_feat=hog_feat,hog_vis=True
                       )
Image adress: all/non-vehicles/GTI/image1686.png
/home/ora/anaconda3/envs/tensorflow/lib/python3.6/site-packages/skimage/feature/_hog.py:119: skimage_deprecation: Default value of `block_norm`==`L1` is deprecated and will be changed to `L2-Hys` in v0.15
'be changed to `L2-Hys` in v0.15', skimage_deprecation)


Build Dataset with feature extraction
car_features = extract_features(cars,color_space=color_space,
                               spatial_size=spatial_size,hist_bins=hist_bins,orient=orient,
                                pix_per_cell=pix_per_cell,cell_per_block=cell_per_block,
                                hog_channel=hog_channel,spatial_feat=spatial_feat,
                                hist_feat=hist_feat,hog_feat=hog_feat)

notcar_features = extract_features(notcars,color_space=color_space,
                                  spatial_size=spatial_size,hist_bins=hist_bins,
                                  orient=orient,pix_per_cell=pix_per_cell,
                                  cell_per_block=cell_per_block,
                                  hog_channel=hog_channel,spatial_feat=spatial_feat,
                                  hist_feat=hist_feat,hog_feat=hog_feat)
# Group cars and notcars images in a single array
X = np.vstack((car_features,notcar_features)).astype(np.float64)
# Define the labels vector
y = np.hstack((np.ones(len(car_features)),np.zeros(len(notcar_features))))
#Normalize data:fit a per-column scaler
X_scaler = StandardScaler().fit(X)
scaled_X = X_scaler.transform(X)

#Split up data into randomized training and test sets(shuffe included)
X_train,X_test,y_train,y_test = train_test_split(scaled_X,y,test_size=0.2,random_state=SEED)

print('Using:',orient,'orientations',pix_per_cell,
     'pixels per cell and ',cell_per_block,'cells per block')
print('Feature vector length:',len(X_train[0]))
print('Mean of example 0{}|std {}'.format(np.mean(X_train[10]),np.std(X_train[0])))
/home/ora/anaconda3/envs/tensorflow/lib/python3.6/site-packages/skimage/feature/_hog.py:119: skimage_deprecation: Default value of `block_norm`==`L1` is deprecated and will be changed to `L2-Hys` in v0.15
'be changed to `L2-Hys` in v0.15', skimage_deprecation)
Using: 12 orientations 8 pixels per cell and 2 cells per block
Feature vector length: 7248
Mean of example 0-0.05479098608161728|std 0.8436106482861411
Run classifier
SVC
這裡我們執行線性支援向量機
svc = LinearSVC()
# Check the training time for the SVC
t = time.time()
svc.fit(X_train,y_train)
t2 = time.time()

print(round(t2-t,2),'Seconds to train SVC...')
# Check the score of the SVC
print('Train Accuracy of SVC=',round(svc.score(X_train,y_train),4))
print('Test Accuracy of SVC=',round(svc.score(X_test,y_test),4))
# Check the prediction time for a single sample
t = time.time()
n_predict = 10
print('My SVC predicts:',svc.predict(X_test[0:n_predict]))
print('For these',n_predict,'labels:',y_test[0:n_predict])
t2 = time.time()
print(round(t2-t,5),'Seconds to predict',n_predict,'labels with SVC')
22.9 Seconds to train SVC...
Train Accuracy of SVC= 1.0
Test Accuracy of SVC= 0.9818
My SVC predicts: [0. 1. 0. 0. 0. 1. 0. 0. 1. 0.]
For these 10 labels: [0. 1. 0. 0. 1. 1. 0. 0. 1. 0.]
0.00101 Seconds to predict 10 labels with SVC
Logistic Regression Classifier
接下來我們執行邏輯迴歸分類器
from sklearn.linear_model import LogisticRegression
lrc = LogisticRegression(max_iter=10)
t = time.time()
lrc.fit(X_train,y_train)
t2 = time.time()
print(round(t2-t,2),'Seconds to train LRC...')
# Check the score of the LRC
print('Train Accuracy of LRC=',round(lrc.score(X_train,y_train),4))
print('Test Accuracy of LRC=',round(lrc.score(X_test,y_test),4))
# Check the prediction time for a single sample
t = time.time()
n_predict = 10
print('My LRC predicts:',lrc.predict(X_test[0:n_predict]))
print('For these',n_predict,'labels:',y_test[0:n_predict])
t2 = time.time()
print(round(t2-t,5),'Seconds to predict',n_predict,'labels with LRC')
27.1 Seconds to train LRC...
Train Accuracy of LRC= 1.0
Test Accuracy of LRC= 0.9852
My LRC predicts: [0. 1. 0. 0. 0. 1. 0. 0. 1. 0.]
For these 10 labels: [0. 1. 0. 0. 1. 1. 0. 0. 1. 0.]
0.00169 Seconds to predict 10 labels with LRC
Multi-Layer Perceptron Classifer
最後我們來執行多層感知分類器
from sklearn.neural_network import MLPClassifier
mlp = MLPClassifier(random_state=SEED)
t = time.time()
mlp.fit(X_train,y_train)
t2 = time.time()
print(round(t2-t,2),'Seconds to train MLP...')
# Check the score of the LRC
print('Train Accuracy of MLP=',round(mlp.score(X_train,y_train),4))
print('Test Accuracy of MLP=',round(mlp.score(X_test,y_test),4))
# Check the prediction time for a single sample
t = time.time()
n_predict = 10
print('My MLP predicts:',mlp.predict(X_test[0:n_predict]))
print('For these',n_predict,'labels:',y_test[0:n_predict])
t2 = time.time()
print(round(t2-t,5),'Seconds to predict',n_predict,'labels with LRC')
21.28 Seconds to train MLP...
Train Accuracy of MLP= 1.0
Test Accuracy of MLP= 0.9953
My MLP predicts: [0. 1. 0. 0. 0. 1. 0. 0. 1. 0.]
For these 10 labels: [0. 1. 0. 0. 1. 1. 0. 0. 1. 0.]
0.00294 Seconds to predict 10 labels with LRC
Save the model
儲存模型
model_combine = 'model.p'
try:
    with open(model_combine,'wb') as pfile:
        pickle.dump(
        {
            'X_dataset':X,
            'y_dataset':y,
            'svc':svc,
            'lrc':lrc,
            'mlp':mlp,
            'X_scaler':X_scaler,
            'color_space':color_space,
            'spatial_size':spatial_size,
            'hist_bins':hist_bins,
            'orient':orient,
            'pix_per_cell':pix_per_cell,
            'cell_per_block':cell_per_block,
            'hog_channel':hog_channel,
            'spatial_feat':spatial_feat,
            'hist_feat':hist_feat,
            'hog_feat':hog_feat
        },
            pfile,pickle.HIGHEST_PROTOCOL)
except Exception as e:
    print('Unable to save data to',model,':',e)
    raise
Vechicle Detection and Tracking
import glob
import matplotlib.image as mpimg
import numpy as np
from skimage.feature import hog
import cv2
import matplotlib.pyplot as plt
from sklearn.preprocessing import StandardScaler
from scipy.ndimage.measurements import label
import time
from sklearn.externals import joblib
import pickle
from moviepy.editor import VideoFileClip
from IPython.display import HTML
# from skimage import measure
SEED = 2018
%matplotlib inline
Feature extractor functions
def get_hog_features(img,orient,pix_per_cell,cell_per_block,vis=False,feature_vector=True):
    '''
    function:Extract HOG image and HOG features of a given image
    orient: number of bins for the orientation
    pix_per_cell: size of a cell
    cell_per_block: nber of cells per block
    vis(Boolean) :visualize the HOG image
    feature_vec(Boolean):return the features as a feature vector
    By default,the function uses transform_sqrt(apply power law compression to normalize the image before processing)
    '''
    if vis == True:
        features,hog_image = hog(img,orientations=orient,
                                pixels_per_cell=(pix_per_cell,pix_per_cell),
                                cells_per_block = (cell_per_block,cell_per_block),
                                transform_sqrt=True,
                                visualise=vis,feature_vector=feature_vector)
        return features,hog_image
    else:
        features = hog(img,orientations=orient,
                       pixels_per_cell=(pix_per_cell,pix_per_cell),
                      cells_per_block=(cell_per_block,cell_per_block),
                      transform_sqrt=True,
                      visualise=vis,feature_vector=feature_vector)
        return features

def bin_spatial(img,size=(32,32)):
    '''
    Binned Color Feature
    img:original image
    size:target size of the image
    output:feature vector
    '''
    features = cv2.resize(img,size).ravel()
    return features

def color_hist(img,nbins=32,bins_range=(0,256)):
    '''
    Color histogram features for each channel of the original image
    img: original image
    nbins: number of bins of the histogram
    output:concatenate feature vector
    '''
    channel1_hist = np.histogram(img[:,:,0],bins=nbins,range=bins_range)
    channel2_hist = np.histogram(img[:,:,1],bins=nbins,range=bins_range)
    channel3_hist = np.histogram(img[:,:,2],bins=nbins,range=bins_range)
    #Concatenate the histograms into a sigle feature vector
    hist_features = np.concatenate((channel1_hist[0],channel2_hist[0],channel3_hist[0]))
    # Return the individual histograms into a single feature vector
    return hist_features

def color_cvt(img,cspace):
    '''
    image conversion to different color space
    cspace avaliable:'HSV','LUV','YUV','YCrCb'
    '''
    if cspace in ['HSV','LUV','HLS','YUV','YCrCb']:
        return cv2.cvtColor(img,eval('cv2.COLOR_RGB2'+cspace))
    else:
        return np.copy(img)
Load SVC Classifier and Feature settings
這裡選用svc分類器
data_file = 'model.p'
with open(data_file,mode='rb') as f:
    data = pickle.load(f)

svc = data['svc']
X_scaler = data['X_scaler']
color_space = data['color_space']
spatial_size = data['spatial_size']
hist_bins = data['hist_bins']
orient = data['orient']
pix_per_cell = data['pix_per_cell']
cell_per_block = data['cell_per_block']
hog_channel = data['hog_channel']
spatial_feat = data['spatial_feat']
hist_feat = data['hist_feat']
hog_feat = data['hog_feat']
Smoothing
# 此處列表的更新,可以使用固定長的佇列儲存,這裡是固定更新的
class Buffer():
def __init__(self,buffer_sz):
self.buffer_sz = buffer_sz
self.hot_windows = []
self.heat_mframe = []
self.hotwindows_mframe = []
self.nwindow_mframe = []
def add_hotwindows(self,new_val):
self.hot_windows.append(new_val)
def update_hotwindows_historic(self,new_val):
self.hotwindows_mframe.extend(new_val)
self.nwindow_mframe.append(len(new_val))
if len(self.nwindow_mframe) > self.buffer_sz:
self.hotwindows_mframe = self.hotwindows_mframe[self.nwindow_mframe[0]:]
self.nwindow_mframe = self.nwindow_mframe[-self.buffer_sz:]
def update_heat_historic(self,new_heat):
self.heat_mframe.append(new_heat)
if len(self.heat_mframe) > self.buffer_sz:
self.heat_mframe = self.heat_mframe[-self.buffer_sz:]
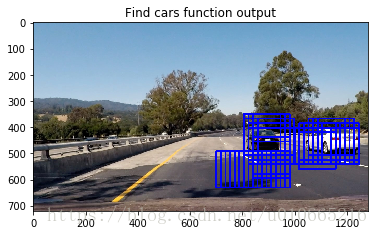
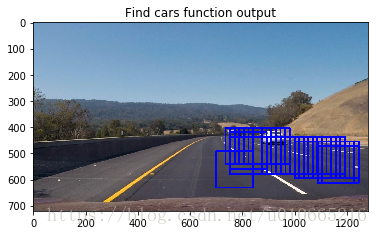
buffer = Buffer(buffer_sz=40)接下來實現一個函式來提取特徵及作出預測
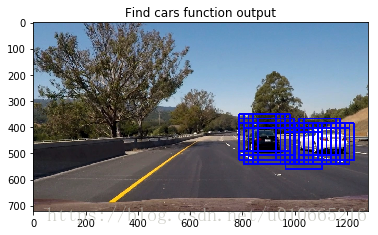
def find_cars(img,ystart,ystop,cells_per_step,scale,svc,X_scale,cspace,orient,pix_per_cell,
             cell_per_block,spatial_feat,spatial_size,hist_feat,hist_bins):
    '''
    uses a single HOG feature extraction on the entire image
    sliding_window = {'scale':[0.6, 0.8, 1.2, 1.6, 2, 2.2],
          'ystart':[400, 400, 400, 350, 350, 350],
          'ystop': [520, 520, 620, 620, 656, 656],
          'cells_per_step': [3, 3, 1, 1, 1, 1]}
    img.shape: (720,1280,3)
    '''
    draw_img = np.copy(img)
    #Normalize pixel intensity
    img = img.astype(np.float32)/255
    #確定搜尋車輛的區域
    img_tosearch = img[ystart:ystop,700::]
    #print(img_tosearch.shape)
    ctrans_tosearch = color_cvt(img_tosearch,cspace=cspace)
    if scale!=1:
        imshape = ctrans_tosearch.shape
        ctrans_tosearch = cv2.resize(ctrans_tosearch,(np.int(imshape[1]/scale),np.int(imshape[0]/scale)))
    ch1 = ctrans_tosearch[:,:,0]
    ch2 = ctrans_tosearch[:,:,1]
    ch3 = ctrans_tosearch[:,:,2]
    #print(ch1.shape[1])
    # Define blocks and steps as above(//地板除法,取整數)
    nxblocks = (ch1.shape[1]//(pix_per_cell))-1
    nyblocks = (ch1.shape[0]//(pix_per_cell))-1
    #nfeat_per_block = orient*cell_per_block**2
    #64 was the original sampling rate with 8 cells and 8 pix per cell
    window = 64
    nblocks_per_window = (window//(pix_per_cell))-1
    #cells_per_step = 2 instead of overlap ,define how many cells to step cells=>block
    nxsteps = (nxblocks-nblocks_per_window)//cells_per_step
    nysteps = (nyblocks-nblocks_per_window)//cells_per_step
    #print('nxsteps:{},nysteps:{}'.format(nxsteps,nysteps))
    # Compute individual channel HOG features for the entire image
    hog1 = get_hog_features(ch1,orient,pix_per_cell,cell_per_block,feature_vector=False)
    hog2 = get_hog_features(ch2,orient,pix_per_cell,cell_per_block,feature_vector=False)
    hog3 = get_hog_features(ch3,orient,pix_per_cell,cell_per_block,feature_vector=False)
    current_hot_windows = []
    for xb in range(nxsteps):
        for yb in range(nysteps):
            ypos = yb*cells_per_step
            xpos = xb*cells_per_step
            #Extract HOG for this patch
            hog_feat1 = hog1[ypos:ypos+nblocks_per_window,xpos:xpos+nblocks_per_window].ravel()
            hog_feat2 = hog2[ypos:ypos+nblocks_per_window,xpos:xpos+nblocks_per_window].ravel()
            hog_feat3 = hog3[ypos:ypos+nblocks_per_window,xpos:xpos+nblocks_per_window].ravel()
            hog_features = np.hstack((hog_feat1,hog_feat2,hog_feat3))

            xleft = xpos*pix_per_cell
            ytop = ypos*pix_per_cell
            #Extract the image patch
            subimg = cv2.resize(ctrans_tosearch[ytop:ytop+window,xleft:xleft+window],(64,64))
            #Get color features
            if spatial_feat == True:
                spatial_features = bin_spatial(subimg,size=spatial_size)
            if hist_feat == True:
                hist_features = color_hist(subimg,nbins=hist_bins)

            #Scale features and make a prediction
            if (spatial_feat== True) and (hist_feat==True) and (hog_feat==True):
                test_feature = X_scaler.transform(np.hstack((spatial_features,hist_features,
                                                             hog_features)).reshape(1,-1))
            elif (spatial_feat==True) and (hist_feat==False) and (hog_feat==True):
                test_features = X_scaler.transform(np.hstack((spatial_features,hog_features)).reshape(1,-1))

            test_prediction = svc.predict(test_features)
            if test_prediction ==1.:
                #這裡scale係數需要還原
                xbox_left = np.int(xleft*scale) + 700
                ytop_draw = np.int(ytop*scale)+ystart
                win_draw = np.int(window*scale)
                buffer.add_hotwindows(((xbox_left,ytop_draw),(xbox_left+win_draw,ytop_draw+win_draw)))
                cv2.rectangle(draw_img,(xbox_left,ytop_draw),(xbox_left+win_draw,ytop_draw+win_draw),
                             (0,0,255),6)
    return draw_img
Filters
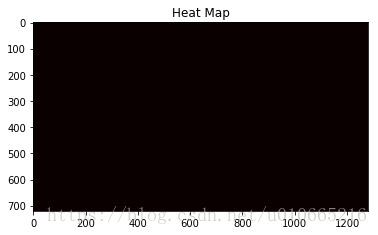
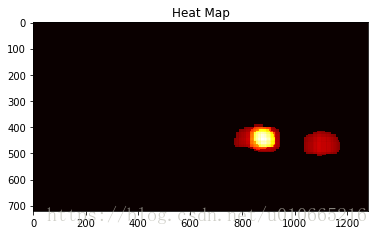
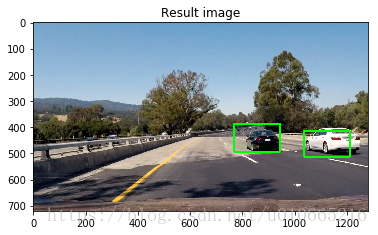
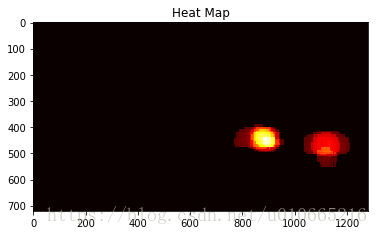
前面程式碼中,我們將檢測到汽車的位置儲存在hot_windows中。通過hot_windows我們來畫出熱點圖,並在熱點圖上應用閾值檢測來清除錯誤檢測的座標
def add_heat(heatmap,bbox_list):
'''
iterate through list of positive sliding windows (bbox_list) and add heat
'''
for box in bbox_list:
# Add +=1 for all pixels inside each bbox
# Assuming each 'box' takes the form ((x1,y1),(x2,y2))
heatmap[box[0][1]:box[1][1],box[0][0]:box[1][0]]+=1
# return updated heatmap
return heatmap# Iterate through
def apply_threshold(heatmap,threshold):
'''
Appy threshold on heatmap
return thresholded heatmap where all values below threshold are set to 0
'''
# Zero out pixles below the threshold
heatmap[heatmap<=threshold] = 0
# return thresholded map
return heatmap
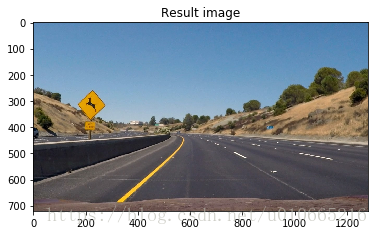
def draw_labeled_bboxes(img,labels):
#Iterate through all detected cars
for car_number in range(1,labels[1]+1):
#find pixels with each car_number label value
nonzero = (labels[0]==car_number).nonzero()
# Identify x and y values of those pixels
nonezeroy = np.array(nonzero[0])
nonezerox = np.array(nonzero[1])
# Define a bounding box based on min/max x and y
bbox = ((np.min(nonezerox),np.min(nonezeroy)),(np.max(nonezerox),np.max(nonezeroy)))
# Check car validtion ==> too small then ignore
if(abs(bbox[0][0]-bbox[1][0])>50 and abs(bbox[0][1]-bbox[1][1])>50):#too small rect are ignore
cv2.rectangle(img,bbox[0],bbox[1],(0,255,0),6)
# return image
return imgsliding_window = {'scale':[0.6, 0.8, 1.2, 1.6, 2, 2.2],
'ystart':[400, 400, 400, 350, 350, 350],
'ystop': [520, 520, 620, 620, 656, 656],
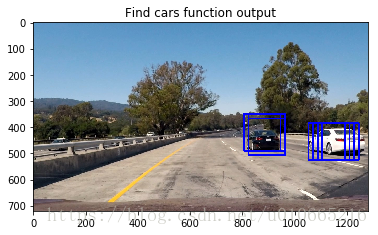
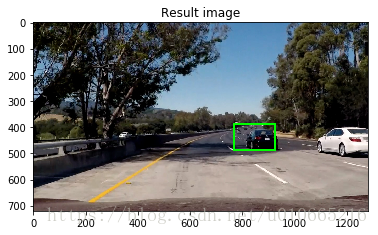
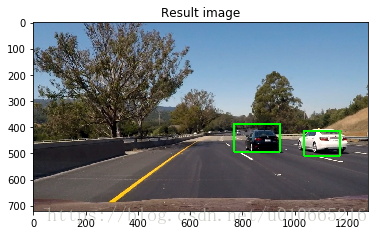
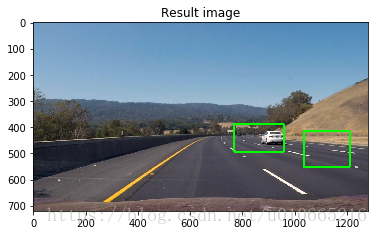
'cells_per_step': [3, 3, 1, 1, 1, 1]}def pipline_test(image):
'''
takes an image and returns a image
'''
#initialize for heatmap of current frame
heat_sframe = np.zeros_like(image[:,:,0]).astype(np.float)
#initialize hot_windows recoder
buffer.hot_windows = []
threshold = 50
for idx ,scale in enumerate(sliding_window['scale']):
ystart = sliding_window['ystart'][idx]
ystop = sliding_window['ystop'][idx]
cells_per_step = sliding_window['cells_per_step'][idx]
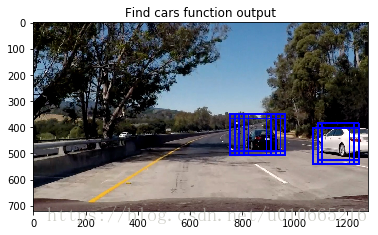
out_img = find_cars(image,ystart,ystop,cells_per_step,scale,svc,X_scaler,color_space,orient,
pix_per_cell,cell_per_block,spatial_feat,spatial_size,hist_feat,hist_bins)
plt.imshow(out_img)
plt.title('Find cars function output')
plt.show()
#Add heat to each box in box list
#print(buffer.hot_windows)
heat_sframe = add_heat(heat_sframe,buffer.hot_windows)
heat_sframe = apply_threshold(heat_sframe,threshold)
buffer.update_heat_historic(heat_sframe)
smooth_heat = np.zeros_like(image[:,:,0]).astype(np.float)
for h in buffer.heat_mframe:
smooth_heat +=h
smooth_heat = smooth_heat/len(buffer.heat_mframe)
heatmap = np.clip(smooth_heat,0,255)
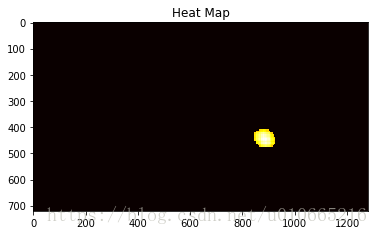
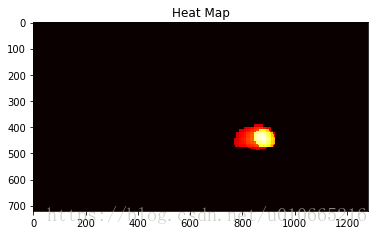
plt.imshow(heatmap,cmap='hot')
plt.title('Heat Map')
plt.show()
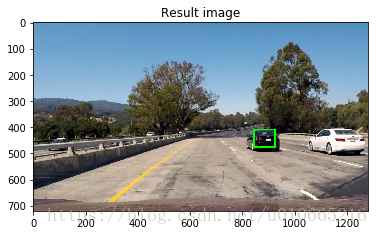
labels = label(heatmap)
new = draw_labeled_bboxes(np.copy(image),labels)
plt.imshow(new)
plt.title('Result image')
plt.show()
return new
# Read test image
test_data = glob.glob('test_images/*.jpg')
for file in test_data:
image = mpimg.imread(file)
new_image = pipline_test(image)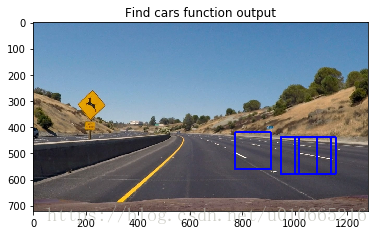

#接下來實現 vehicle detector pipeline

def pipline(image):
    '''
    takes an image and returns a image

    '''
    #initialize for heatmap of current frame
    heat_sframe = np.zeros_like(image[:,:,0]).astype(np.float)
    #initialize hot_windows recoder
    buffer.hot_windows = []
    threshold = 50

    for idx ,scale in enumerate(sliding_window['scale']):
        ystart = sliding_window['ystart'][idx]
        ystop = sliding_window['ystop'][idx]
        cells_per_step = sliding_window['cells_per_step'][idx]
        out_img = find_cars(image,ystart,ystop,cells_per_step,scale,svc,X_scaler,color_space,orient,
                           pix_per_cell,cell_per_block,spatial_feat,spatial_size,hist_feat,hist_bins)

    heat_sframe = add_heat(heat_sframe,buffer.hot_windows)

    heat_sframe = apply_threshold(heat_sframe,threshold)

    buffer.update_heat_historic(heat_sframe)

    smooth_heat = np.zeros_like(image[:,:,0]).astype(np.float)

    for h in buffer.heat_mframe:
        smooth_heat +=h

    smooth_heat = smooth_heat/len(buffer.heat_mframe)
    heatmap = np.clip(smooth_heat,0,255)

    labels = label(heatmap)
    new = draw_labeled_bboxes(np.copy(image),labels)
    return new
# Run pipeline on video
video_output = 'project_solution.mp4'
clip1 = VideoFileClip('project_video.mp4')
white_clip = clip1.fl_image(pipline)
%time white_clip.write_videofile(video_output,audio=False)[MoviePy] >>>> Building video project_solution.mp4
[MoviePy] Writing video project_solution.mp4
100%|█████████▉| 1260/1261 [12:31<00:00, 1.70it/s]
[MoviePy] Done.
[MoviePy] >>>> Video ready: project_solution.mp4
CPU times: user 12min 32s, sys: 2.17 s, total: 12min 34s
Wall time: 12min 32s