
unity 通過使用 photon networking Pun 實現 HTC Vive VR的多人聯網。進階版 《二》
阿新 • • 發佈:2018-12-31
——pun的配置,以及實現頭盔以及兩個手柄的同步。
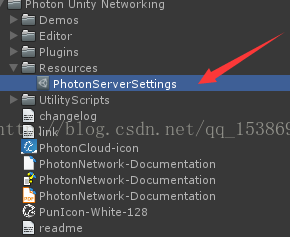
下載完pun並匯入後如圖所示
有這些東西,pun的介紹還是很清楚的,有很多demo可以學習,而且文件自帶。很容易上手。
首先,就是伺服器的配置了。就是圖中箭頭所指向的。開啟它,
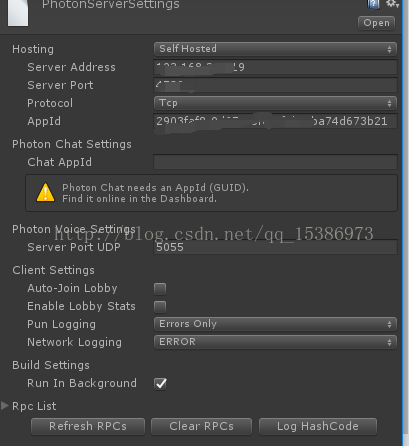
可以看到很多設定,很顯然一般最重要的都在最上面,也就是hosting 主機。因為我將photon的伺服器裝到了自己的主機上,所以我連的就是我自己的photon伺服器。主機有很多選項,主要是歐洲,美洲的。(聽說國內也已經有了)(其實也是因為國外的經常掉線我才搗鼓著把伺服器裝到自己電腦上的。如果你想了解這一部分的知識的話,那你就告訴我)如果你是連結自己伺服器的話IP自然不用說,埠號要你看是Tcp連線方式還是Udp連線方式。
配置好後就是連線伺服器了。這裡講一下他的連線模式。(感覺這個用詞也不太好)。pun和現在主流的網路遊戲一樣都是基於大廳,房間的模式。就像DOTA,LOL這樣,我們進入大廳後,只能說是連線到伺服器,還要看我們進入哪些房間,房間有多少人,房間的一些規則。這些。當然也可以隨機加入房間。(怎麼說呢,我的描述我覺得還是有點問題,但是玩過這類遊戲的話,肯定很明白,明白意思就好)。
下面程式碼
上面這是一段自動加入房間的程式碼。public class ConnectAndJoinRandom : Photon.MonoBehaviour { /// <summary>Connect automatically? If false you can set this to true later on or call ConnectUsingSettings in your own scripts.</summary> public bool AutoConnect = true; public byte Version = 1; /// <summary>if we don't want to connect in Start(), we have to "remember" if we called ConnectUsingSettings()</summary> private bool ConnectInUpdate = true; public void Start() { //Debug.Log("當前是否連線" + PhotonNetwork.connected); PhotonNetwork.autoJoinLobby = false; // we join randomly. always. no need to join a lobby to get the list of rooms. if (PhotonNetwork.connected) { PhotonNetwork.JoinRandomRoom(); } } public virtual void Update() { if (ConnectInUpdate && AutoConnect && !PhotonNetwork.connected) { Debug.Log("Update() was called by Unity. Scene is loaded. Let's connect to the Photon Master Server. Calling: PhotonNetwork.ConnectUsingSettings();"); ConnectInUpdate = false; PhotonNetwork.ConnectUsingSettings(Version + "." + SceneManagerHelper.ActiveSceneBuildIndex); } } // below, we implement some callbacks of PUN // you can find PUN's callbacks in the class PunBehaviour or in enum PhotonNetworkingMessage public virtual void OnConnectedToMaster() { Debug.Log("OnConnectedToMaster() was called by PUN. Now this client is connected and could join a room. Calling: PhotonNetwork.JoinRandomRoom();"); PhotonNetwork.JoinRandomRoom(); } public virtual void OnJoinedLobby() { Debug.Log("OnJoinedLobby(). This client is connected and does get a room-list, which gets stored as PhotonNetwork.GetRoomList(). This script now calls: PhotonNetwork.JoinRandomRoom();"); PhotonNetwork.JoinRandomRoom(); } public virtual void OnPhotonRandomJoinFailed() { Debug.Log("OnPhotonRandomJoinFailed() was called by PUN. No random room available, so we create one. Calling: PhotonNetwork.CreateRoom(null, new RoomOptions() {maxPlayers = 4}, null);"); PhotonNetwork.CreateRoom(null, new RoomOptions() { MaxPlayers = 4 }, null); } // the following methods are implemented to give you some context. re-implement them as needed. public virtual void OnFailedToConnectToPhoton(DisconnectCause cause) { Debug.LogError("Cause: " + cause); } public void OnJoinedRoom() { Debug.Log("OnJoinedRoom() called by PUN. Now this client is in a room. From here on, your game would be running. For reference, all callbacks are listed in enum: PhotonNetworkingMessage"); } }
勾選上autoconnect 掛到空物體下,在初始化的時候就可以連結到伺服器,當然我還是建議,在沒有很熟悉的情況下,在他的demo上面進行新增修改,這樣不會出錯。
建議使用這個demo。有指令碼實時顯示著連結狀態,非常好用。
好,下一節講如何連線HTC VIVE。不要怪我一節說這麼少內容,反正也沒什麼人看,哈哈哈哈
文章一連結:http://blog.csdn.net/qq_15386973/article/details/54312091