
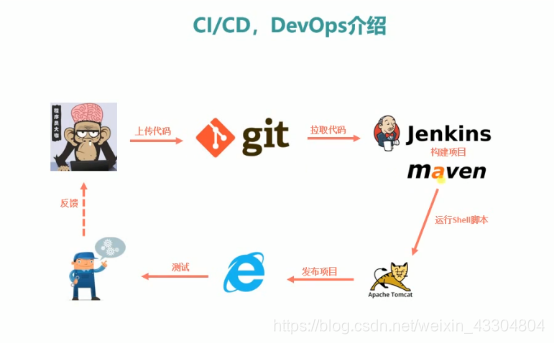
Pipeline流水線及分散式流水線釋出PHP專案
Jenkins的Pipeline流水線
| 主機名 | IP地址 | 備註 |
|---|---|---|
| Git | 192.168.146.136 | Git伺服器 |
| Jenkins | 192.168.146.137 | Jenkins伺服器 |
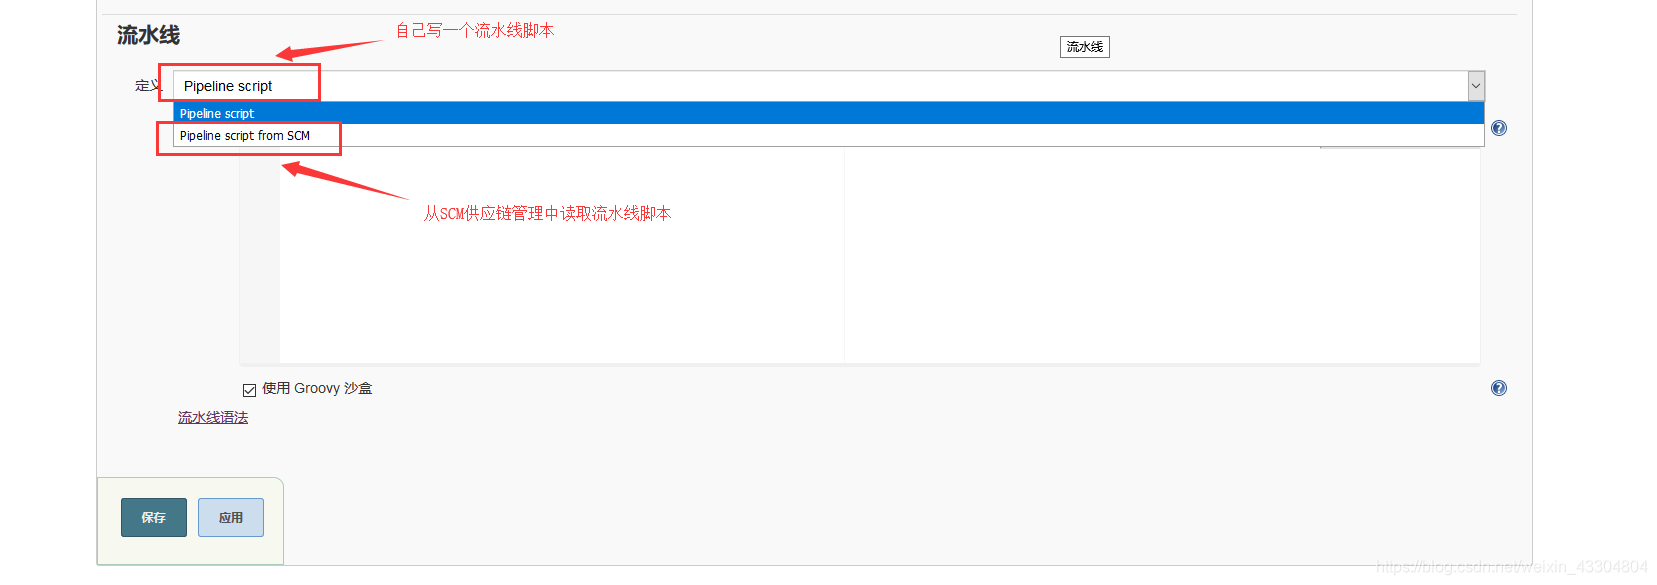
- Pipeline流水線介紹
(1) Jenkins Pipeline(或者簡稱為“Pipeline”)是一套外掛,支援在 Jenkins 中實施和整合持續交付流水線。
持續交付(CD)流水線是將軟體從版本控制釋出到使用者和客戶的過程的自動化表達。對軟體的每一次改變(在原始碼控制中提交)都會在釋出過程中經歷一個複雜的過程。這個過程包括以可靠和可重複的方式構建軟體,以及通過測試和部署的多個階段來推進構建的軟體(稱為“構建”)。
Pipeline 提供了一套可擴充套件的工具,用於通過 Pipeline domain-specific language(DSL)語法將交付流水線“作為程式碼”建模。
Jenkins Pipeline 的定義寫在稱為 Jenkinsfile 的文字檔案中,這個檔案可以提交到專案的程式碼控制倉庫。這是“Pipeline-as-code”的基礎。 將 CD 流水線作為應用程式的一部分進行版本控制,並像任何其他程式碼一樣進行審查。
(2) 建立 Jenkinsfile 檔案並且提交到版本控制有下面幾個好處:
對所有的 branches 和 pull 請求自動建立 Pipeline。
Pipeline 上的程式碼審查/迭代(along with the remaining source code)。
稽核追蹤 Pipeline
Pipeline 的單一真實來源,可由專案的多個成員檢視和編輯。
雖然用於定義 Pipeline 的語法無論是在 Web UI 中還是在 Jenkinsfile 中是相同的,但在 Jenkinsfile 中定義 Pipeline 並提交到原始碼控制中通常被認為是最佳實踐。
(3) Pipeline的幾個基本概念:
Stage: 階段,一個Pipeline可以劃分為若干個Stage,每個Stage代表一組操作。注意,Stage是一個邏輯分組的概念,可以跨多個Node。
Node: 節點,一個Node就是一個Jenkins節點,或者是Master,或者是Agent,是執行Step的具體執行期環境。
Step: 步驟,Step是最基本的操作單元,小到建立一個目錄,大到構建一個Docker映象,由各類Jenkins Plugin提供。
-
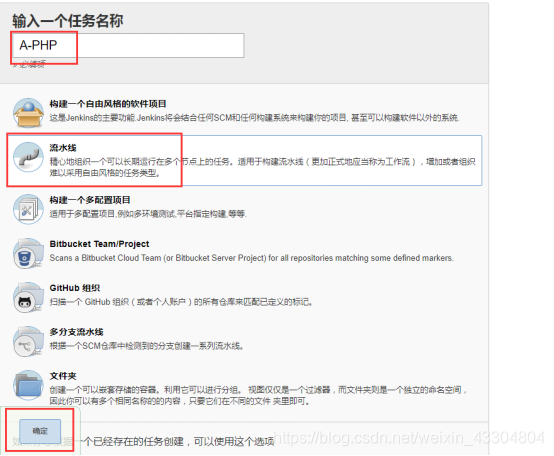
建立一個基於Pipeline流水線的專案
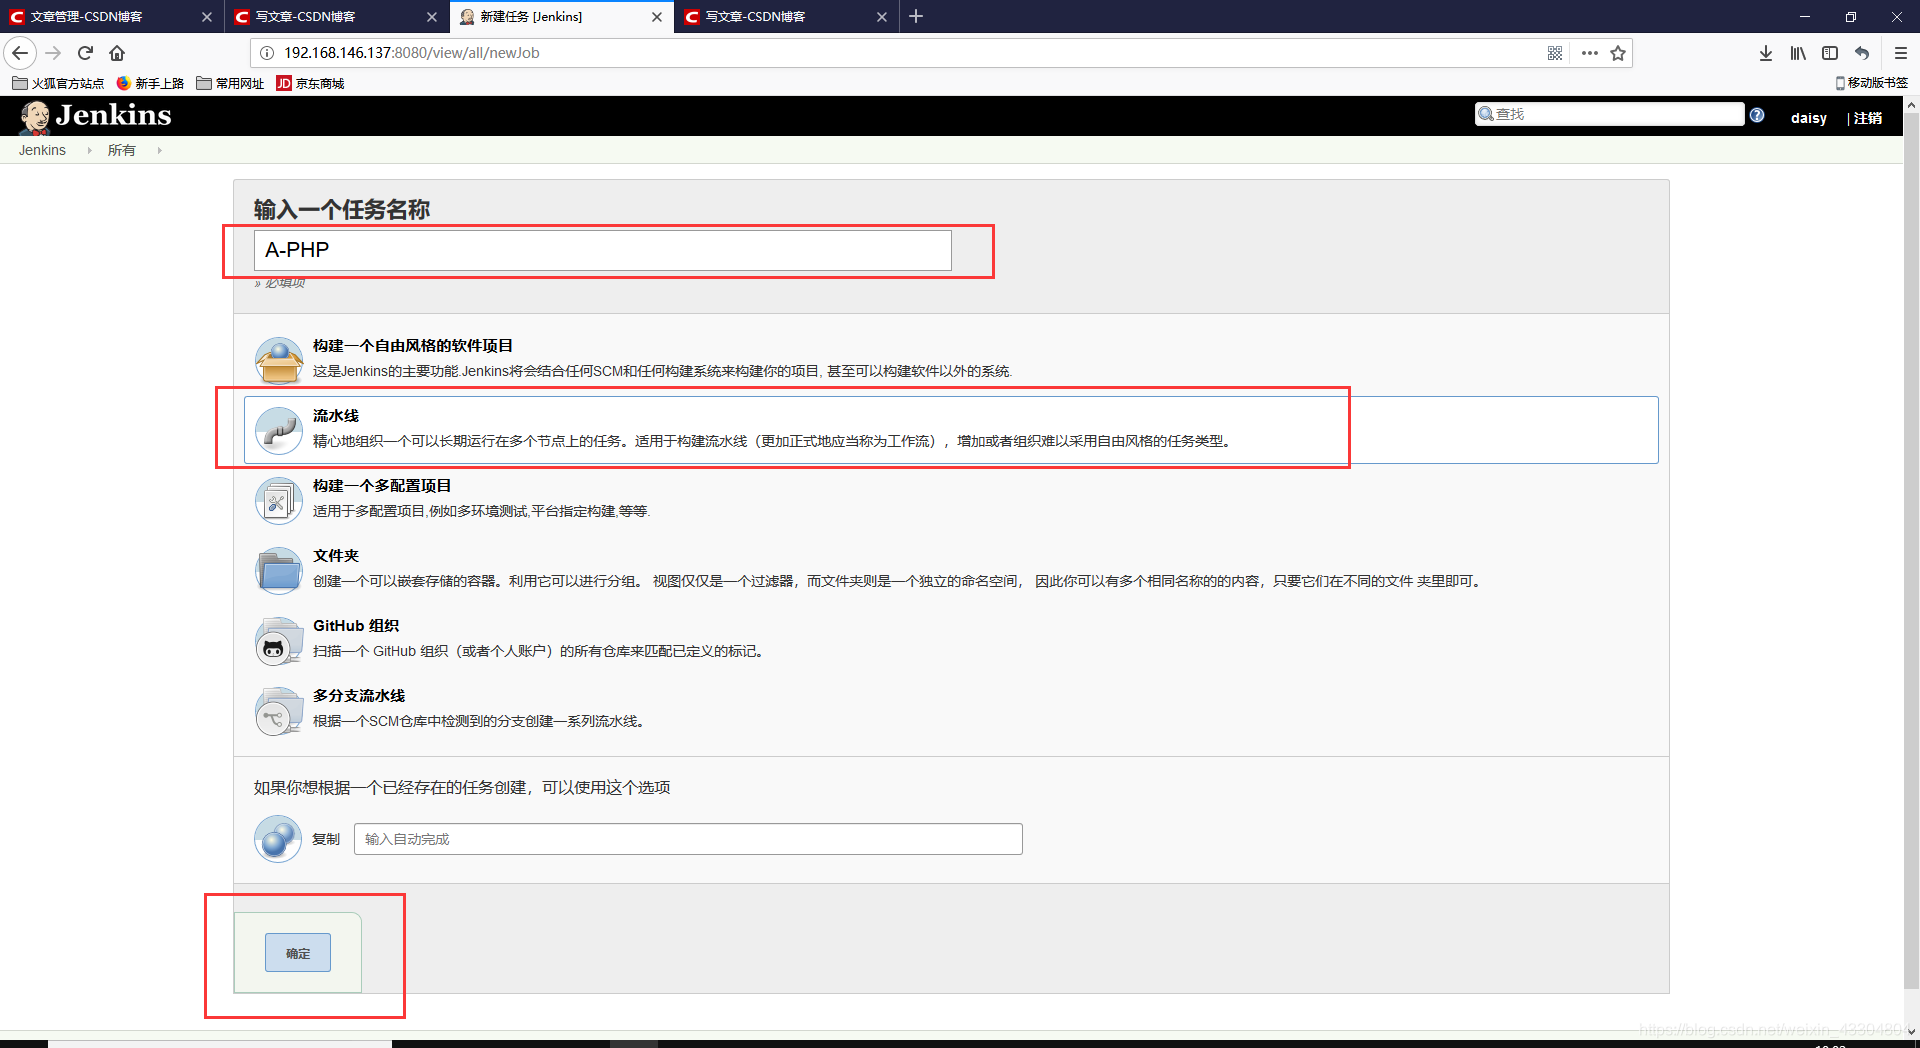
-
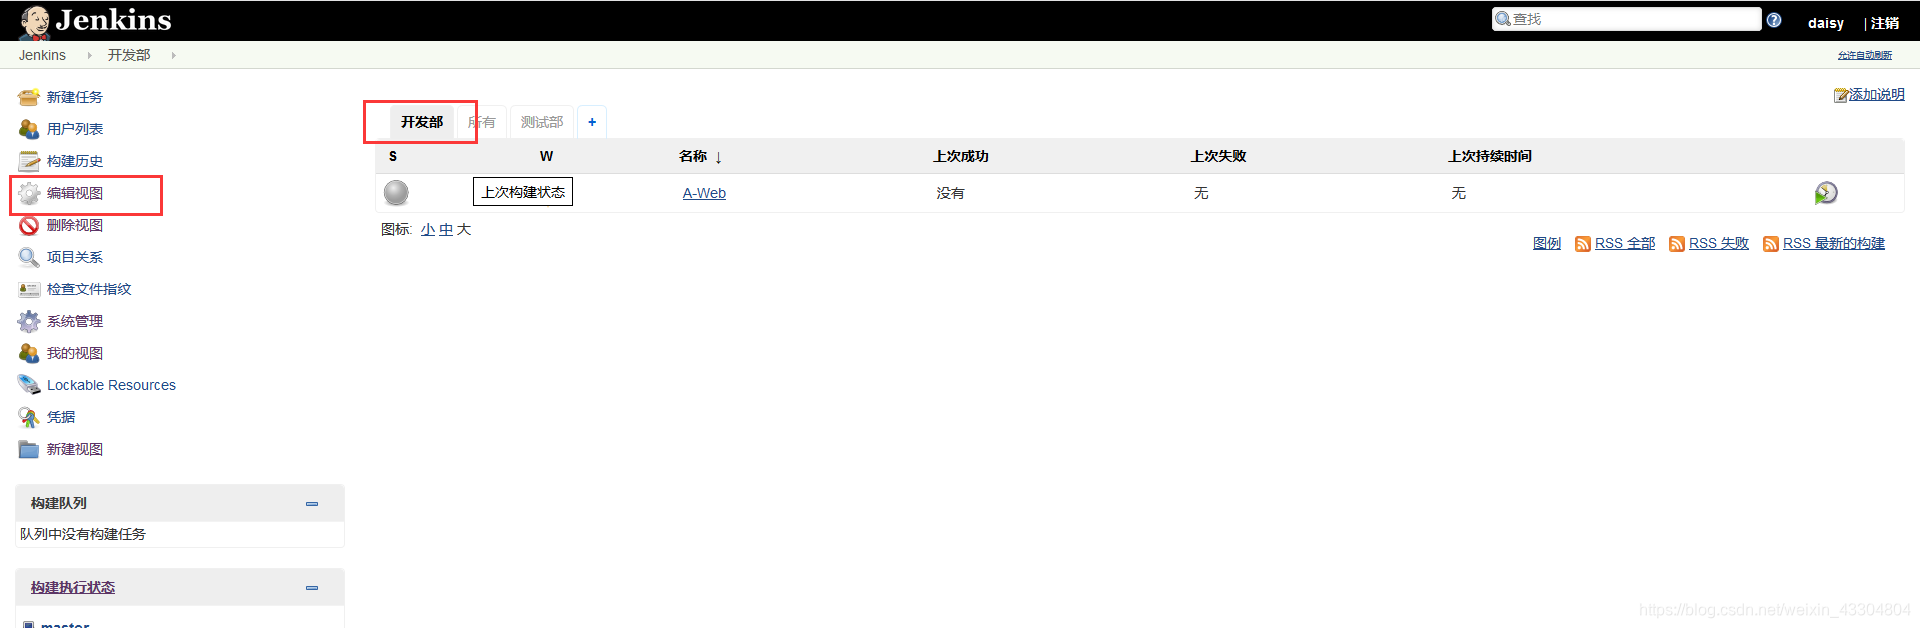
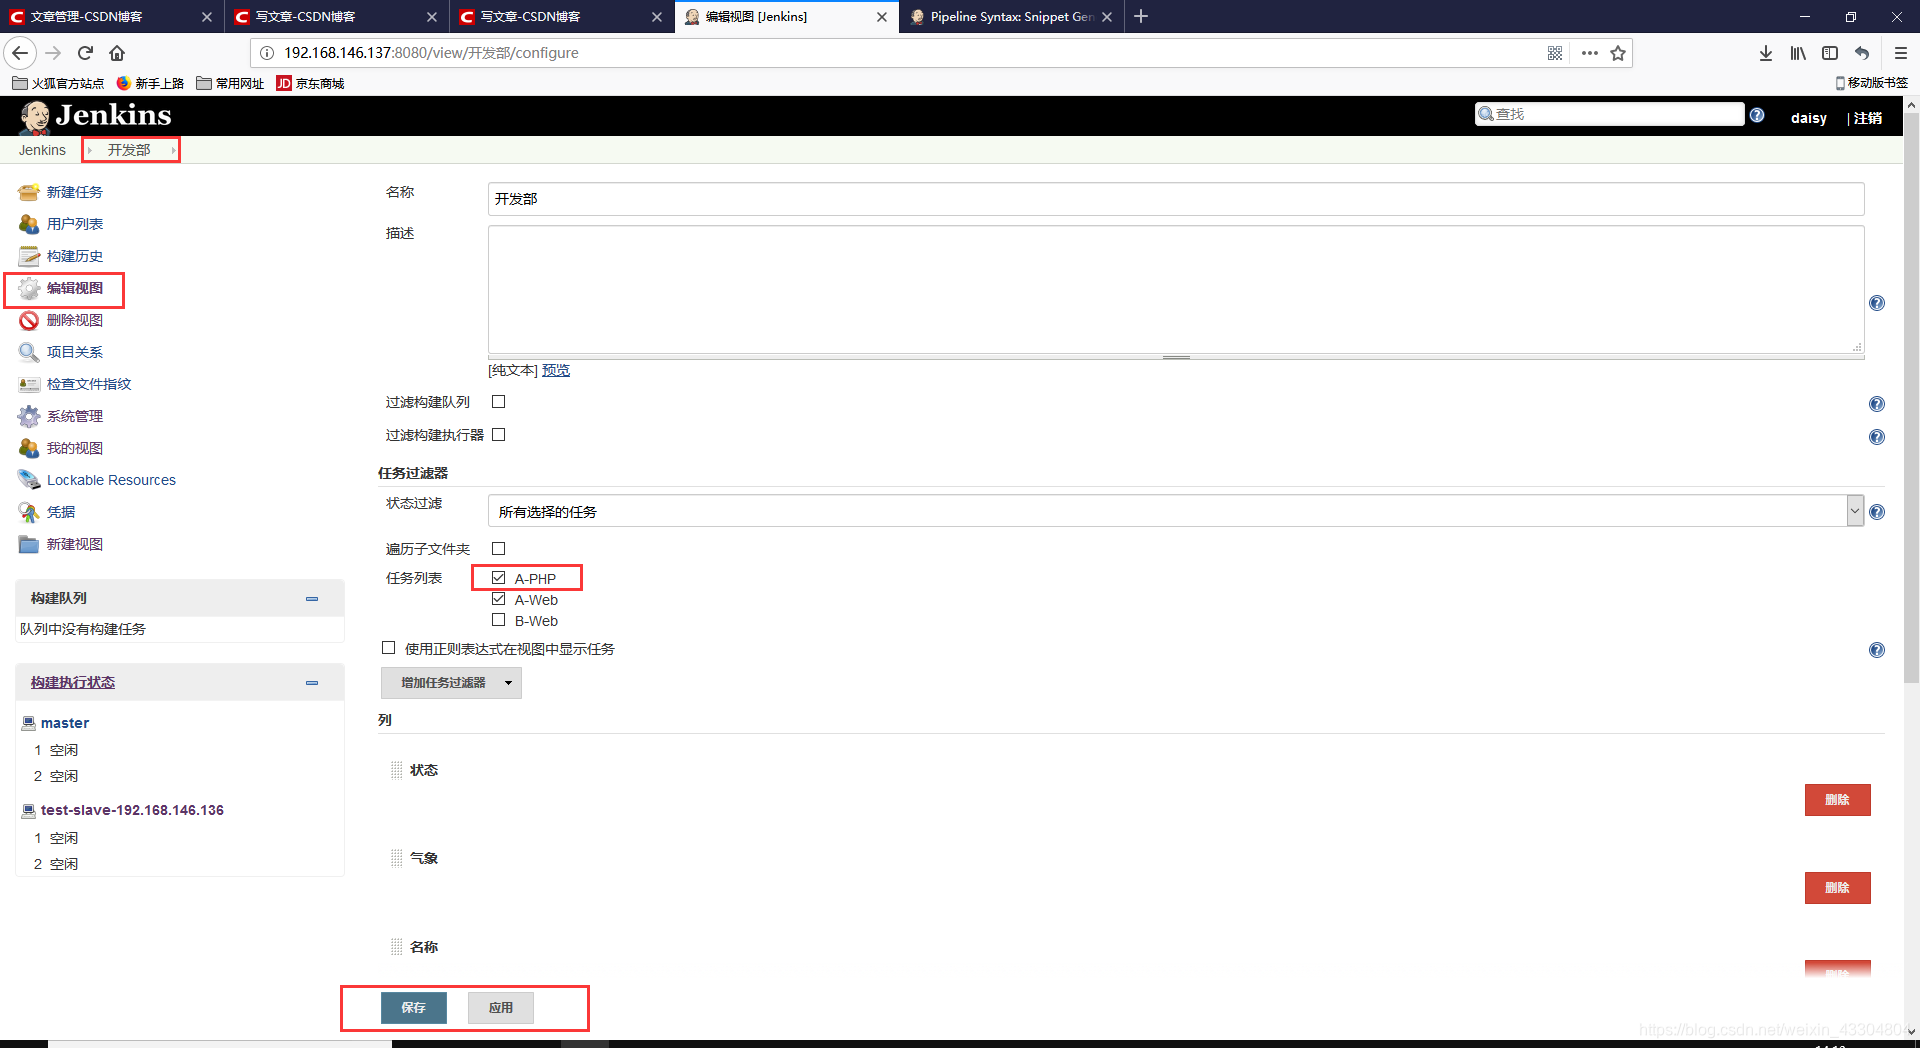
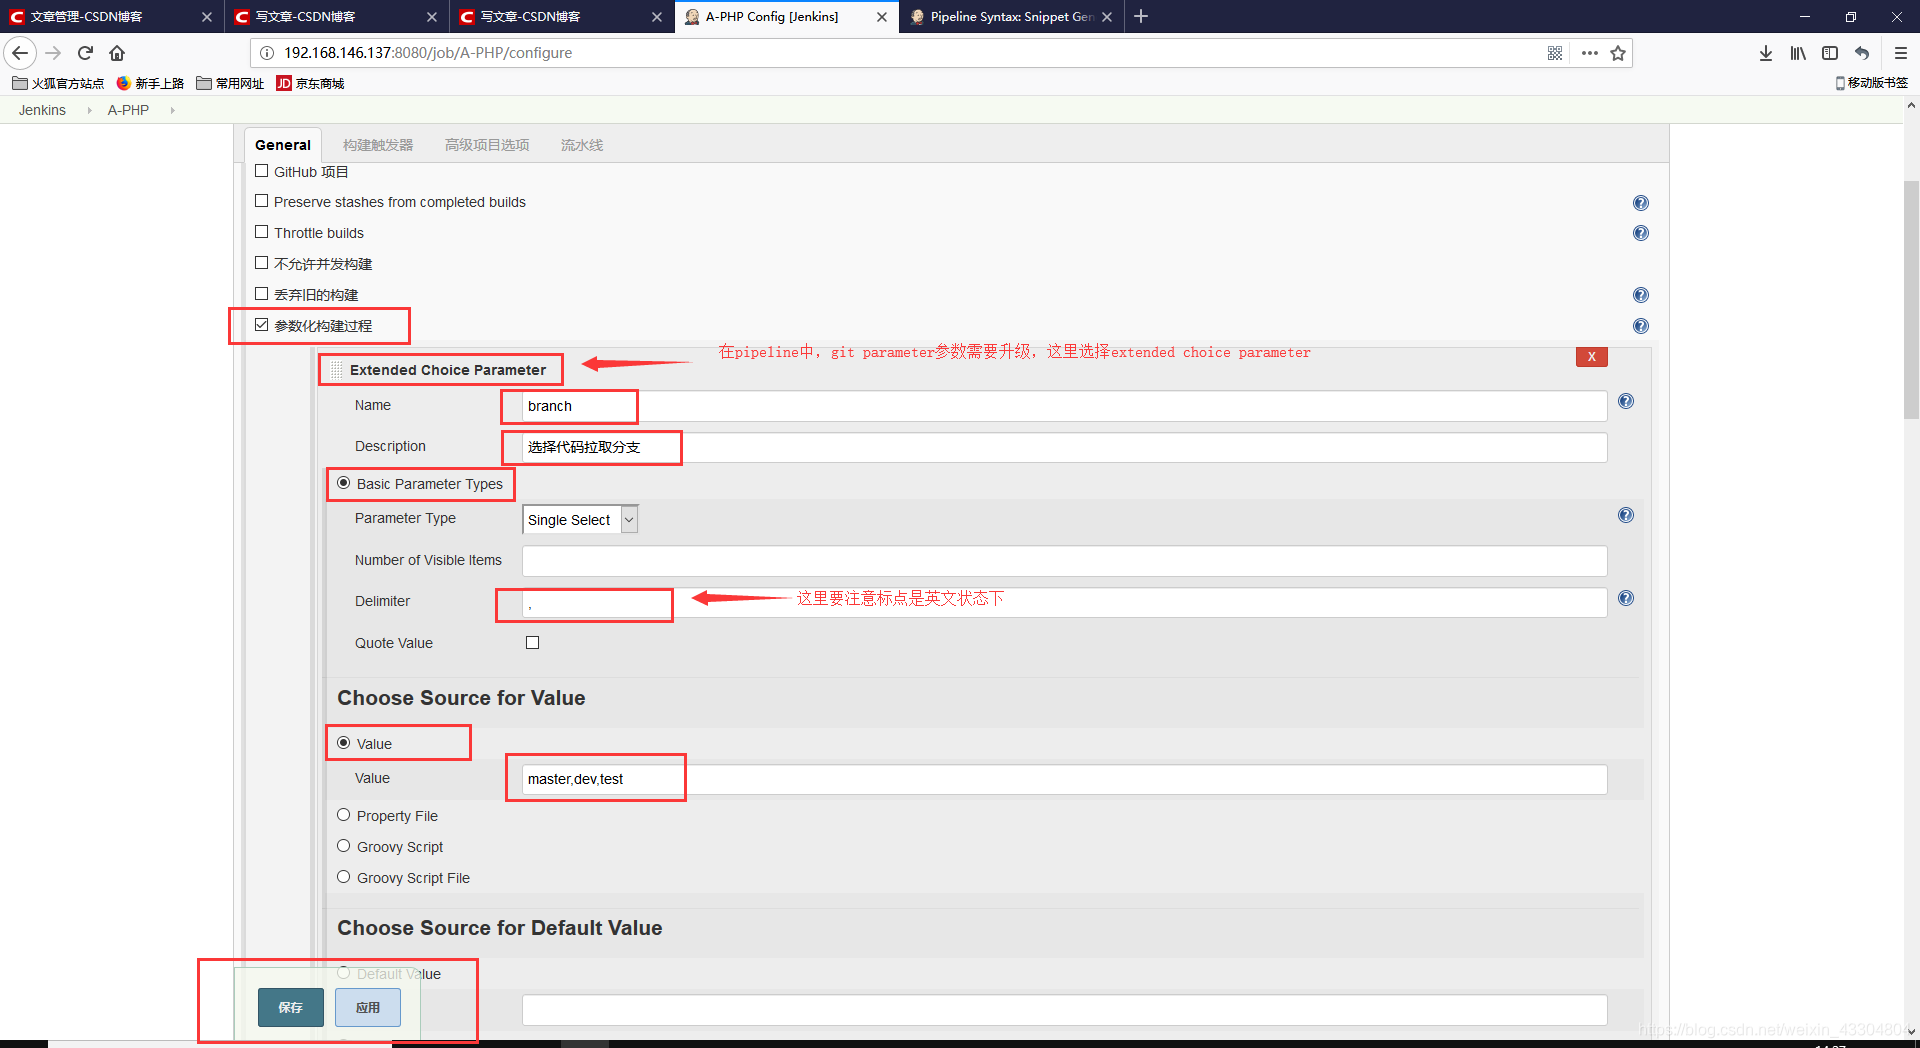
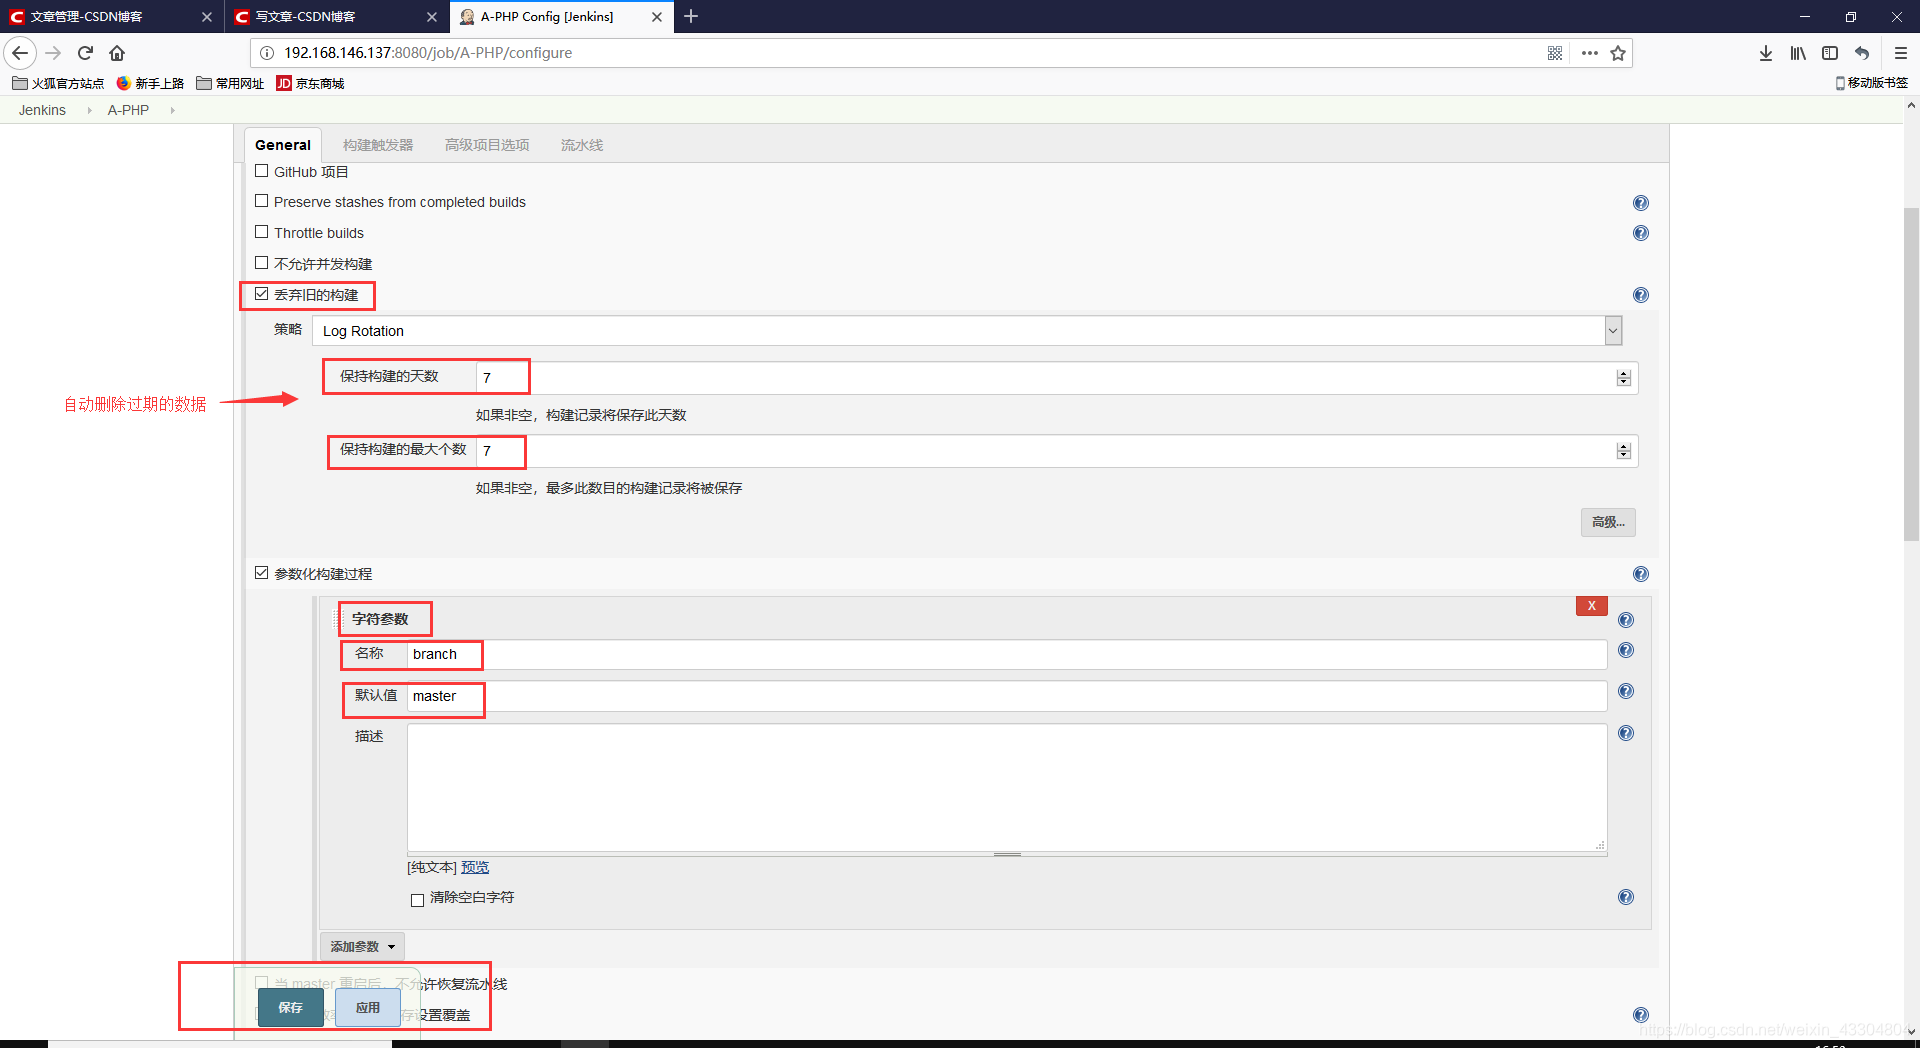
新增專案Git引數化構建
 node:代表單臺伺服器的節點
 -
Pipeline指令碼語法架構介紹
#Pipeline指令碼語法架構
node ('slave節點名') {          #被操控的節點伺服器
   def 變數    #def可以進行變數宣告
   stage('階段名A'){     #流水線階段一
       執行步驟A
       執行步驟B
       執行步驟C
   }
   stage('階段名B'){     #流水線階段二
       執行步驟A
        執行步驟B
       執行步驟C
   }
    stage('階段名C'){     #流水線階段三
       執行步驟A
       執行步驟B
       執行步驟C
   }
}
#流水線模板指令碼
node {
   def mvnHome
   stage('Preparation') { // for display purposes
      // Get some code from a GitHub repository
      git 'https://github.com/jglick/simple-maven-project-with-tests.git'
      // Get the Maven tool.
      // ** NOTE: This 'M3' Maven tool must be configured
      // **       in the global configuration.
      mvnHome = tool 'M3'
   }
   stage('Build') {
      // Run the maven build         # “//” 註釋
      if (isUnix()) {
         sh "'${mvnHome}/bin/mvn' -Dmaven.test.failure.ignore clean package"
      } else {
         bat(/"${mvnHome}\bin\mvn" -Dmaven.test.failure.ignore clean package/)
      }
   }
   stage('Results') {
      junit '**/target/surefire-reports/TEST-*.xml'
      archive 'target/*.jar'
   }
}
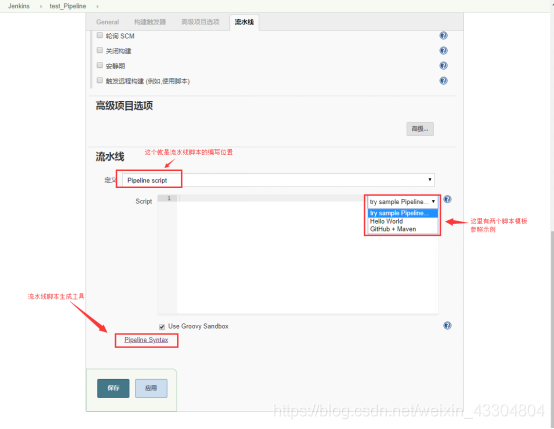
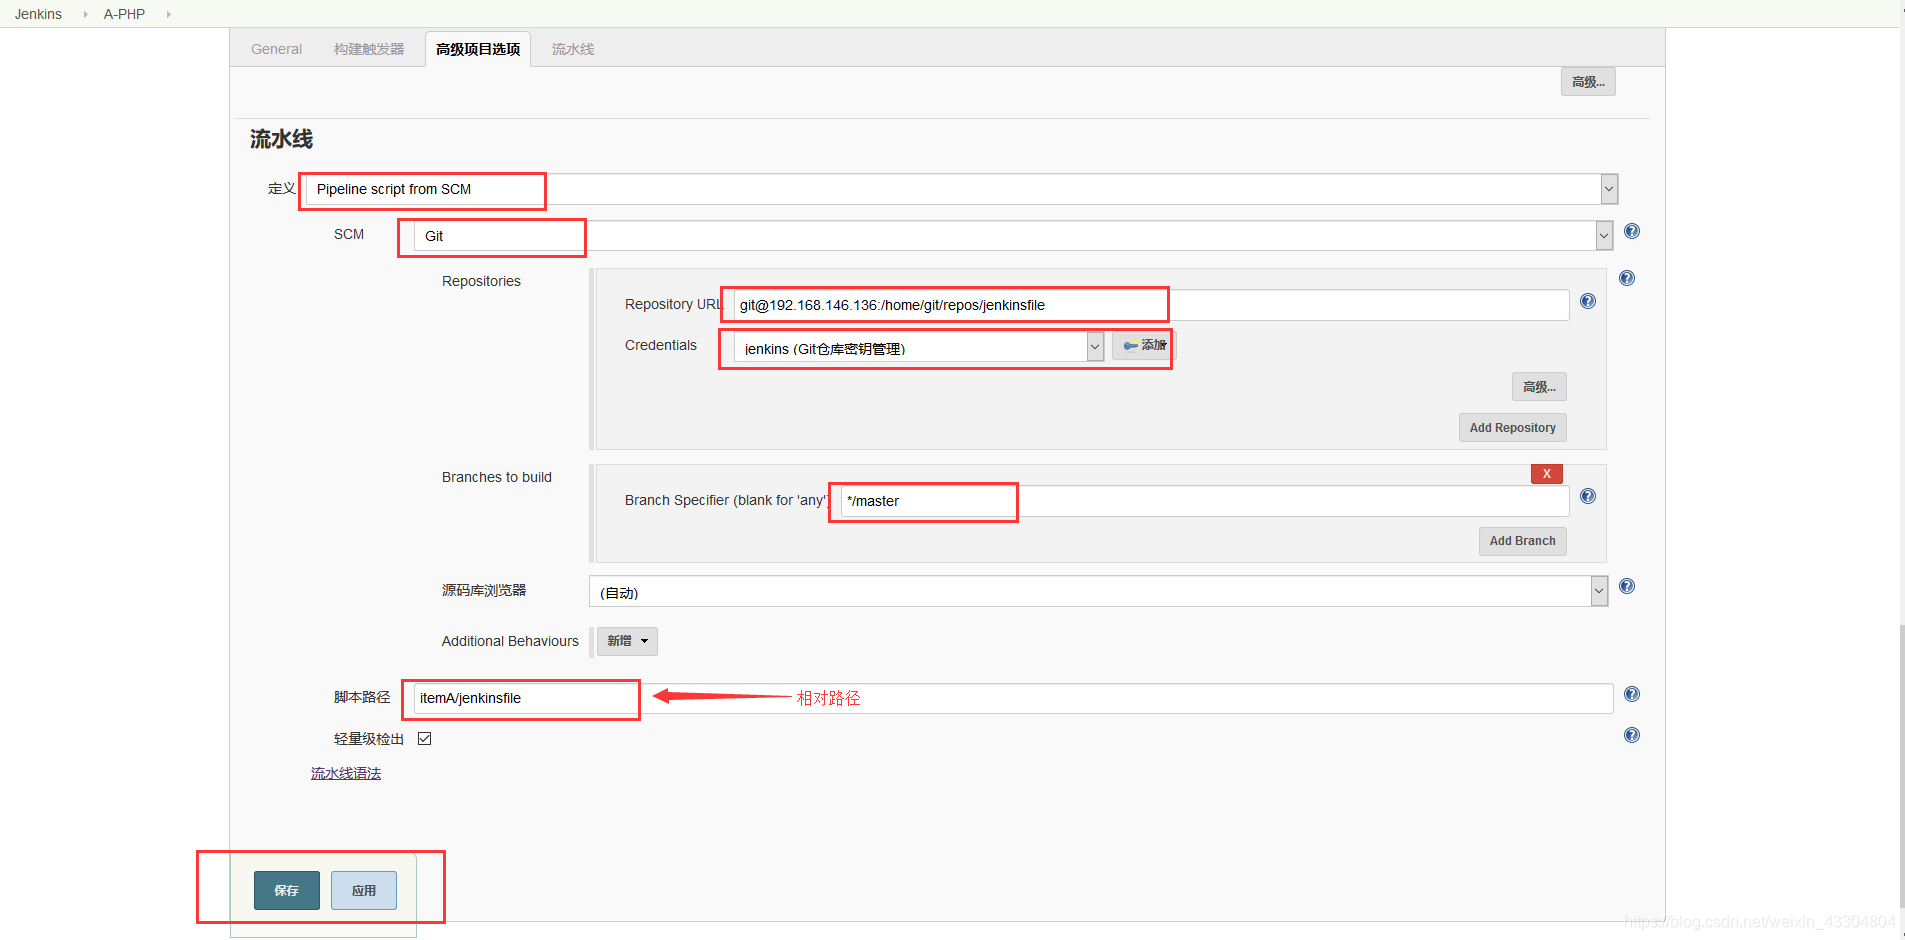
- 利用Pipeline Syntax,編寫Pipeline Script並構建
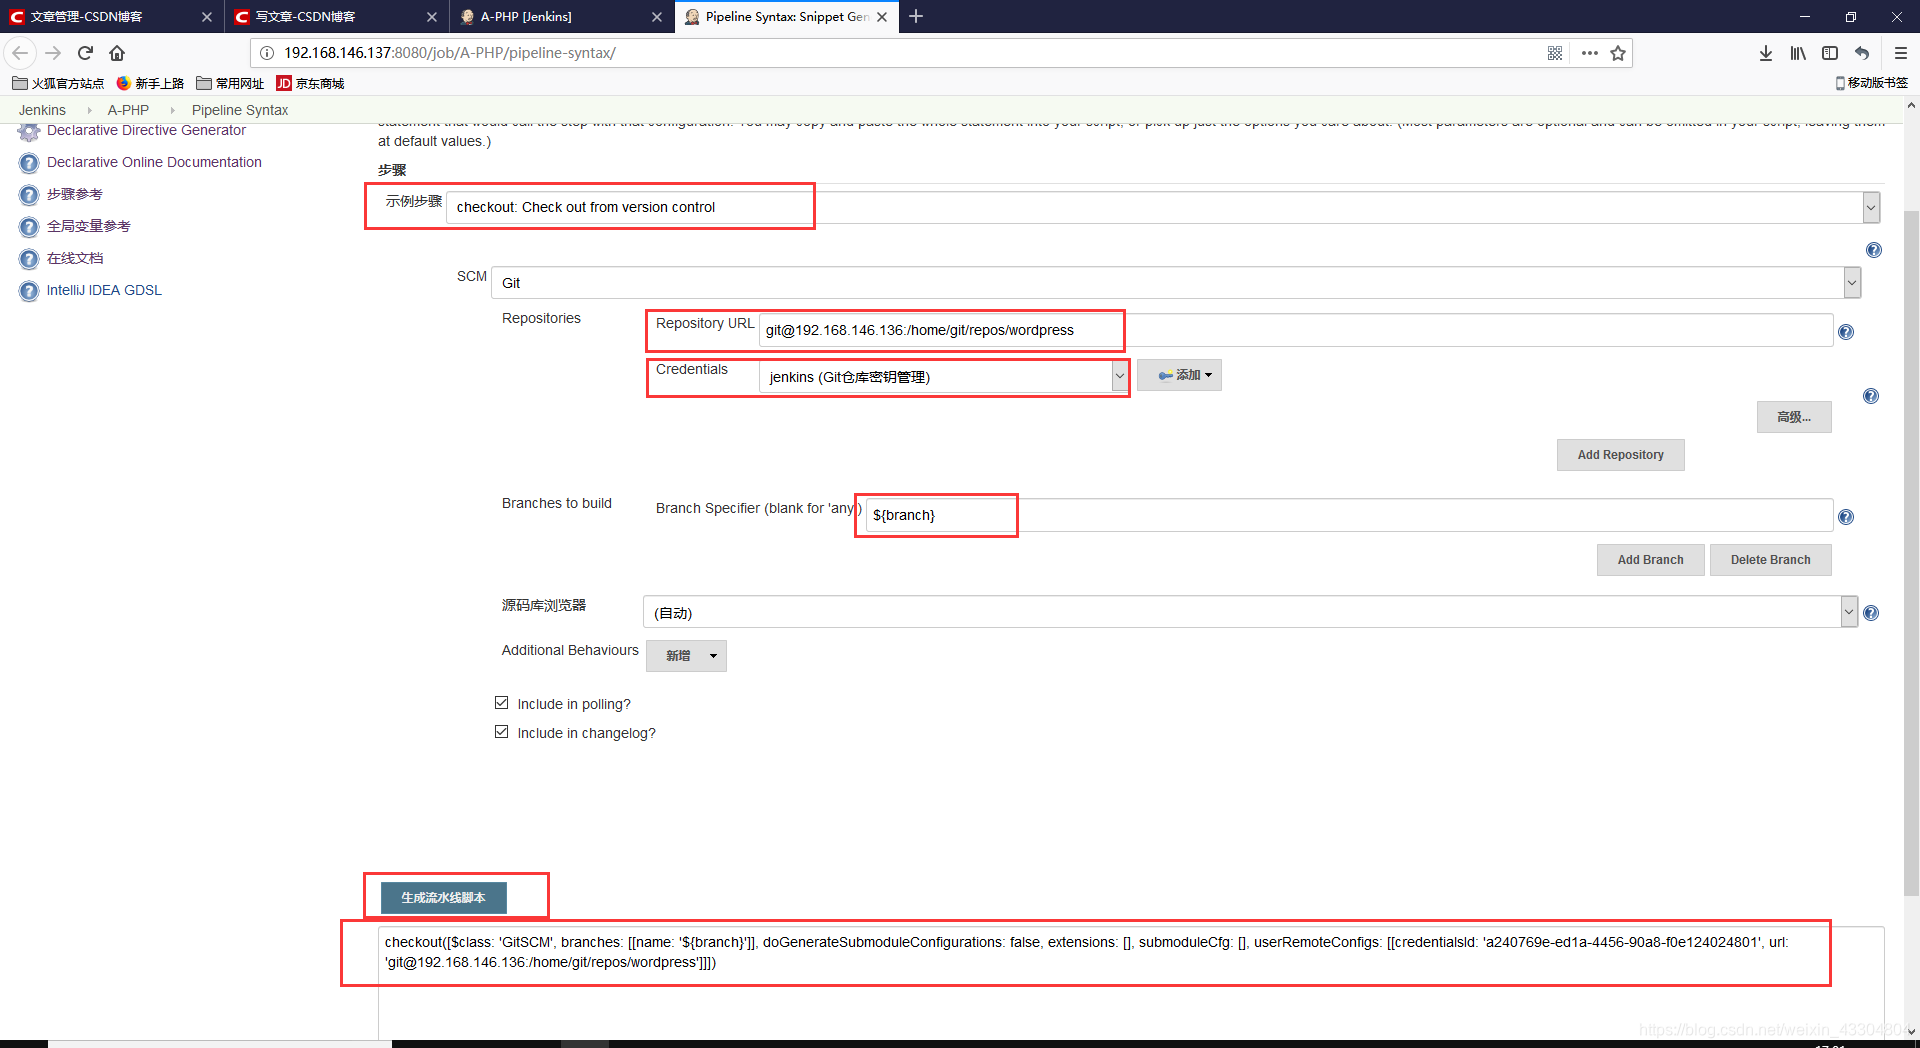
(1)進入Pipeline Syntax
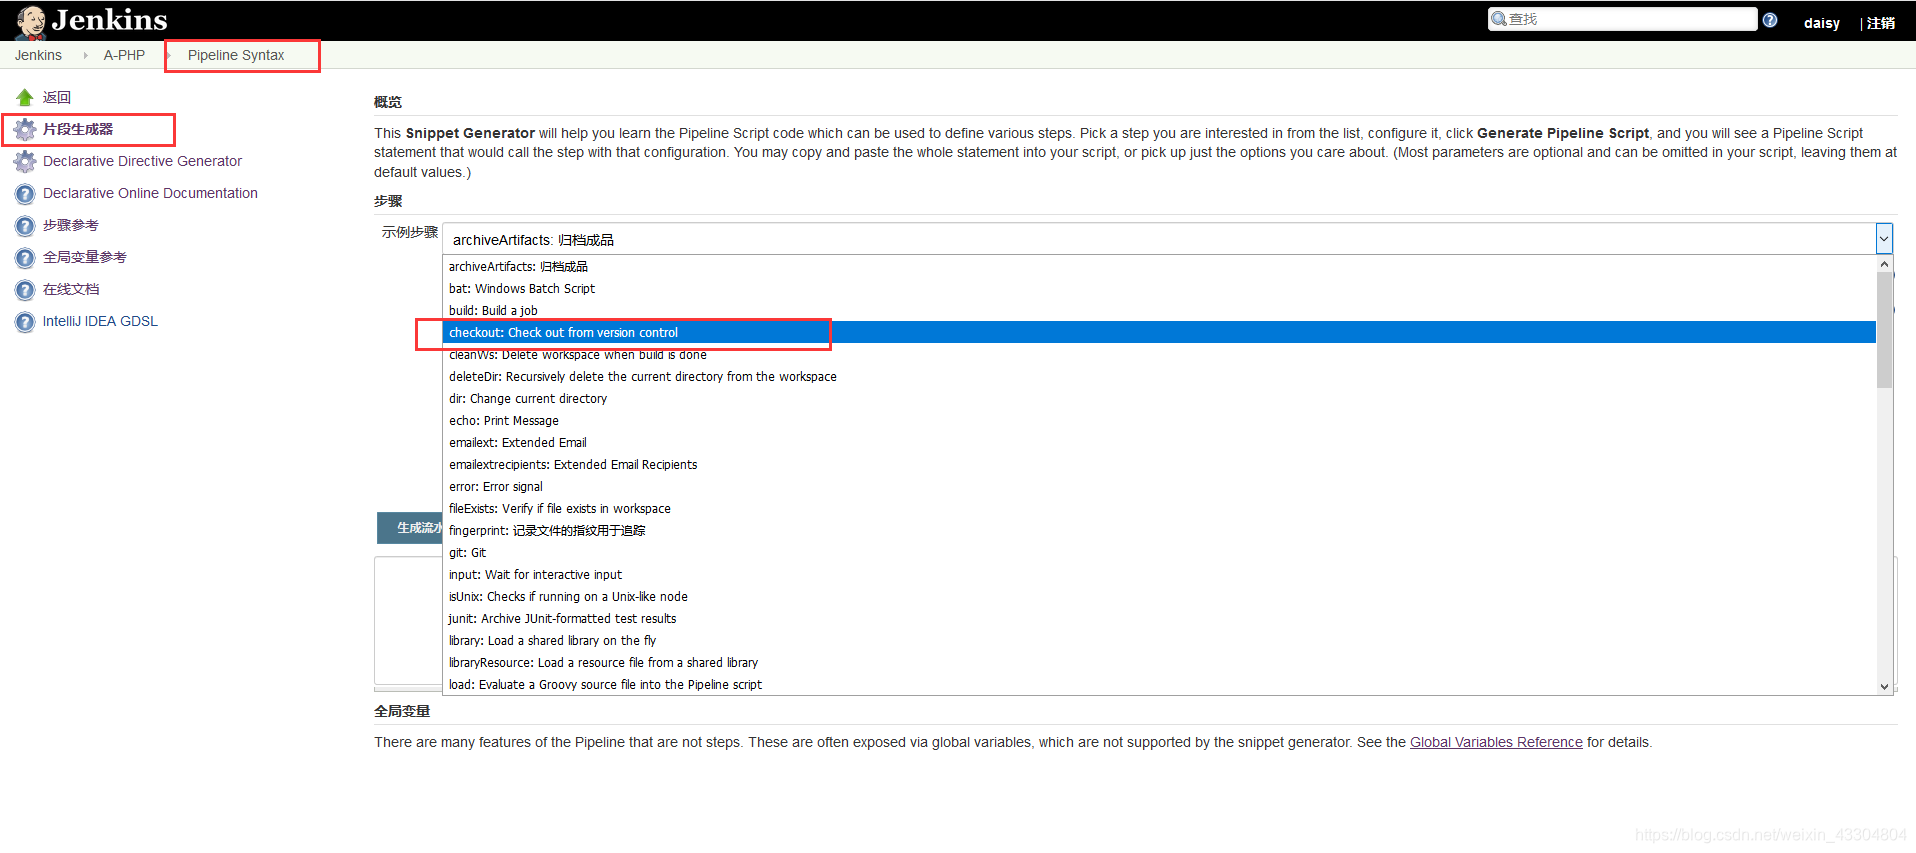 (2)通過指令碼程式碼生成器,生成Pipeline指令碼程式碼
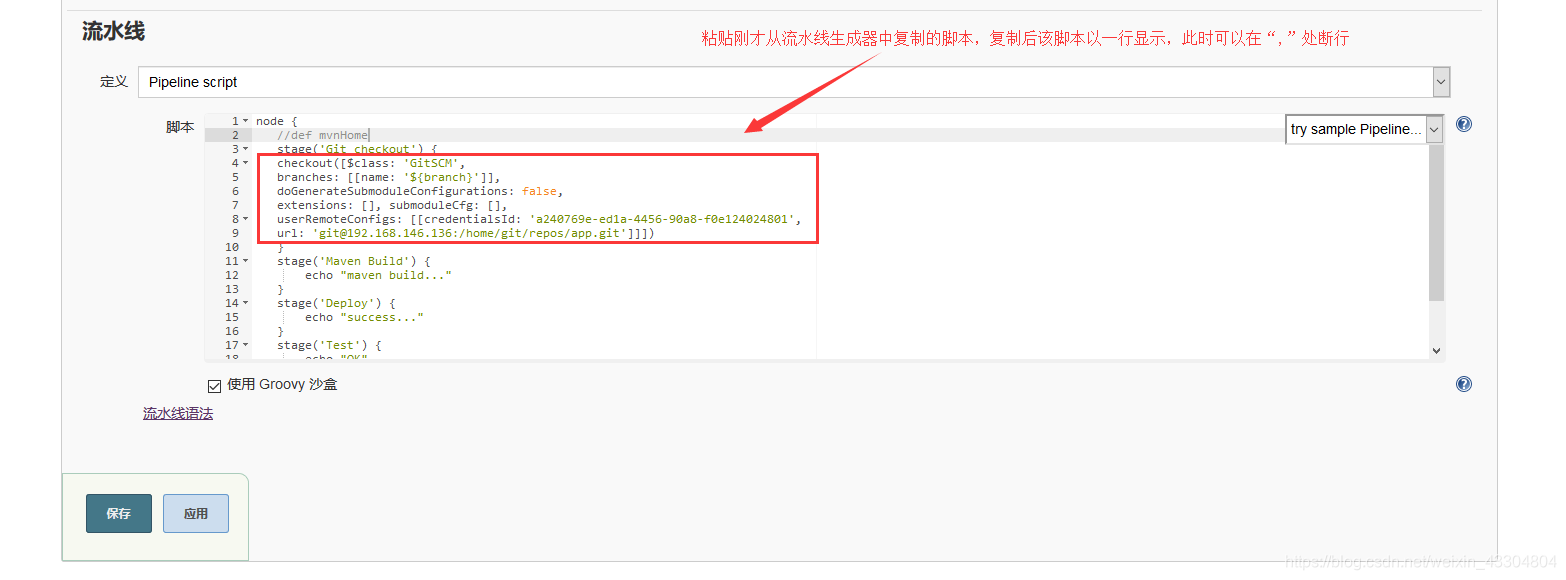
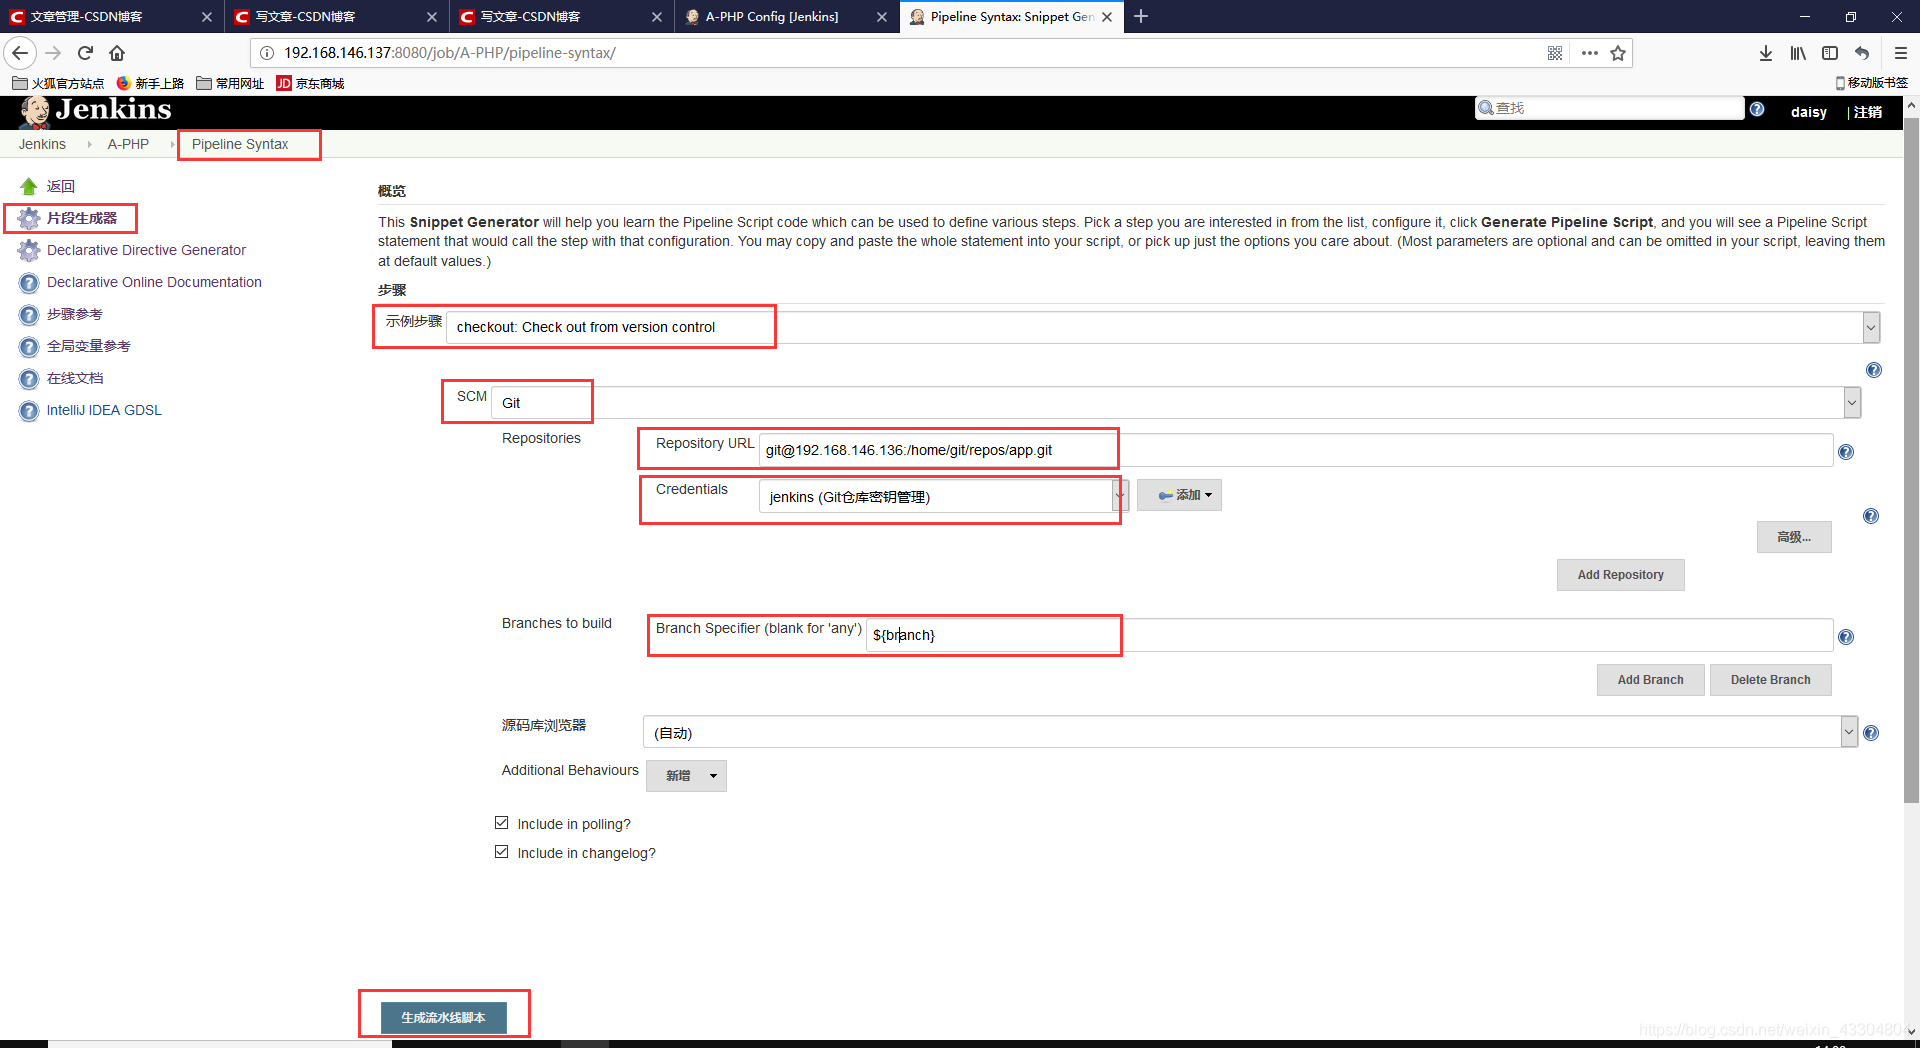 (3)將生成的程式碼複製到流水線指令碼相應步驟的stage函式裡


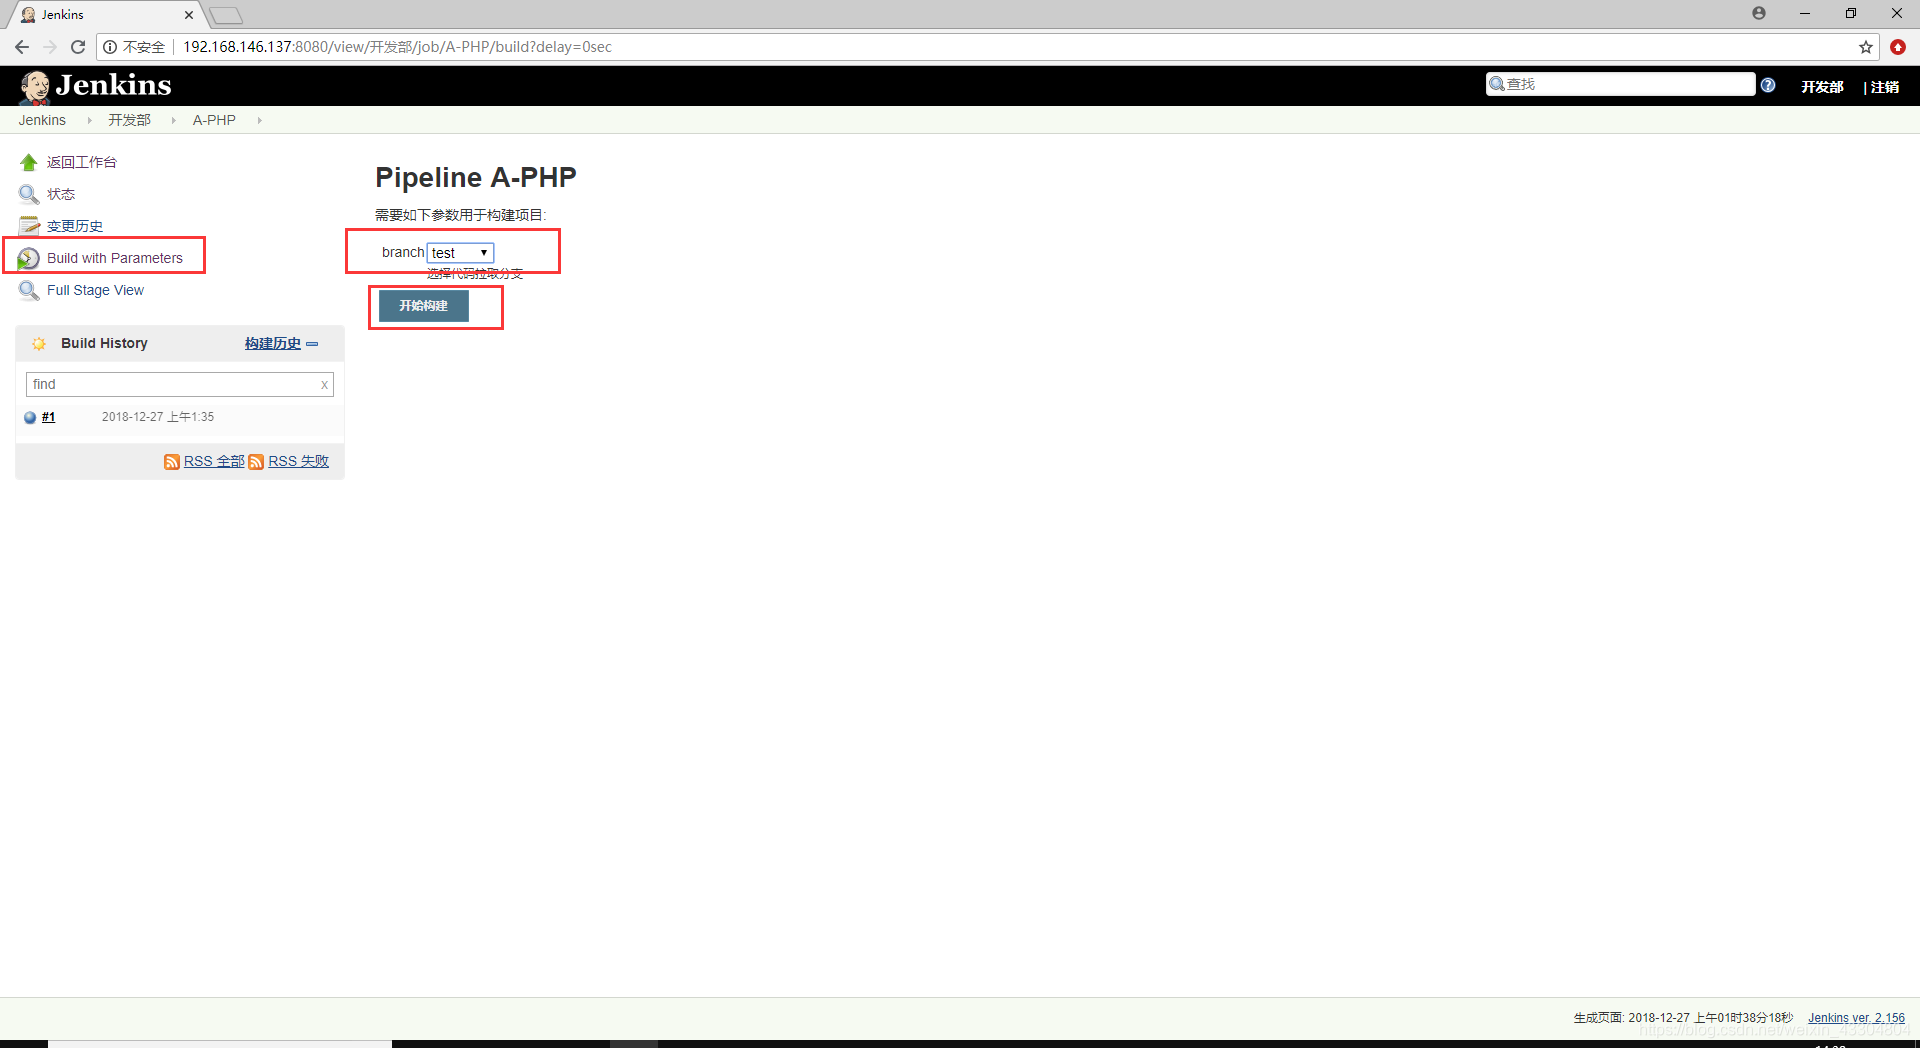
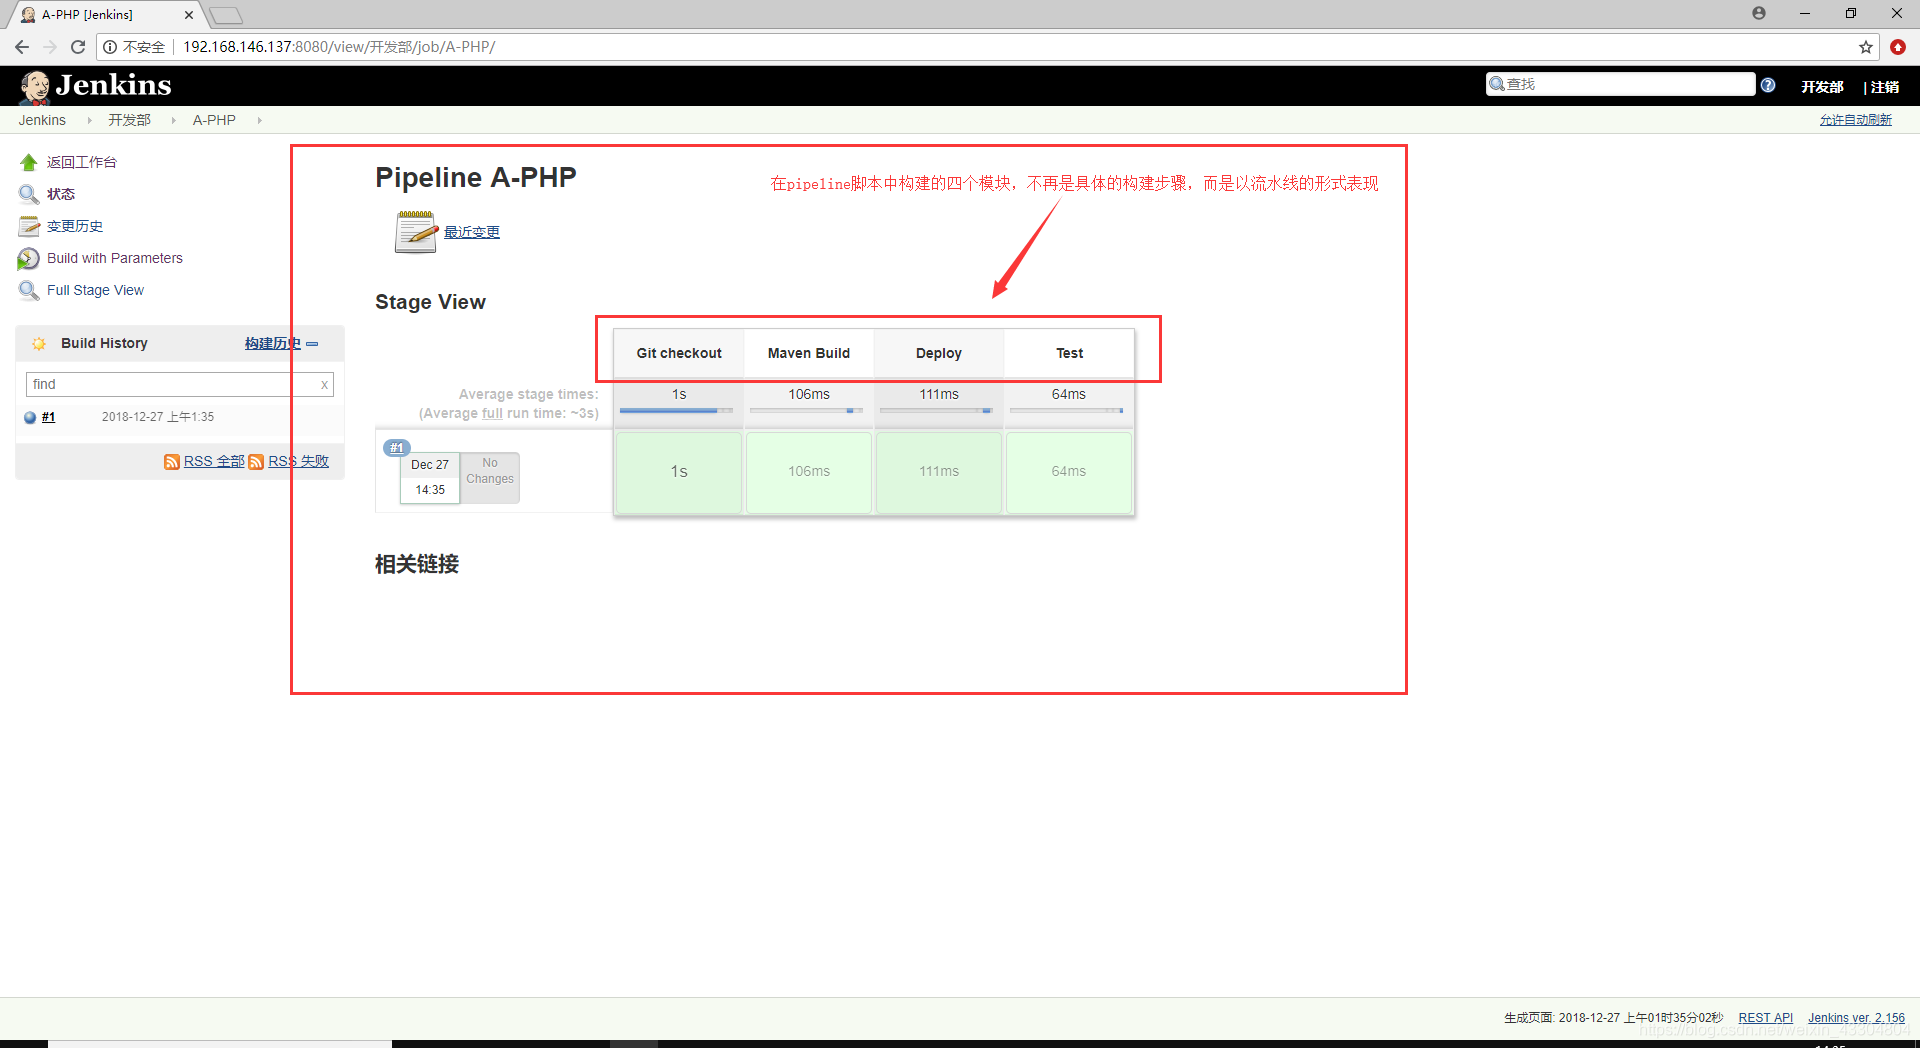
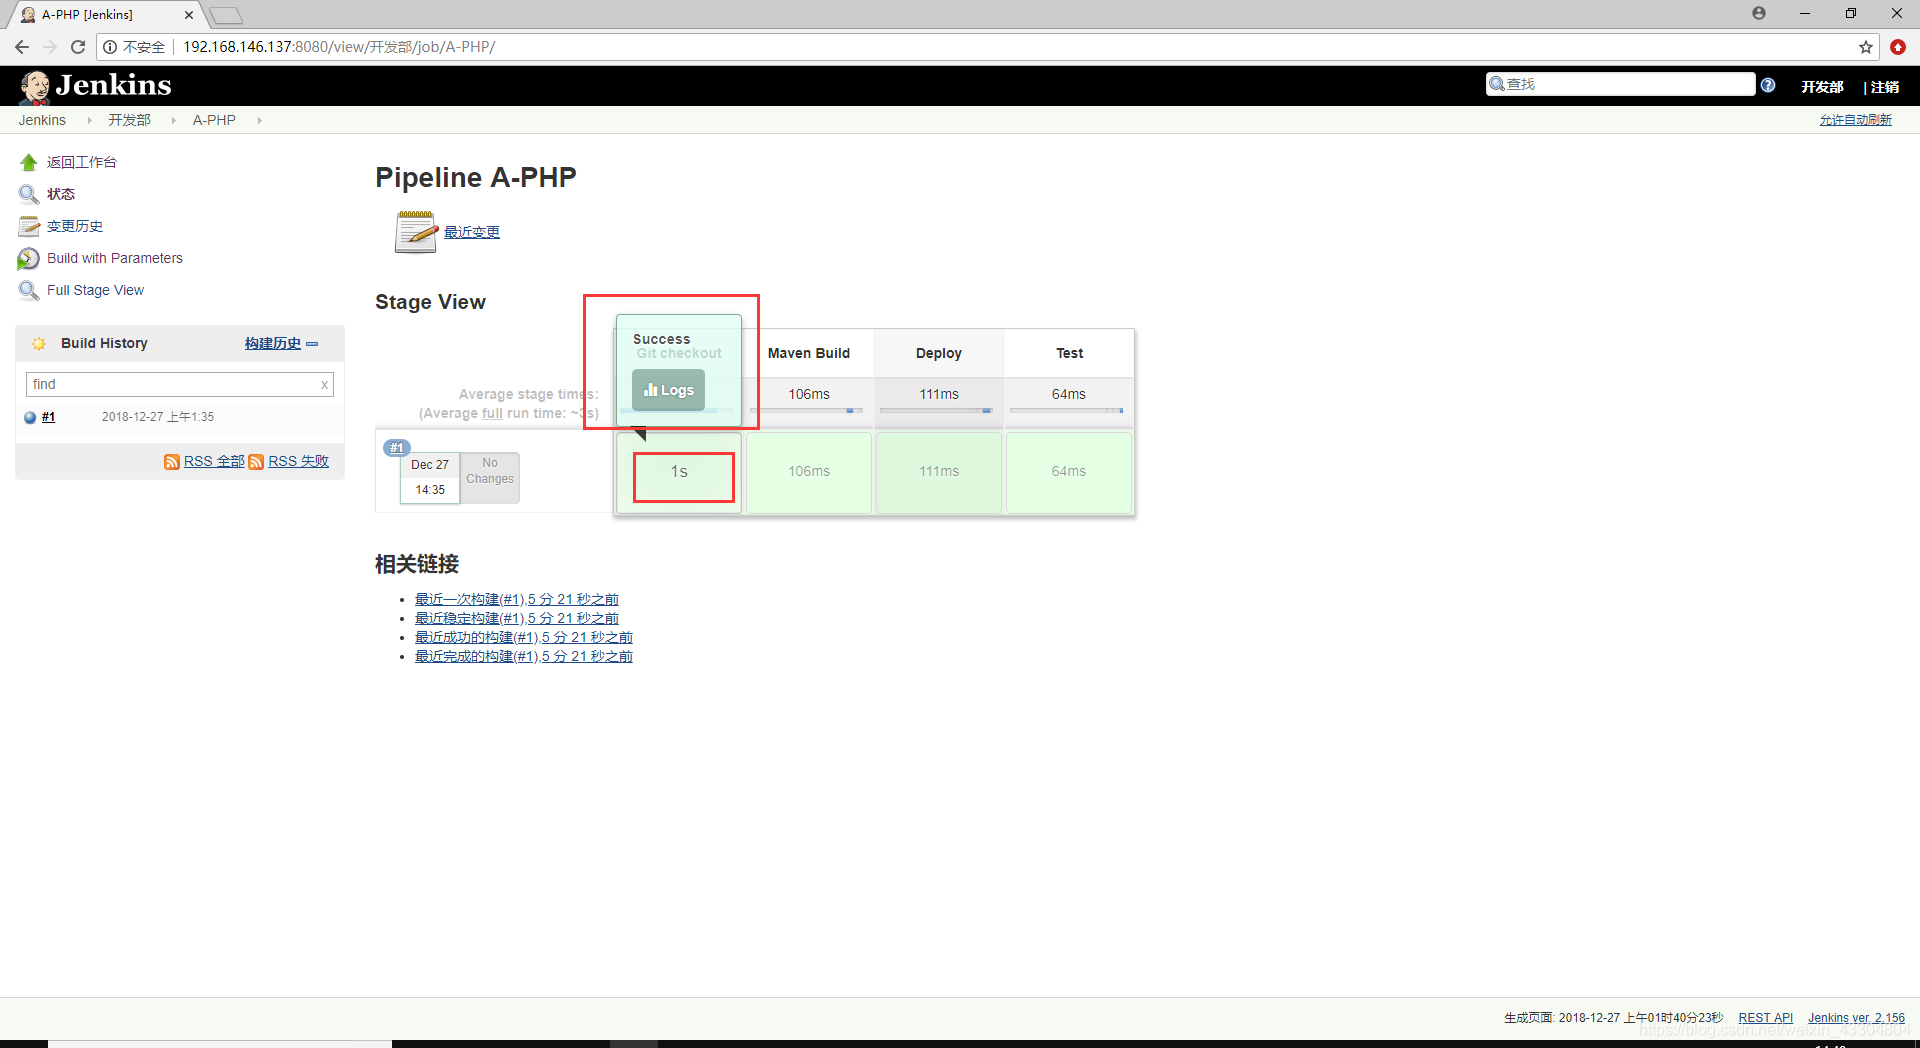
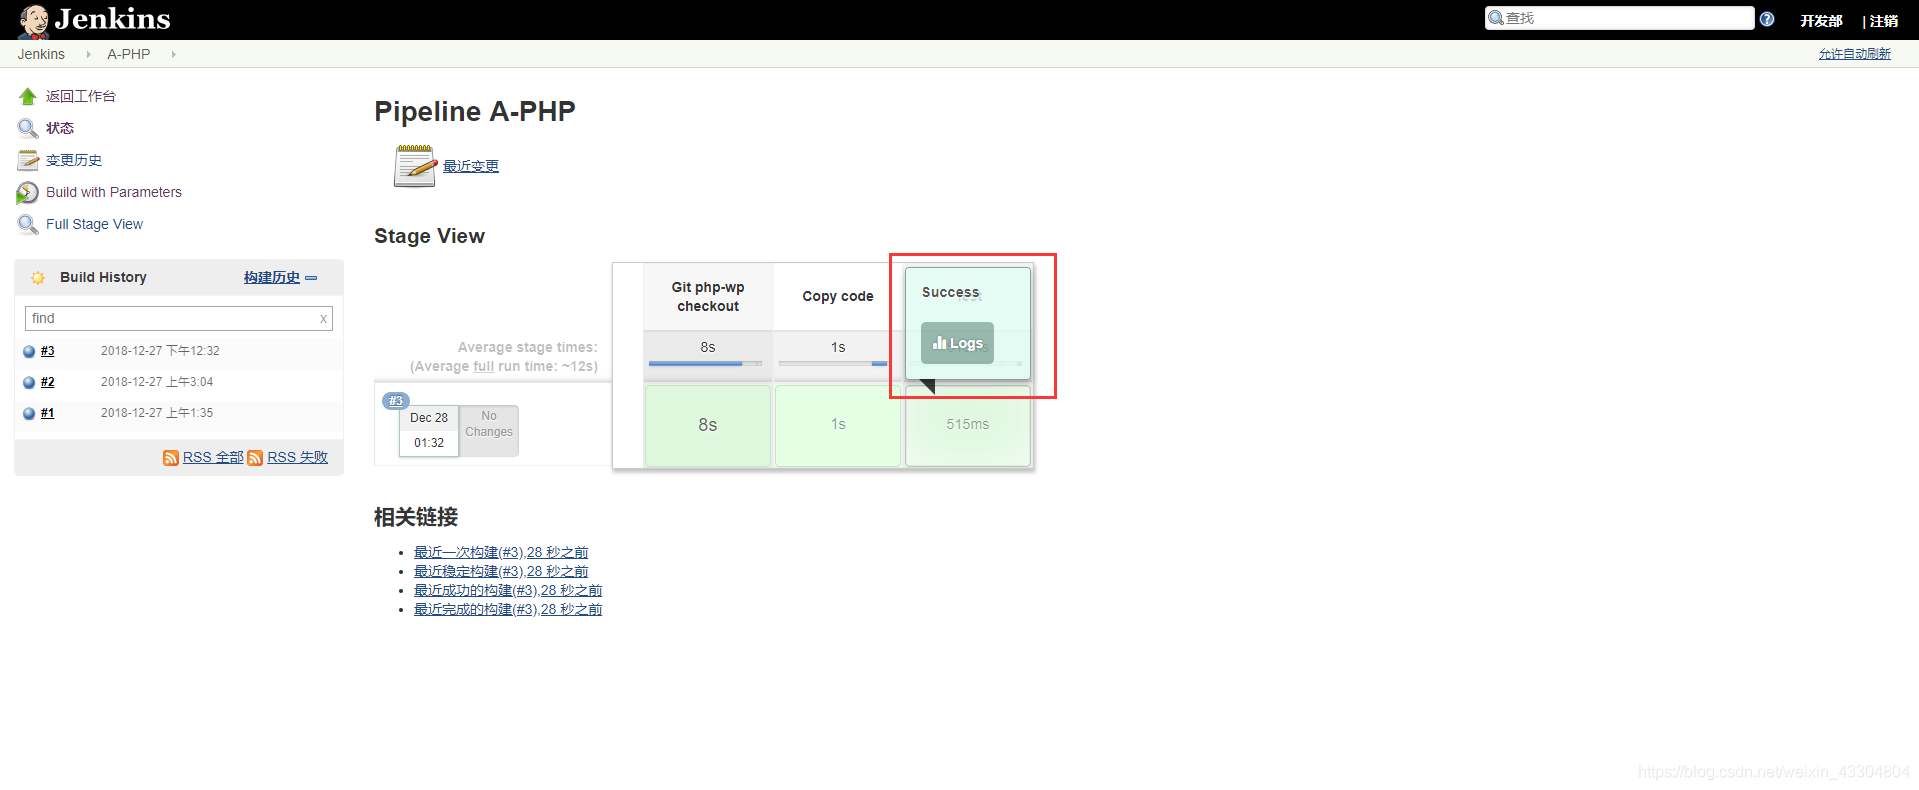
(4)開始構建Pipeline專案
[[email protected] workspace]# cd /test/
[[email protected] test]# cd app/
[[email protected] app]# ls
test.txt
[[email protected] app]# git remote -v
origin	[email protected]:/home/git/repos/app.git (fetch)
origin	[email protected]:/home/git/repos/app.git (push)
[[email protected] app]# git branch -a
* dev
  master
  test
  remotes/origin/HEAD -> origin/master
  remotes/origin/dev
  remotes/origin/master
  remotes/origin/test
[[email protected] app]# cd /var/lib/jenkins/
[[email protected] jenkins]# cd workspace/
- 從遠端倉庫下載Pipeline Script,並構建
(1)在Git伺服器上建立一個存放Pipeline指令碼的倉庫
[[email protected] ~]# su - git
Last login: Thu Dec 27 00:56:35 EST 2018 on pts/1
Last failed login: Thu Dec 27 00:58:54 EST 2018 from 192.168.146.137 on ssh:notty
There were 12 failed login attempts since the last successful login.
[[email protected] ~]$ cd /home/git/repos/
[[email protected] repos]$ ls
app.git
[[email protected] repos]$ mkdir jenkinsfile		#建立存放Pipeline指令碼的倉庫
[[email protected] repos]$ cd jenkinsfile/
[[email protected] jenkinsfile]$ git --bare init			#初始化倉庫
Initialized empty Git repository in /home/git/repos/jenkinsfile/
(2)在jenkins伺服器上,往遠端倉庫提交一個Pipeline指令碼。
[[email protected] ~]# cd /test/
[[email protected] test]# ls
app
[[email protected] test]# rm -rf *
[[email protected] test]# git clone [email protected]:/home/git/repos/jenkinsfile
Cloning into 'jenkinsfile'...
warning: You appear to have cloned an empty repository.
Checking connectivity... done.
[[email protected] test]# ls
jenkinsfile
[[email protected] test]# cd jenkinsfile/
[[email protected] jenkinsfile]# ls
[[email protected] jenkinsfile]# mkdir itemA
[[email protected] jenkinsfile]# ls
itemA
[[email protected] jenkinsfile]# mkdir itemB
[[email protected] jenkinsfile]# cd itemA
[[email protected] itemA]# vim jenkinsfile
node {
//def mvnHome
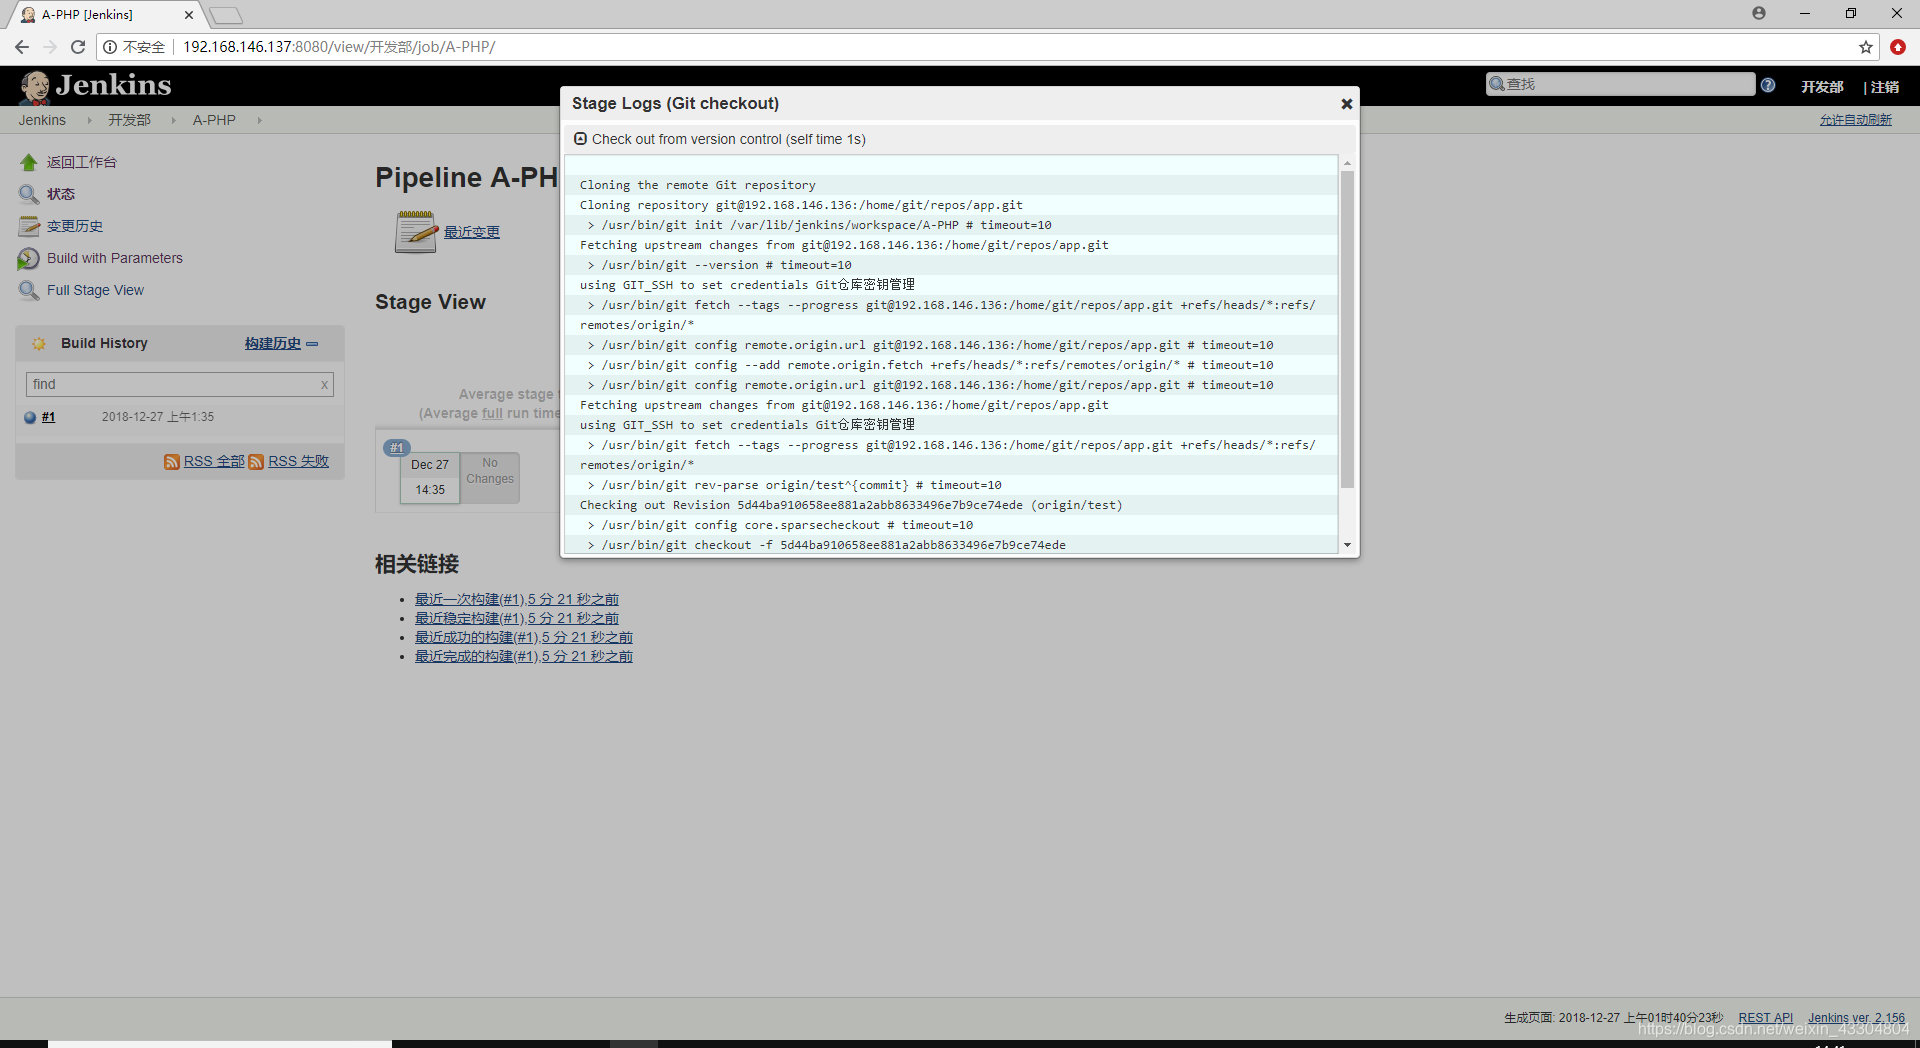
stage('Git checkout') {
checkout([$class: 'GitSCM',
branches: [[name: '${branch}']],
doGenerateSubmoduleConfigurations: false,
extensions: [], submoduleCfg: [],
userRemoteConfigs: [[credentialsId: 'a240769e-ed1a-4456-90a8-f0e124024801',
url: '[email protected]:/home/git/repos/app.git']]])
}
stage('Maven Build') {
echo "maven build..."
}
stage('Deploy') {
echo "success..."
}
stage('Test') {
echo "OK"
}
}
#將指令碼推送到遠端倉庫的master分支
[[email protected] itemA]# git add *
[[email protected] itemA]# git commit -m "jenkinsfile commit"
[master (root-commit) 1f3715d] jenkinsfile commit
1 file changed, 21 insertions(+)
create mode 100644 itemA/jenkinsfile
[[email protected] itemA]# git push -u origin master
Counting objects: 4, done.
Compressing objects: 100% (2/2), done.
Writing objects: 100% (4/4), 559 bytes | 0 bytes/s, done.
Total 4 (delta 0), reused 0 (delta 0)
To 192.168.146.136:/home/git/repos/jenkinsfile
* [new branch] master -> master
Branch master set up to track remote branch master from origin.
(3)利用遠端倉庫裡的Pipeline指令碼,進行流水線的構建
專案案例一:Jenkins+Pipeline+Git+PHP部落格專案流水線自動釋出
| 主機名 | IP地址 | 備註 |
|---|---|---|
| Git | 192.168.146.136 | Git伺服器 |
| Jenkins | 192.168.146.137 | Jenkins伺服器 |
| Web | 192.168.146.138 | Web伺服器 |
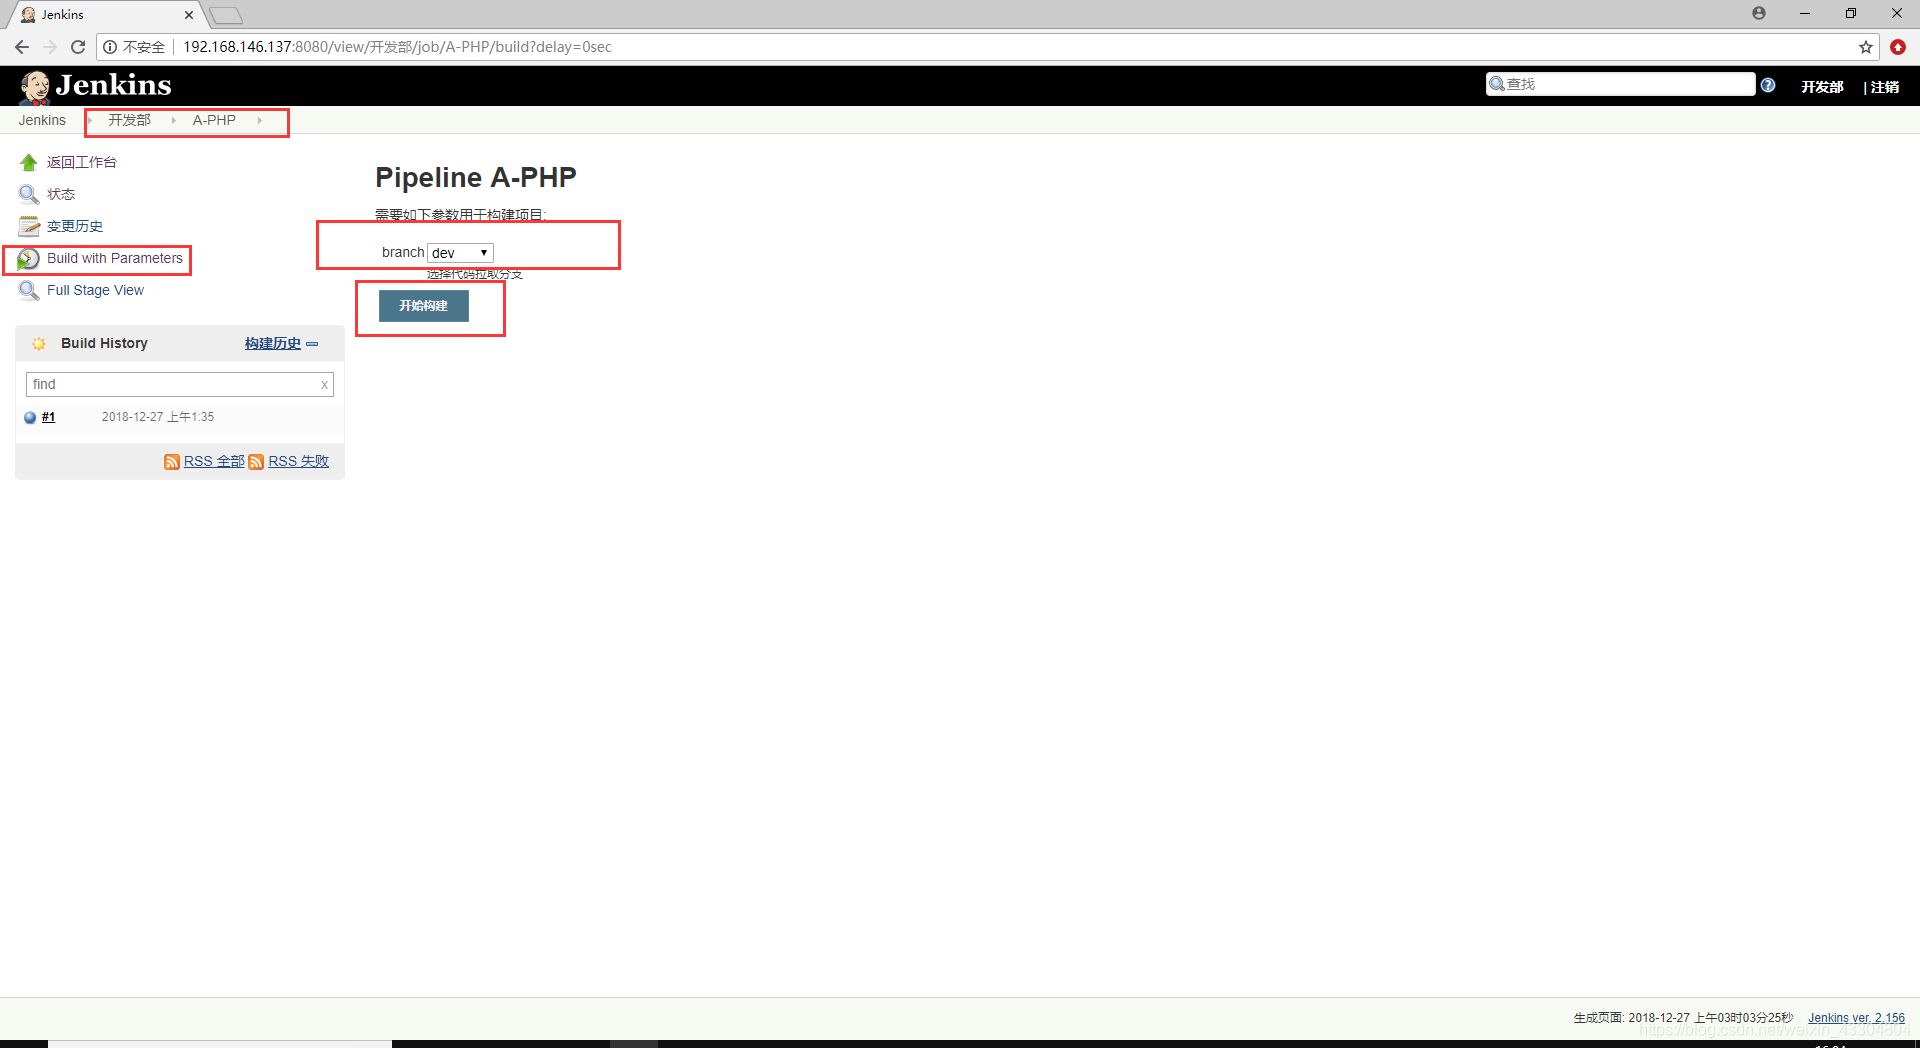
- 建立一個Pipeline流水線專案並進行引數化構建
流水線一般情況下是用在線上環境,測試環境一般不用流水線,因為資料經常變更;測試環境不支援Git引數化構建,而線上環境只拉取master。
由於我們仍舊打算將pipeline指令碼放在遠端Git倉庫裡,因此我們需要從遠端Git倉庫拉取Pipeline指令碼,所以,引數化構建不支援Git的引數化。我們只能使用字元結構的引數化構建。
- 下載用於自動化釋出的PHP原始碼wordpress原始碼包,並上傳遠端git倉庫
#在Git中操作
[[email protected] ~]# su - git
Last login: Thu Dec 27 00:56:35 EST 2018 on pts/1
Last failed login: Thu Dec 27 00:58:54 EST 2018 from 192.168.146.137 on ssh:notty
There were 12 failed login attempts since the last successful login.
[[email protected] jenkinsfile]$ cd /home/git/repos/
[[email protected] repos]$ ls
app.git  jenkinsfile
[[email protected] repos]$ mkdir wordpress
[[email protected] repos]$ cd wordpress/
[[email protected] wordpress]$ git --bare init
Initialized empty Git repository in /home/git/repos/wordpress/
[[email protected] wordpress]$ ls
branches  config  description  HEAD  hooks  info  objects  refs
在NginxWeb中操作(提前建立jdk、maven、git環境)
[[email protected] git-2.9.5]# git config --global user.email "[email protected]"
[[email protected] git-2.9.5]# git config --global user.name "daisy"
[[email protected] ~]# mkdir -p /mycode
#下載wordpres原始碼
[[email protected] ~]# tar xf wordpress-4.9.4-zh_CN.tar.gz -C /mycode/
[[email protected] ~]# cd /mycode/
[[email protected] mycode]# mv wordpress wordpress111
[[email protected] mycode]# ls
wordpress111
#在jenkins伺服器上,克隆建立好的遠端Git倉庫
[[email protected] mycode]# git clone [email protected]:/home/git/repos/wordpress
Cloning into 'wordpress'...
The authenticity of host '192.168.146.136 (192.168.146.136)' can't be established.
ECDSA key fingerprint is SHA256:14NKIeIbfU5Cx3usA72K/AmnoeDt/UyH+SII8+rV1dA.
ECDSA key fingerprint is MD5:60:ab:53:4a:f8:fc:74:2b:93:1e:6f:b3:4c:e4:33:de.
Are you sure you want to continue connecting (yes/no)? yes
Warning: Permanently added '192.168.146.136' (ECDSA) to the list of known hosts.
[email protected]'s password:
warning: You appear to have cloned an empty repository.
Checking connectivity... done.
[[email protected] mycode]# ls
wordpress wordpress111
[[email protected] mycode]# mv wordpress111/* wordpress
[[email protected] mycode]# rm -rf wordpress111/
[[email protected] mycode]# ls
wordpress
#在專案程式碼里加入一個健康檢查測試頁面,並推送到遠端Git倉庫
[[email protected] mycode]# cd wordpress/
[[email protected] mycode]# ls
index.php wp-admin wp-cron.php wp-mail.php
license.txt wp-blog-header.php wp-includes wp-settings.php
readme.html wp-comments-post.php wp-links-opml.php wp-signup.php
wp-config-sample.php wp-load.php wp-trackback.php
wp-activate.php wp-content wp-login.php xmlrpc.php
[[email protected] mycode]# vim status.html
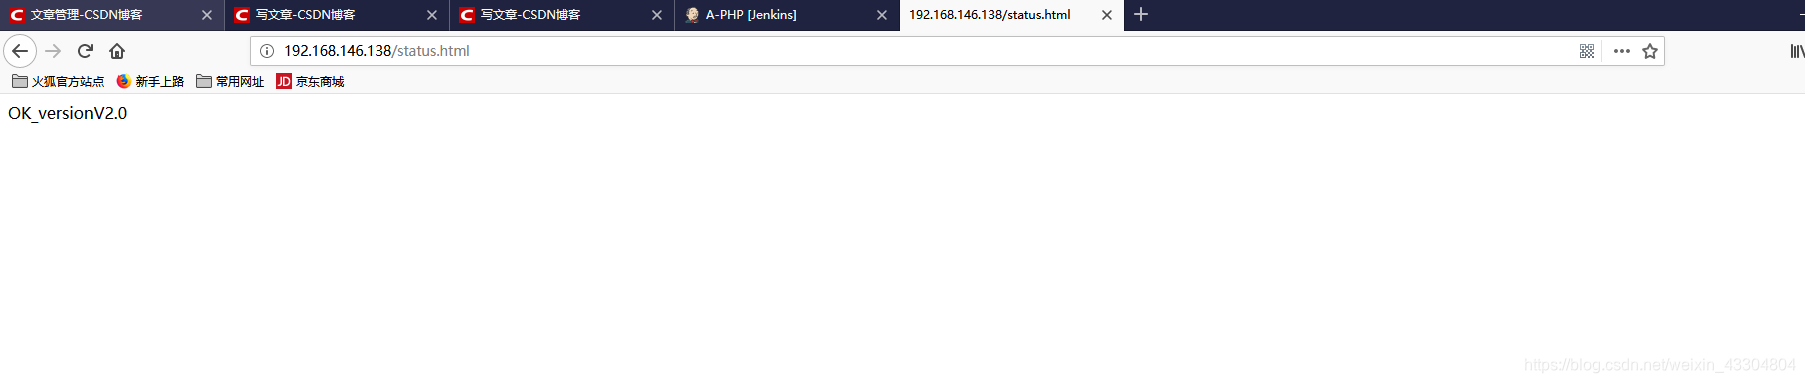
[[email protected] mycode]# cat status.html
OK_versionV2.0
#在jenkins上提交程式碼到遠端Git倉庫
[[email protected] mycode]# git add *
[[email protected] mycode]# git commit -m "wordpress"
[[email protected] wordpress]# git remote -v
origin [email protected]:/home/git/repos/wordpress (fetch)
origin [email protected]:/home/git/repos/wordpress (push)
[[email protected] wordpress]# git push -u origin master
[email protected]'s password:
Counting objects: 1661, done.
Compressing objects: 100% (1635/1635), done.
Writing objects: 100% (1661/1661), 8.86 MiB | 8.40 MiB/s, done.
Total 1661 (delta 173), reused 0 (delta 0)
To 192.168.146.136:/home/git/repos/wordpress
* [new branch] master -> master
Branch master set up to track remote branch master from origin.
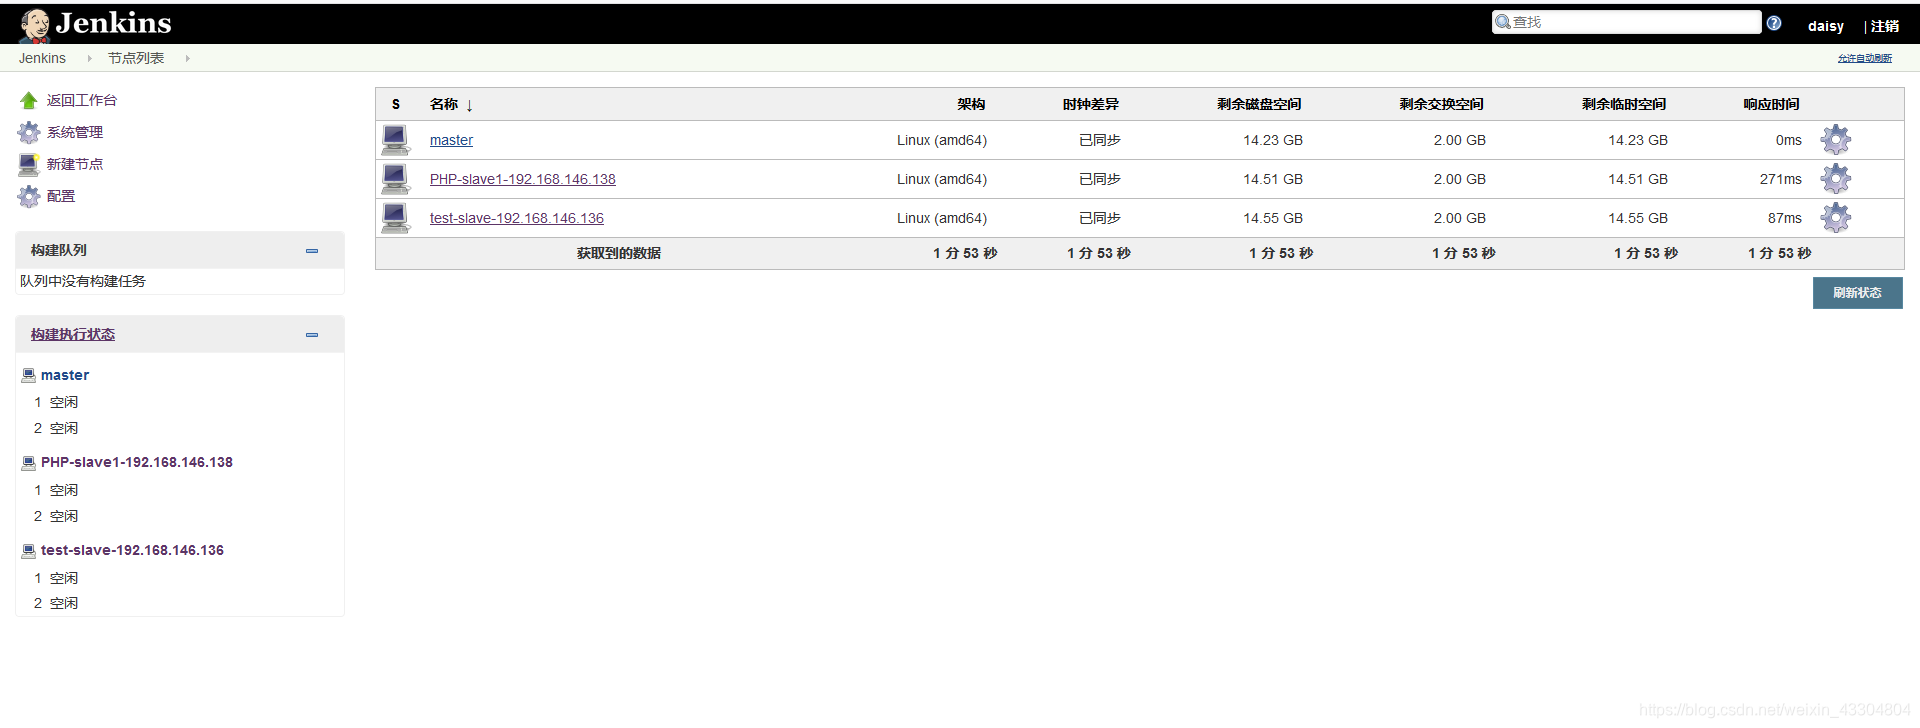
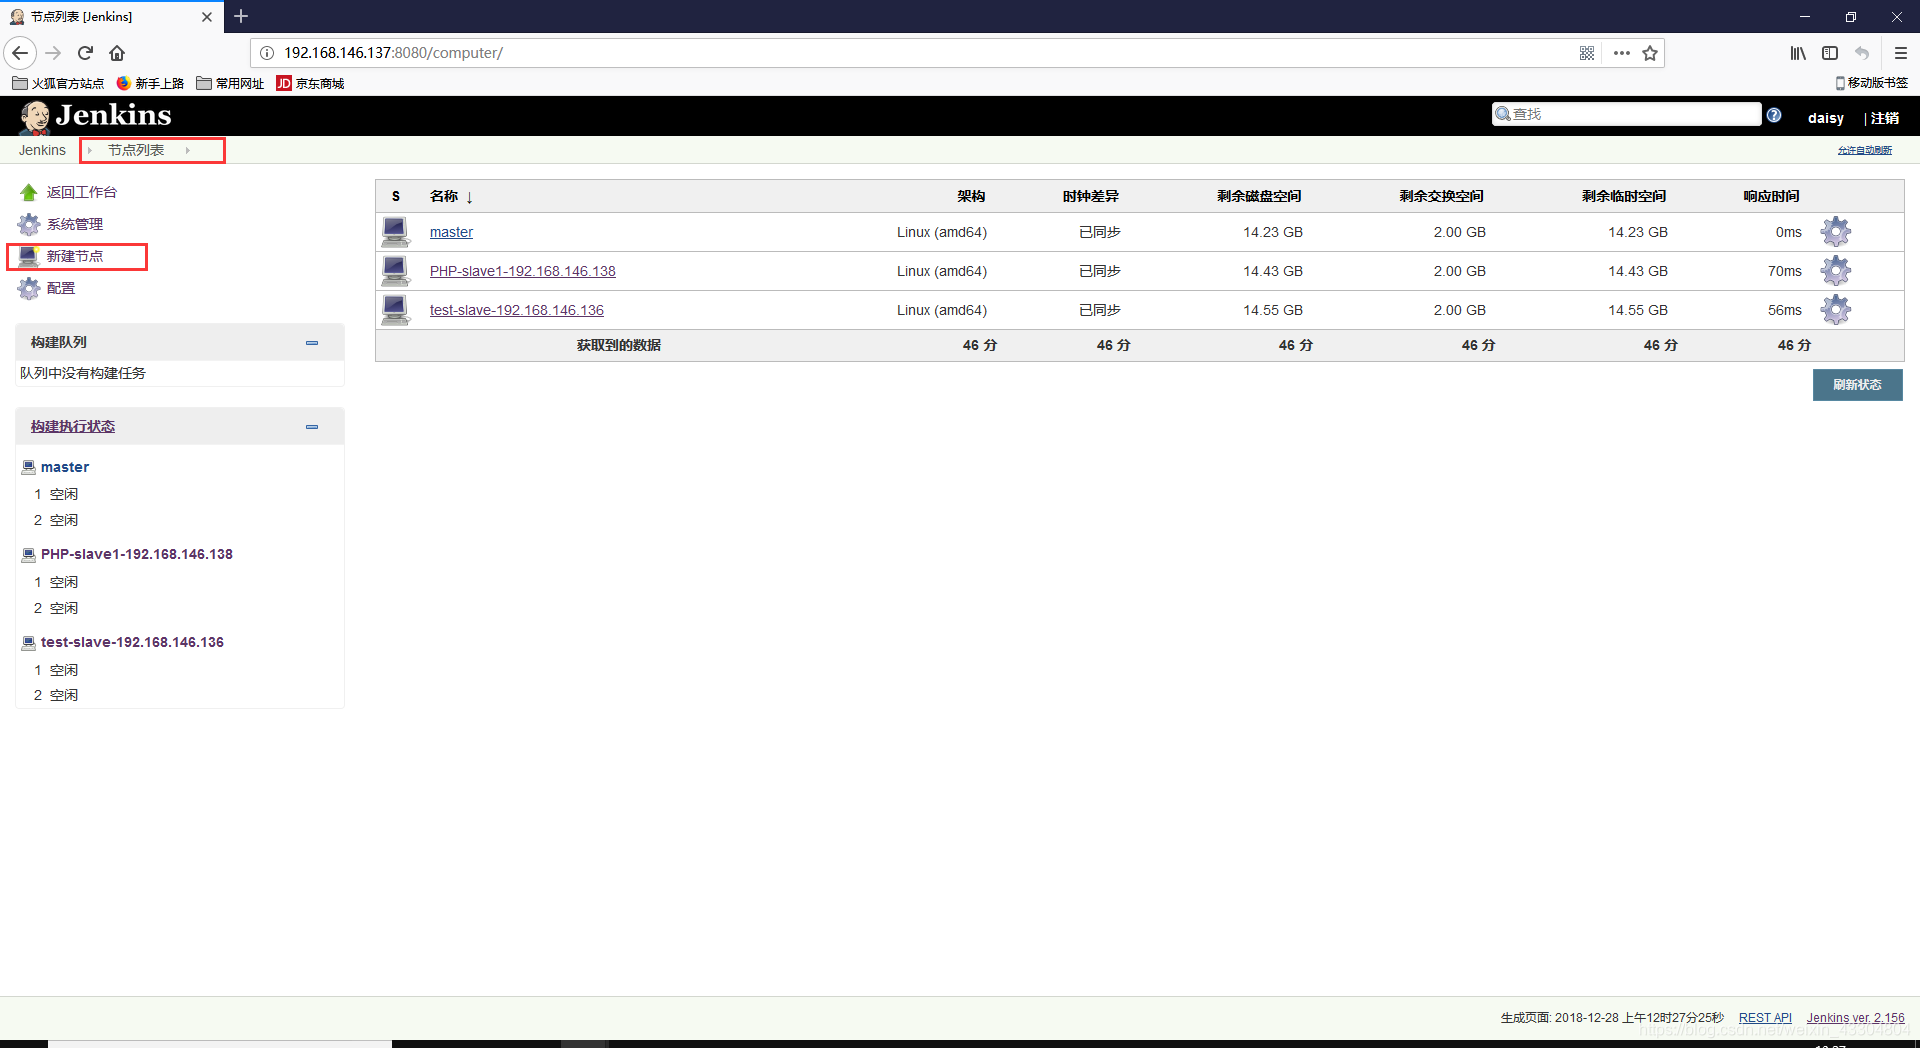
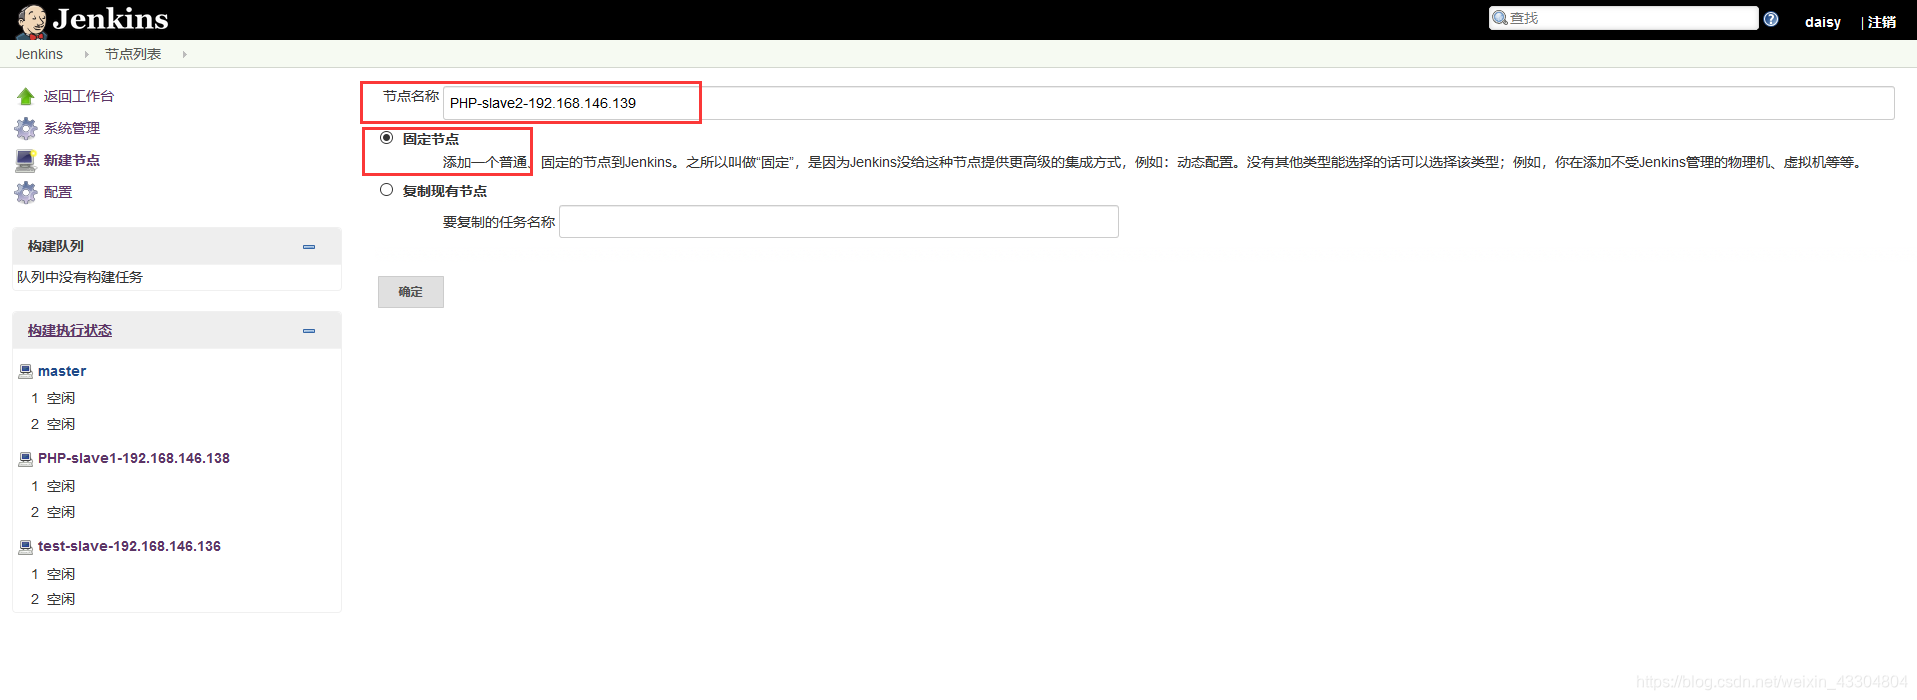
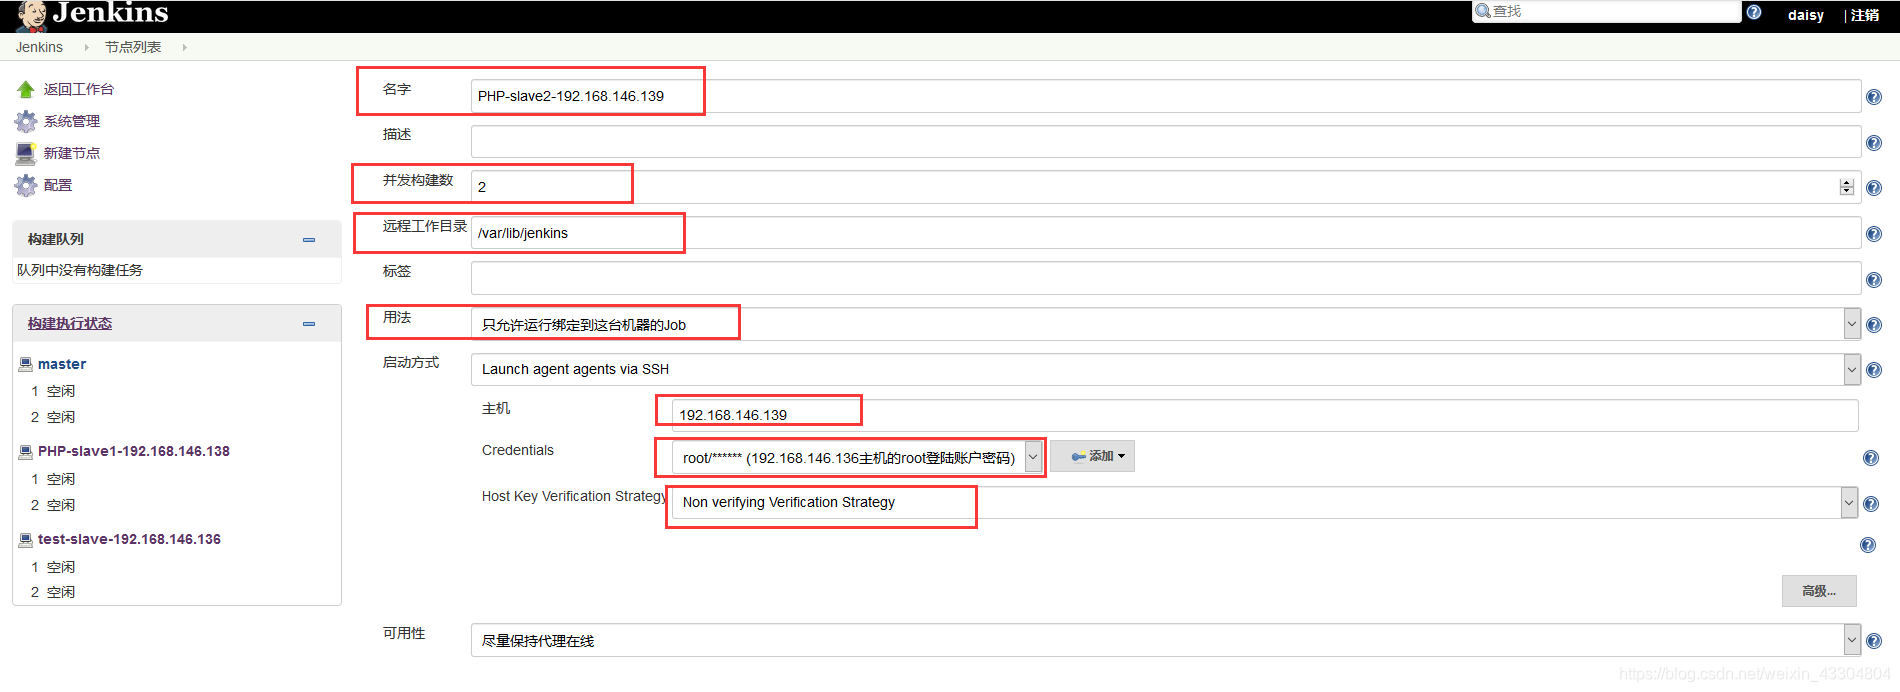
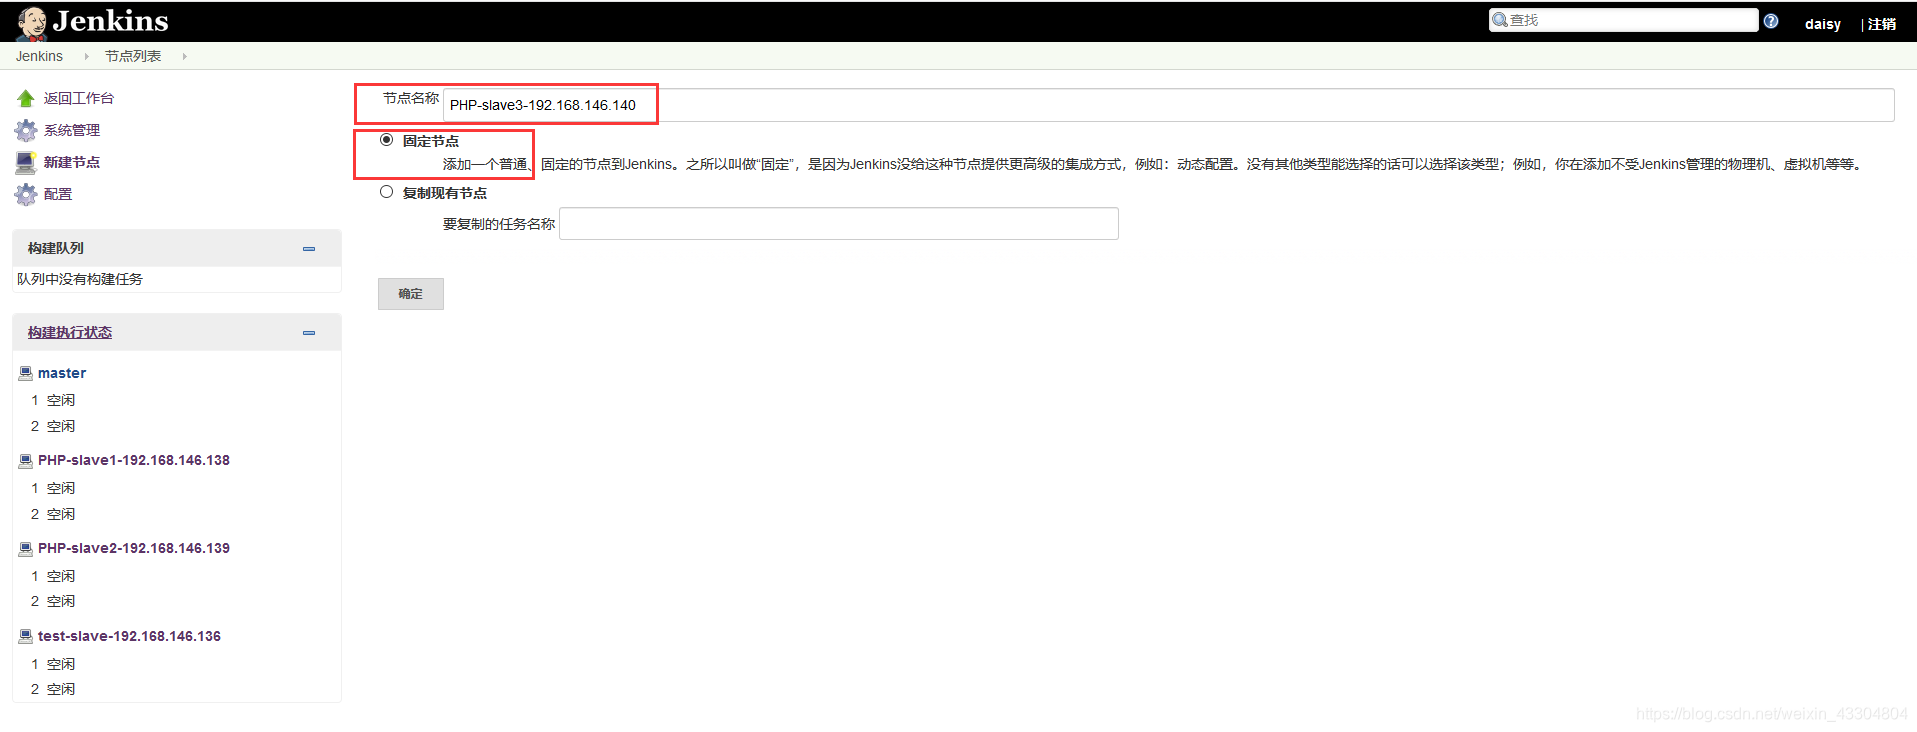
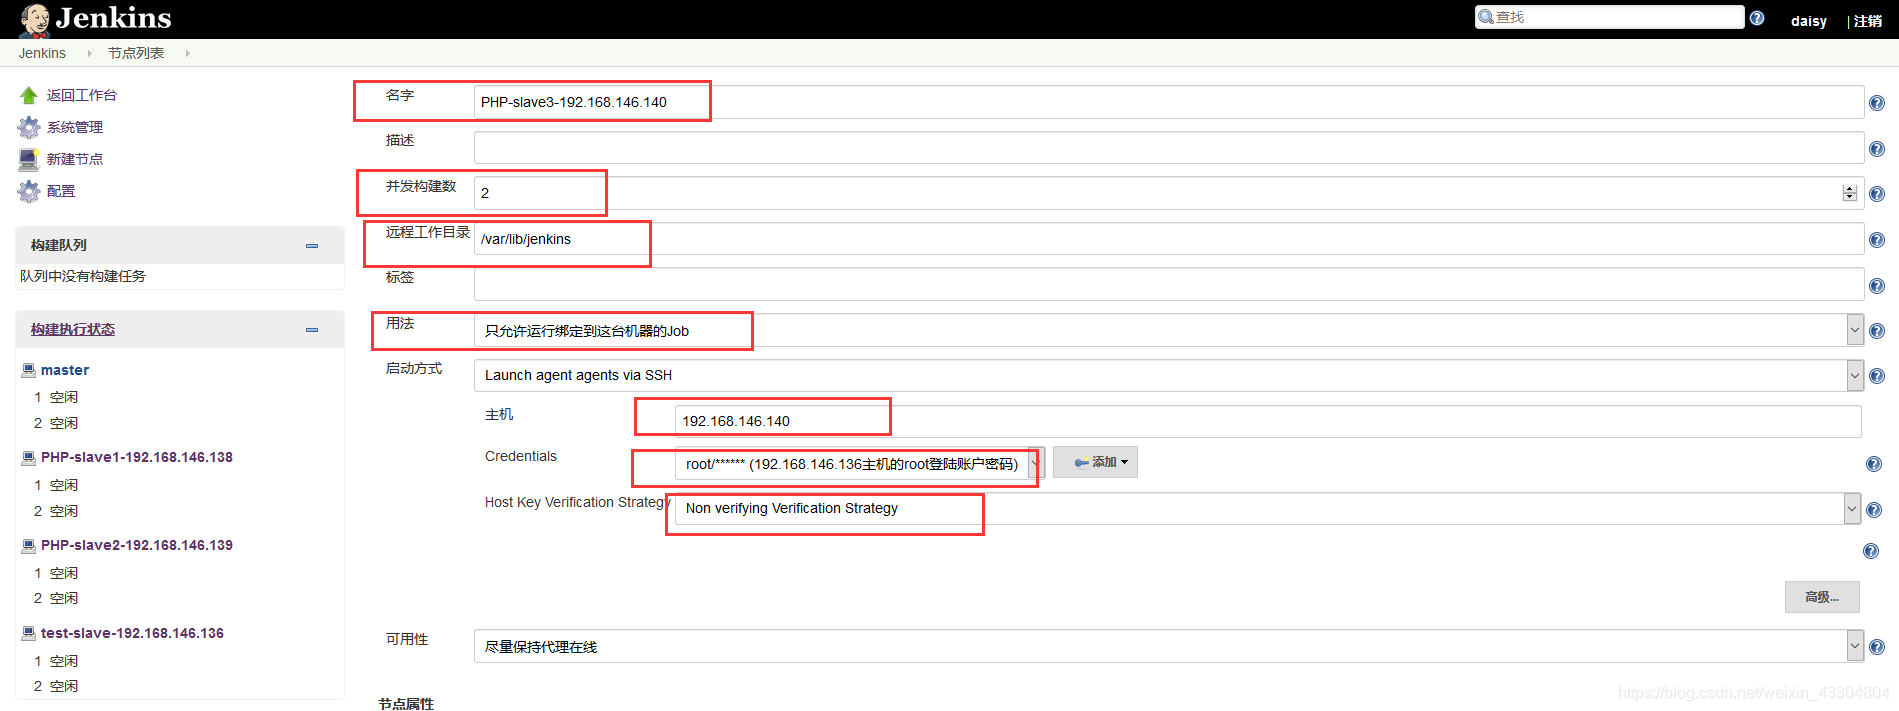
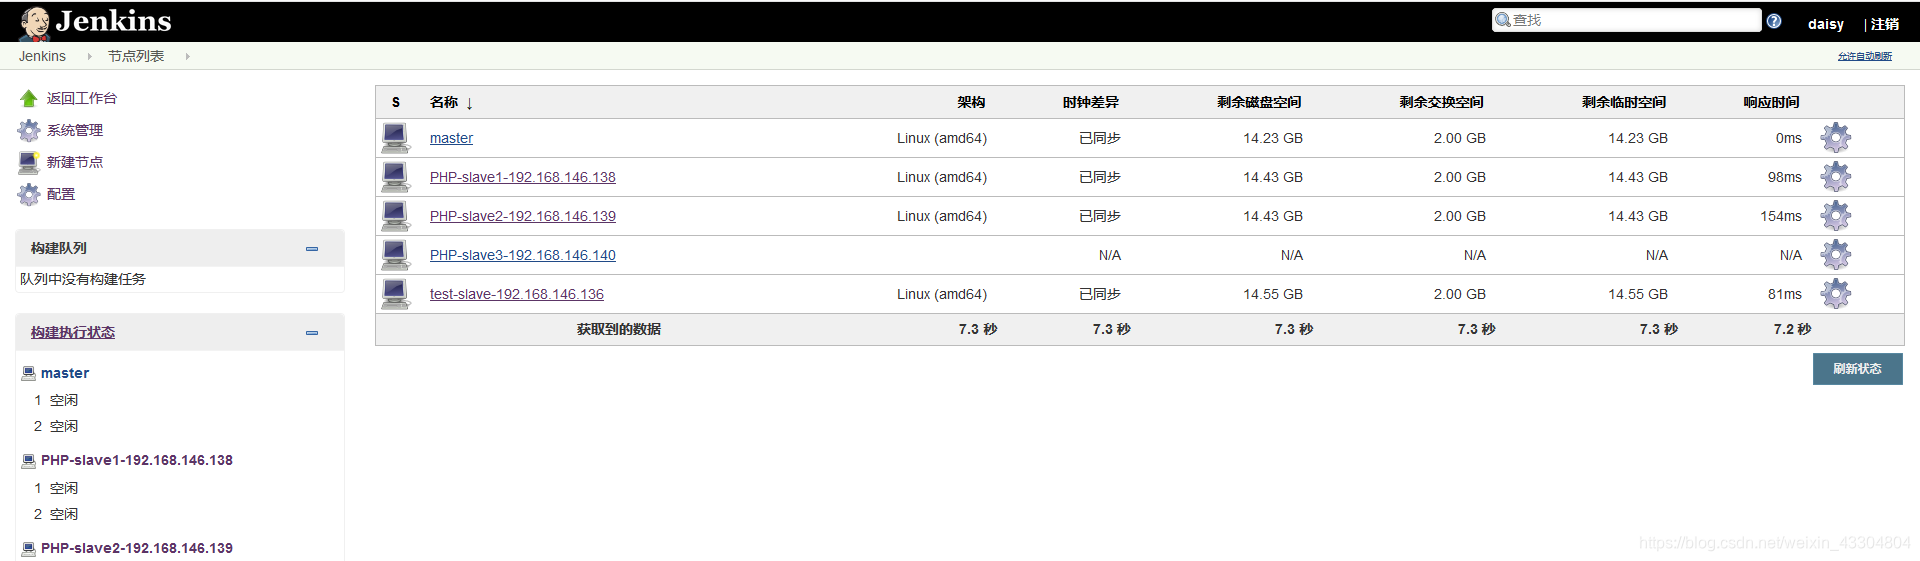
- 設定分散式構建的slave管理節點
我們計劃利用分散式構建的方式,啟動pipeline的流水線專案釋出
slave管理節點就設定為需要用於釋出專案的Web伺服器
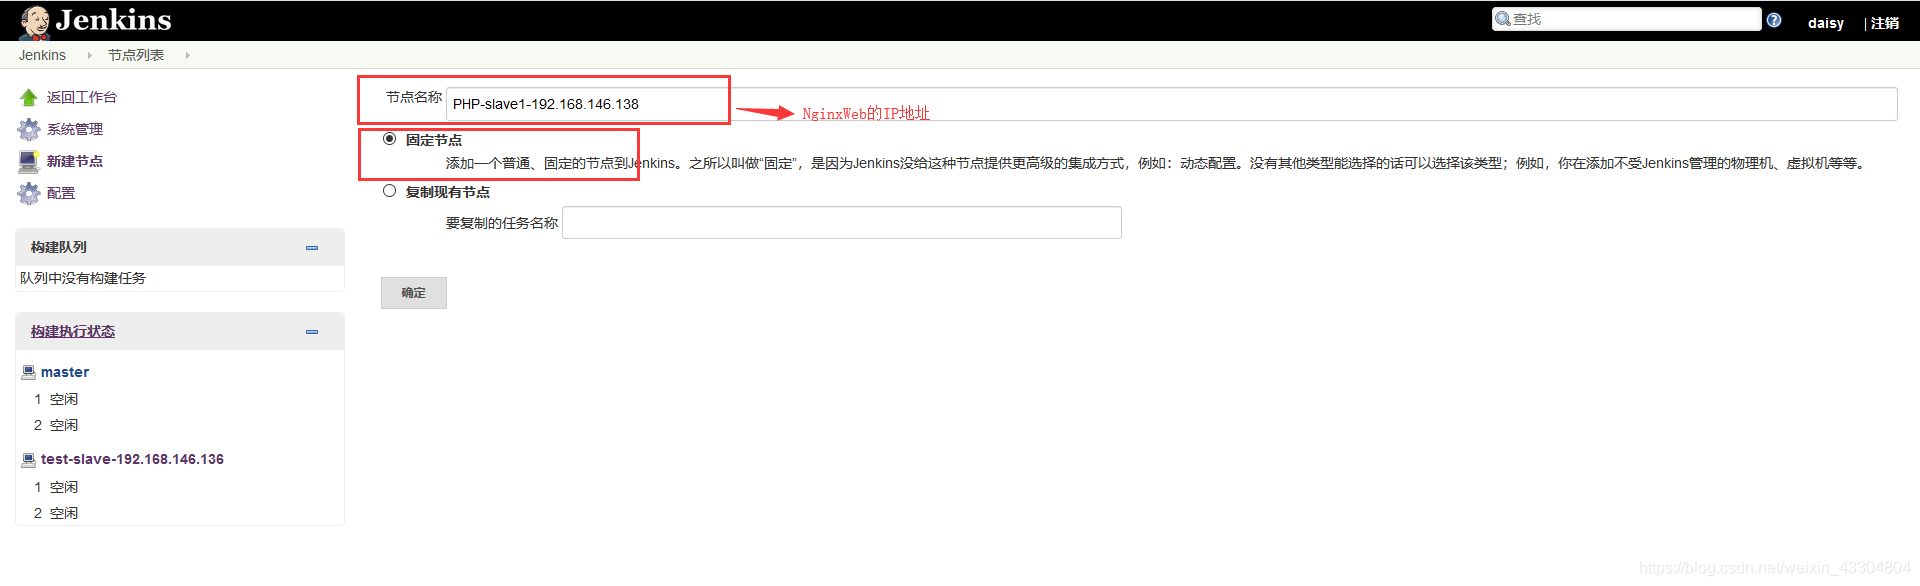
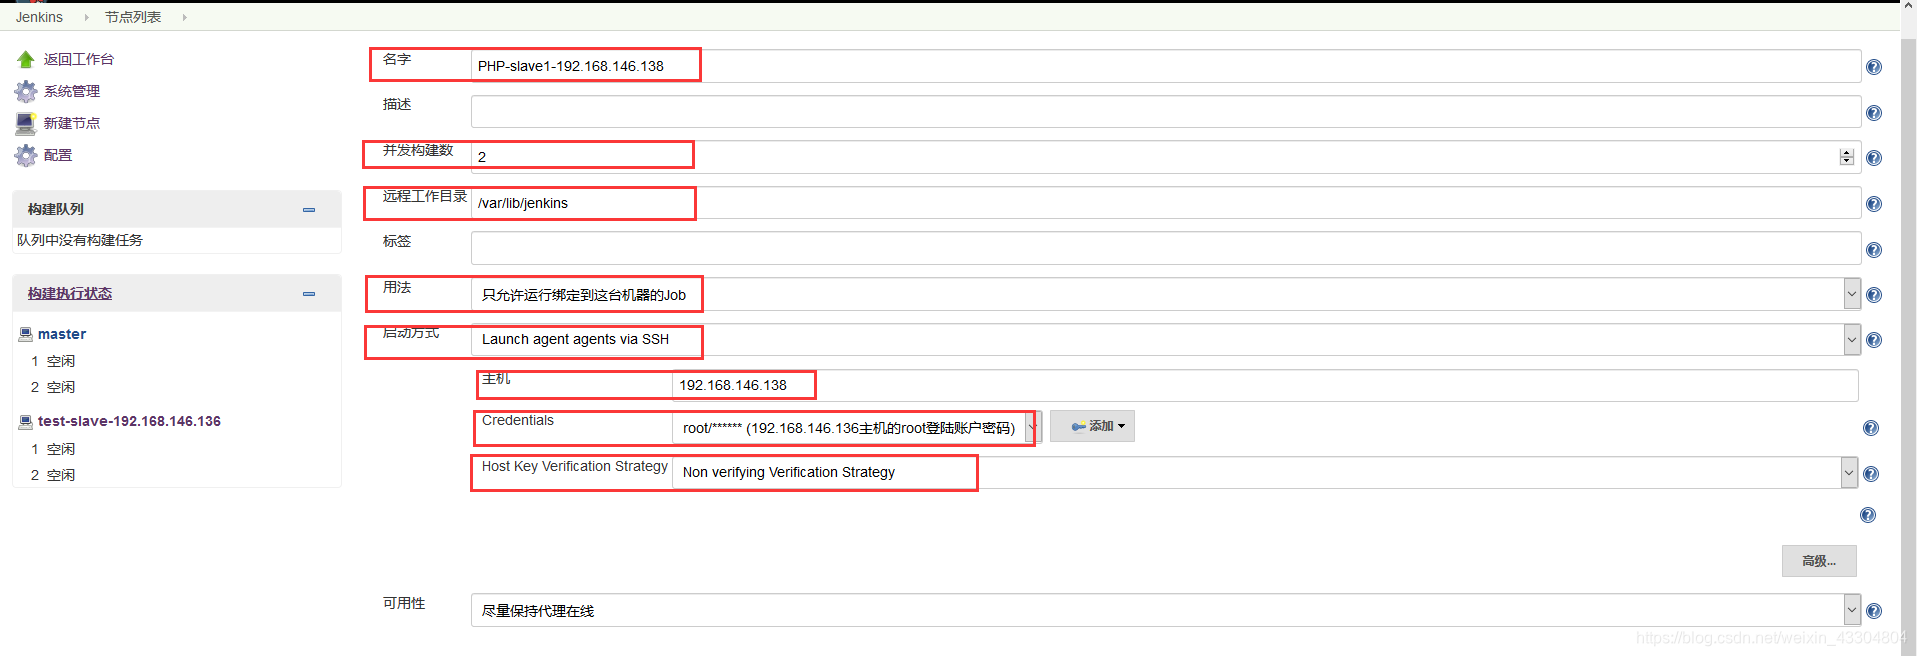
(1) 新增用於連線slave代理節點的SSH證書
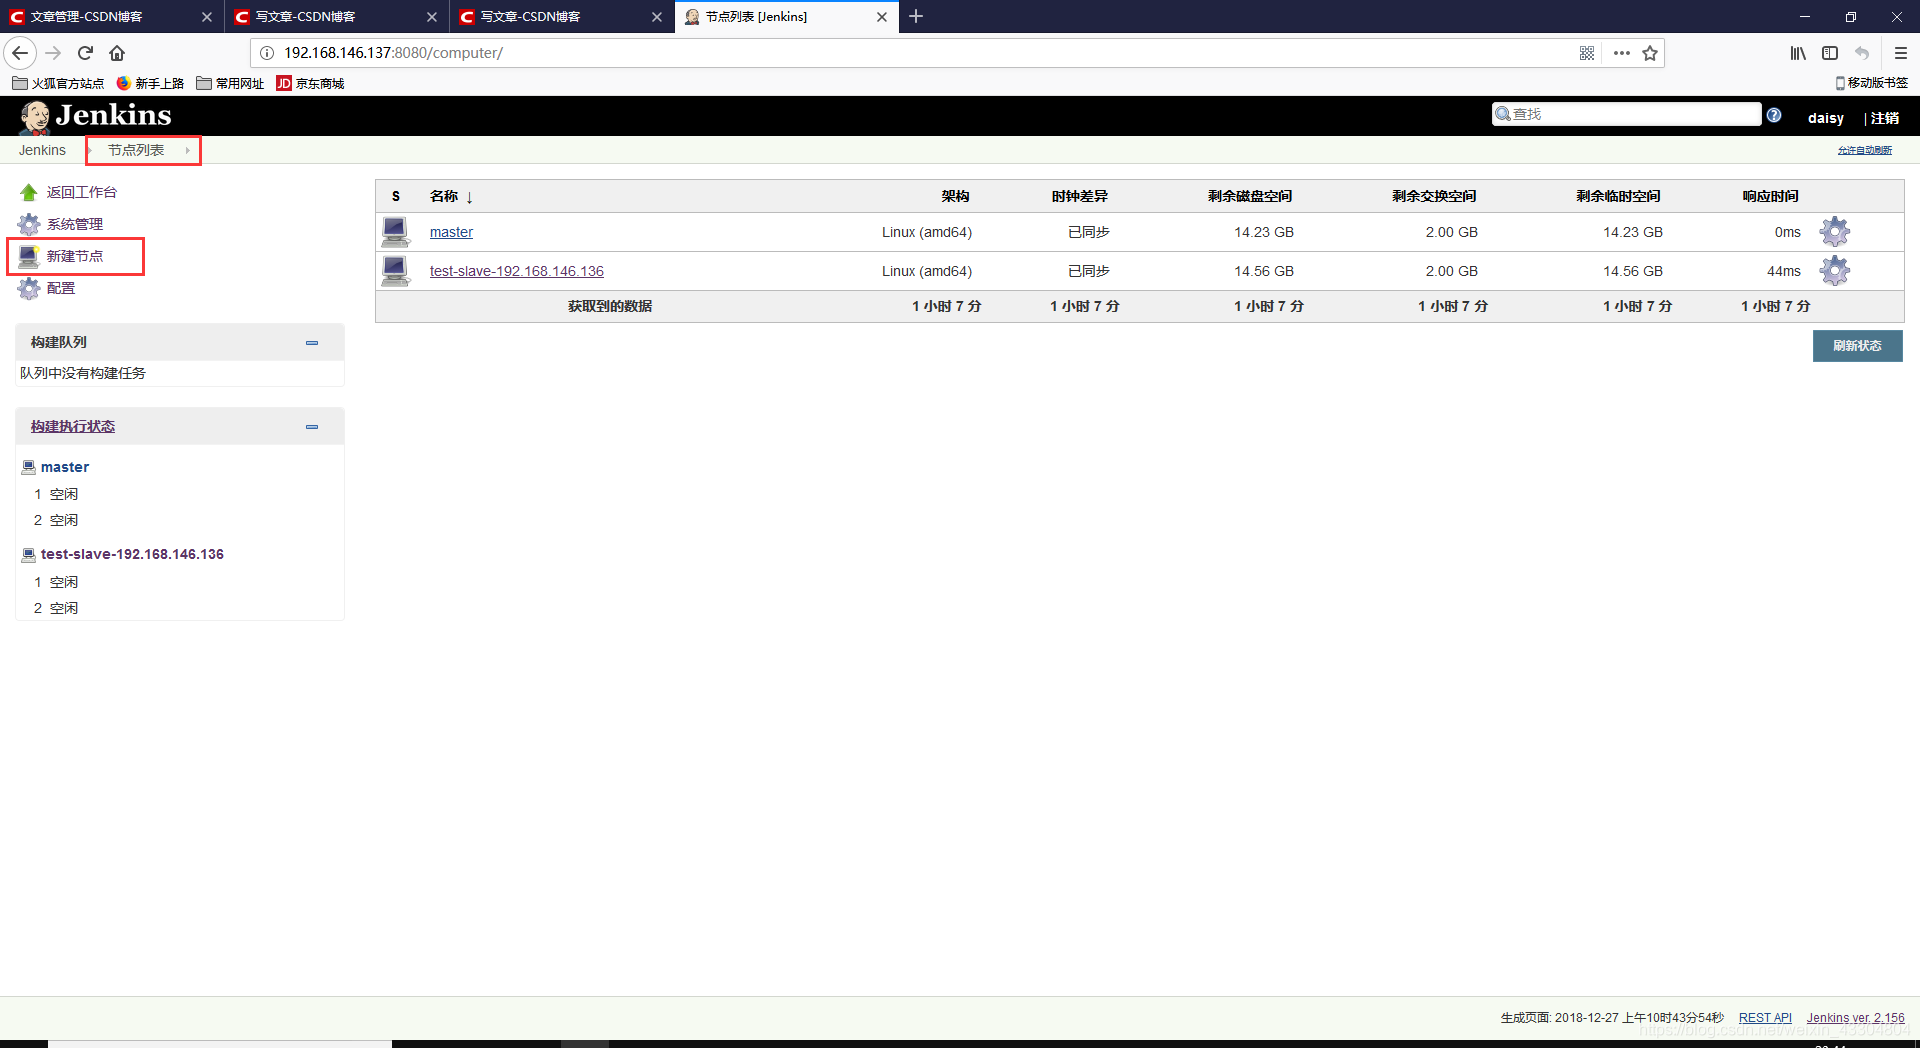 (2) 新增並設定slave管理從節點
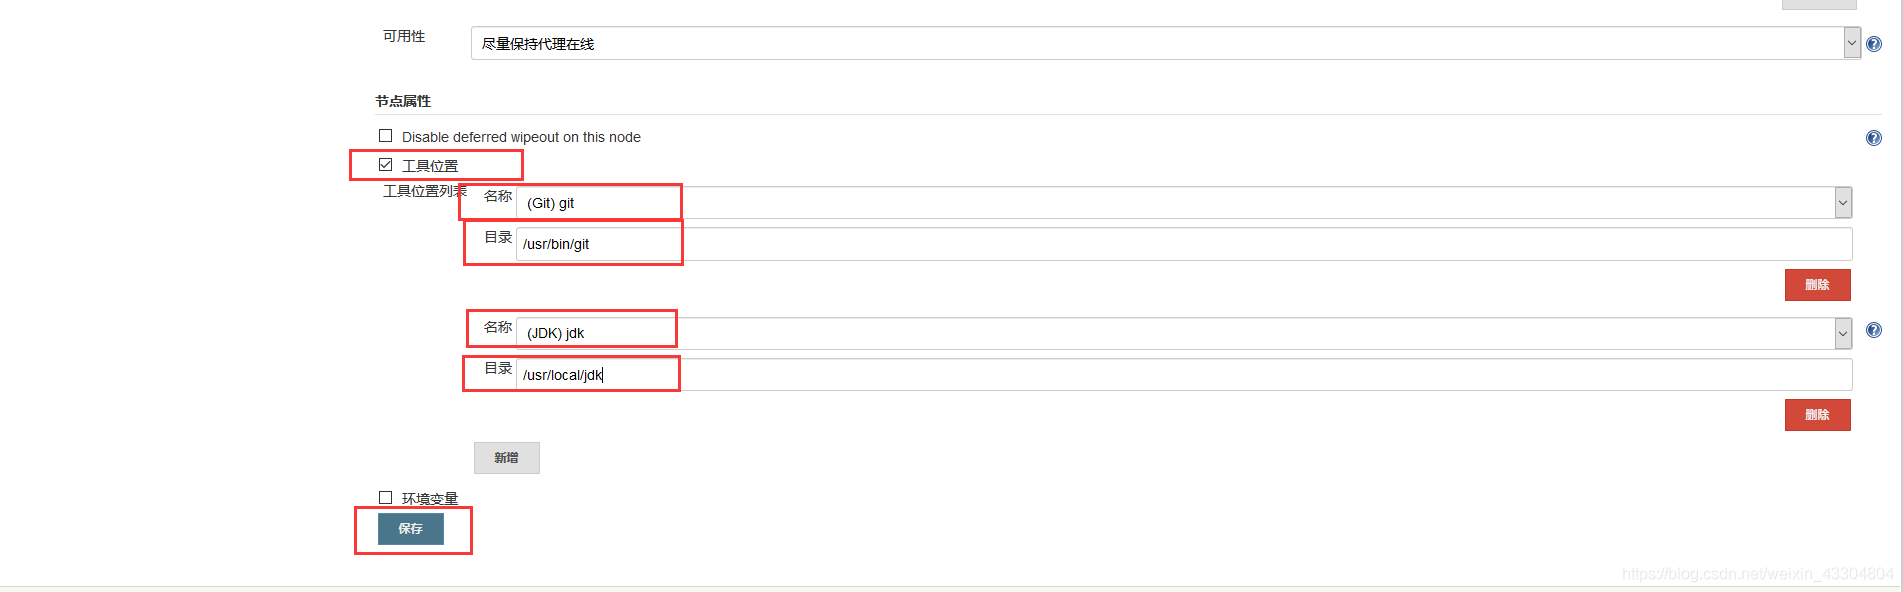
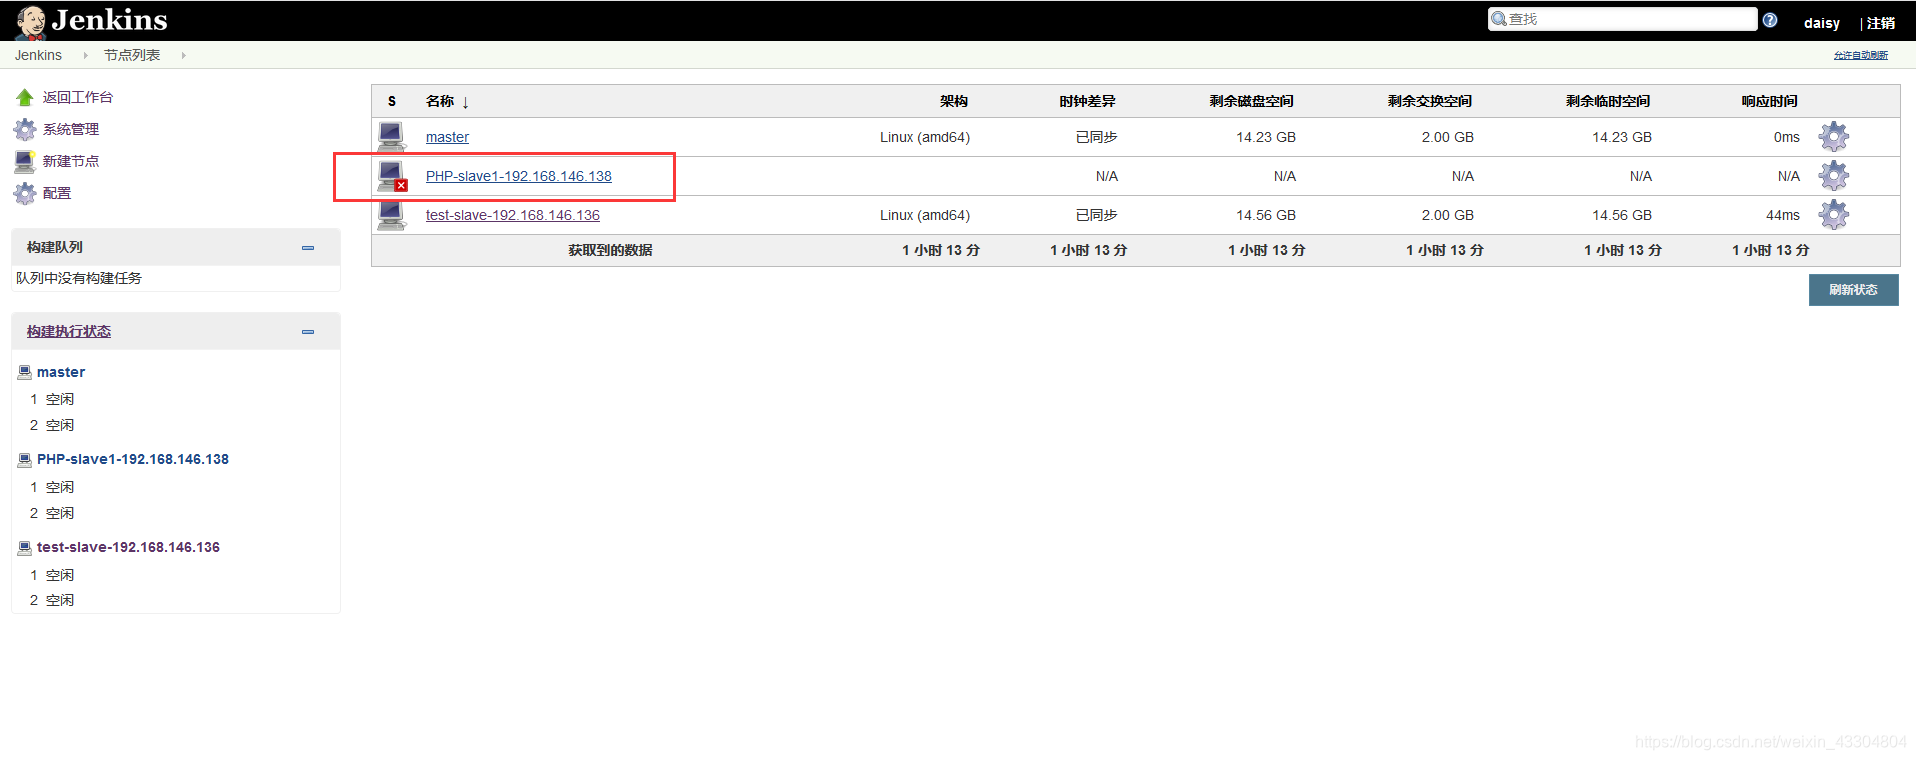
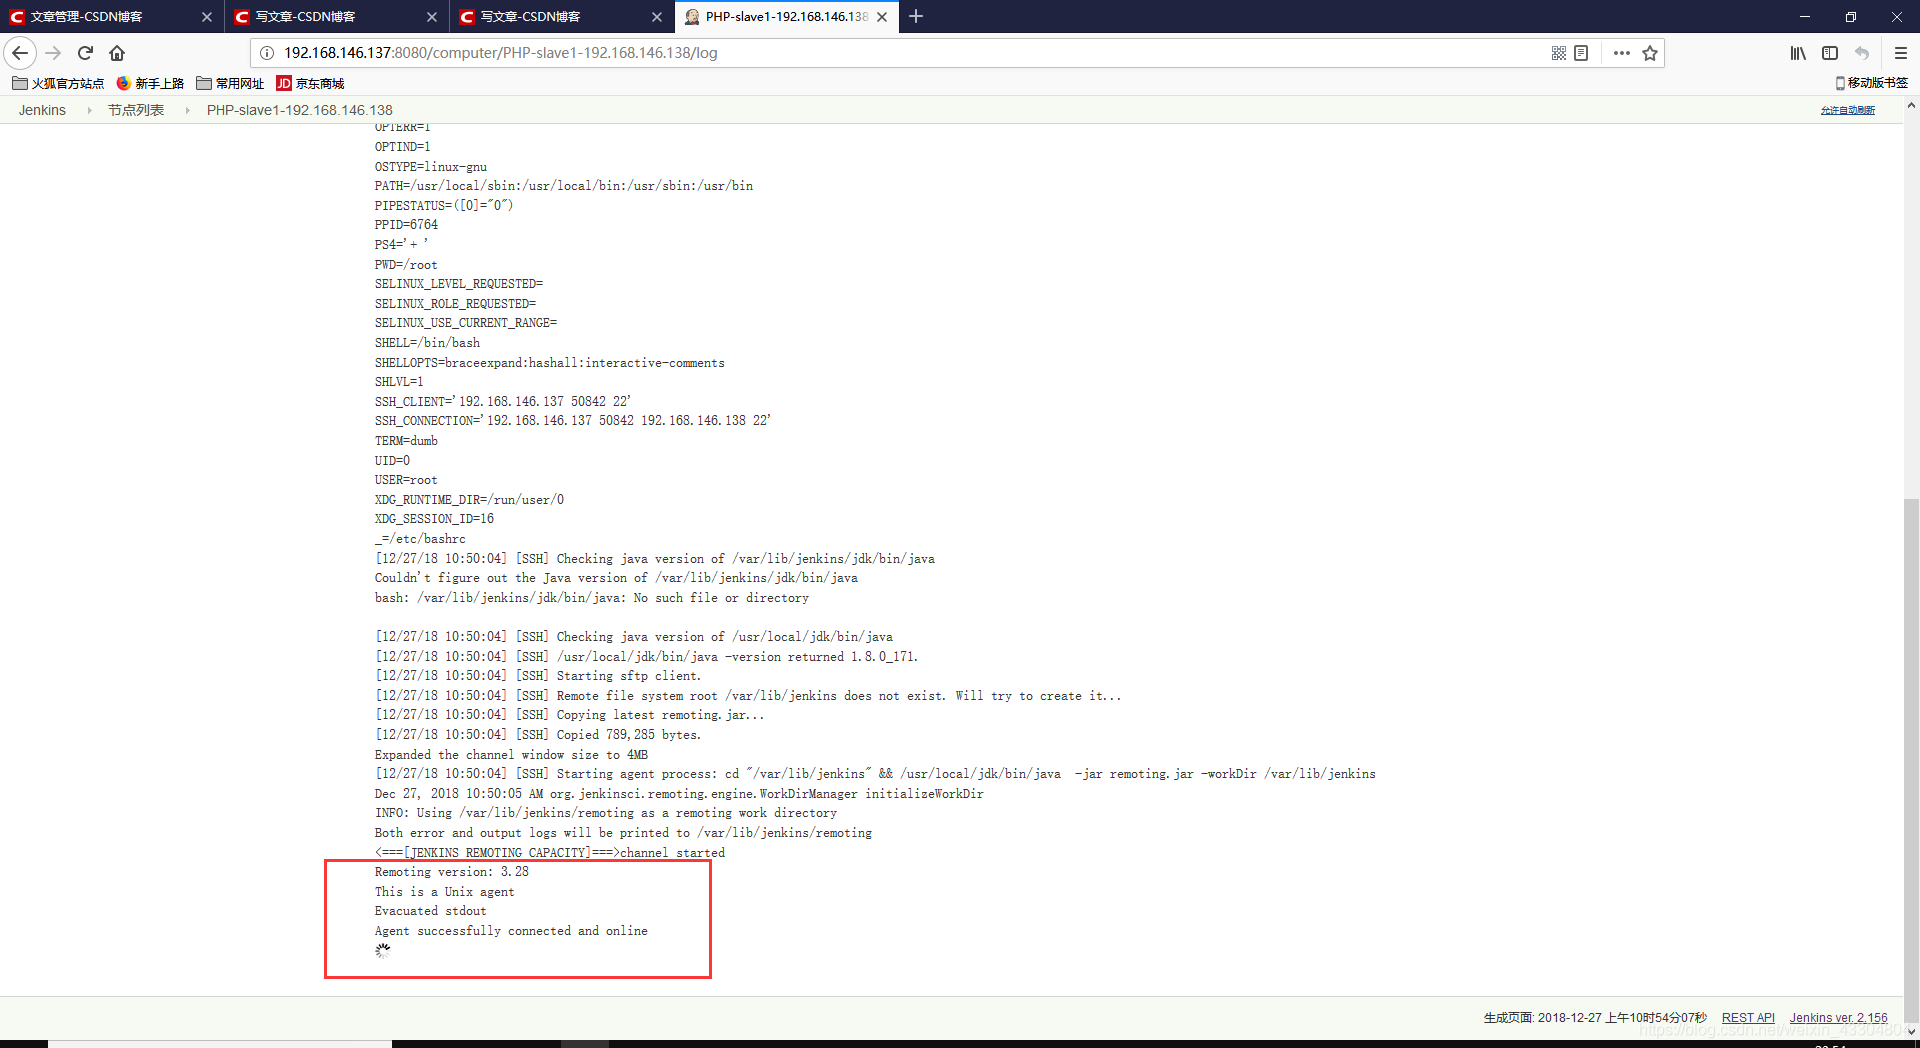
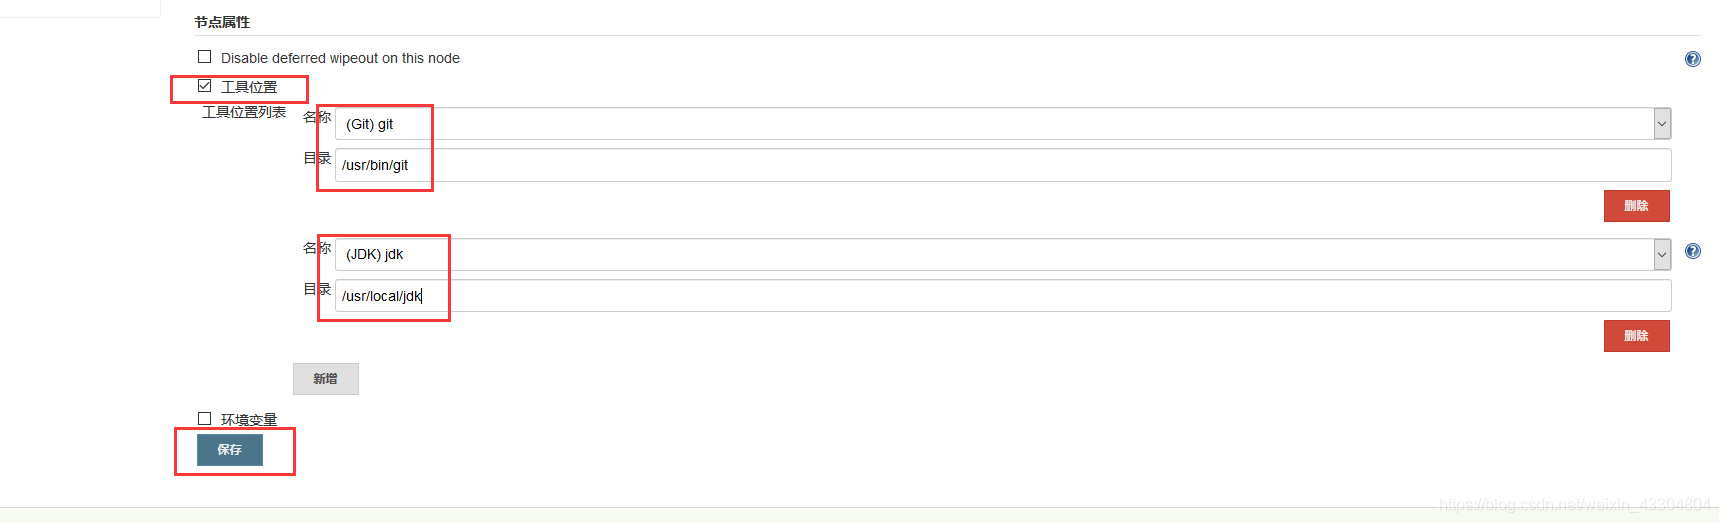
(3) slave從節點安裝java環境,並啟動jenkins的slave管理節點
#解壓安裝jdk
[[email protected] ~]# tar xf jdk-8u171-linux-x64.tar.gz -C /usr/local
[[email protected] ~]# cd /usr/local
[[email protected] local]# mv jdk1.8.0_171 jdk
[[email protected] local]# /usr/local/jdk/bin/java -version
java version "1.8.0_171"
Java(TM) SE Runtime Environment (build 1.8.0_171-b11)
Java HotSpot(TM) 64-Bit Server VM (build 25.171-b11, mixed mode)
#配置java環境
[[email protected] local]# sed -i.org '$a export JAVA_HOME=/usr/local/jdk/' /etc/profile
[[email protected] local]# sed -i.org '$a export PATH=$PATH:$JAVA_HOME/bin' /etc/profile
[[email protected] local]# sed -i.org '$a export CLASSPATH=.$CLASSPATH:$JAVA_HOME/lib:$JAVA_HOME/lib/tools.jar' /etc/profile
[[email protected] local]# tail -3 /etc/profile
export JAVA_HOME=/usr/local/jdk/
export PATH=$PATH:$JAVA_HOME/bin
export CLASSPATH=.$CLASSPATH:$JAVA_HOME/lib:$JAVA_HOME/lib/tools.jar
[[email protected] local]# source /etc/profile
[[email protected] local]# java -version
java version "1.8.0_171"
Java(TM) SE Runtime Environment (build 1.8.0_171-b11)
Java HotSpot(TM) 64-Bit Server VM (build 25.171-b11, mixed mode)
#設定軟連結
[[email protected] ~]# ln -s /usr/local/jdk/bin/* /usr/local/bin/
 該日誌表示PHP啟動成功
(4) Web伺服器安裝LNMP環境,並手動拉取程式碼模擬訪問
[[email protected] ~]# yum -y install epel-release
[[email protected] ~]# yum -y install nginx php-fpm php-mysql
[[email protected] ~]# cd /etc/nginx/
[[email protected] nginx]# ls
conf.d                fastcgi_params.default  nginx.conf           uwsgi_params.default
default.d             koi-utf                 nginx.conf.default   win-utf
fastcgi.conf          koi-win                 scgi_params
fastcgi.conf.default  mime.types              scgi_params.default
fastcgi_params        mime.types.default      uwsgi_params
[[email protected] nginx]# cp nginx.conf{,.bak}
[[email protected] nginx]# egrep -v "#|^$" nginx.conf.bak > nginx.conf
[[email protected] nginx]# vim nginx.conf
user nginx;
worker_processes auto;
error_log /var/log/nginx/error.log;
pid /run/nginx.pid;
include /usr/share/nginx/modules/*.conf;
events {
    worker_connections 1024;
}
http {
    log_format  main  '$remote_addr - $remote_user [$time_local] "$request" '
                      '$status $body_bytes_sent "$http_referer" '
                      '"$http_user_agent" "$http_x_forwarded_for"';
    access_log  /var/log/nginx/access.log  main;
    sendfile            on;
    tcp_nopush          on;
    tcp_nodelay         on;
    keepalive_timeout   65;
    types_hash_max_size 2048;
    include             /etc/nginx/mime.types;
    default_type        application/octet-stream;
    include /etc/nginx/conf.d/*.conf;					#include了一個配置檔案目錄
    server {
        listen       80 default_server;					#預設的server配置(如果用IP訪問就進入這個server)
        listen       [::]:80 default_server;
        server_name  _;
        root         /usr/share/nginx/html;				#預設的網頁目錄
        include /etc/nginx/default.d/*.conf;
        location / {
        }
        error_page 404 /404.html;
            location = /40x.html {
        }
        error_page 500 502 503 504 /50x.html;
            location = /50x.html {
        }
    }
}
#由於預設的配置檔案include了/etc/nginx/conf.d/*.conf因此我們增加一個server配置檔案即可
[[email protected] nginx]# pwd
/etc/nginx
[[email protected] nginx]# ls
conf.d                fastcgi_params.default  nginx.conf           uwsgi_params
default.d             koi-utf                 nginx.conf.bak       uwsgi_params.default
fastcgi.conf          koi-win                 nginx.conf.default   win-utf
fastcgi.conf.default  mime.types              scgi_params
fastcgi_params        mime.types.default      scgi_params.default
[[email protected] conf.d]# vim nginx.conf
events {
        worker_connections 1024;
}
http {
        include  mime.types;
        default_type  application/octet-stream;
        sendfile   on;
        keepalive_timeout  65;
        server {

                listen 80;
                server_name www.yunjisuan.com;
                root /usr/share/nginx/html/www.yunjisuan.com;
                location / {
                        index index.php index.html;
                }
                location ~ \.php {
                        fastcgi_index index.php;
                        fastcgi_pass 127.0.0.1:9000;
                        include fastcgi.conf;
                }
        }
}

#建立網頁目錄
[[email protected] conf.d]# cd /usr/share/nginx/html/
[[email protected] html]# ls
404.html  50x.html  index.html  nginx-logo.png  poweredby.png
[[email protected] html]# mkdir www.yunjisuan.com
[[email protected] html]# cd www.yunjisuan.com/
[[email protected] www.yunjisuan.com]# ls
[[email protected] www.yunjisuan.com]#

#將網頁目錄許可權授權給apache程式使用者
[[email protected] nginx]# ll -d html/
drwxr-xr-x. 3 root root 124 Dec 27 11:29 html/
[[email protected] html]# id apache
uid=48(apache) gid=48(apache) groups=48(apache)
[[email protected] nginx]# chown -R apache html
[[email protected] nginx]# ll -d html/
drwxr-xr-x. 3 apache root 124 Dec 27 11:29 html/

#啟動nginx服務和php-fpm服務
[[email protected] ~]# systemctl start nginx
[[email protected] ~]# systemctl enable nginx
Created symlink from /etc/systemd/system/multi-user.target.wants/nginx.service to /usr/lib/systemd/system/nginx.service.
[[email protected] ~]# ss -antup | grep 80
tcp    LISTEN     0      128       *:80                    *:*                   users:(("n
tcp    LISTEN     0      128      :::80                   :::*                   users:(("n
[[email protected] ~]# systemctl start php-fpm
[[email protected] ~]# systemctl enable php-fpm
Created symlink from /etc/systemd/system/multi-user.target.wants/php-fpm.service to /usr/lib/systemd/system/php-fpm.service.
[[email protected] ~]# ss -antup | grep 9000
tcp    LISTEN     0      128    127.0.0.1:9000                  *:*                   users2,fd=0),("php-fpm",pid=7431,fd=0),("php-fpm",pid=7429,fd=6))
做好宿主機的域名對映後,瀏覽器訪問測試
5. 在遠端Git倉庫中建立一個用於構建的Pipeline指令碼
在流水線指令碼生成器中操作
配置 jenkinsfile-php-wp指令碼
在jenkins伺服器上進行如下操作
[[email protected] itemA]# cd /test/
[[email protected] test]# ls
jenkinsfile
[[email protected] test]# cd jenkinsfile/
[[email protected] jenkinsfile]# ls
itemA itemB
[[email protected] jenkinsfile]# cd itemA
[[email protected] itemA]# ls
jenkinsfile
[[email protected] itemA]# cp jenkinsfile jenkinsfile-php-wp
[[email protected] itemA]# vim jenkinsfile-php-wp
node ("PHP-slave1-192.168.146.138") {
//def mvnHome
stage('Git php-wp checkout') {
checkout([$class: 'GitSCM', branches: [[name: '${branch}']],
doGenerateSubmoduleConfigurations: false,
extensions: [], submoduleCfg: [],
userRemoteConfigs: [[credentialsId: 'a240769e-ed1a-4456-90a8-f0e124024801',
url: '[email protected]:/home/git/repos/wordpress']]])
}
stage('Copy code') {
sh ''' #sh語句,一行顯示時,用“sh ' ' ”表示;多行顯示時,用“sh ''' ''' ”表示
rm -rf ${WORKSPACE}/.git # ${WORKSPACE} 是Jenkins的內建變數,相當於/var/lib/jenkins/專案名
[ -d /data/backup ] || mkdir -p /data/backup
mv /usr/share/nginx/html/www.yunjisuan.com /data/backup/www.yunjisuan.com-$(date +%F_%T)
cp -rf ${WORKSPACE} /usr/share/nginx/html/www.yunjisuan.com
'''
}
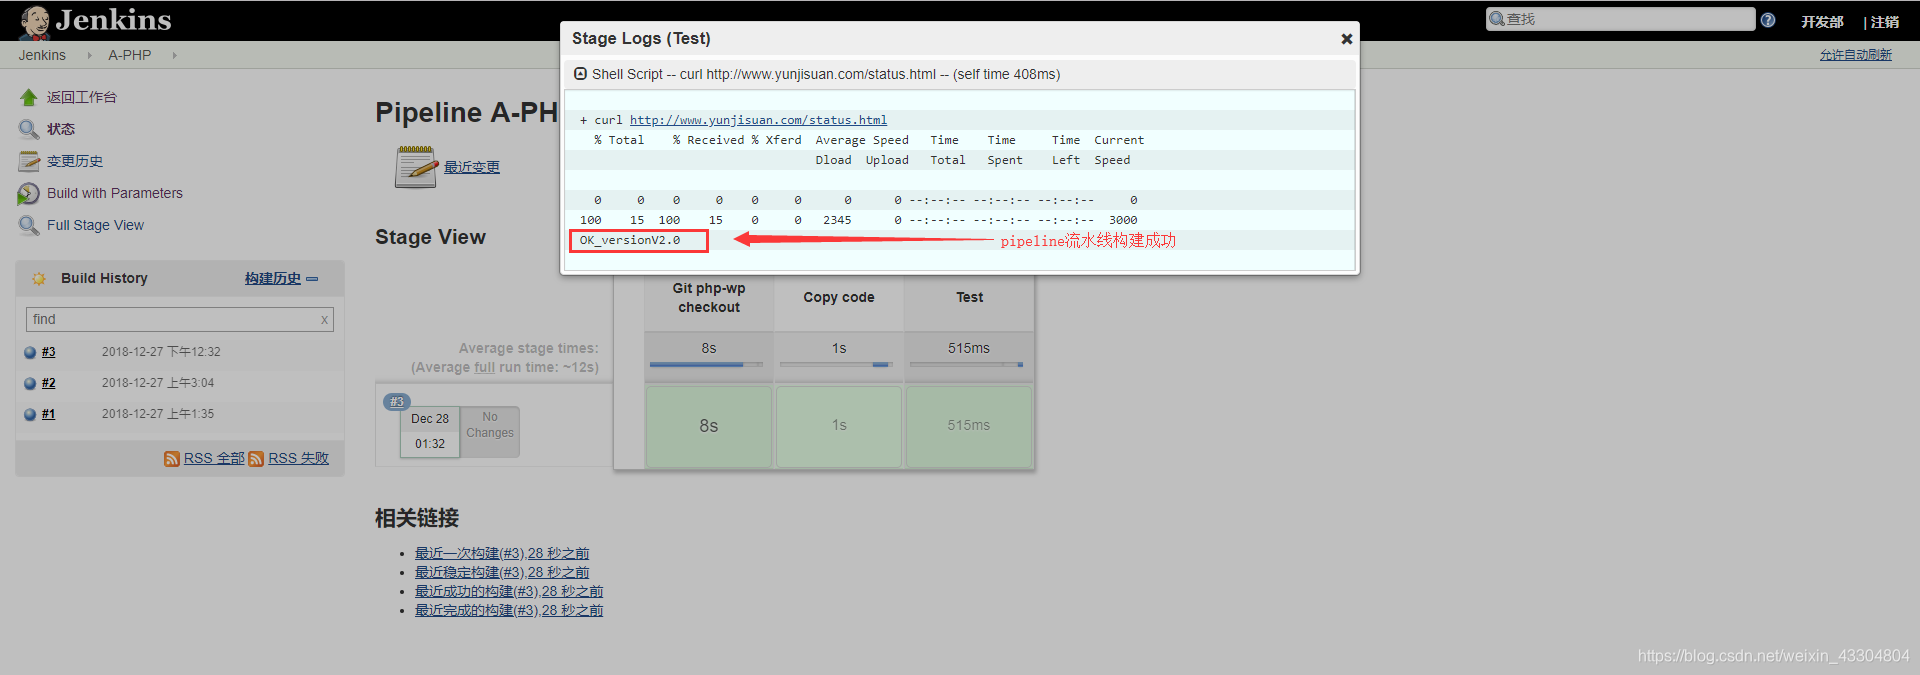
stage('Test') {
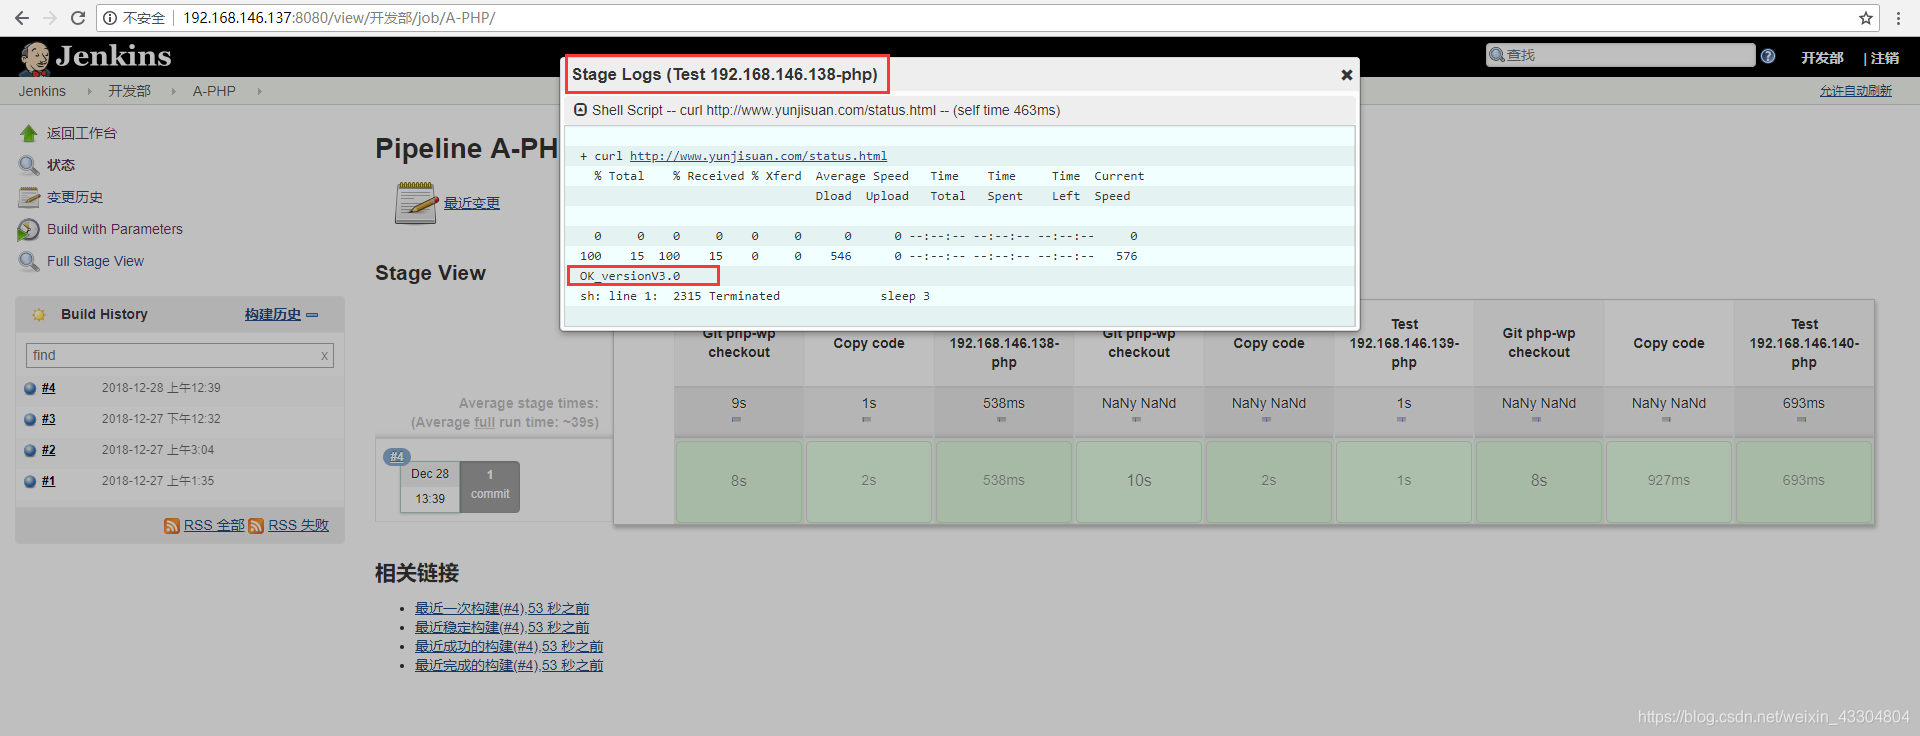
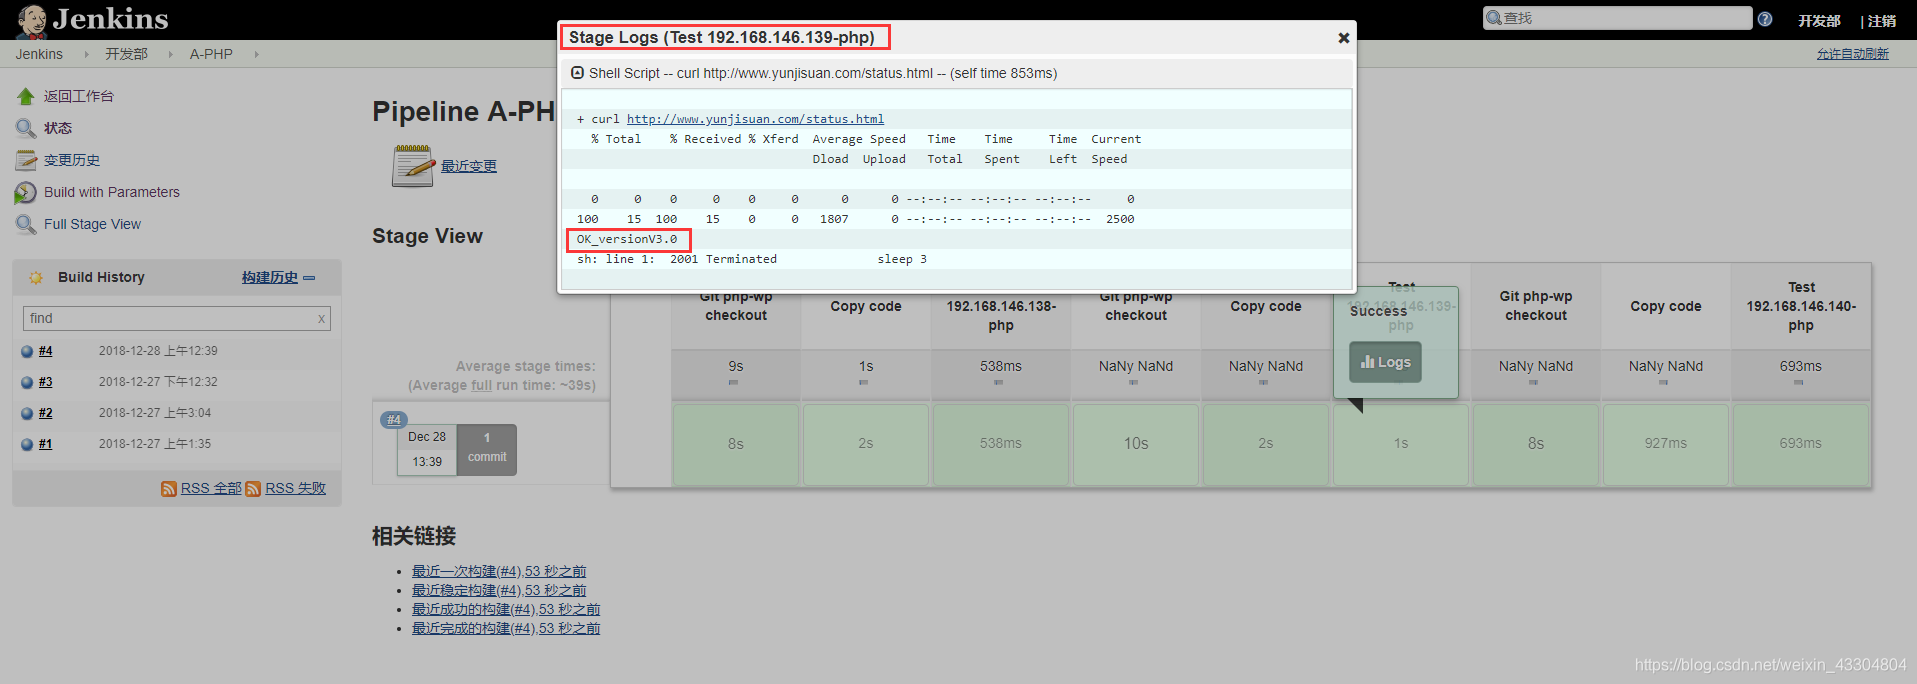
sh 'curl http://www.yunjisuan.com/status.html'
}
}
#推送到Git遠端倉庫
[[email protected] itemA]# cd ..
[[email protected] jenkinsfile]# git add *
[[email protected] jenkinsfile]# git commit -m "123123"
[master 362e774] 123123
1 file changed, 22 insertions(+)
create mode 100644 itemA/jenkinsfile-php-wp
[[email protected] jenkinsfile]# git remote -v
origin [email protected]:/home/git/repos/jenkinsfile (fetch)
origin [email protected]:/home/git/repos/jenkinsfile (push)
[[email protected] jenkinsfile]# git push -u origin master
Counting objects: 4, done.
Compressing objects: 100% (3/3), done.
Writing objects: 100% (4/4), 736 bytes | 0 bytes/s, done.
Total 4 (delta 0), reused 0 (delta 0)
To 192.168.146.136:/home/git/repos/jenkinsfile
1f3715d..362e774 master -> master
Branch master set up to track remote branch master from origin.
- 在NginxWeb端做本地對映
[[email protected] ~]# echo "`hostname -I` www.yunjisuan.com" >> /etc/hosts
[[email protected] ~]# tail -1 /etc/hosts
192.168.146.138  www.yunjisuan.com
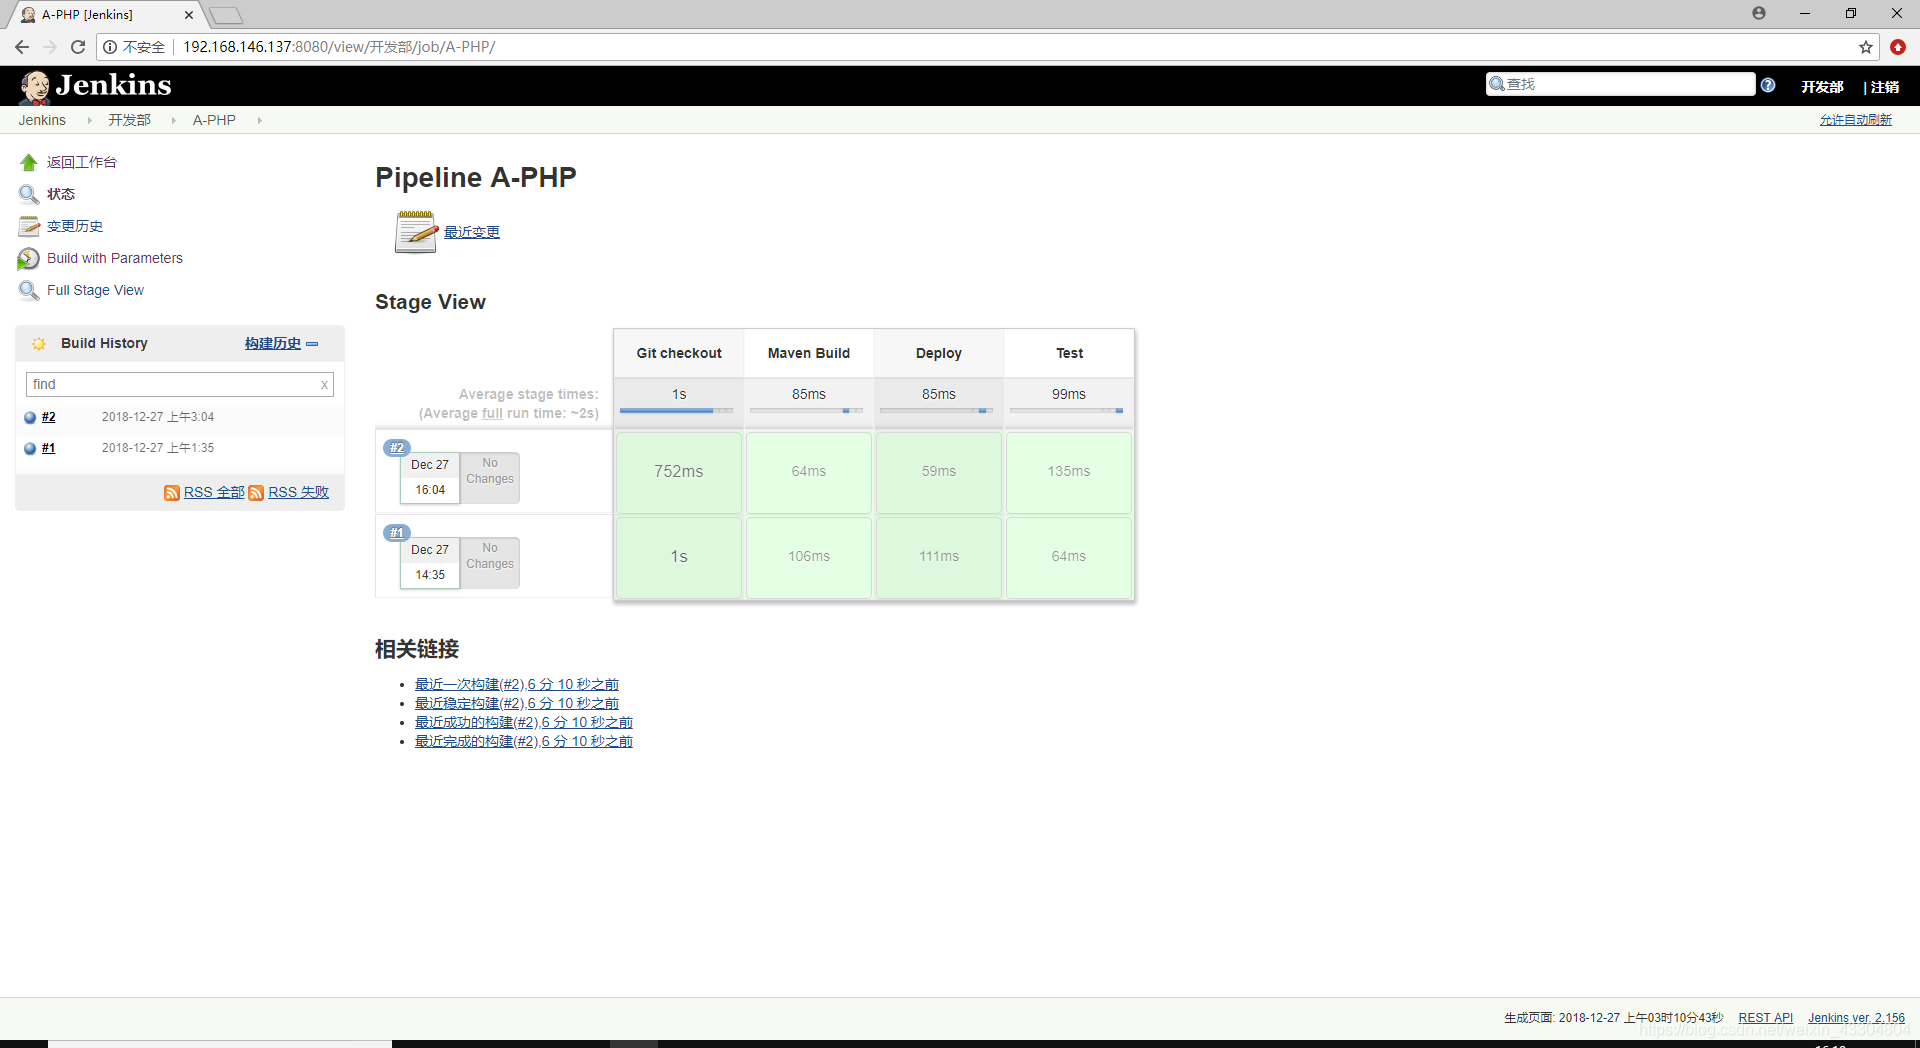
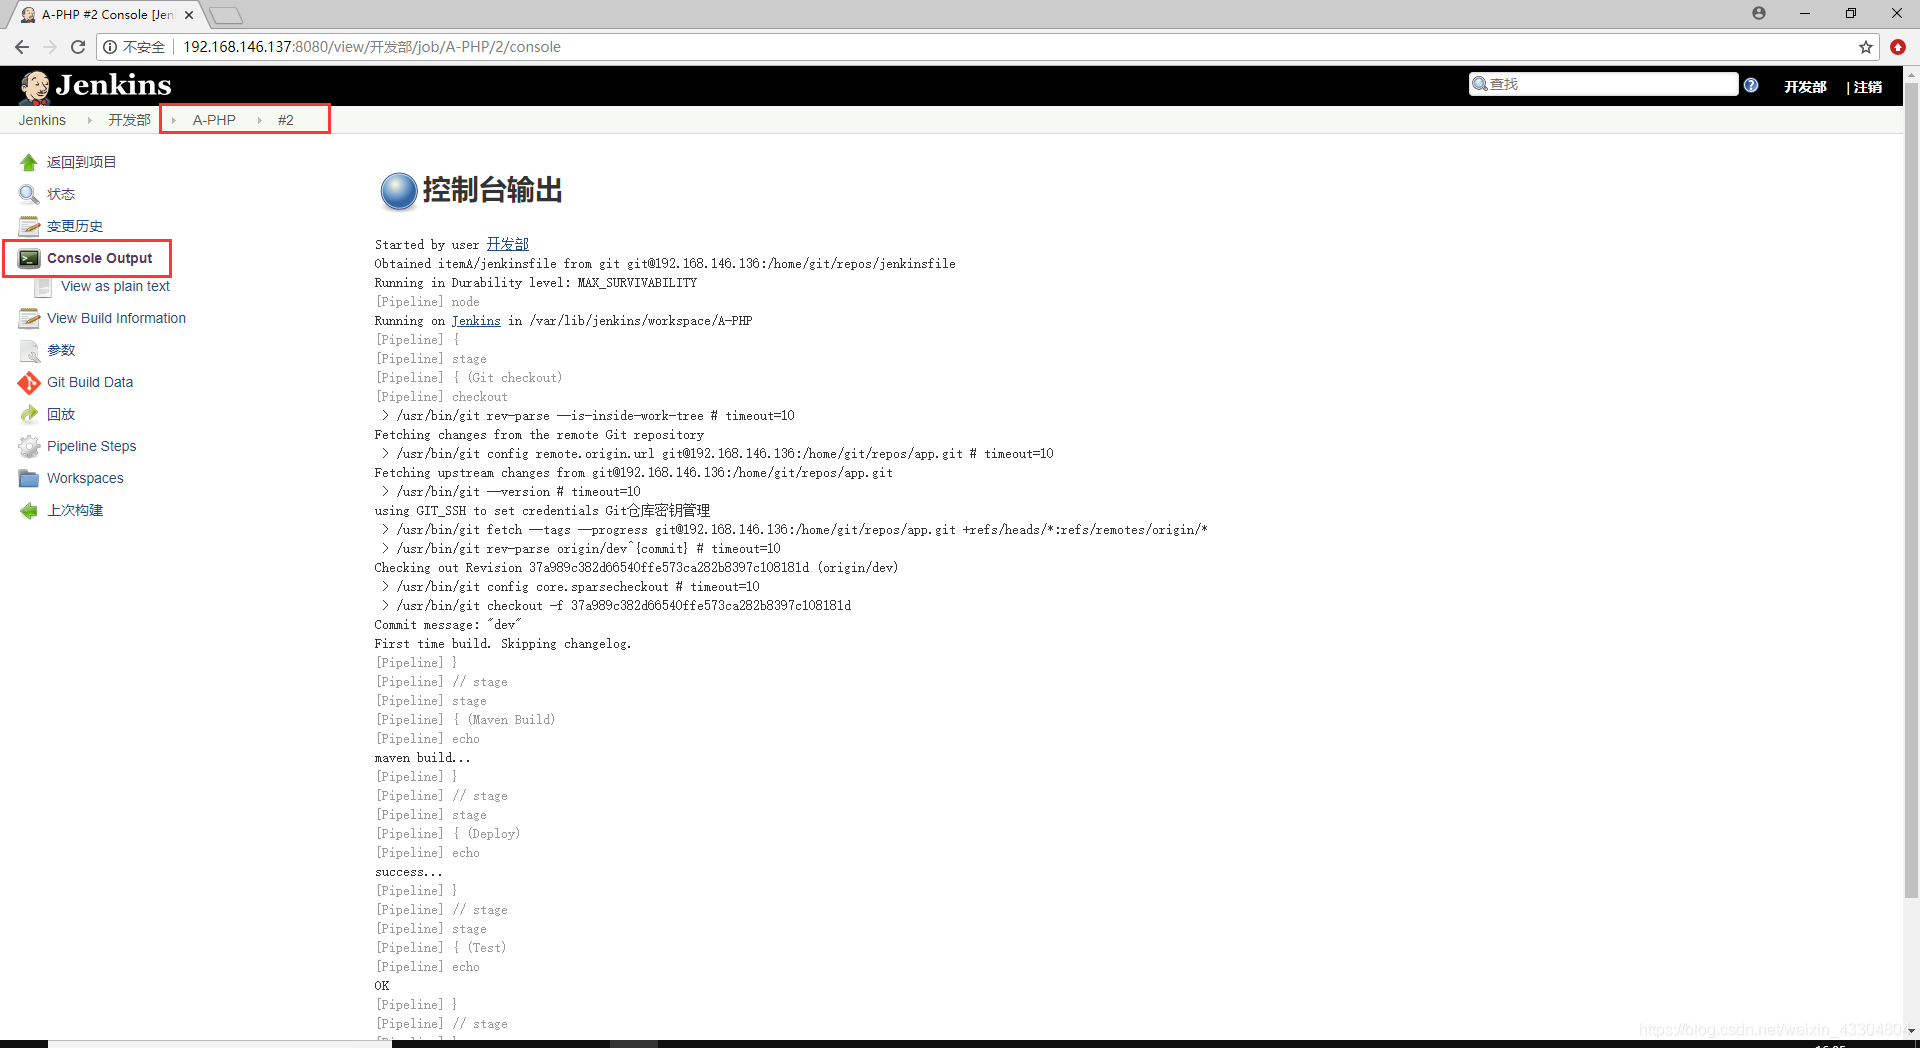
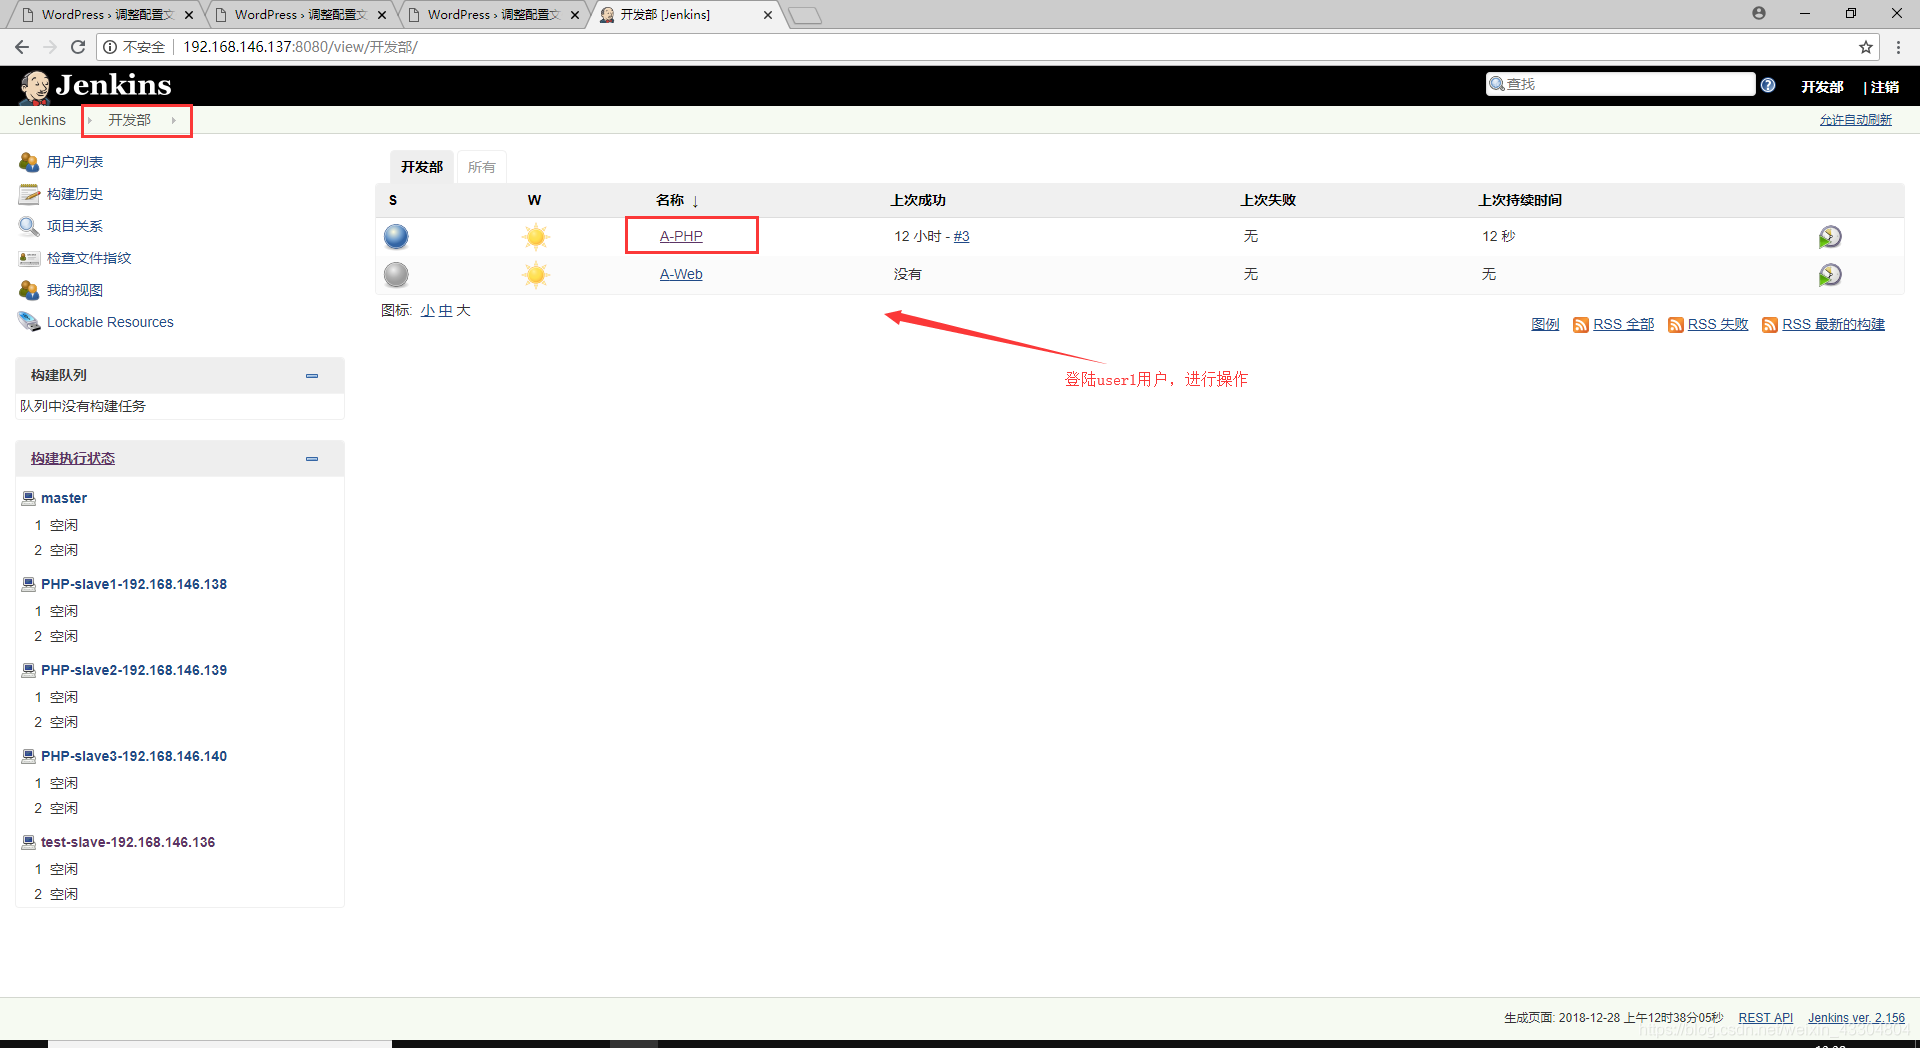
- 瀏覽器訪問jenkins進行PHP專案流水線釋出構建
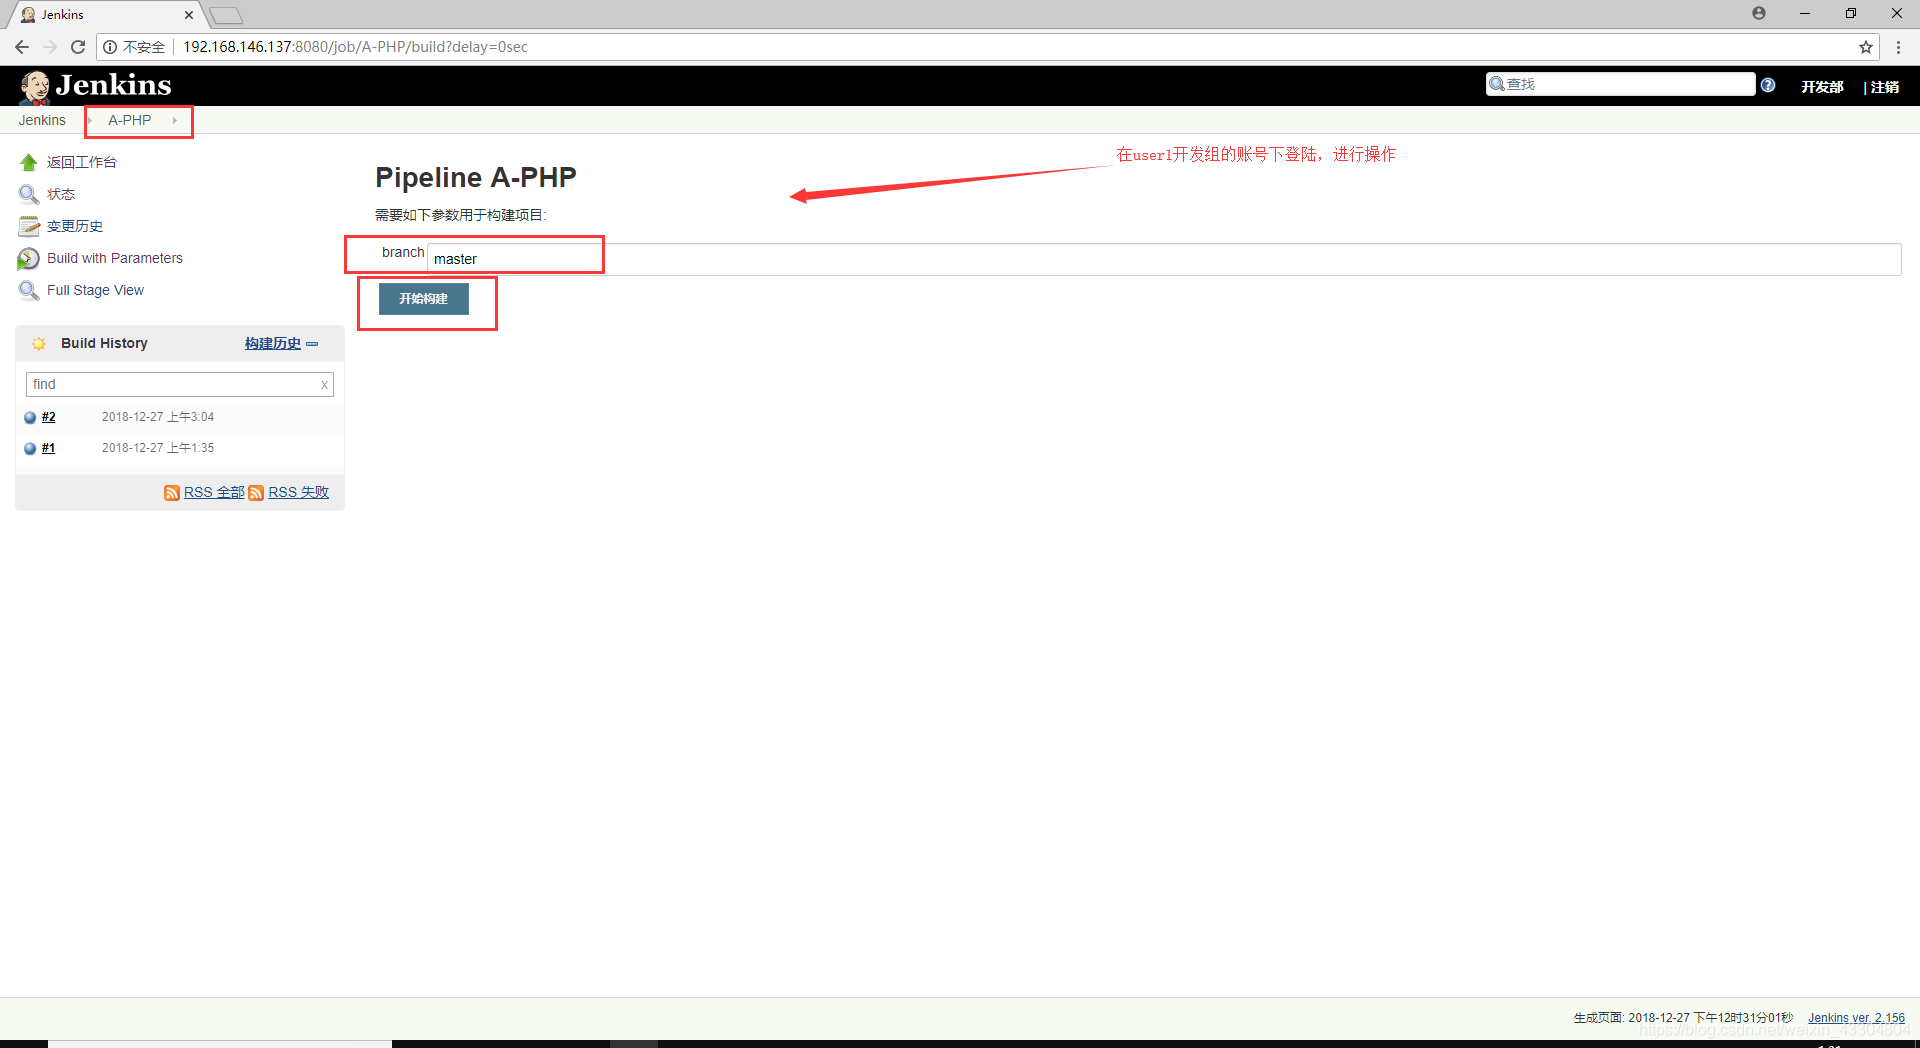
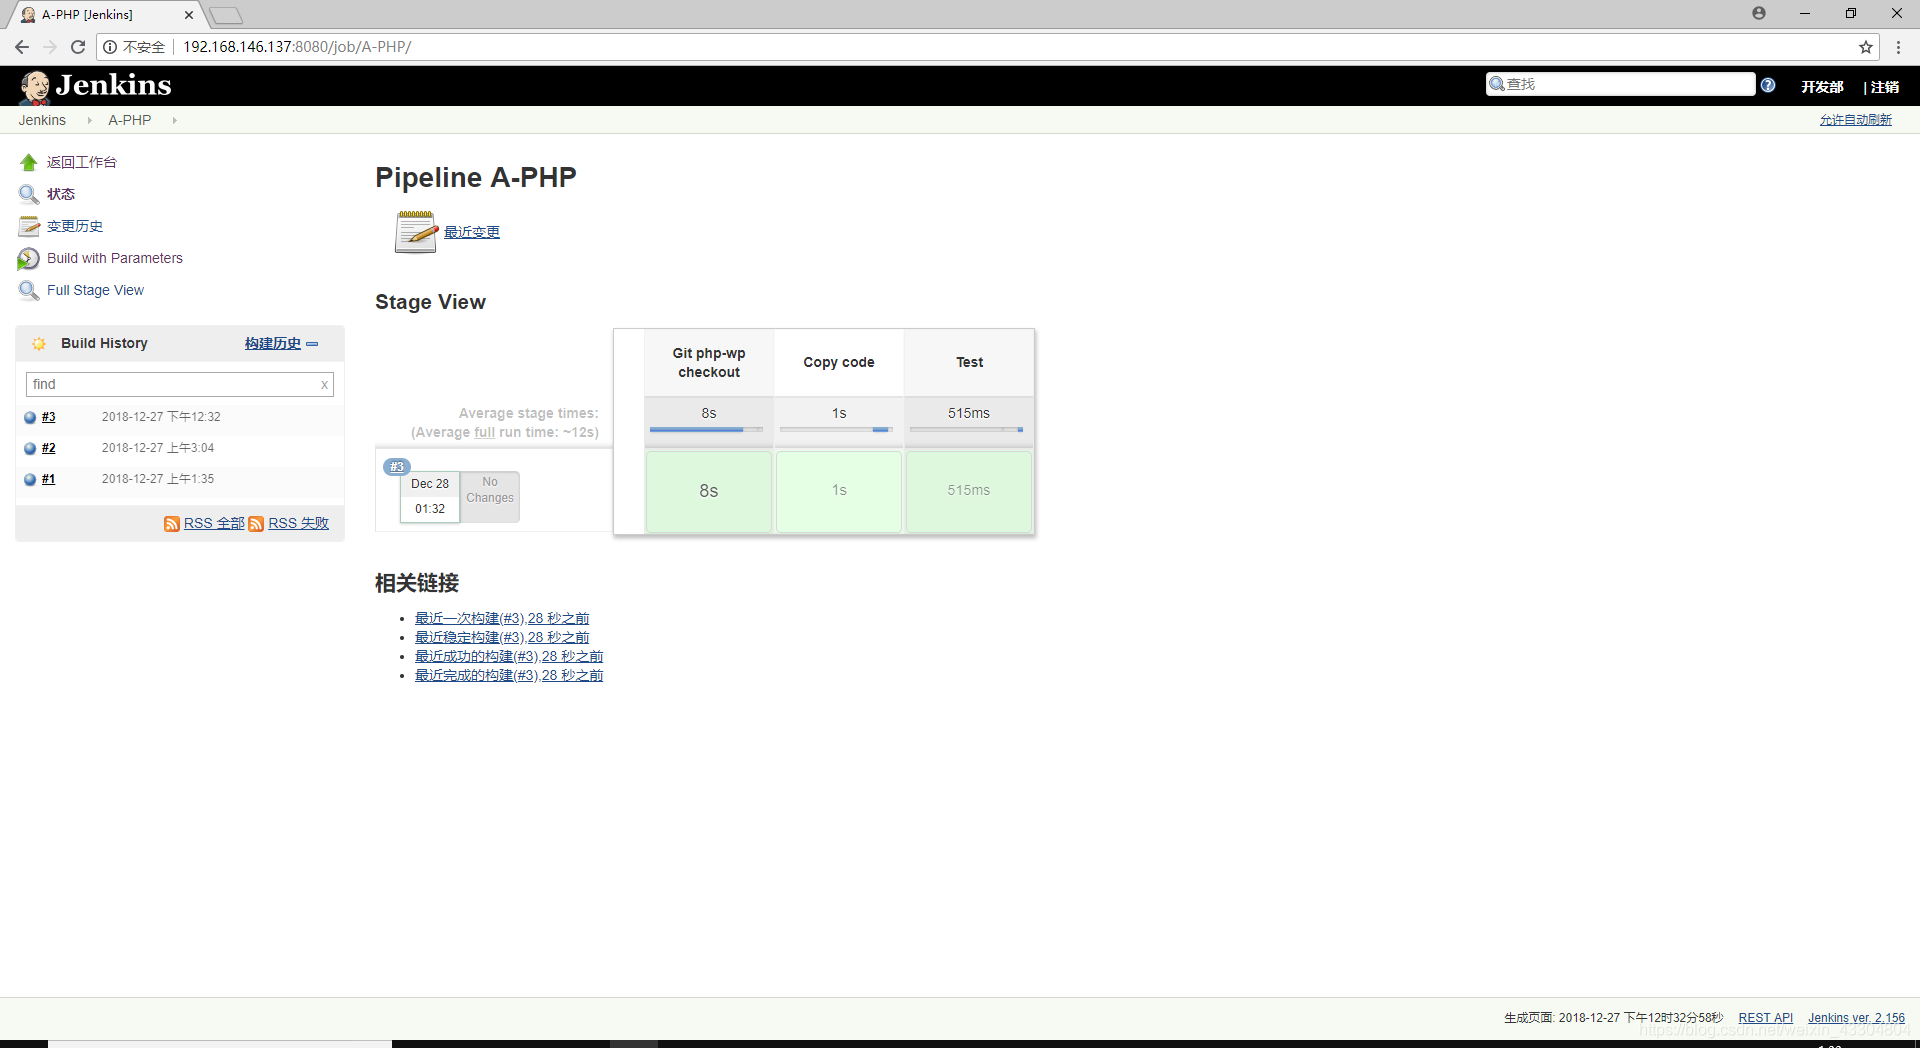
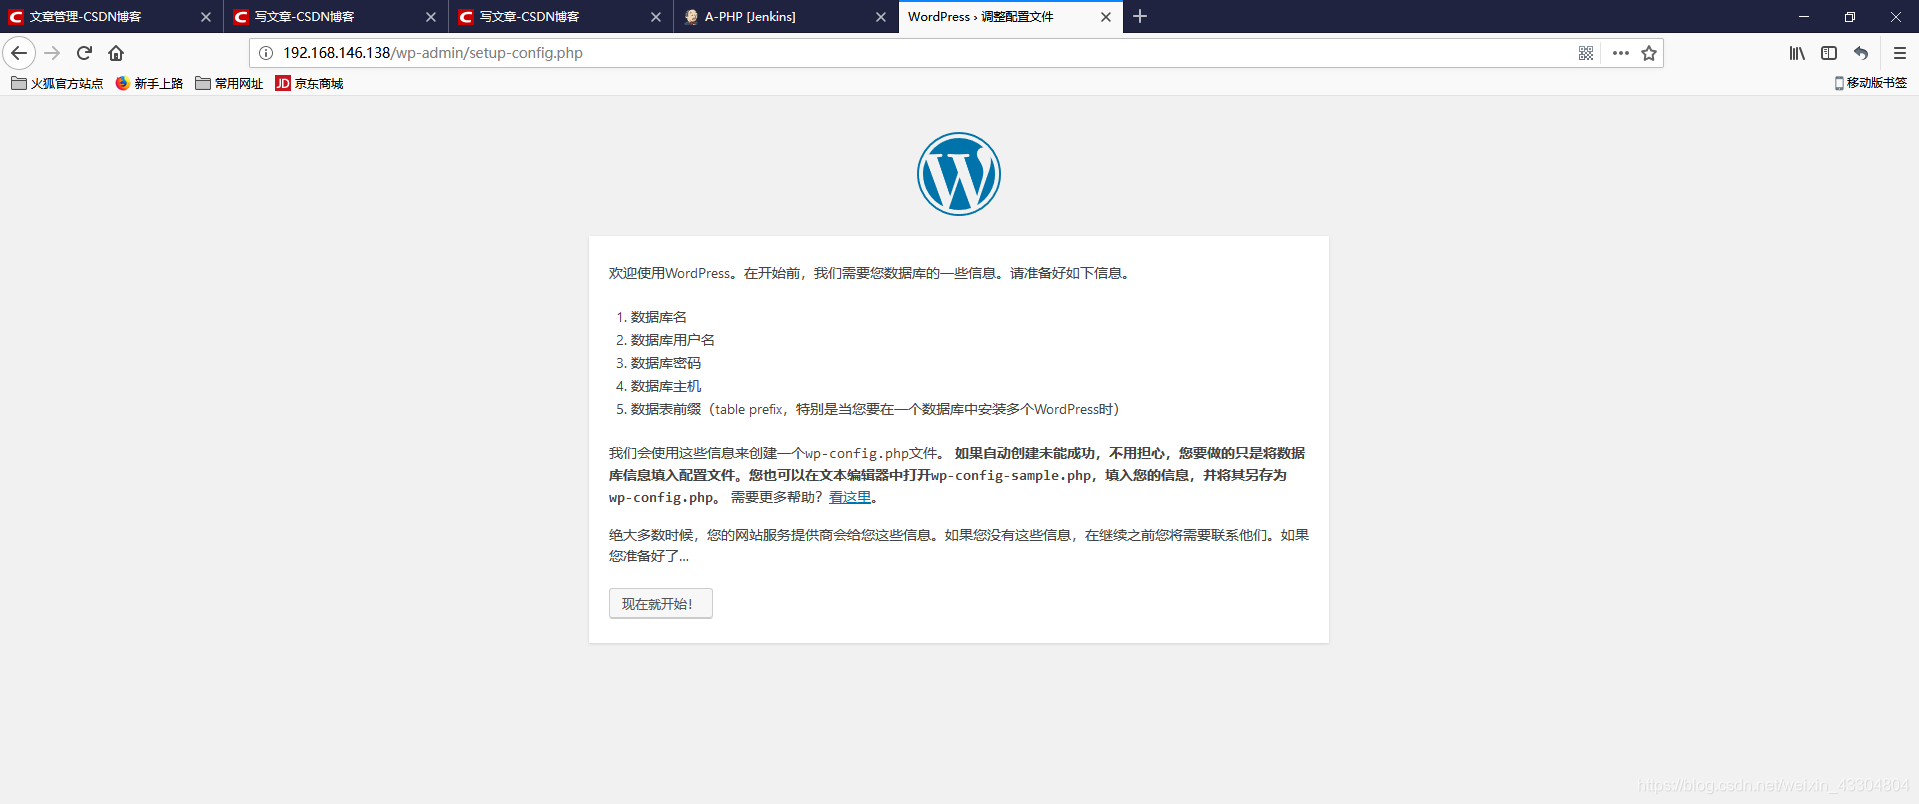
 在NginxWeb下操作
[[email protected] ~]# cd /var/lib/jenkins/
[[email protected] jenkins]# ls
remoting  remoting.jar  workspace
[[email protected] jenkins]# cd workspace/
[[email protected] workspace]# ls
A-PHP  [email protected]
[[email protected] workspace]# cd A-PHP
[[email protected] A-PHP]# ls
index.php        wp-admin              wp-cron.php        wp-mail.php
license.txt      wp-blog-header.php    wp-includes        wp-settings.php
readme.html      wp-comments-post.php  wp-links-opml.php  wp-signup.php
status.html      wp-config-sample.php  wp-load.php        wp-trackback.php
wp-activate.php  wp-content            wp-login.php       xmlrpc.php
[[email protected] A-PHP]# cat status.html
OK_versionV2.0
[[email protected] A-PHP]# ls /data/backup/
www.yunjisuan.com-2018-12-27_12:32:41
[[email protected] A-PHP]# cd /usr/share/nginx/html/
[[email protected] html]# ls
404.html  50x.html  index.html  nginx-logo.png  poweredby.png  www.yunjisuan.com
[[email protected] html]# cd www.yunjisuan.com/
[[email protected] www.yunjisuan.com]# ls
index.php        wp-admin              wp-cron.php        wp-mail.php
license.txt      wp-blog-header.php    wp-includes        wp-settings.php
readme.html      wp-comments-post.php  wp-links-opml.php  wp-signup.php
status.html      wp-config-sample.php  wp-load.php        wp-trackback.php
wp-activate.php  wp-content            wp-login.php       xmlrpc.php
Jenkins+Pipeline+Git+PHP部落格專案多節點流水線自動釋出
- 環境部署
| 主機名 | IP地址 | 備註 |
|---|---|---|
| Git | 192.168.146.136 | Git伺服器 |
| Jenkins | 192.168.146.137 | Jenkins伺服器 |
| Web01 | 192.168.146.138 | Web伺服器 |
| Web02 | 192.168.146.139 | Web伺服器 |
| Web03 | 192.168.146.140 | Web伺服器 |
Git伺服器:
git-2.9.5.tar.gz
apache-maven-3.5.0-bin.tar.gz
jdk-8u171-linux-x64.tar.gz
Jenkins伺服器:
git-2.9.5.tar.gz
jenkins-2.156-1.1.noarch.rpm
apache-maven-3.5.0-bin.tar.gz
jdk-8u171-linux-x64.tar.gz
Web伺服器:
git-2.9.5.tar.gz
apache-maven-3.5.0-bin.tar.gz
jdk-8u171-linux-x64.tar.gz
wordpress-4.9.4-zh_CN.tar.gz
#在NginxWeb01中操作
[[email protected] ~]# cd /mycode/
[[email protected] mycode]# ls
wordpress
[[email protected] mycode]# cd wordpress/
[[email protected] wordpress]# ls
index.php        wp-admin              wp-cron.php        wp-mail.php
license.txt      wp-blog-header.php    wp-includes        wp-settings.php
readme.html      wp-comments-post.php  wp-links-opml.php  wp-signup.php
status.html      wp-config-sample.php  wp-load.php        wp-trackback.php
wp-activate.php  wp-content            wp-login.php       xmlrpc.php
[[email protected] wordpress]# vim status.html
OK_versionV3.0

#提交更新的程式碼
[[email protected] wordpress]# git add *
[[email protected] wordpress]# git commit -m "versionV3.0"
[master 530c401] versionV3.0
 Committer: root <[email protected]>
Your name and email address were configured automatically based
on your username and hostname. Please check that they are accurate.
You can suppress this message by setting them explicitly. Run the
following command and follow the instructions in your editor to edit
your configuration file:

    git config --global --edit

After doing this, you may fix the identity used for this commit with:

    git commit --amend --reset-author

 1 file changed, 1 insertion(+), 1 deletion(-)
[[email protected] wordpress]# git config --global user.email "[email protected]"
[[email protected] wordpress]# git config --global user.name "daisy"
[[email protected] wordpress]# git remote -v
origin	[email protected]:/home/git/repos/wordpress (fetch)
origin	[email protected]:/home/git/repos/wordpress (push)
[[email protected] wordpress]# git push -u origin master
[email protected]'s password:
Counting objects: 3, done.
Compressing objects: 100% (2/2), done.
Writing objects: 100% (3/3), 270 bytes | 0 bytes/s, done.
Total 3 (delta 1), reused 0 (delta 0)
To 192.168.146.136:/home/git/repos/wordpress
   5ba2f63..530c401  master -> master
Branch master set up to track remote branch master from origin.
#在NginxWeb02中操作
[[email protected] ~]# echo "`hostname -I` www.yunjisuan.com" >> /etc/hosts
[[email protected] ~]# tail -1 /etc/hosts
192.168.146.139  www.yunjisuan.com
#在NginxWeb03中操作
[[email protected] ~]# echo "`hostname -I` www.yunjisuan.com" >> /etc/hosts
[[email protected] ~]# tail -1 /etc/hosts
192.168.146.140  www.yunjisuan.com
#在Jenkins服務端操作,修改流水線生成指令碼
[[email protected] ~]# cd /test/
[[email protected] test]# ls
jenkinsfile
[[email protected] test]# cd jenkinsfile/
[[email protected] jenkinsfile]# ls
itemA itemB
[[email protected] jenkinsfile]# cd itemA/
[[email protected] itemA]# ls
jenkinsfile jenkinsfile-php-wp
[[email protected] itemA]# vim jenkinsfile-php-wp
[[email protected] itemA]# cp jenkinsfile-php-wp{,.bak}
[[email protected] itemA]# mv jenkinsfile-php-wp.bak /tmp/
[[email protected] itemA]# ls
jenkinsfile jenkinsfile-php-wp
[[email protected] itemA]# vim jenkinsfile-php-wp
node ("PHP-slave1-192.168.146.138") { #NginxWeb01節點
//def mvnHome
stage('Git php-wp checkout') {
checkout([$class: 'GitSCM', branches: [[name: '${branch}']],
userRemoteConfigs: [[credentialsId: 'a240769e-ed1a-4456-90a8-f0e124024801',
url: '[email protected]:/home/git/repos/wordpress']]])
}
rm -rf ${WORKSPACE}/.git
[ -d /data/backup ] || mkdir -p /data/backup
cp -rf ${WORKSPACE} /usr/share/nginx/html/www.yunjisuan.com ''' stage('Test 192.168.146.138-php') { sh 'curl http://www.yunjisuan.com/status.html'
}
node ("PHP-slave2-192.168.146.139") { #NginxWeb02節點
//def mvnHome
stage('Git php-wp checkout') {
checkout([$class: 'GitSCM', branches: [[name: '${branch}']],
userRemoteConfigs: [[credentialsId: 'a240769e-ed1a-4456-90a8-f0e124024801',
url: '[email protected]:/home/git/repos/wordpress']]])
}
rm -rf ${WORKSPACE}/.git
[ -d /data/backup ] || mkdir -p /data/backup
cp -rf ${WORKSPACE} /usr/share/nginx/html/www.yunjisuan.com ''' } stage('Test 192.168.146.139-php') { sh 'curl http://www.yunjisuan.com/status.html' }
}
node ("PHP-slave3-192.168.146.140") { #NginxWeb03節點
//def mvnHome
stage('Git php-wp checkout') {
checkout([$class: 'GitSCM', branches: [[name: '${branch}']],
doGenerateSubmoduleConfigurations: false,
extensions: [], submoduleCfg: [],
userRemoteConfigs: [[credentialsId: 'a240769e-ed1a-4456-90a8-f0e124024801',
url: '[email protected]:/home/git/repos/wordpress']]])
}
stage('Copy code') {
sh '''
rm -rf ${WORKSPACE}/.git
[ -d /data/backup ] || mkdir -p /data/backup
mv /usr/share/nginx/html/www.yunjisuan.com /data/backup/www.yunjisuan.com-$(date +%F_%T)
cp -rf ${WORKSPACE} /usr/share/nginx/html/www.yunjisuan.com '''
}
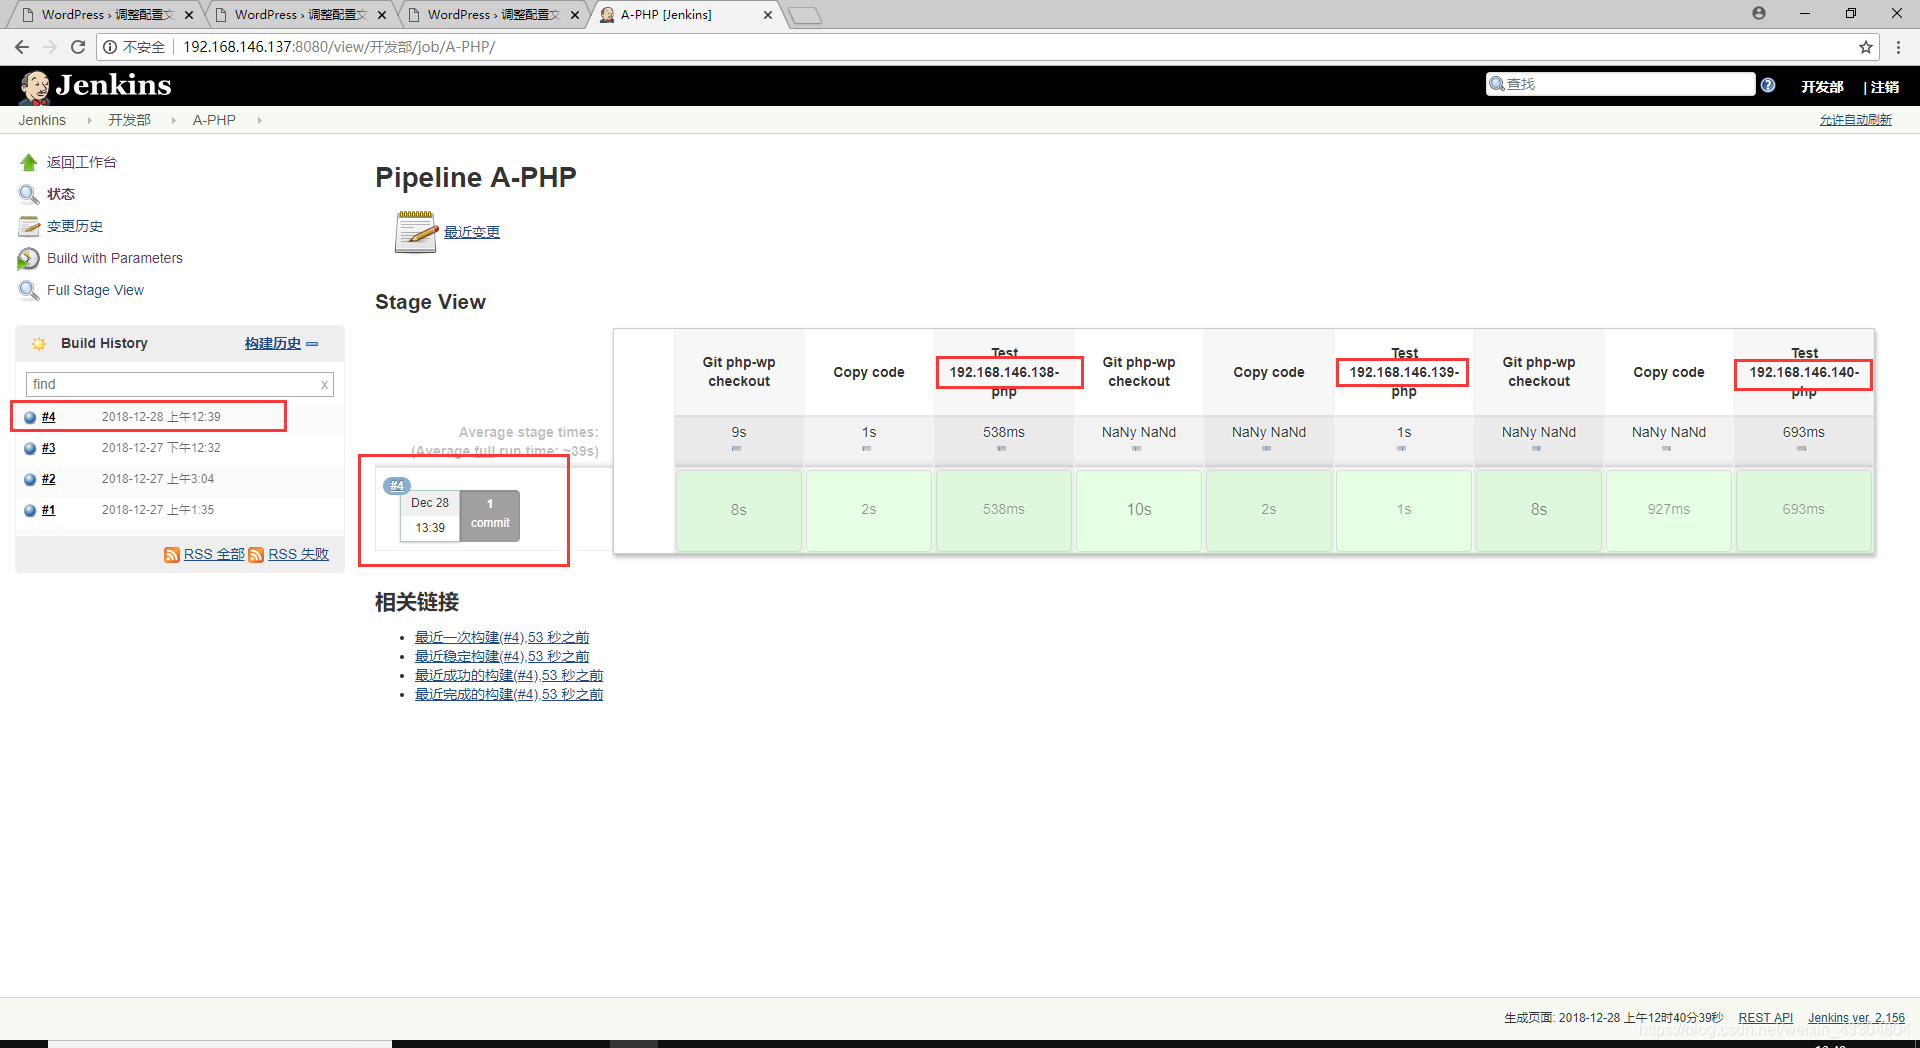
stage('Test 192.168.146.140-php') {
sh 'curl http://www.yunjisuan.com/status.html'
}
}
#提交更新流水線指令碼
[[email protected] itemA]# git add *
[[email protected] itemA]# git commit -m "3 node"
[master 2be47ae] 3 node
1 file changed, 43 insertions(+), 1 deletion(-)
[[email protected] itemA]# git remote -v
origin [email protected]:/home/git/repos/jenkinsfile (fetch)
origin [email protected]:/home/git/repos/jenkinsfile (push)
[[email protected] itemA]# git push -u origin master
Counting objects: 4, done.
Compressing objects: 100% (3/3), done.
Writing objects: 100% (4/4), 783 bytes | 0 bytes/s, done.
Total 4 (delta 0), reused 0 (delta 0)
To 192.168.146.136:/home/git/repos/jenkinsfile
362e774..2be47ae master -> master
Branch master set up to track remote branch master from origin.


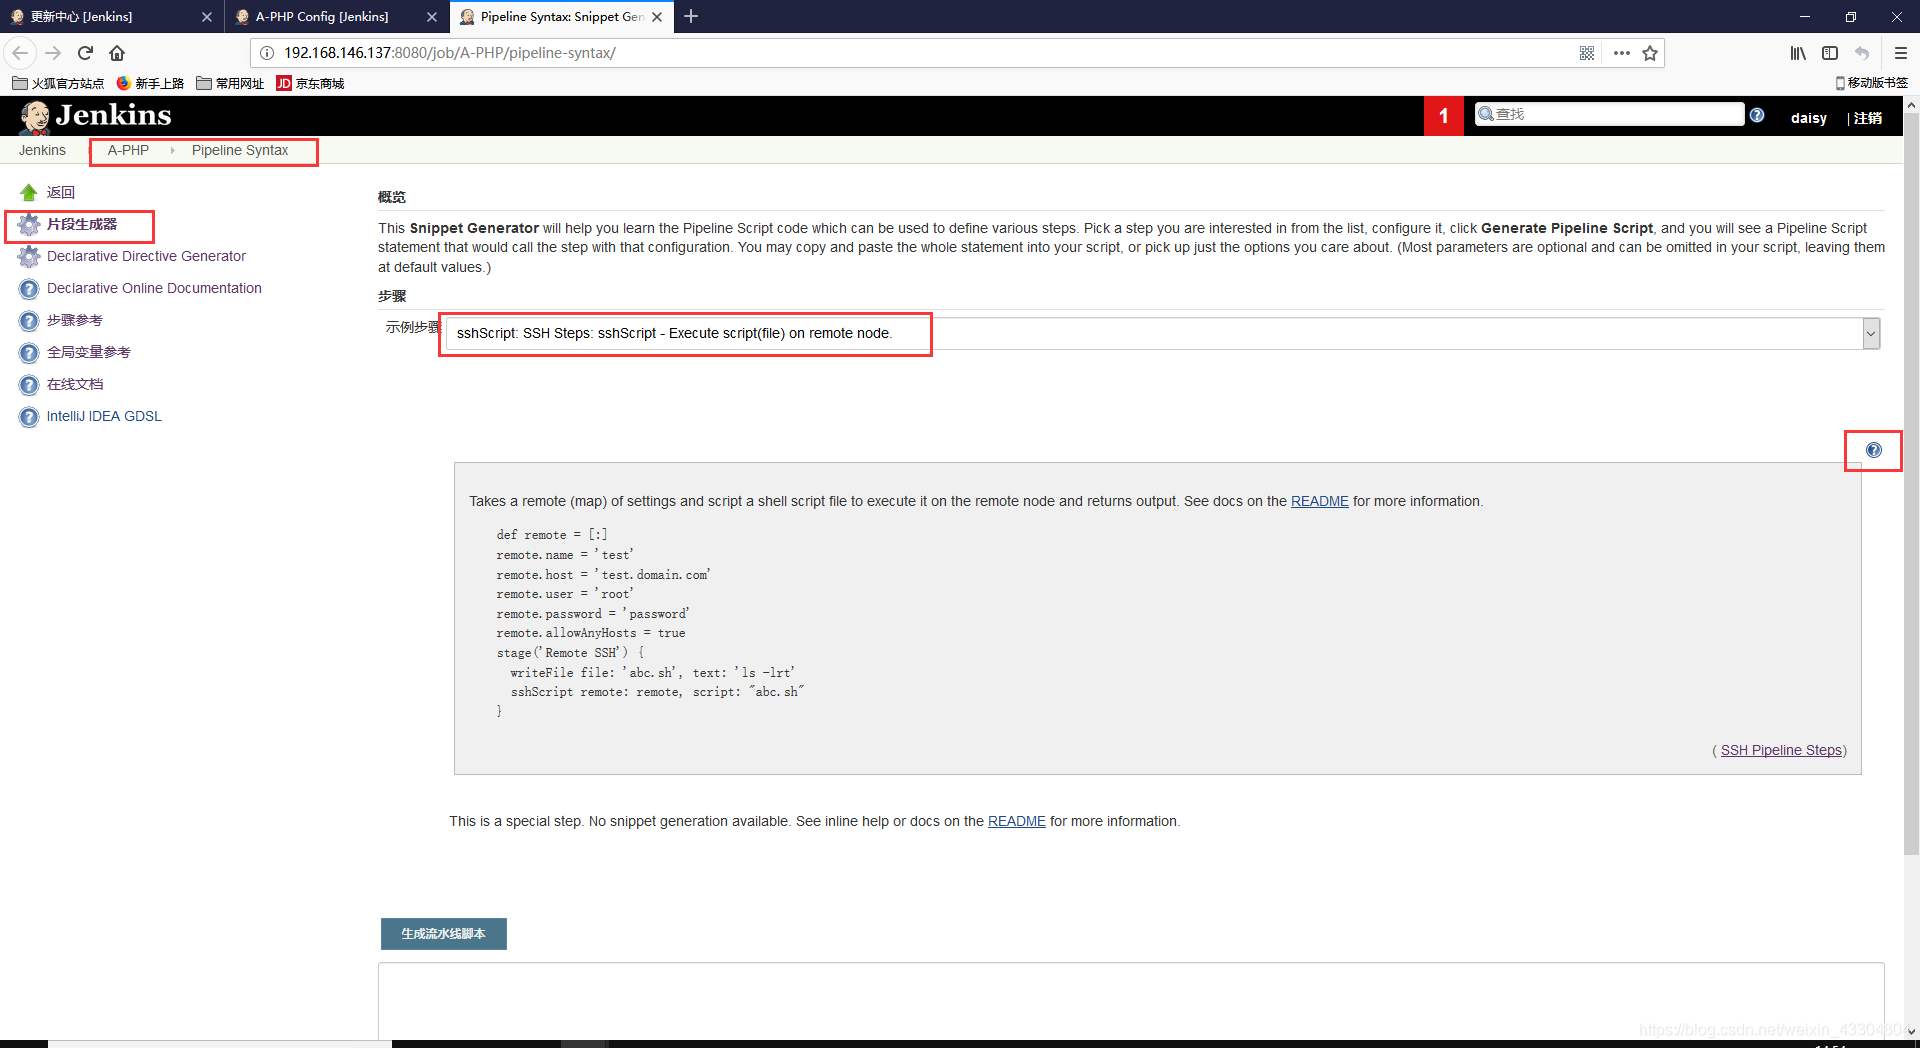
利用從節點遠端部署Web伺服器(通過SSH方式實現)
- 通過SSH分發指令碼
- 通過SSH直接下命令
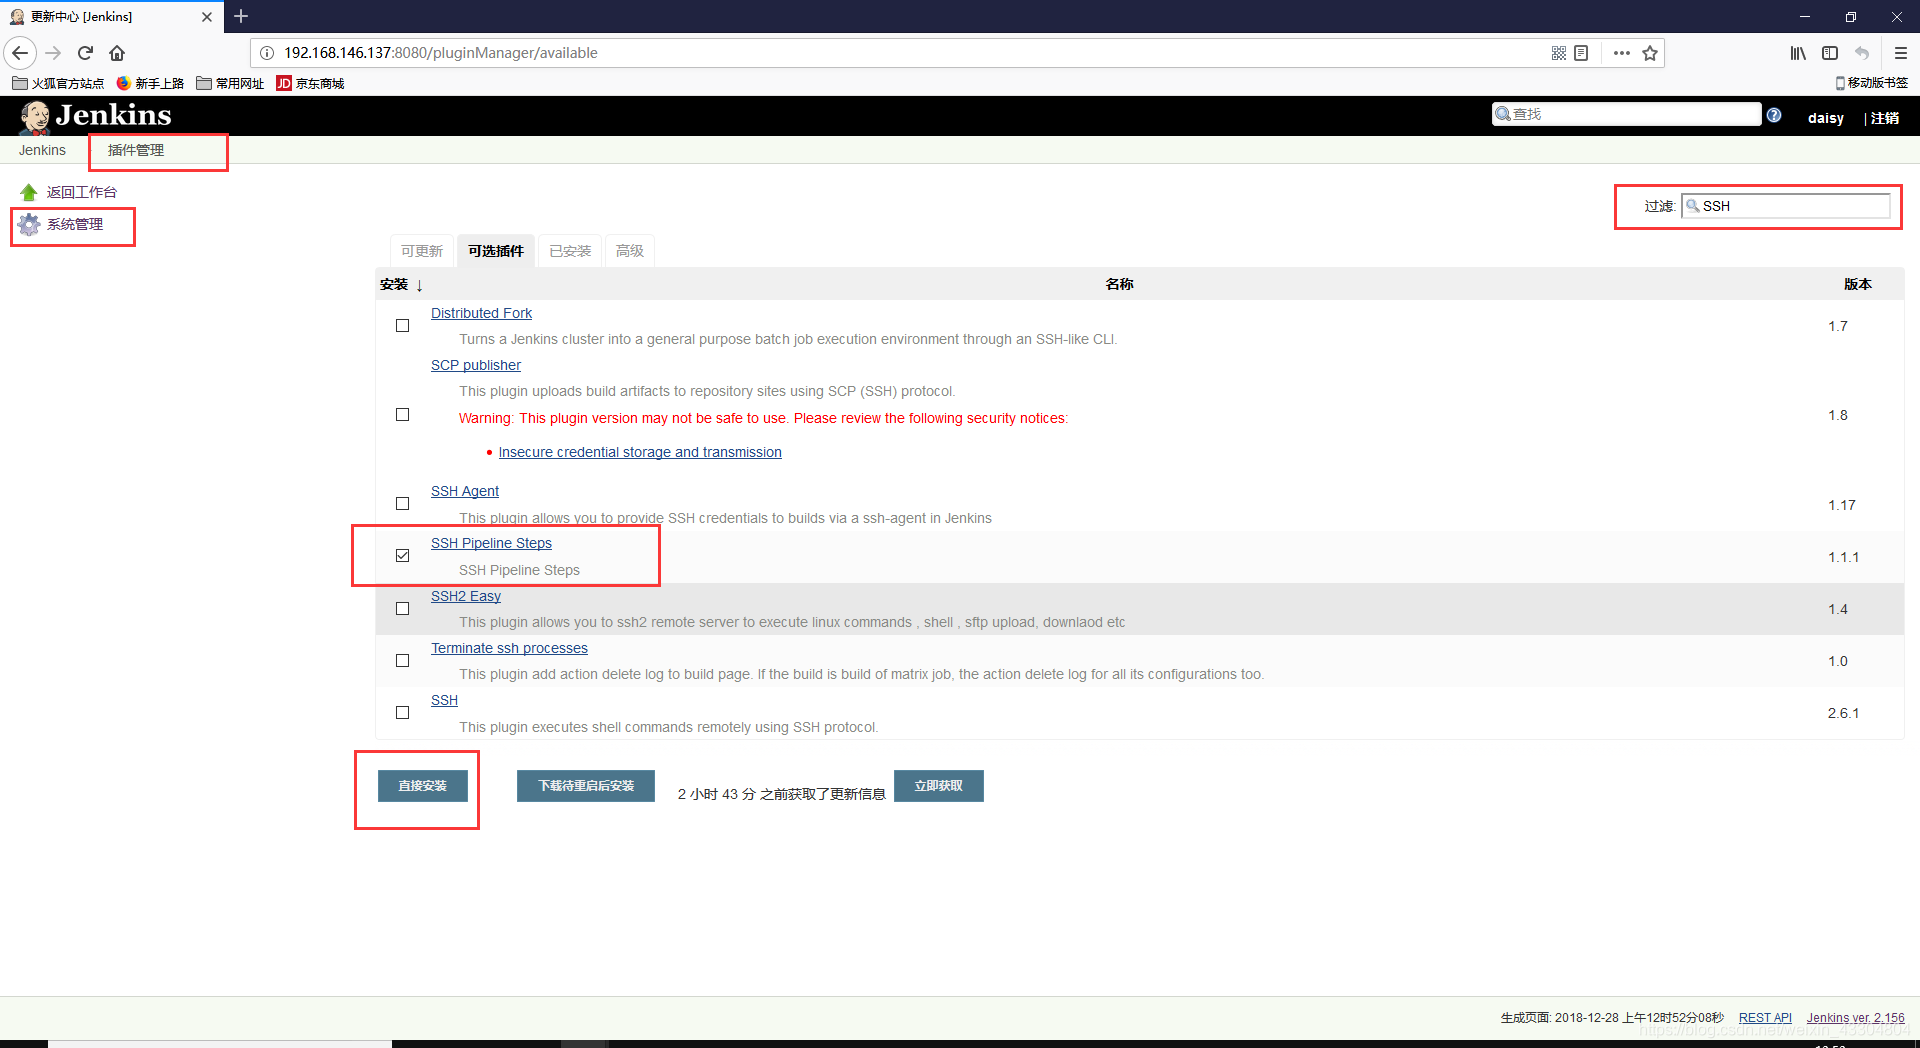
- 安裝SSH Pipeline Steps外掛(使SSH主持流水線)
 通過主Jenkins伺服器向從節點NginxWeb01下任務,讓從節點NginxWeb01通過SSH的方式向NginxWeb02和NginxWeb03伺服器分發指令碼;把指令碼用scp過去之後覆蓋;用流水線指令碼把程式碼發過去,使本地指令碼遠端啟用並執行在對方電腦中
相關推薦
Pipeline流水線及分散式流水線釋出PHP專案
Jenkins的Pipeline流水線 主機名 IP地址 備註 Git 192.168.146.136 Git伺服器 Jenkins
部署jeckins釋出php專案、修改jenkins以www使用者執行
1. 修改Jenkins配置檔案 1.1 修改$JENKINS_USER 開啟jenkins配置檔案: ➜ vim /etc/sysconfig/jenkins 1 找到如下行: 將原來的jenkins使用者修改為 root使用者。 $JENKINS_U
Jenkins-Pipeline 流水線釋出部署專案
node { sh 'mkdir -p cms' dir('cms') { git branch: 'prerelease', credentialsId: '5fb79ef0-4301-4b7c-a491-15365a5', url: 'https://gitee.com/hyxk/veeap.git'
PHP專案-smarty框架了解及使用
Smarty是一個php模板引擎。更準確的說,它分開了邏輯程式和外在的內容,提供了一種易於管理的方法。可以描述為應用程式設計師和美工扮演了不同的角色,因為在大多數情況下 ,他們不可能是同
Serverless Kubernetes容器服務中快速部署jenkins環境及執行流水線構建
本文主要演示如何在阿里雲Serverless Kubernetes服務上快速搭建jenkins持續整合環境,並基於提供的示例應用快速完成應用原始碼編譯、映象構建和推送以及應用部署的流水線。 先決條件:阿里雲Serverless Kubernetes叢集。 一 快速開始 1. 部署jenkins (1)
Shiro 第二十三章 多專案集中許可權管理及分散式會話
在做一些企業內部專案時或一些網際網路後臺時;可能會涉及到集中許可權管理,統一進行多專案的許可權管理;另外也需要統一的會話管理,即實現單點身份認證和授權控制。學習本章之前,請務必先學習《第十章 會話管理》和《第十六章 綜合例項》,本章程式碼都是基於這兩章的程式碼基礎上完成的。本
Jenkins+Git+PHP生成構建PHP專案的changelog以用於生成增量或減量打包釋出
由於專案使用Git進行原始碼管理,並且每次釋出的時候並不是全布打包進行釋出,而是隻釋出與上次釋出版本之後所修改的檔案。考慮到每次釋出的時候會有新增的檔案、修改的檔案以及刪除的檔案,在網上看了不少資料,都是通過用git diff --stat base_branch_name
計算機組成原理之流水線及流水線中的衝突
一.實驗目的 (1)理解計算機流水線基本概念。 (2)理解MIPS結構如何用5段流水線來實現。 (3)理解各段的功能和基本操作。 (4)加深對資料衝突、結構衝突的理解,理解這兩類衝突對CPU效能的影響。 (5)進一步理解解決資料衝突的方法,掌握
Ant學習例子2(用ant釋出web專案,及連線資料庫)
<project> <property name="build.dir" location="build"></property> <property name="src.dir" location="src"></proper
微信公眾號支付及經典PHP專案精講-魏永強-專題視訊課程
微信公眾號支付及經典PHP專案精講—1003人已學習 課程介紹 本課程是微信公眾號支付PHP教程,在本教程中從基礎出發,在其中包含了在兩大主流框架tp5和yii2框架下如何封裝accesstoken功能、微信網頁授權、jsapi的使用等。在整個課程中包含了兩個真
eclipse 安裝php外掛及配置xampp整合環境開發php專案
1.首先要做的事是到網上現在xampp整合開發環境服務,可以百度搜索到。 2.進行xampp安裝,在安裝過程中只需要勾選我們需要的幾項就可以了 3安裝後檢視Apache埠是否被佔用,如被佔用開啟以下選項進行配置,開啟httpd.config項,找的Listen 80修改為其
計算機體系結構實驗——流水線及流水線中的衝突
實驗目的 加深對計算機流水線基本概念的理解。 理解MIPS結構如何用5段流水線來實現,理解各段的功能和基本操作。 加深對資料衝突、結構衝突的理解,理解這兩類衝突對CPU效能的影響。 進一步理解解決資料衝突的方法,掌握如何應用定向技術來減少資料衝突引起的停頓。
PHP面試題及答案解析(8)—PHP綜合應用題
java應用程序 外殼 sleep 服務應用程序 解釋 源碼 use lee eve 1.寫出下列服務的用途和默認端口。 ftp、ssh、http、telnet、https ftp:File Transfer Protocol,文件傳輸協議,是應用層的協議,它基於傳輸層,
laravel路由 實現短連接生成及跳轉(php 301重定向)
AC ont pla 分享圖片 eve 生成 rst val mage 最近懶癌犯了,本來早想做的事拖了1個月。短連接這個之前工作中發送短信是用到過,一般大的網站都會有自己的短連接生成網站,我們公司也有。當然這次我是想在自己的服務器上弄。 短連接原理:將網站地址傳到
Android釋出開源專案到jcenter
Android釋出開源專案到jcenter 網路上介紹開源專案上傳jcenter的文章很多,按照所寫的步驟一步一步照做了,可是還是不成功,花了接近一個下午的時間,終於搞定了。本文也沒有什麼技術含量,就當做是記錄這個過程。 環境:Android Studio 方式:bint
vsCode開發PHP專案配置ftp和本地預覽
使用vsCode開發PHP專案,配置ftp步驟如下: 1、首先下載ftp-sync外掛安裝。安裝完成就可以使用了。 2,建立一個專案檔案。 3、配置ftp-sync:init檔案才能使用,使用快捷鍵 command+shift+p(mac快捷鍵 ) 調出如下介面:然後輸入:ftp-syns
簡明分散式系統實現 - 開源專案
Concise-Distributed-Storage A simple distributed storage model 介紹: 本專案是學習胡世傑老師的分散式物件儲存課程的訓練專案,如果您有疑問,可以在issues 裡給我留言。非常歡迎您與我交流,也感謝胡世傑老師的指導。 使用說明: 測試環境
Cesium 呼叫Geoserver WMS服務及Geoserver服務釋出
轉:https://blog.csdn.net/kill5921/article/details/79170963 GeoServer服務釋出 下載GeoServer安裝版安裝,同時安裝geopackage擴充套件,以備使用。
從搭建開發環境到釋出線上專案的企業級流程之軟體源配置
1:作業系統:centOs6.8:(映象地址)http://mirrors.aliyun.com/centos/6.8/isos/x86_64/CentOS-6.8-x86_64-bin-DVD1.iso 2:linux軟體源配置: 因為這個專案是想搭建一個自己
從搭建環境到釋出線上專案的企業級流程之git的安裝與配置
一:安裝 1:下載 官網下載 http://github.com/git/git/releases?after=v2.9.1 直接在linux下執行安裝 wget https://github.com/git/git/archive/v2.8.0.tar.gz 2: