
Haproxy+Heartbeat 高可用叢集方案操作記錄
阿新 • • 發佈:2019-01-02
之前詳細介紹了haproxy的基礎知識點, 下面記錄下Haproxy+Heartbeat高可用web叢集方案實現過程, 以加深理解.
架構草圖如下:

1) 基本環境準備 (centos6.9系統)
172.16.60.208(eth0) HA主節點(ha-master) haproxy,heartbeat 172.16.60.207(eth0) HA備節點(ha-slave) haproxy,heartbeat 172.16.60.229 VIP地址 172.16.60.204(eth0) 後端節點1(rs-204) nginx/tomcat 172.16.60.205(eth0) 後端節點2(rs-205) nginx/tomcat 1) 關閉防火牆和selinux (四臺節點機都操作) [[email protected] ~]# /etc/init.d/iptables stop [[email protected] ~]# setenforce 0 [[email protected] ~]# vim /etc/sysconfig/selinux SELINUX=disabled 2) 設定主機名和繫結hosts (兩臺HA節點機器都操作) 主節點操作 [[email protected] ~]# hostname ha-master [[email protected] ~]# vim /etc/sysconfig/network HOSTNAME=ha-master [[email protected] ~]# vim /etc/hosts 172.16.60.208 ha-master 172.16.60.207 ha-slave 備節點操作 [[email protected] ~]# hostname ha-slave [[email protected] ~]# vim /etc/sysconfig/network HOSTNAME=ha-slave [[email protected] ~]# vim /etc/hosts 172.16.60.208 ha-master 172.16.60.207 ha-slave
2) 安裝後端兩個realserver節點的web環境 (即172.16.60.204/205兩臺機器都要安裝nginx)
採用yum方式在兩臺realserver節點上安裝nginx (先安裝nginx的yum源)
[[email protected] ~]# rpm -ivh http://nginx.org/packages/centos/6/noarch/RPMS/nginx-release-centos-6-0.el6.ngx.noarch.rpm
[[email protected] ~]# yum install -y nginx

rs-204的nginx配置
[[email protected] ~]# cd /etc/nginx/conf.d/
[[email protected] conf.d]# cat default.conf
[[email protected] conf.d]# >/usr/share/nginx/html/index.html
[[email protected] conf.d]# vim /usr/share/nginx/html/index.html
this is test page of realserver01:172.16.60.204

[[email protected] conf.d]# /etc/init.d/nginx start
Starting nginx:                                            [  OK  ]
[[email protected] conf.d]# lsof -i:80
COMMAND   PID  USER   FD   TYPE DEVICE SIZE/OFF NODE NAME
nginx   31944  root    6u  IPv4  91208      0t0  TCP *:http (LISTEN)
nginx   31945 nginx    6u  IPv4  91208      0t0  TCP *:http (LISTEN)

rs-205的nginx配置
[[email protected] src]# cd /etc/nginx/conf.d/
[[email protected] conf.d]# cat default.conf
[[email protected] conf.d]# >/usr/share/nginx/html/index.html
[[email protected] conf.d]# vim /usr/share/nginx/html/index.html
this is test page of realserver02:172.16.60.205

[[email protected] conf.d]# /etc/init.d/nginx start
Starting nginx:                                            [  OK  ]
[[email protected] conf.d]# lsof -i:80
COMMAND   PID  USER   FD   TYPE    DEVICE SIZE/OFF NODE NAME
nginx   20839  root    6u  IPv4 289527645      0t0  TCP *:http (LISTEN)
nginx   20840 nginx    6u  IPv4 289527645      0t0  TCP *:http (LISTEN)

訪問http://172.16.60.204/, 訪問結果為"this is test page of realserver01:172.16.60.204"
訪問http://172.16.60.205/, 訪問結果為"this is test page of realserver02:172.16.60.205"
3) 安裝配置Haproxy (兩臺HA節點機進行同樣操作)
1) 先安裝haproxy
[[email protected] ~]# yum install gcc gcc-c++ make openssl-devel kernel-devel
[[email protected] ~]# cd /usr/local/src/                              #下載haproxy軟體到/usr/local/src目錄下
[[email protected] src]# ls haproxy-1.8.12.tar.gz
haproxy-1.8.12.tar.gz
[[email protected] src]# tar -zvxf haproxy-1.8.12.tar.gz
[[email protected] src]# cd haproxy-1.8.12
[[email protected] haproxy-1.8.12]# make TARGET=linux26 CPU=x86_64 PREFIX=/usr/local/haprpxy USE_OPENSSL=1 ADDLIB=-lz

引數說明:
TARGET=linux26      #使用 uname -r 檢視核心,如:2.6.32-642.el6.x86_64,此時該引數就為linux26
CPU=x86_64          #使用 uname -r 檢視系統資訊,如 x86_64 GNU/Linux,此時該引數就為 x86_64
PREFIX=/usr/local/haprpxy      #haprpxy 安裝路徑

[[email protected] haproxy-1.8.12]# ldd haproxy | grep ssl
        libssl.so.10 => /usr/lib64/libssl.so.10 (0x00000031d0400000)

[[email protected] haproxy-1.8.12]# make install PREFIX=/usr/local/haproxy

[[email protected] haproxy-1.8.12]# mkdir -p /usr/local/haproxy/conf
[[email protected] haproxy-1.8.12]# mkdir -p /etc/haproxy
[[email protected] haproxy-1.8.12]# cp /usr/local/src/haproxy-1.8.12/examples/option-http_proxy.cfg /usr/local/haproxy/conf/haproxy.cfg
[[email protected] haproxy-1.8.12]# ln -s /usr/local/haproxy/conf/haproxy.cfg /etc/haproxy/haproxy.cfg
[[email protected] haproxy-1.8.12]# cp -r /usr/local/src/haproxy-1.8.12/examples/errorfiles  /usr/local/haproxy/errorfiles
[[email protected] haproxy-1.8.12]# ln -s /usr/local/haproxy/errorfiles /etc/haproxy/errorfiles
[[email protected] haproxy-1.8.12]# mkdir -p /usr/local/haproxy/log
[[email protected] haproxy-1.8.12]# touch /usr/local/haproxy/log/haproxy.log
[[email protected] haproxy-1.8.12]# ln -s /usr/local/haproxy/log/haproxy.log /var/log/haproxy.log
[[email protected] haproxy-1.8.12]# cp /usr/local/src/haproxy-1.8.12/examples/haproxy.init /etc/rc.d/init.d/haproxy
[[email protected] haproxy-1.8.12]# chmod +x /etc/rc.d/init.d/haproxy
[[email protected] haproxy-1.8.12]# chkconfig haproxy on
[[email protected] haproxy-1.8.12]# ln -s /usr/local/haproxy/sbin/haproxy /usr/sbin

2) haroxy.cfg檔案進行負載配置
[[email protected] haproxy-1.8.12]# cd /usr/local/haproxy/conf/
[[email protected] conf]# cp haproxy.cfg haproxy.cfg.bak
[[email protected] conf]# > haproxy.cfg
[[email protected] conf]# vim haproxy.cfg
global
   log 127.0.0.1 local3 info
   maxconn 65535
   chroot /usr/local/haproxy
   uid 99
   gid 99
   daemon

defaults
   log global
   mode http
   retries 3
   option redispatch
   stats uri /haproxy
   stats refresh 30s
   stats realm haproxy-status
   stats auth admin:dxInCtFianKtL]36
   stats hide-version
   maxconn 65535
   timeout connect 5000
   timeout client 50000
   timeout server 50000

frontend http-in
   mode http
   maxconn 65535
   bind :80
   log global
   option httplog
   option httpclose
   acl is_01 hdr_beg(host) www.kevin.com
   use_backend web-server if is_01

backend web-server
   mode http
   balance roundrobin
   cookie SERVERID insert indirect nocache
   option httpclose
   option forwardfor
   server web01 172.16.60.204:80 weight 1 cookie 3 check inter 2000 rise 2 fall 5
   server web02 172.16.60.205:80 weight 1 cookie 4 check inter 2000 rise 2 fall 5

3) 配置HAProxy日誌
[[email protected] conf]# vim /etc/rsyslog.conf
.......
$ModLoad imudp                        #取消註釋 ,這一行不註釋,日誌就不會寫
$UDPServerRun 514                    #取消註釋 ,這一行不註釋,日誌就不會寫
.......
local3.*                                                /var/log/haproxy.log      #這一行必須要寫,因為在haproxy.cfg裡global全域性定義好的日誌級別

[[email protected] conf]# vim /etc/sysconfig/rsyslog
SYSLOGD_OPTIONS="-r -m 0"           #接收遠端伺服器日誌

重啟syslog日誌服務
[[email protected] conf]# service rsyslog restart
Shutting down system logger:                               [  OK  ]
Starting system logger:                                         [  OK  ]

4) 設定haproxy負載均衡的最大併發連線數
檢視核心
[[email protected] conf]# sysctl -a | grep file
fs.file-nr = 992        0       386459
fs.file-max = 386459

檢視應用層面的需求
[[email protected] conf]# cat /usr/local/haproxy/conf/haproxy.cfg
global                                                        #全域性引數設定
   maxconn 65535                                      #設定最大連線數

更改系統層面
[[email protected] conf]# vim /etc/security/limits.conf                    #最後一行增加
*                -       nofile          65535

5) 重啟兩臺HA機器的haproxy
[[email protected] conf]# /etc/init.d/haproxy start
Starting haproxy:                                          [  OK  ]

[[email protected] conf]# ps -ef|grep haproxy
nobody   13080     1  0 16:43 ?        00:00:00 /usr/sbin/haproxy -D -f /etc/haproxy/haproxy.cfg -p /var/run/haproxy.pid
root     13083 11940  0 16:43 pts/0    00:00:00 grep haproxy

[[email protected] conf]# lsof -i:80
COMMAND   PID   USER   FD   TYPE DEVICE SIZE/OFF NODE NAME
haproxy 13080 nobody    4u  IPv4 428975      0t0  TCP *:http (LISTEN)

將www.kevin.com域名解析到兩個HA節點上, 即172.16.60.208 和 172.16.60.207上
接著訪問http://www.kevin.com/, 則發現訪問結果是"this is test page of realserver01:172.16.60.204" , 不斷重新整理, 訪問結果也是這個.
只有當172.16.60.204這個節點的nginx掛了, 訪問結果才變成"this is test page of realserver02:172.16.60.205", 即請求轉發到正常的realserver節點上.

從haproxy.cfg檔案中可以看出, 雖然配置了"balance roundrobin"這個選項, 即客戶端每一次訪問, 都跳轉到後端不同的伺服器上. 但是並沒有生效!
因為又配置了"cookie SERVERID insert indirect nocache", 即保持客戶端session會話同步的配置, 所以客戶端請求會一直轉發到同一個realserver節點上,直至
這個節點發生故障才會轉發到另外正常的節點上.

把"cookie SERVERID insert indirect nocache" 這個配置去掉或註釋掉, 再次訪問http://www.kevin.com/, 就會發現每重新整理一次, 請求都會轉發到不同的realserver
節點上, 即"balance roundrobin" 配置生效!

訪問http://www.kevin.com/haproxy, 輸入haproxy.cfg檔案中配置的使用者名稱和密碼admin:dxInCtFianKtL]36, 即可開啟haproxy監控頁面
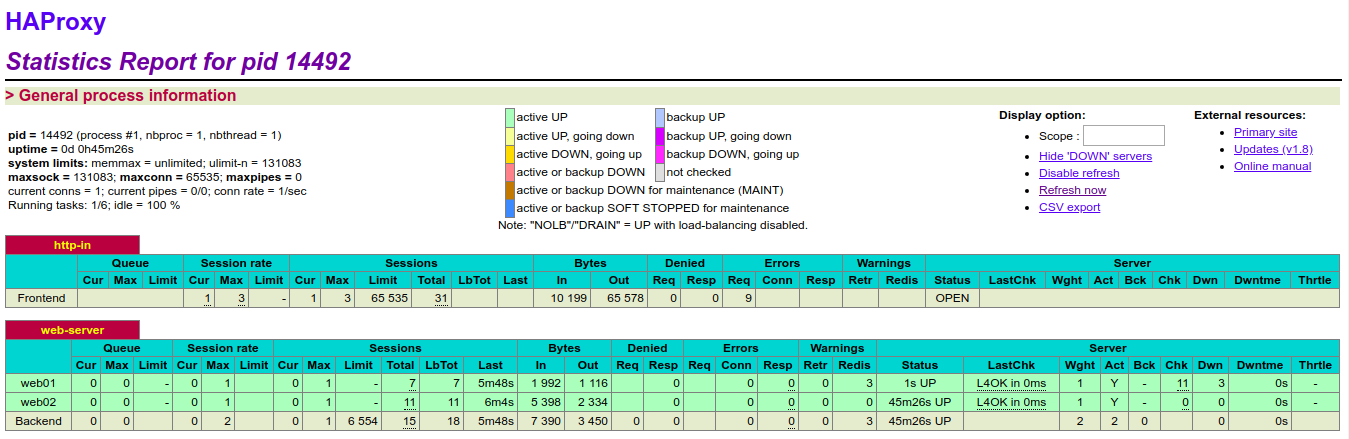
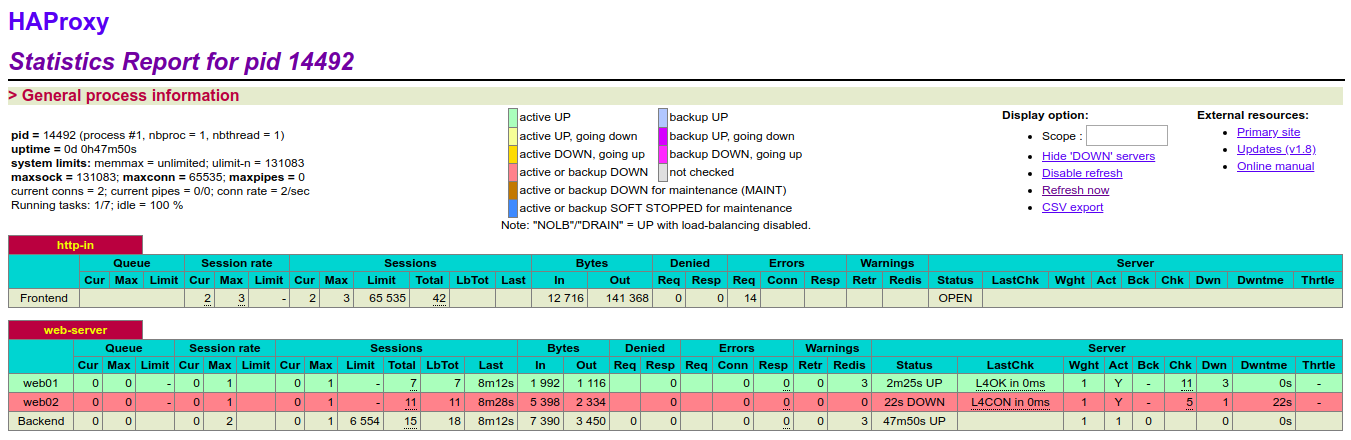
從上圖可以看出, 此時監控的後端兩個realserver節點的服務都是OK的(配置檔案中定義的web01和web02此時都是綠色狀態)。 現在嘗試關閉rs-205的nginx服務, 重新整理http://www.kevin.com/haproxy監控頁面, 發現web02變成紅色,即此時該節點服務是故障狀態!然後重啟rs-205的nginx服務,再次刷出監控頁面, 發現web02就又恢復到正常的綠色狀態了!
4) 安裝配置Heartbeat (兩臺HA節點機進行同樣操作)