SpringBoot實踐-整合SSM
阿新 • • 發佈:2019-01-03
需求:實現一個使用者管理系統,對使用者進行CRUD操作
前端:easyUI
後端:SpringBoot+ssm+通用Mapper+druid+mysql
接下來,我們來看看如何用SpringBoot來玩轉以前的SSM,我們用到的資料庫tb_user和實體類User如下:
tb_user:
CREATE TABLE `tb_user` (
  `id` bigint(20) NOT NULL,
  `username` varchar(50) DEFAULT NULL,
  `password` varchar(50) DEFAULT NULL,
  `name` varchar(50) DEFAULT NULL,
  `age` int(11) DEFAULT NULL,
  `sex` int(11) DEFAULT NULL,
  `birthday` date DEFAULT NULL,
  `created` date DEFAULT NULL,
  `updated` date DEFAULT NULL,
  `note` varchar(50) DEFAULT NULL
) ENGINE=InnoDB DEFAULT CHARSET=utf8;

INSERT INTO `tb_user` VALUES ('1', 'ly', '123456', '柳巖', '18', null, '2000-12-06', null, null, null);
User:
public class User implements Serializable {
    private static final long serialVersionUID = 1L;
    private Long id;
    // 使用者名稱
    private String userName;
    // 密碼
    private String password;
    // 姓名
    private String name;
    // 年齡
    private Integer age;
    // 性別,1男性,2女性
    private Integer sex;
    // 出生日期
    private Date birthday;
    // 建立時間
    private Date created;
    // 更新時間
    private Date updated;
    // 備註
    private String note;
    public Long getId() {
        return id;
    }
   // getter 和 setter方法
   // ...
    @Override
    public String toString() {
        return "User [id=" + id + ", userName=" + userName + ", password="
                + password + ", name=" + name + ", age=" + age + ", sex=" + sex
                + ", birthday=" + birthday + ", created=" + created
                + ", updated=" + updated + ", note=" + note + "]";
    }
}
1.1.整合啟動器
1.1.1 整合SpringMVC啟動器
<dependency>
    <groupId>org.springframework.boot</groupId>
    <artifactId>spring-boot-starter-web</artifactId>
</dependency>
1.1.2 整合JDBC和事務啟動器
<dependency>
    <groupId>org.springframework.boot</groupId>
    <artifactId>spring-boot-starter-jdbc</artifactId>
</dependency>
1.1.3 整合mysql驅動包
<dependency>
    <groupId>mysql</groupId>
    <artifactId>mysql-connector-java</artifactId>
</dependency>
1.1.4 整合druid啟動器
<!-- druid啟動器
     druid1.1.6啟動器有嚴重bug,直接導致專案執行失敗
     druid1.1.10沒有該問題
-->
<dependency>
    <groupId>com.alibaba</groupId>
    <artifactId>druid-spring-boot-starter</artifactId>
    <version>1.1.10</version>
</dependency>
1.1.5 整合mybatis啟動器
<!-- mybatis的啟動器 -->
<dependency>
    <groupId>org.mybatis.spring.boot</groupId>
    <artifactId>mybatis-spring-boot-starter</artifactId>
    <version>1.3.2</version>
</dependency>
1.1.6 整合通用Mapper啟動器
<!-- 通用mapper的啟動器 -->
<dependency>
    <groupId>tk.mybatis</groupId>
    <artifactId>mapper-spring-boot-starter</artifactId>
    <version>2.0.2</version>
</dependency>
1.2 編寫程式碼
1.2.1 dao
@org.apache.ibatis.annotations.Mapper // mybatis
public interface UserMapper extends Mapper<User> {
}
1.2.2 controller
@Controller
@RequestMapping("/user")
public class UserController {

    @Autowired
    private UserService userService;

    @RequestMapping("/findAll")
    @ResponseBody// 結果返回json
    public List<User> findAll(){
        List<User> list = userService.findAll();
        return list;
    }

}
1.2.3 service
/**
 * Service中實現業務
 *  使用者的CRUD操作,在此類中需要提供 增、刪、改、查 4個方法
 */
@Service
@Transactional// 註解
public class UserService {
    @Resource
    private UserMapper userMapper;


    public List<User> findAll() {
        return userMapper.selectAll();
    }
}
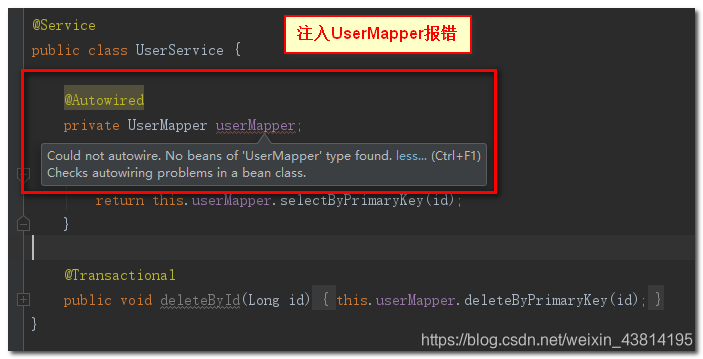
報錯:

【解決方案1 】
原因:IDE自身檢查級別的原因。
解決方案:需要調整IDE對於@Autowired的檢查級別
解決步驟:
1 、File — Settings
2、需要從Error改為Warning

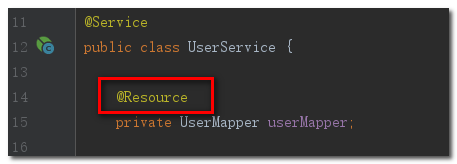
【解決方案2 】
將@Autowrid換成@Resrouce,但是idea2017.1.1/2017.1.3不支援此方式

1.2.4 pojo
@Table(name = "tb_user")
public class User {
    @Id
    // @GeneratedValue(strategy = GenerationType.IDENTITY)//對應mysql的自增長主鍵策略
    private Integer id;
    private String userName;
    private String password;
    private String name;
    private Integer age;
    private Integer sex;
    private Date birthday;
    private String note;// 說明,備註
    private Date created;// 建立時間
    private Date updated;// 更新時間
}
1.3 properties屬性檔案

1.3.1 連線資料庫四大金剛
# 連線四大金剛 等號前面是key,是固定寫法,等號後面是根據自己的資料庫來定義
spring.datasource.url=jdbc:mysql://localhost:3306/ssm_user
spring.datasource.username=root
spring.datasource.password=111111
# 可省略,SpringBoot自動推斷 驅動
spring.datasource.driverClassName=com.mysql.jdbc.Driver
1.3.2 資料庫連線池druid
# druid連線池
#初始化連線數
spring.datasource.druid.initial-size=1
#最小空閒連線
spring.datasource.druid.min-idle=1
#最大活動連線
spring.datasource.druid.max-active=20
#獲取連線時測試是否可用
spring.datasource.druid.test-on-borrow=true
#監控頁面啟動
spring.datasource.druid.stat-view-servlet.allow=true
1.4 測試訪問

