
TabLayout+ViewPager實現切頁
阿新 • • 發佈:2019-01-03
安卓使用TabLayout+ViewPager+Fragment 實現頁面切換,可實現左右滑動切換檢視介面和點選切換
可自定義選單欄是在頂部還是在底部
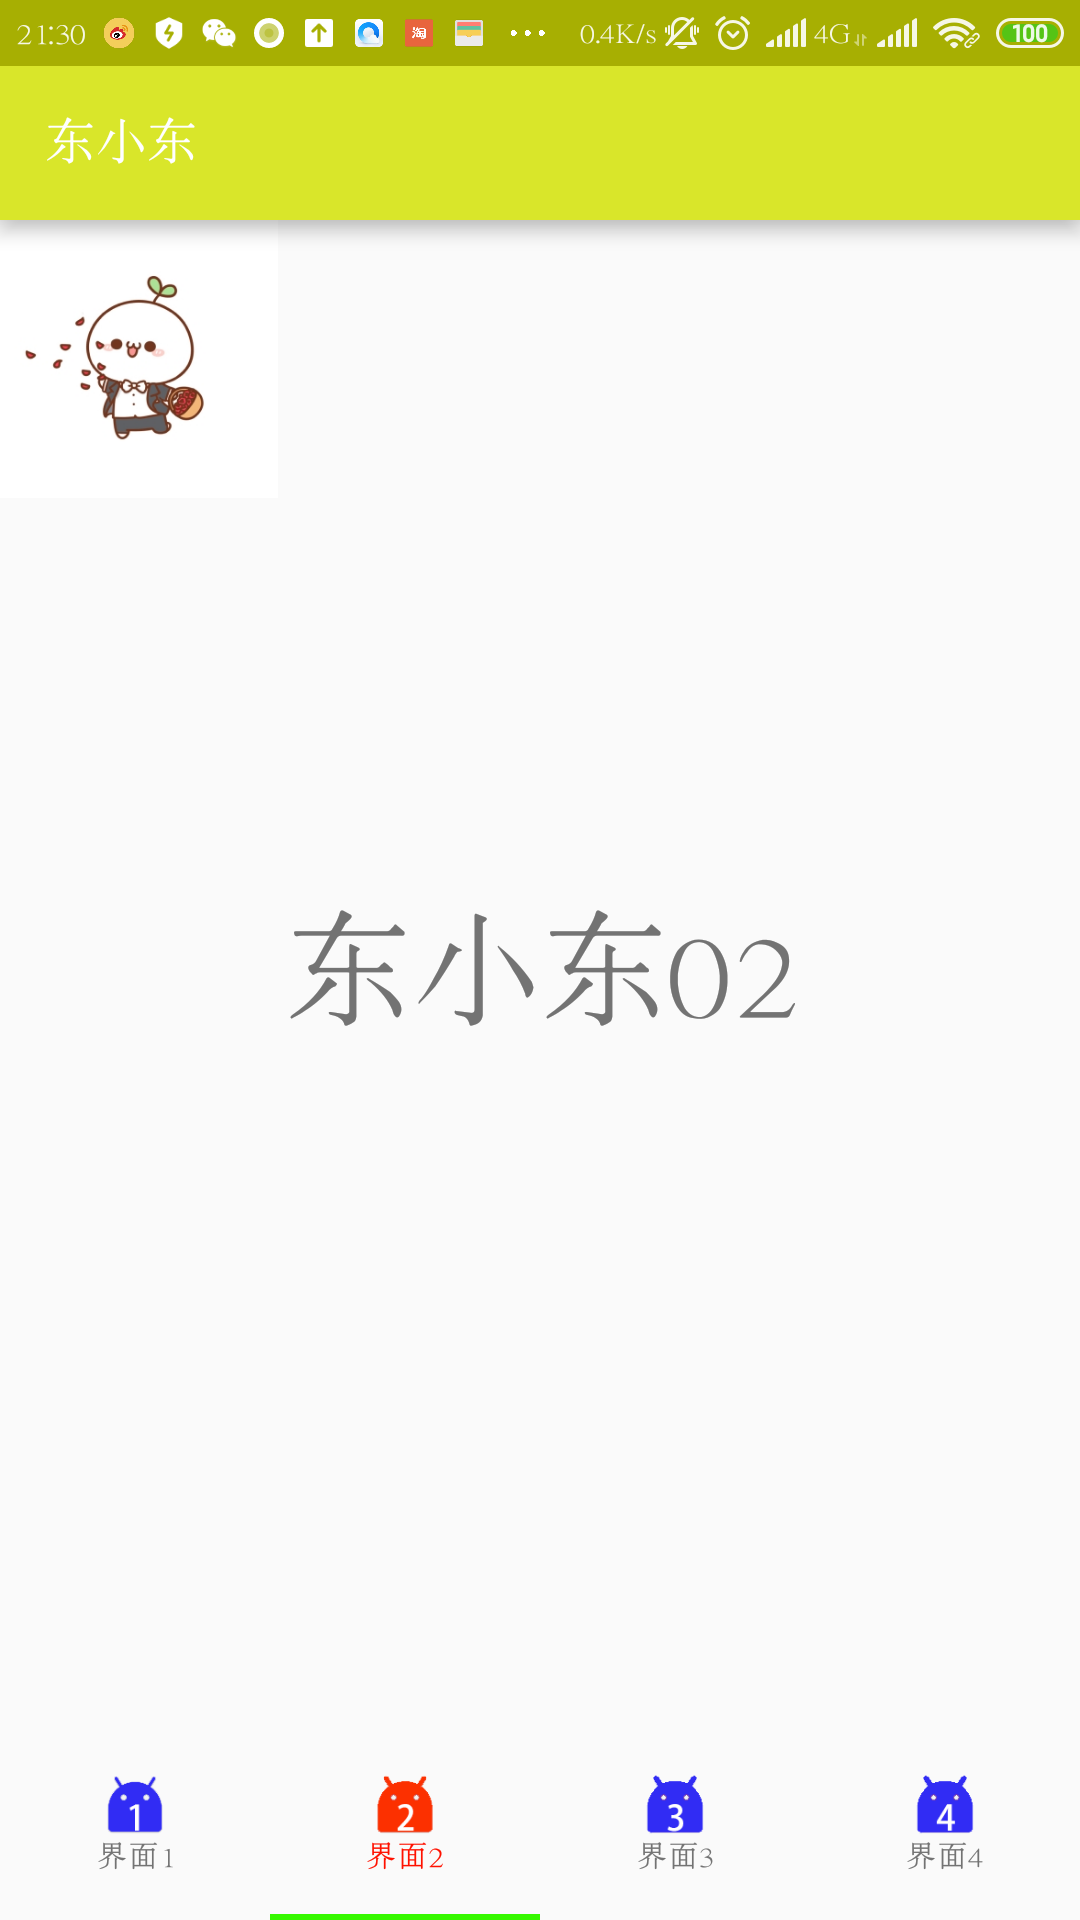
一、實現效果:
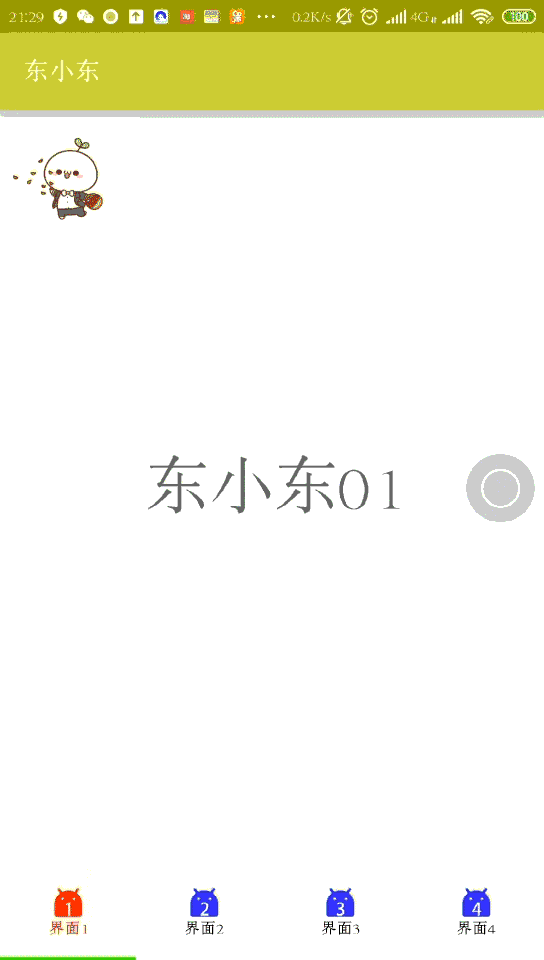
二、實現過程:
2.1 一些重要的設定
新增必須依賴:
因為需要使用:import android.support.design.widget.TabLayout;,所以必須新增下列依賴
compile 'com.android.support:design:23.3.0'
主佈局檔案編寫:
頂部或者底部顯示,只要更改ViewPager和TabLayout排列順序即可
1 <?xml version="1.0" encoding="utf-8"?> 2 <LinearLayout xmlns:android="http://schemas.android.com/apk/res/android" 3 xmlns:tools="http://schemas.android.com/tools" 4 android:layout_width="match_parent" 5 android:layout_height="match_parent" 6 xmlns:app="http://schemas.android.com/apk/res-auto"7 android:paddingBottom="0dp" 8 android:paddingLeft="0dp" 9 android:paddingRight="0dp" 10 android:orientation="vertical" 11 android:paddingTop="0dp" 12 tools:context="com.example.fafa.MainActivity"> 13 14 <android.support.v4.view.ViewPager 15 android:id="@+id/viewpager"16 android:layout_width="match_parent" 17 android:layout_height="0dp" 18 android:layout_weight="1" 19 /> 20 <!-- 21 app:tabIndicatorColor="" 指示器顏色 22 app:tabIndicatorHeight="" 指示器高度,設定為0就是沒有指示器 23 app:tabTextColor="" Tab文字預設顏色 24 app:tabSelectedTextColor="" Tab文字被選中後的顏色 25 app:tabTextAppearance="" 為Tab文字設定樣式,一般是需要為Tab加圖示時使用 26 app:tabMode="" 只有兩個值:fixed、scrollable 27 其中 fixed用於標題欄少的情況,每個Tab可以平分螢幕寬度 28 其中 scrollable用於標題欄多出螢幕的情況,如果標題欄少的時候用很難看,佔不滿螢幕 29 app:tabGravity="center" 整體居中,不可與上共用 30 app:tabBackground="" TabLayout背景,和android:background=""效果一樣 31 app:tabGravity="" 對齊方式: 居中顯示center、fill填滿 32 --> 33 34 <android.support.design.widget.TabLayout 35 android:id="@+id/tabs2" 36 android:layout_width="match_parent" 37 android:layout_height="wrap_content" 38 android:layout_gravity="center" 39 40 app:tabMode="fixed" 41 app:tabIndicatorColor="@color/colorLv" 42 app:tabTextColor="@android:color/black" 43 app:tabSelectedTextColor="@color/colorred" 44 45 /> 46 </LinearLayout>
2.2 僅字元選單欄顯示實現:
未加入圖片顯示,實現較為簡單

基本邏輯程式碼:
每個介面使用不同的fragment,進行一 一對應
 1 import android.support.design.widget.TabLayout;
 2 public class MainActivity extends AppCompatActivity {
 3     private ViewPager viewPager;
 4     private TabLayout tabLayout;
 5     @Override
 6     protected void onCreate(Bundle savedInstanceState) {
 7         super.onCreate(savedInstanceState);
 8         setContentView(R.layout.activity_main);
 9
10
11         tabLayout = (TabLayout) findViewById(R.id.tabs2);
12         viewPager = (ViewPager) findViewById(R.id.viewpager);
13
14         //設定介面檔案和文字一一對應
15         final Fragment[] fragments = {new Fragment0(), new Fragment1(), new Fragment2()};
16         final String[] titles = {"介面1", "介面2", "介面3"};
17
18  //新增tablayout中的豎線,每一項的中間分隔線
19  //LinearLayout linearLayout = (LinearLayout) tabLayout.getChildAt(0);
20 // linearLayout.setShowDividers(LinearLayout.SHOW_DIVIDER_MIDDLE);
21 // linearLayout.setDividerDrawable(ContextCompat.getDrawable(this, R.mipmap.fg));
22
23  //每項只進入一次
24  viewPager.setAdapter(new FragmentPagerAdapter(getSupportFragmentManager()) {
25      @Override
26      public Fragment getItem(int position) {
27          return fragments[position];
28      }
29      @Override
30      public int getCount() {
31          return fragments.length;
32      }
33
34      @Override
35      public CharSequence getPageTitle(int position) {
36          return titles[position];
37      }
38  });
39
40  tabLayout.setupWithViewPager(viewPager);
41  tabLayout.getTabAt(1).select();//設定第一個為選中
42     }
43 }
2.3 字元和圖片選單欄實現
圖片加漢字選單欄,選單欄每項都是一個檢視可以自定義設計
選單欄每項的佈局檔案設計:
一個圖片顯示和一個文字顯示,定義為垂直佈局,其中android:layout_gravity="center"是把控制元件居中,這裡不寫,在選單欄顯示時可能會出現錯位
 1 <?xml version="1.0" encoding="utf-8"?>
 2 <LinearLayout xmlns:android="http://schemas.android.com/apk/res/android"
 3     android:layout_width="match_parent"
 4     android:orientation="vertical"
 5     android:id="@+id/item_view"
 6
 7     android:layout_height="match_parent">
 8     <ImageView
 9         android:layout_width="wrap_content"
10         android:src="@mipmap/ic_launcher"
11         android:id="@+id/item_img"
12         android:layout_gravity="center"
13         android:layout_height="wrap_content" />
14     <TextView
15         android:layout_width="wrap_content"
16         android:text="xxxx"
17         android:layout_gravity="center"
18         android:id="@+id/item_text"
19         android:layout_height="wrap_content" />
20 </LinearLayout>
主佈局檔案更改:
在主佈局檔案的<android.support.design.widget.TabLayout>更改android:layout_height="70dp",表示其選單欄的高度改變。
定義必要的類變數:
 1 private ViewPager viewPager;
 2  private TabLayout tabLayout;
 3  //設定介面檔案和文字一一對應
 4  private Fragment[] Lfragments = {new Fragment0(), new Fragment1(), new Fragment2(),new Fragment3()};
 5  private String[] Ltitles = {"介面1", "介面2", "介面3","介面4"};
 6  //未選中圖片
 7  private int[] Limg = {R.mipmap.an1,R.mipmap.an2,R.mipmap.an3,R.mipmap.an4};
 8  //選中圖片
 9  private int[]  Limgn = {R.mipmap.ann1,R.mipmap.ann2,R.mipmap.ann3,R.mipmap.ann4};
10 //配置預設選中第幾項
11  private int ItemWhat=1;
資料初始化及基本介面載入:
 1 //只進入一次,初始化
 2 viewPager.setAdapter(new FragmentPagerAdapter(getSupportFragmentManager()) {
 3     @Override
 4     public Fragment getItem(int position) {
 5         return Lfragments[position];
 6     }
 7     @Override
 8     public int getCount() {
 9         return Lfragments.length;
10     }
11
12     @Override
13     public CharSequence getPageTitle(int position) {
14         return Ltitles[position];
15     }
16 });
17
18 //繫結
19 tabLayout.setupWithViewPager(viewPager);
20
21 //設定預設選中頁,巨集定義
22 tabLayout.getTabAt(ItemWhat).select();
23 viewPager.setOffscreenPageLimit(3); //設定向左和向右都快取的頁面個數
24 //初始化選單欄顯示
25 for (int i = 0; i < tabLayout.getTabCount(); i++) {
26     //尋找到控制元件
27     View view = LayoutInflater.from(MainActivity.this).inflate(R.layout.items, null);
28      LinearLayout mTabView = (LinearLayout) view.findViewById(R.id.item_view);
29     TextView mTabText = (TextView) view.findViewById(R.id.item_text);
30     ImageView mTabIcon = (ImageView) view.findViewById(R.id.item_img);
31
32     mTabText.setText(Ltitles[i]);
33     mTabIcon.setImageResource(Limg[i]);
34     //設定不可點選
35    // mTabView.setClickable(true);
36
37     //更改選中項樣式
38     if(i==ItemWhat){
39         mTabIcon.setImageResource(Limgn[i]);
40         mTabText.setTextColor(ContextCompat.getColor(this, R.color.colorRed));
41     }
42
43     //設定樣式
44     tabLayout.getTabAt(i).setCustomView(view);
45 }
監聽選擇事件:
 1 //是否選中監聽
 2 tabLayout.setOnTabSelectedListener(new TabLayout.OnTabSelectedListener() {
 3     @Override
 4     public void onTabSelected(TabLayout.Tab tab) {
 5      //選中時進入,改變樣式
 6         ItemSelect(tab);
 7         //onTabselected方法裡面呼叫了viewPager的setCurrentItem 所以要想自定義OnTabSelectedListener,也加上mViewPager.setCurrentItem(tab.getPosition())就可以了
 8         viewPager.setCurrentItem(tab.getPosition());
 9     }
10
11     @Override
12     public void onTabUnselected(TabLayout.Tab tab) {
13       //未選中進入,改變樣式
14         ItemNoSelect(tab);
15
16     }
17
18     @Override
19     public void onTabReselected(TabLayout.Tab tab) {
20      //重新選中
21
22     }
23 });
選中和非選中,更改其中顯示樣式:
 1 //某個項選中,改變其樣式
 2  private void ItemSelect(TabLayout.Tab tab) {
 3      View customView = tab.getCustomView();
 4      TextView tabText = (TextView) customView.findViewById(R.id.item_text);
 5      ImageView tabIcon = (ImageView) customView.findViewById(R.id.item_img);
 6      tabText.setTextColor(ContextCompat.getColor(this, R.color.colorRed));
 7      String stitle = tabText.getText().toString();
 8      for(int i=0;i<Ltitles.length;i++){
 9          if(Ltitles[i].equals(stitle)){
10              //Toast.makeText(MainActivity.this,"xxx+"+i,Toast.LENGTH_SHORT).show();
11              tabIcon.setImageResource(Limgn[i]);
12          }
13      }
14  }
15 //某個項非選中,改變其樣式
16  private void ItemNoSelect(TabLayout.Tab tab) {
17      View customView = tab.getCustomView();
18      TextView tabText = (TextView) customView.findViewById(R.id.item_text);
19      ImageView tabIcon = (ImageView) customView.findViewById(R.id.item_img);
20      tabText.setTextColor(ContextCompat.getColor(this, R.color.colorBlack));
21      String stitle = tabText.getText().toString();
22      for(int i=0;i<Ltitles.length;i++){
23          if(Ltitles[i].equals(stitle)){
24              tabIcon.setImageResource(Limg[i]);
25          }
26      }
27  }
整體程式碼:
  1 import android.support.design.widget.TabLayout;
  2 public class MainActivity extends AppCompatActivity {
  3     private ViewPager viewPager;
  4     private TabLayout tabLayout;
  5     //設定介面檔案和文字一一對應
  6     private Fragment[] Lfragments = {new Fragment0(), new Fragment1(), new Fragment2(),new Fragment3()};
  7     private String[] Ltitles = {"介面1", "介面2", "介面3","介面4"};
  8     //未選中圖片
  9     private int[] Limg = {R.mipmap.an1,R.mipmap.an2,R.mipmap.an3,R.mipmap.an4};
 10     //選中圖片
 11     private int[]  Limgn = {R.mipmap.ann1,R.mipmap.ann2,R.mipmap.ann3,R.mipmap.ann4};
 12    //配置預設選中第幾項
 13     private int ItemWhat=1;
 14     @Override
 15     protected void onCreate(Bundle savedInstanceState) {
 16         super.onCreate(savedInstanceState);
 17         setContentView(R.layout.activity_main);
 18
 19         //找控制元件
 20         tabLayout = (TabLayout) findViewById(R.id.tabs2);
 21         viewPager = (ViewPager) findViewById(R.id.viewpager);
 22
 23         //新增tablayout中的豎線,每一項的中間分隔線
 24         //LinearLayout linearLayout = (LinearLayout) tabLayout.getChildAt(0);
 25        // linearLayout.setShowDividers(LinearLayout.SHOW_DIVIDER_MIDDLE);
 26        // linearLayout.setDividerDrawable(ContextCompat.getDrawable(this, R.mipmap.fg));
 27
 28         //只進入一次,初始化
 29         viewPager.setAdapter(new FragmentPagerAdapter(getSupportFragmentManager()) {
 30             @Override
 31             public Fragment getItem(int position) {
 32                 return Lfragments[position];
 33             }
 34             @Override
 35             public int getCount() {
 36                 return Lfragments.length;
 37             }
 38
 39             @Override
 40             public CharSequence getPageTitle(int position) {
 41                 return Ltitles[position];
 42             }
 43         });
 44
 45         //繫結
 46         tabLayout.setupWithViewPager(viewPager);
 47
 48         //設定預設選中頁,巨集定義
 49         tabLayout.getTabAt(ItemWhat).select();
 50         viewPager.setOffscreenPageLimit(3); //設定向左和向右都快取的頁面個數
 51         //初始化選單欄顯示
 52         for (int i = 0; i < tabLayout.getTabCount(); i++) {
 53             //尋找到控制元件
 54             View view = LayoutInflater.from(MainActivity.this).inflate(R.layout.items, null);
 55              LinearLayout mTabView = (LinearLayout) view.findViewById(R.id.item_view);
 56             TextView mTabText = (TextView) view.findViewById(R.id.item_text);
 57             ImageView mTabIcon = (ImageView) view.findViewById(R.id.item_img);
 58
 59             mTabText.setText(Ltitles[i]);
 60             mTabIcon.setImageResource(Limg[i]);
 61             //設定不可點選
 62            // mTabView.setClickable(true);
 63
 64             //更改選中項樣式
 65             if(i==ItemWhat){
 66                 mTabIcon.setImageResource(Limgn[i]);
 67                 mTabText.setTextColor(ContextCompat.getColor(this, R.color.colorRed));
 68             }
 69
 70             //設定樣式
 71             tabLayout.getTabAt(i).setCustomView(view);
 72         }
 73         //是否選中監聽
 74         tabLayout.setOnTabSelectedListener(new TabLayout.OnTabSelectedListener() {
 75             @Override
 76             public void onTabSelected(TabLayout.Tab tab) {
 77              //選中時進入,改變樣式
 78                 ItemSelect(tab);
 79                 //onTabselected方法裡面呼叫了viewPager的setCurrentItem 所以要想自定義OnTabSelectedListener,也加上mViewPager.setCurrentItem(tab.getPosition())就可以了
 80                 viewPager.setCurrentItem(tab.getPosition());
 81             }
 82             @Override
 83             public void onTabUnselected(TabLayout.Tab tab) {
 84               //未選中進入,改變樣式
 85                 ItemNoSelect(tab);
 86             }
 87             @Override
 88             public void onTabReselected(TabLayout.Tab tab) {
 89              //重新選中
 90
 91             }
 92         });}
 93     //某個項選中,改變其樣式
 94     private void ItemSelect(TabLayout.Tab tab) {
 95         View customView = tab.getCustomView();
 96         TextView tabText = (TextView) customView.findViewById(R.id.item_text);
 97         ImageView tabIcon = (ImageView) customView.findViewById(R.id.item_img);
 98         tabText.setTextColor(ContextCompat.getColor(this, R.color.colorRed));
 99         String stitle = tabText.getText().toString();
100         for(int i=0;i<Ltitles.length;i++){
101             if(Ltitles[i].equals(stitle)){
102                 //Toast.makeText(MainActivity.this,"xxx+"+i,Toast.LENGTH_SHORT).show();
103                 tabIcon.setImageResource(Limgn[i]);
104             }
105         }
106     }
107    //某個項非選中,改變其樣式
108     private void ItemNoSelect(TabLayout.Tab tab) {
109         View customView = tab.getCustomView();
110         TextView tabText = (TextView) customView.findViewById(R.id.item_text);
111         ImageView tabIcon = (ImageView) customView.findViewById(R.id.item_img);
112         tabText.setTextColor(ContextCompat.getColor(this, R.color.colorBlack));
113         String stitle = tabText.getText().toString();
114         for(int i=0;i<Ltitles.length;i++){
115             if(Ltitles[i].equals(stitle)){
116                 tabIcon.setImageResource(Limg[i]);
117             }
118         }
119     }
120
121 }