基於深度學習實現以圖搜圖功能
阿新 • • 發佈:2019-01-03
前記: 深度學習的發展使得在此之前以機器學習為主流演算法的相關實現變得簡單,而且準確率更高,效果更好,在影象檢索這一塊兒,目前有谷歌的以圖搜圖,百度的以圖搜圖,而百度以圖搜圖的關鍵技術叫做“感知雜湊演算法”,這是一個很簡單且快速的演算法,其原理在於針對每一張圖片都生成一個特定的“指紋”,然後採取一種相似度的度量方式得出兩張圖片的近似程度,具體見之前的一篇部落格雜湊演算法-圖片相似度計算。
而深度學習在影象領域的快速發展,在於它能學習到圖片的相關特徵,評價一個深度模型的好壞往往在於它學習到有用的特徵程度的多少,在提取特徵這方面而言,目前神經網路有著不可替代的優勢。而影象檢索往往也是基於影象的特徵比較,看特徵匹配的程度有多少,從而檢索出相似度高的圖片。
基於vgg16網路提取影象特徵
我們都知道,vgg網路在影象領域有著廣泛的應用,後續許多層次更深,網路更寬的模型都是基於此擴充套件的,vgg網路能很好的提取到圖片的有用特徵,本次實現是基於Keras實現的,提取的是最後一層卷積特徵。
提取特徵
#  extract_cnn_vgg16_keras.py
# -*- coding: utf-8 -*-
import numpy as np
from numpy import linalg as LA

from keras.applications.vgg16 import VGG16
# from keras.applications.resnet50 import ResNet50
# from keras.applications.densenet import DenseNet121
from keras.preprocessing import image
from keras.applications.vgg16 import preprocess_input as preprocess_input_vgg
# from keras.applications.resnet50 import preprocess_input as preprocess_input_resnet
# from keras.applications.densenet import preprocess_input as preprocess_input_densenet
class VGGNet:
    def __init__(self):
        # weights: 'imagenet'
        # pooling: 'max' or 'avg'
        # input_shape: (width, height, 3), width and height should >= 48
        self.input_shape = (224, 224, 3)
        self.weight = 'imagenet'
        self.pooling = 'max'
        # include_top:是否保留頂層的3個全連線網路
        # weights:None代表隨機初始化,即不載入預訓練權重。'imagenet'代表載入預訓練權重
        # input_tensor:可填入Keras tensor作為模型的影象輸出tensor
        # input_shape:可選,僅當include_top=False有效,應為長為3的tuple,指明輸入圖片的shape,圖片的寬高必須大於48,如(200,200,3)
        #pooling:當include_top = False時,該引數指定了池化方式。None代表不池化,最後一個卷積層的輸出為4D張量。‘avg’代表全域性平均池化,‘max’代表全域性最大值池化。
        #classes:可選,圖片分類的類別數,僅當include_top = True並且不載入預訓練權重時可用。
        self.model_vgg = VGG16(weights = self.weight, input_shape = (self.input_shape[0], self.input_shape[1], self.input_shape[2]), pooling = self.pooling, include_top = False)
     #    self.model_resnet = ResNet50(weights = self.weight, input_shape = (self.input_shape[0], self.input_shape[1], self.input_shape[2]), pooling = self.pooling, include_top = False)
     #   self.model_densenet = DenseNet121(weights = self.weight, input_shape = (self.input_shape[0], self.input_shape[1], self.input_shape[2]), pooling = self.pooling, include_top = False)
        self.model_vgg.predict(np.zeros((1, 224, 224 , 3)))
    #    self.model_resnet.predict(np.zeros((1, 224, 224, 3)))
    #    self.model_densenet.predict(np.zeros((1, 224, 224, 3)))
    '''
    Use vgg16/Resnet model to extract features
    Output normalized feature vector
    '''
    #提取vgg16最後一層卷積特徵
    def vgg_extract_feat(self, img_path):
        img = image.load_img(img_path, target_size=(self.input_shape[0], self.input_shape[1]))
        img = image.img_to_array(img)
        img = np.expand_dims(img, axis=0)
        img = preprocess_input_vgg(img)
        feat = self.model_vgg.predict(img)
        # print(feat.shape)
        norm_feat = feat[0]/LA.norm(feat[0])
        return norm_feat
    #提取resnet50最後一層卷積特徵
    def resnet_extract_feat(self, img_path):
        img = image.load_img(img_path, target_size=(self.input_shape[0], self.input_shape[1]))
        img = image.img_to_array(img)
        img = np.expand_dims(img, axis=0)
        img = preprocess_input_resnet(img)
        feat = self.model_resnet.predict(img)
        # print(feat.shape)
        norm_feat = feat[0]/LA.norm(feat[0])
        return norm_feat
    #提取densenet121最後一層卷積特徵
    def densenet_extract_feat(self, img_path):
        img = image.load_img(img_path, target_size=(self.input_shape[0], self.input_shape[1]))
        img = image.img_to_array(img)
        img = np.expand_dims(img, axis=0)
        img = preprocess_input_densenet(img)
        feat = self.model_densenet.predict(img)
        # print(feat.shape)
        norm_feat = feat[0]/LA.norm(feat[0])
        return norm_feat
將特徵以及對應的檔名儲存為h5檔案
# index.py
# -*- coding: utf-8 -*-
import os
import h5py
import numpy as np
import argparse
from extract_cnn_vgg16_keras import VGGNet

'''
 Returns a list of filenames for all jpg images in a directory.
'''
def get_imlist(path):
    return [os.path.join(path,f) for f in os.listdir(path) if f.endswith('.jpg')]


'''
 Extract features and index the images
'''
if __name__ == "__main__":
    database = './data/picture'
    index = 'vgg_featureCNN.h5'
    img_list = get_imlist(database)

    print("--------------------------------------------------")
    print("         feature extraction starts")
    print("--------------------------------------------------")

    feats = []
    names = []

    model = VGGNet()
    for i, img_path in enumerate(img_list):
        norm_feat = model.vgg_extract_feat(img_path)      #修改此處改變提取特徵的網路
        img_name = os.path.split(img_path)[1]
        feats.append(norm_feat)
        names.append(img_name)
        print("extracting feature from image No. %d , %d images in total" %((i+1), len(img_list)))

    feats = np.array(feats)
    # print(feats)
    # directory for storing extracted features
    # output = args["index"]
    output = index
    print("--------------------------------------------------")
    print("      writing feature extraction results ...")
    print("--------------------------------------------------")


    h5f = h5py.File(output, 'w')
    h5f.create_dataset('dataset_1', data = feats)
    # h5f.create_dataset('dataset_2', data = names)
    h5f.create_dataset('dataset_2', data = np.string_(names))
    h5f.close()
選一張測試圖片測試檢索效果
相似度採用餘弦相似度度量
#  test.py
# -*- coding: utf-8 -*-
from extract_cnn_vgg16_keras import VGGNet
import numpy as np
import h5py
import matplotlib.pyplot as plt
import matplotlib.image as mpimg
import argparse

query = './data/picture/bird.jpg'
index = 'vgg_featureCNN.h5'
result = './data/picture'
# read in indexed images' feature vectors and corresponding image names
h5f = h5py.File(index,'r')
# feats = h5f['dataset_1'][:]
feats = h5f['dataset_1'][:]
print(feats)
imgNames = h5f['dataset_2'][:]
print(imgNames)
h5f.close()

print("--------------------------------------------------")
print("               searching starts")
print("--------------------------------------------------")

# read and show query image
# queryDir = args["query"]
queryImg = mpimg.imread(query)
plt.title("Query Image")
plt.imshow(queryImg)
plt.show()

# init VGGNet16 model
model = VGGNet()

# extract query image's feature, compute simlarity score and sort
queryVec = model.vgg_extract_feat(query)    #修改此處改變提取特徵的網路
print(queryVec.shape)
print(feats.shape)
scores = np.dot(queryVec, feats.T)
rank_ID = np.argsort(scores)[::-1]
rank_score = scores[rank_ID]
# print (rank_ID)
print (rank_score)


# number of top retrieved images to show
maxres = 3          #檢索出三張相似度最高的圖片
imlist = []
for i,index in enumerate(rank_ID[0:maxres]):
    imlist.append(imgNames[index])
    # print(type(imgNames[index]))
    print("image names: "+str(imgNames[index]) + " scores: %f"%rank_score[i])
print("top %d images in order are: " %maxres, imlist)
# show top #maxres retrieved result one by one
for i,im in enumerate(imlist):
    image = mpimg.imread(result+"/"+str(im, 'utf-8'))
    plt.title("search output %d" %(i+1))
    plt.imshow(image)
    plt.show()
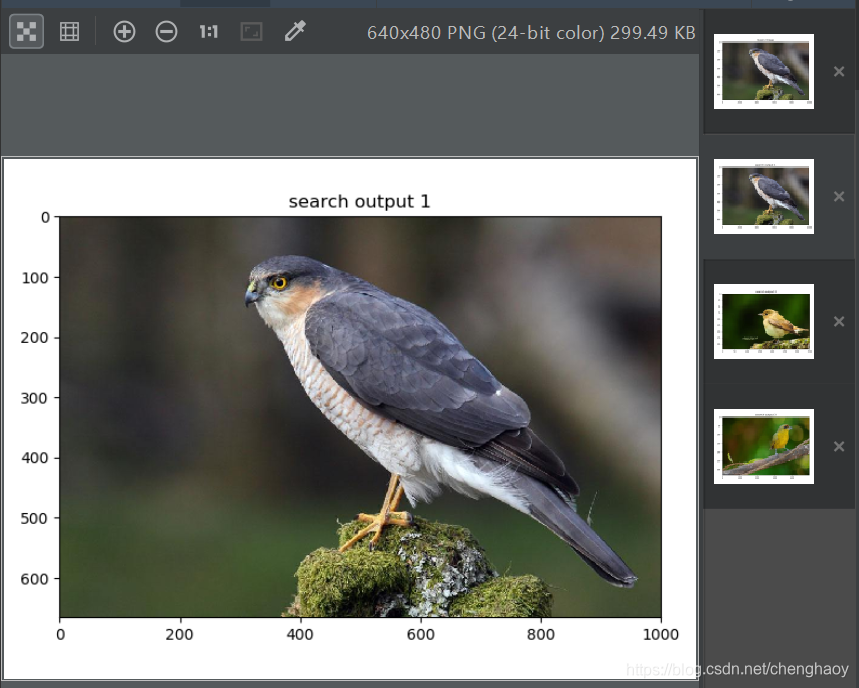
以一張小鳥的圖片為例測試結果如下:

第一張為測試圖片,後面三張為檢索圖片,可以看出效果相當好了。

如果想用Resnet或者Densenet提取特徵,只需針對上述程式碼做出相應的修改,去掉註釋修改部分程式碼即可。
參考文獻:
https://github.com/willard-yuan/flask-keras-cnn-image-retrieval
https://www.zhihu.com/question/29467370
http://yongyuan.name/blog/layer-selection-and-finetune-for-cbir.html
