pixhawk串列埠讀取感測器資料
阿新 • • 發佈:2019-01-03
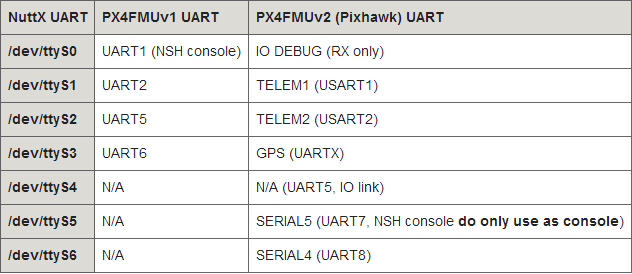
1、 Pixhawk板上串列埠說明:

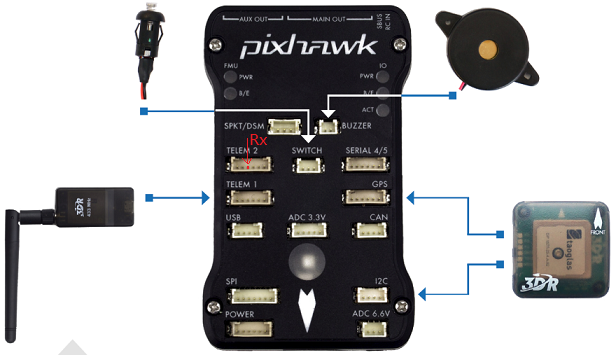
測試使用Pixhawk板上TELEM2介面的USART2,對應的Nuttx UART裝置檔案尾
/dev/ttyS2: 2 讀取資料測試
步驟:
- 在
Firmware/src/modules中新增一個新的資料夾,命名為rw_uart - 在
rw_uart資料夾中建立CMakeLists.txt檔案,並輸入以下內容:
px4_add_module(
MODULE modules__rw_uart
MAIN rw_uart
COMPILE_FLAGS
-Os
SRCS
rw_uart.c
DEPENDS
platforms__common
)
這是CMake的編譯指令碼 - 在
rw_uart資料夾中建立rw_uart.c檔案 - 註冊新新增的應用到NuttShell中。/src/Firmware/cmake/configs/nuttx_px4fmu-v2_default.cmake檔案中新增如下內容:
modules/rw_uart
- 在
上面表示把rw_uart.c編譯成可以在nuttx裡面執行的程式。
rw_uart.c
#include <stdio.h>
#include <termios.h>
#include <unistd.h>
#include <stdbool.h>
#include <errno.h>
#include <drivers/drv_hrt.h>
#include <string.h>
#include <systemlib/err.h>
#include <systemlib/systemlib.h>
#include <fcntl.h>
#include <sys/types.h>
#include <sys/stat.h>

__EXPORT int rw_uart_main(int argc, char *argv[]);

int set_uart_baudrate(const int fd, unsigned int baud);

int set_uart_baudrate(const int fd, unsigned int baud)
{
int speed;

switch (baud) {
case 9600:   speed = B9600;   break;
case 19200:  speed = B19200;  break;
case 38400:  speed = B38400;  break;
case 57600:  speed = B57600;  break;
case 115200: speed = B115200; break;
default:
warnx("ERR: baudrate: %d\n", baud);
return -EINVAL;
}

struct termios uart_config;

int termios_state;

/* fill the struct for the new configuration */
tcgetattr(fd, &uart_config);
/* clear ONLCR flag (which appends a CR for every LF) */
uart_config.c_oflag &= ~ONLCR;
/* no parity, one stop bit */
uart_config.c_cflag &= ~(CSTOPB | PARENB);
/* set baud rate */
if ((termios_state = cfsetispeed(&uart_config, speed)) < 0) {
warnx("ERR: %d (cfsetispeed)\n", termios_state);
return false;
}

if ((termios_state = cfsetospeed(&uart_config, speed)) < 0) {
warnx("ERR: %d (cfsetospeed)\n", termios_state);
return false;
}

if ((termios_state = tcsetattr(fd, TCSANOW, &uart_config)) < 0) {
warnx("ERR: %d (tcsetattr)\n", termios_state);
return false;
}

return true;
}

int rw_uart_main(int argc, char *argv[])
{
char data = '0';
char buffer[4] = "";

int uart_read = open("/dev/ttyS2", O_RDWR | O_NOCTTY);//開啟串列埠裝置

if (uart_read < 0) {
err(1, "failed to open port: %s", "/dev/ttyS2");
return -1;
}

if(false == set_uart_baudrate(uart_read,9600)){
printf("[YCM]set_uart_baudrate is failed\n");
return -1;
}
printf("[YCM]uart init is successful\n");

while(true){
read(uart_read,&data,1);
if(data == 'R'){
for(int i = 0;i <4;++i){
read(uart_read,&data,1);//讀取串列埠資料
buffer[i] = data;
data = '0';
}
printf("%s\n",buffer);
}
}

return 0;
}
編譯並刷韌體
make clean
make px4fmu-v2_default
make up
檢視app
在NSH終端中輸入help,在Builtin Apps中出現rw_uart應用。
執行rw_uart應用(前提是模組與Pixhawk連線好)
在NSH終端中輸入rw_uart,回車,檢視串列埠資料的列印資料(TELEM2介面的USART2)。
以上就是簡單的PIX裡面的應用程式。可以從串列埠讀取到資料到內部,可以看到避開了複雜的微控制器配置過程,還是很方便的。
/src/ROMFS/init.d/rc_mc_app下新增子啟動
//mcu_avoid start /dev/ttyS6
//laser_gun start /dev/ttyS3
//laser_gun_shoot start /dev/ttyS3

