MVP、MVVM,MVC設計模式的例項分析
先只考慮V和P的分離,在這裡,我們用介面實現
首先,程式先例項化V,主函式程式碼如下
static class Program
{
/// <summary>
/// 應用程式的主入口點。
/// </summary>
[STAThread]
static void Main()
{
Application.EnableVisualStyles();
Application.SetCompatibleTextRenderingDefault(false 然後,我們讓V去例項化P,將對自己的引用傳給P
VIEW程式碼如下
public partial class FrmTestMvp : Form, ITestMvpView
{
private TestMvpPresenter _testMvpPresenter;
public FrmTestMvp()
{
InitializeComponent();
//注意構造Presenter時需把自身傳過去 VIEW實現瞭如下介面。這讓我們的Presenter可以支援多個VIEW,只要他作出了對介面的實現
    //聲明瞭一個委託型別,並在介面安上了和這個委託型別相關的事件
    public delegate void Button1_Click();

    interface ITestMvpView
    {
        //宣告控制元件
        TextBox TextBox1{get;}
        //事件
        event Button1_Click Click;
    }
最後就是我們的Presenter部分,利用介面給它的介面來訪問介面。
    class TestMvpPresenter
    {
        private ITestMvpView _testMvpView;

        /// <summary>
        /// 建構函式,出入檢視介面
        /// </summary>
        /// <param name="testMvpView">ITestMvpView介面</param>
        public TestMvpPresenter(ITestMvpView testMvpView)
        {
            this._testMvpView = testMvpView;
            this.InitEvent();
        }

        //載入委託事件
        private void InitEvent()
        {
            this._testMvpView.Click += new Button1_Click(_testMvpView_Click);
        }

        //處理事件
        void _testMvpView_Click()
        {
            if (CheckValue())
            {
                this.ShowMessage(this._testMvpView.TextBox1.Text);
            }
            else
            {
                this.ShowMessage("輸入的值不能為空!");
                this._testMvpView.TextBox1.Focus();
            }
        }

        //檢查TestBox1的輸入值是否合法
        private bool CheckValue()
        {
            if (this._testMvpView.TextBox1.Text.ToString() == "")
            {
                return false;
            }
            return true;
        }

        private void ShowMessage(string message)
        {
            MessageBox.Show(message);
        }
    }
實際上,上面的例子是先初始化view,然後初始化presenter的方式,我們成為view-first。反過來當然也一樣,叫做presenter-first方式。
另外一個例子,首先,在來看我們的Model,model是一個只包含屬性的實體類.書寫如下
    public class TestMvpModel
    {
        public string Name { get; set; }
    }
然後寫我們的view類
View類中依賴model,並負責model和view的繫結
   public partial class FrmTestMvp : Form
    {
        private TestMvpModel model;
        public TestMvpModel Model
        {
            get
            {
                return model as TestMvpModel;
            }
            set
            {
                model = value as TestMvpModel;
                label1.Text = model.Name;
            }
        }

        public FrmTestMvp()
        {
            InitializeComponent();
        }

        public EventHandler ButtonClick;

        private void button1_Click(object sender, EventArgs e)
        {
            if (ButtonClick != null)
            {
                ButtonClick(sender,e);
            }
        }
    }
最後寫我們的presenter,負責一切的初始化,和頁面邏輯的控制
 class TestMvpPresenter
    {
        public FrmTestMvp View { get; set; }
        public TestMvpPresenter(FrmTestMvp view)
        {
            this.View = view;

            this.View.Model = new TestMvpModel() {Name = "GDL" };

            this.View.ButtonClick += delegate
            {
                this.View.Model = new TestMvpModel() { Name = "ABC" };
            };
        }

    }
主程式改為如下
        [STAThread]
        static void Main()
        {
            Application.EnableVisualStyles();
            Application.SetCompatibleTextRenderingDefault(false);

            TestMvpPresenter presenter = new TestMvpPresenter(new FrmTestMvp());
            Application.Run(presenter.View);
        }
在我的理解中,MVP模式的核心就是將傳統VIEW中相互耦合的業務邏輯,頁面靜態部分,和頁面中動態部分分開。頁面中不變的靜態部分繼續放在view裡。動態部分放在model裡。而業務邏輯放在我們的presenter中。
是不是覺得上面的view程式碼有點多,還需要手工繫結兩件事:
(1)頁面動作和presenter中的處理函式
        private void button1_Click(object sender, EventArgs e)
        {
            if (ButtonClick != null)
            {
                ButtonClick(sender,e);
            }
        }
(2)模型和頁面的一致性變化
        public TestMvpModel Model
        {
            get
            {
                return model as TestMvpModel;
            }
            set
            {
                model = value as TestMvpModel;
                label1.Text = model.Name;
            }
        }
所以,微軟又推出了WPF。我們來看一下WPF中的view典型寫法
<Window x:Class="MVPDemo2.PanelView"
    xmlns="http://schemas.microsoft.com/winfx/2006/xaml/presentation"
    xmlns:x="http://schemas.microsoft.com/winfx/2006/xaml"
    Title="PanelView" Height="300" Width="300">
    <Grid>
        <Label Height="28" HorizontalAlignment="Left" Margin="10,10,0,0" Name="label1" VerticalAlignment="Top" Width="120" Content="{Binding Name}" />
        <Button Height="24" HorizontalAlignment="Left" Margin="10,79,0,0" Name="btnModify" VerticalAlignment="Top" Width="111" Click="btnModify_Click">修改Label的文字</Button>
    </Grid>
</Window>
顯然,在上述的XAML中,已經對前文提到的兩件事進行了繫結。在wpf下,我們可以輕鬆的寫出model程式碼(#region部分為INotifyPropertyChanged
介面新增)
    public class PanelPresenterationModel : INotifyPropertyChanged
    {
        private string name;

        public string Name
        {
            get
            {
                return this.name;
            }
            set
            {
                if (this.name != value)
                {
                    this.name = value;
                    this.OnPropertyChanged("Name");
                }
            }
        }

        #region INotifyPropertyChanged Members

        public event PropertyChangedEventHandler PropertyChanged;

        private void OnPropertyChanged(string propertyName)
        {
            PropertyChangedEventHandler Handler = PropertyChanged;
            if (Handler != null) Handler(this, new PropertyChangedEventArgs(propertyName));
        }

        #endregion
    }
我們給出presenter程式碼
    public class PanelPresenter
    {
        public PanelPresenter(PanelView view)
        {
            this.View = view;

            //初始化Model
            this.View.Model = new PanelPresenterationModel() { Name = "Bao, Jianqiang" };

            this.View.ButtonClick += delegate
            {
                this.View.Model.Name = "Jax.Bao";

            };
        }

        public PanelView View { get; set; }
    }
我們看到WPF很成功的實現了MVP。
然而,還有好事者,他們開發了MVVM模式
Simple Mvvm,Mvvm Light和Prism都是MVVM的開源框架
下面只貼上典型的viewmodel的例項
namespace SilverlightApplication2.ViewModels
{
public class StudentViewModel : NotificationObject
{
public StudentViewModel()
{
student = new Student();
}
Student student;
public Student Student
{
get
{
return this.student;
}
private set
{
this.student = value;
this.RaisePropertyChanged(() => this.student);
}
}
public bool CanSubmit
{
get
{
return true;
}
}
public void Submit()
{
student.Mock();
}
}
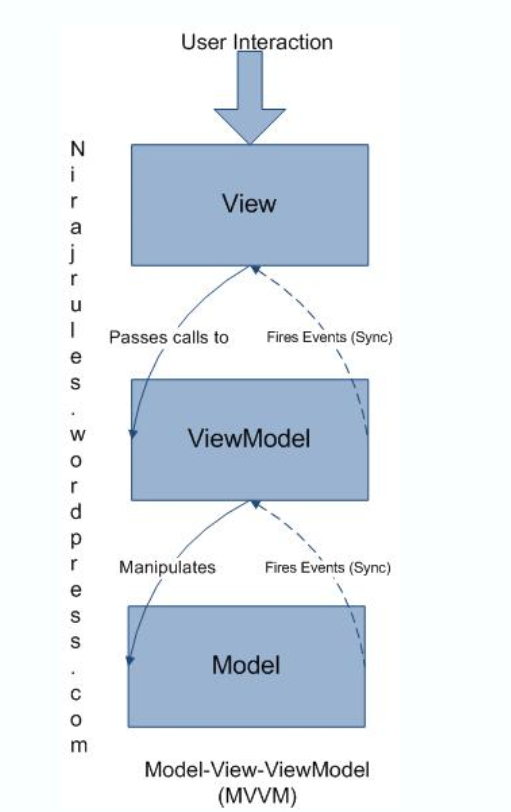
}在上程式碼中可以看見,viewmodel又負責處理view內容的更新,同時也負責對model內容進行同步調整。下面展現了一個一般MVVM系統的架構
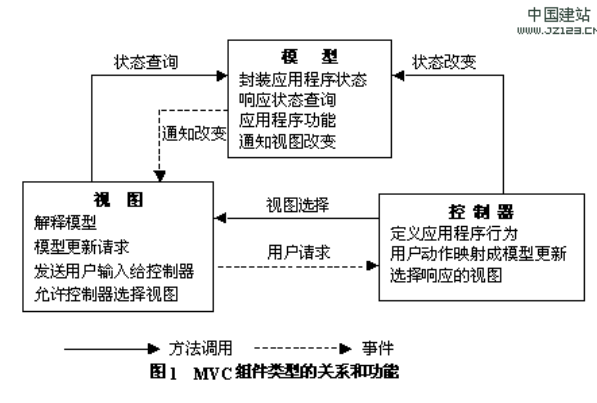
下面,我們用一個圖來解釋MVC
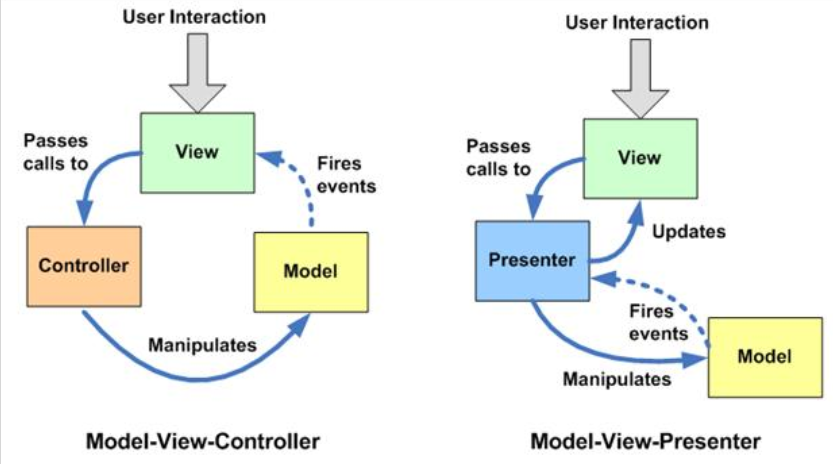
MVC架構和MVP架構的區別