Android 程序架構: MVC、MVP、MVVM、Unidirectional、Clean...
摘選自:
GUI 應用程序架構的十年變遷:MVC、MVP、MVVM、Unidirectional、Clean
https://zhuanlan.zhihu.com/p/26799645
MV* in Android
此部分完整代碼在這裏,筆者在這裏節選出部分代碼方便對照演示。Android中的Activity的功能很類似於iOS中的UIViewController,都可以看做MVC中的Controller。在2010年左右經典的Android程序大概是這樣的:
TextView mCounterText;
Button mCounterIncrementButton;

int mClicks = 0;

public void onCreate(Bundle b) {
  super.onCreate(b);

  mCounterText = (TextView) findViewById(R.id.tv_clicks);
  mCounterIncrementButton = (Button) findViewById(R.id.btn_increment);

  mCounterIncrementButton.setOnClickListener(new View.OnClickListener() {
    public void onClick(View v) {
      mClicks++;
      mCounterText.setText(""+mClicks);
    }
  });
}
後來2013年左右出現了ButterKnife這樣的基於註解的控件綁定框架,此時的代碼看上去是這樣的:
@Bind(R.id.tv_clicks) mCounterText;
@OnClick(R.id.btn_increment)
public void onSubmitClicked(View v) {
    mClicks++;
    mCounterText.setText("" + mClicks);
}
後來Google官方也推出了數據綁定的框架,從此MVVM模式在Android中也愈發流行:
<layout xmlns:android="http://schemas.android.com/apk/res/android">
   <data>
       <variable name="counter" type="com.example.Counter"/>
       <variable name="handlers" type="com.example.ClickHandler"/>
   </data>
   <LinearLayout
       android:orientation="vertical"
       android:layout_width="match_parent"
       android:layout_height="match_parent">
       <TextView android:layout_width="wrap_content"
           android:layout_height="wrap_content"
           android:text="@{counter.value}"/>
       <Buttonandroid:layout_width="wrap_content"
           android:layout_height="wrap_content"
           android:text="@{handlers.clickHandle}"/>
   </LinearLayout>
</layout>
後來Anvil這樣的受React啟發的組件式框架以及Jedux這樣借鑒了Redux全局狀態管理的框架也將Unidirectional 架構引入了Android開發的世界。
MVC
-
聲明View中的組件對象或者Model對象
    private Subscription subscription;
    private RecyclerView reposRecycleView;
    private Toolbar toolbar;
    private EditText editTextUsername;
    private ProgressBar progressBar;
    private TextView infoTextView;
    private ImageButton searchButton;
-
將組件與Activity中對象綁定,並且聲明用戶響應處理函數
        super.onCreate(savedInstanceState);
        setContentView(R.layout.activity_main);
        progressBar = (ProgressBar) findViewById(R.id.progress);
        infoTextView = (TextView) findViewById(R.id.text_info);
        //Set up ToolBar
        toolbar = (Toolbar) findViewById(R.id.toolbar);
        setSupportActionBar(toolbar);
        //Set up RecyclerView
        reposRecycleView = (RecyclerView) findViewById(R.id.repos_recycler_view);
        setupRecyclerView(reposRecycleView);
        // Set up search button
        searchButton = (ImageButton) findViewById(R.id.button_search);
        searchButton.setOnClickListener(new View.OnClickListener() {
            @Override
            public void onClick(View v) {
                loadGithubRepos(editTextUsername.getText().toString());
            }
        });
        //Set up username EditText
        editTextUsername = (EditText) findViewById(R.id.edit_text_username);
        editTextUsername.addTextChangedListener(mHideShowButtonTextWatcher);
        editTextUsername.setOnEditorActionListener(new TextView.OnEditorActionListener() {
            @Override
            public boolean onEditorAction(TextView v, int actionId, KeyEvent event) {
                if (actionId == EditorInfo.IME_ACTION_SEARCH) {
                    String username = editTextUsername.getText().toString();
                    if (username.length() > 0) loadGithubRepos(username);
                    return true;
                }
                return false;
            }
});
-
用戶輸入之後的更新流程
        progressBar.setVisibility(View.VISIBLE);
        reposRecycleView.setVisibility(View.GONE);
        infoTextView.setVisibility(View.GONE);
        ArchiApplication application = ArchiApplication.get(this);
        GithubService githubService = application.getGithubService();
        subscription = githubService.publicRepositories(username)
                .observeOn(AndroidSchedulers.mainThread())
                .subscribeOn(application.defaultSubscribeScheduler())
                .subscribe(new Subscriber<List<Repository>>() {
                    @Override
                    public void onCompleted() {
                        progressBar.setVisibility(View.GONE);
                        if (reposRecycleView.getAdapter().getItemCount() > 0) {
                            reposRecycleView.requestFocus();
                            hideSoftKeyboard();
                            reposRecycleView.setVisibility(View.VISIBLE);
                        } else {
                            infoTextView.setText(R.string.text_empty_repos);
                            infoTextView.setVisibility(View.VISIBLE);
                        }
                    }

                    @Override
                    public void onError(Throwable error) {
                        Log.e(TAG, "Error loading GitHub repos ", error);
                        progressBar.setVisibility(View.GONE);
                        if (error instanceof HttpException
                                && ((HttpException) error).code() == 404) {
                            infoTextView.setText(R.string.error_username_not_found);
                        } else {
                            infoTextView.setText(R.string.error_loading_repos);
                        }
                        infoTextView.setVisibility(View.VISIBLE);
                    }

                    @Override
                    public void onNext(List<Repository> repositories) {
                        Log.i(TAG, "Repos loaded " + repositories);
                        RepositoryAdapter adapter =
                                (RepositoryAdapter) reposRecycleView.getAdapter();
                        adapter.setRepositories(repositories);
                        adapter.notifyDataSetChanged();
                    }
});
MVP
-
將Presenter與View綁定,並且將用戶響應事件綁定到Presenter中
        //Set up presenter
        presenter = new MainPresenter();
        presenter.attachView(this);
        ...

        // Set up search button
        searchButton = (ImageButton) findViewById(R.id.button_search);
        searchButton.setOnClickListener(new View.OnClickListener() {
            @Override
            public void onClick(View v) {
                presenter.loadRepositories(editTextUsername.getText().toString());
            }
        });
-
Presenter中調用Model更新數據,並且調用View中進行重新渲染
    public void loadRepositories(String usernameEntered) {
        String username = usernameEntered.trim();
        if (username.isEmpty()) return;

        mainMvpView.showProgressIndicator();
        if (subscription != null) subscription.unsubscribe();
        ArchiApplication application = ArchiApplication.get(mainMvpView.getContext());
        GithubService githubService = application.getGithubService();
        subscription = githubService.publicRepositories(username)
                .observeOn(AndroidSchedulers.mainThread())
                .subscribeOn(application.defaultSubscribeScheduler())
                .subscribe(new Subscriber<List<Repository>>() {
                    @Override
                    public void onCompleted() {
                        Log.i(TAG, "Repos loaded " + repositories);
                        if (!repositories.isEmpty()) {
                            mainMvpView.showRepositories(repositories);
                        } else {
                            mainMvpView.showMessage(R.string.text_empty_repos);
                        }
                    }

                    @Override
                    public void onError(Throwable error) {
                        Log.e(TAG, "Error loading GitHub repos ", error);
                        if (isHttp404(error)) {
                            mainMvpView.showMessage(R.string.error_username_not_found);
                        } else {
                            mainMvpView.showMessage(R.string.error_loading_repos);
                        }
                    }

                    @Override
                    public void onNext(List<Repository> repositories) {
                        MainPresenter.this.repositories = repositories;
                    }
                });
        }
MVVM
-
XML中聲明數據綁定
<data>
        <variable
            name="viewModel"
            type="uk.ivanc.archimvvm.viewmodel.MainViewModel"/>
</data>
...
            <EditText
                android:id="@+id/edit_text_username"
                android:layout_width="match_parent"
                android:layout_height="wrap_content"
                android:layout_toLeftOf="@id/button_search"
                android:hint="@string/hit_username"
                android:imeOptions="actionSearch"
                android:inputType="text"
                android:onEditorAction="@{viewModel.onSearchAction}"
                android:textColor="@color/white"
                android:theme="@style/LightEditText"
                app:addTextChangedListener="@{viewModel.usernameEditTextWatcher}"/>
-
View中綁定ViewModel
        super.onCreate(savedInstanceState);
        binding = DataBindingUtil.setContentView(this, R.layout.main_activity);
        mainViewModel = new MainViewModel(this, this);
        binding.setViewModel(mainViewModel);
        setSupportActionBar(binding.toolbar);
        setupRecyclerView(binding.reposRecyclerView);
-
ViewModel中進行數據操作
public boolean onSearchAction(TextView view, int actionId, KeyEvent event) {
        if (actionId == EditorInfo.IME_ACTION_SEARCH) {
            String username = view.getText().toString();
            if (username.length() > 0) loadGithubRepos(username);
            return true;
        }
        return false;
    }

    public void onClickSearch(View view) {
        loadGithubRepos(editTextUsernameValue);
    }

    public TextWatcher getUsernameEditTextWatcher() {
        return new TextWatcher() {
            @Override
            public void beforeTextChanged(CharSequence charSequence, int start, int count, int after) {

            }

            @Override
            public void onTextChanged(CharSequence charSequence, int start, int before, int count) {
                editTextUsernameValue = charSequence.toString();
                searchButtonVisibility.set(charSequence.length() > 0 ? View.VISIBLE : View.GONE);
            }

            @Override
            public void afterTextChanged(Editable editable) {

            }
        };
}
Unidirectional User Interface Architecture: 單向數據流
Unidirectional User Interface Architecture架構的概念源於後端常見的CROS/Event Sourcing模式,其核心思想即是將應用狀態被統一存放在一個或多個的Store中,並且所有的數據更新都是通過可觀測的Actions觸發,而所有的View都是基於Store中的狀態渲染而來。該架構的最大優勢在於整個應用中的數據流以單向流動的方式從而使得有用更好地可預測性與可控性,這樣可以保證你的應用各個模塊之間的松耦合性。與MVVM模式相比,其解決了以下兩個問題:
-
避免了數據在多個ViewModel中的冗余與不一致問題
-
分割了ViewModel的職責,使得ViewModel變得更加Clean
雙向數據綁定的不足
This means that one change (a user input or API response) can affect the state of an application in many places in the code — for example, two-way data binding. That can be hard to maintain and debug.
Facebook強調,雙向數據綁定極不利於代碼的擴展與維護。從具體的代碼實現角度來看,雙向數據綁定會導致更改的不可預期性(UnPredictable),就好像Angular利用Dirty Checking來進行是否需要重新渲染的檢測,這導致了應用的緩慢,簡直就是來砸場子的。而在采用了單向數據流之後,整個應用狀態會變得可預測(Predictable),也能很好地了解當狀態發生變化時到底會有多少的組件發生變化。另一方面,相對集中地狀態管理,也有助於你不同的組件之間進行信息交互或者狀態共享,特別是像Redux這種強調Single Store與SIngle State Tree的狀態管理模式,能夠保證以統一的方式對於應用的狀態進行修改,並且Immutable的概念引入使得狀態變得可回溯。
譬如Facebook在Flux Overview中舉的例子,當我們希望在一個界面上同時展示未讀信息列表與未讀信息的總數目的時候,對於MV*就有點惡心了,特別是當這兩個組件不在同一個ViewModel/Controller中的時候。一旦我們將某個未讀信息標識為已讀,會引起控制已讀信息、未讀信息、未讀信息總數目等等一系列模型的更新。特別是很多時候為了方便我們可能在每個ViewModel/Controller都會設置一個數據副本,這會導致依賴連鎖更新,最終導致不可預測的結果與性能損耗。而在Flux中這種依賴是反轉的,Store接收到更新的Action請求之後對數據進行統一的更新並且通知各個View,而不是依賴於各個獨立的ViewModel/Controller所謂的一致性更新。從職責劃分的角度來看,除了Store之外的任何模塊其實都不知道應該如何處理數據,這就保證了合理的職責分割。這種模式下,當我們創建新項目時,項目復雜度的增長瓶頸也就會更高,不同於傳統的View與ViewLogic之間的綁定,控制流被獨立處理,當我們添加新的特性,新的數據,新的界面,新的邏輯處理模塊時,並不會導致原有模塊的復雜度增加,從而使得整個邏輯更加清晰可控。
這裏還需要提及一下,很多人應該是從React開始認知到單向數據流這種架構模式的,而當時Angular 1的緩慢與性能之差令人發指,但是譬如Vue與Angular 2的性能就非常優秀。借用Vue.js官方的說法,
The virtual-DOM approach provides a functional way to describe your view at any point of time, which is really nice. Because it doesn’t use observables and re-renders the entire app on every update, the view is by definition guaranteed to be in sync with the data. It also opens up possibilities to isomorphic JavaScript applications.
Instead of a Virtual DOM, Vue.js uses the actual DOM as the template and keeps references to actual nodes for data bindings. This limits Vue.js to environments where DOM is present. However, contrary to the common misconception that Virtual-DOM makes React faster than anything else, Vue.js actually out-performs React when it comes to hot updates, and requires almost no hand-tuned optimization. With React, you need to implementshouldComponentUpdate everywhere and use immutable data structures to achieve fully optimized re-renders.
總而言之,筆者認為雙向數據流與單向數據流相比,性能上孰優孰劣尚無定論,最大的區別在於單向數據流與雙向數據流相比有更好地可控性,這一點在上文提及的函數響應式編程中也有體現。若論快速開發,筆者感覺雙向數據綁定略勝一籌,畢竟這種View與ViewModel/ViewLogic之間的直接綁定直觀便捷。而如果是註重於全局的狀態管理,希望維護耦合程度較低、可測試性/可擴展性較高的代碼,那麽還是單向數據流,即Unidirectional Architecture較為合適。一家之言,歡迎討論。
Flux:數據流驅動的頁面
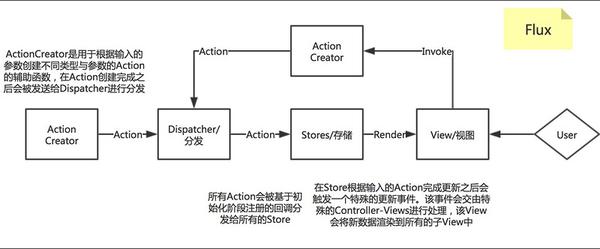
Flux不能算是絕對的先行者,但是在Unidirectional Architecture中卻是最富盛名的一個,也是很多人接觸到的第一個Unidirectional Architecture。Flux主要由以下幾個部分構成:
-
Stores:存放業務數據和應用狀態,一個Flux中可能存在多個Stores
-
View:層次化組合的React組件
-
Actions:用戶輸入之後觸發View發出的事件
-
Dispatcher:負責分發Actions
 根據上述流程,我們可知Flux模式的特性為:
-
Dispatcher:Event Bus中設置有一個單例的Dispatcher,很多Flux的變種都移除了Dispatcher依賴。
-
只有View使用可組合的組件:在Flux中只有React的組件可以進行層次化組合,而Stores與Actions都不可以進行層次化組合。React組件與Flux一般是松耦合的,因此Flux並不是Fractal,Dispatcher與Stores可以被看做Orchestrator。
-
用戶事件響應在渲染時聲明:在React的 render() 函數中,即負責響應用戶交互,也負責註冊用戶事件的處理器
下面我們來看一個具體的代碼對比,首先是以經典的Cocoa風格編寫一個簡單的計數器按鈕:
class ModelCounter
constructor: (@value=1) ->
increaseValue: (delta) =>
@value += delta
class ControllerCounter
constructor: (opts) ->
@model_counter = opts.model_counter
@observers = []
getValue: => @model_counter.value
increaseValue: (delta) =>
@model_counter.increaseValue(delta)
@notifyObservers()
notifyObservers: =>
obj.notify(this) for obj in @observers
registerObserver: (observer) =>
@observers.push(observer)
class ViewCounterButton
constructor: (opts) ->
@controller_counter = opts.controller_counter
@button_class = opts.button_class or ‘button_counter‘
@controller_counter.registerObserver(this)
render: =>
elm = $("<button class=\"[email protected]_class}\">
[email protected]_counter.getValue()}</button>")
elm.click =>
@controller_counter.increaseValue(1)
return elm
notify: =>
$("[email protected]_class}").replaceWith(=> @render())
上述代碼邏輯用上文提及的MVC模式圖演示就是:

而如果用Flux模式實現,會是下面這個樣子:
# Store
class CounterStore extends EventEmitter

    constructor: ->
        @count = 0
        @dispatchToken = @registerToDispatcher()

    increaseValue: (delta) ->
        @count += 1

    getCount: ->
        return @count

    registerToDispatcher: ->
        CounterDispatcher.register((payload) =>
            switch payload.type
                when ActionTypes.INCREASE_COUNT
                    @increaseValue(payload.delta)
        )

# Action
class CounterActions

    @increaseCount: (delta) ->
        CounterDispatcher.handleViewAction({
            ‘type‘: ActionTypes.INCREASE_COUNT
            ‘delta‘: delta
        })

# View
CounterButton = React.createClass(

    getInitialState: ->
        return {‘count‘: 0}

    _onChange: ->
        @setState({
            count: CounterStore.getCount()
        })

    componentDidMount: ->
        CounterStore.addListener(‘CHANGE‘, @_onChange)

    componentWillUnmount: ->
        CounterStore.removeListener(‘CHANGE‘, @_onChange)

    render: ->
        return React.DOM.button({‘className‘: @prop.class}, @state.value)

)
其數據流圖為:

Redux:集中式的狀態管理
Redux是Flux的所有變種中最為出色的一個,並且也是當前Web領域主流的狀態管理工具,其獨創的理念與功能深刻影響了GUI應用程序架構中的狀態管理的思想。Redux將Flux中單例的Dispatcher替換為了單例的Store,即也是其最大的特性,集中式的狀態管理。並且Store的定義也不是從零開始單獨定義,而是基於多個Reducer的組合,可以把Reducer看做Store Factory。Redux的重要組成部分包括:
-
Singleton Store:管理應用中的狀態,並且提供了一個dispatch(action)函數。
-
Provider:用於監聽Store的變化並且連接像React、Angular這樣的UI框架
-
Actions:基於用戶輸入創建的分發給Reducer的事件
-
Reducers:用於響應Actions並且更新全局狀態樹的純函數

根據上述流程,我們可知Redux模式的特性為:
-
以工廠模式組裝Stores:Redux允許我以createStore()函數加上一系列組合好的Reducer函數來創建Store實例,還有另一個applyMiddleware()函數可以允許在dispatch()函數執行前後鏈式調用一系列中間件。
-
Providers:Redux並不特定地需要何種UI框架,可以與Angular、React等等很多UI框架協同工作。Redux並不是Fractal,一般來說Store被視作Orchestrator。
-
User Event處理器即可以選擇在渲染函數中聲明,也可以在其他地方進行聲明。
Model-View-Update
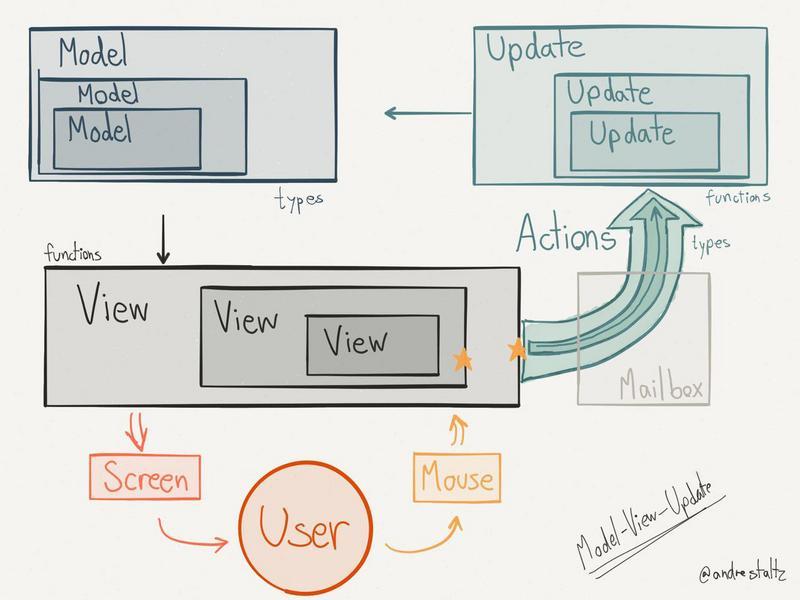
又被稱作Elm Architecture,上面所講的Redux就是受到Elm的啟發演化而來,因此MVU與Redux之間有很多的相通之處。MVU使用函數式編程語言Elm作為其底層開發語言,因此該架構可以被看做更純粹的函數式架構。MVU中的基本組成部分有:
-
Model:定義狀態數據結構的類型
-
View:純函數,將狀態渲染為界面
-
Actions:以Mailbox的方式傳遞用戶事件的載體
-
Update:用於更新狀態的純函數
 根據上述流程,我們可知Elm模式的特性為:
-
到處可見的層次化組合:Redux只是在View層允許將組件進行層次化組合,而MVU中在Model與Update函數中也允許進行層次化組合,甚至Actions都可以包含內嵌的子Action
-
Elm屬於Fractal架構:因為Elm中所有的模塊組件都支持層次化組合,即都可以被單獨地導出使用
Model-View-Intent
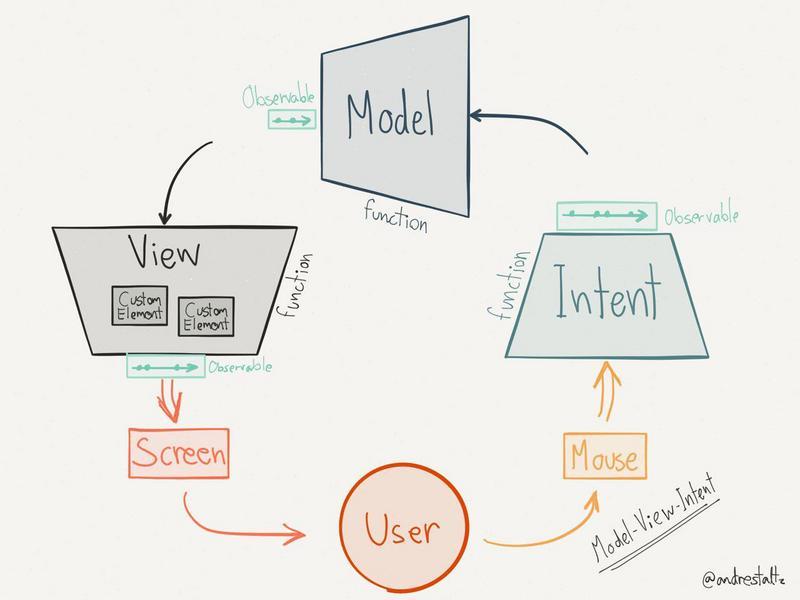
MVI是一個基於RxJS的響應式單向數據流架構。MVI也是Cycle.js的首選架構,主要由Observable事件流對象與處理函數組成。其主要的組成部分包括:
-
Intent:Observable提供的將用戶事件轉化為Action的函數
-
Model:Observable提供的將Action轉化為可觀測的State的函數
-
View:將狀態渲染為用戶界面的函數
-
Custom Element:類似於React Component那樣的界面組件

根據上述流程,我們可知MVI模式的特性為:
-
重度依賴於Observables:架構中的每個部分都會被轉化為Observable事件流
-
Intent:不同於Flux或者Redux,MVI中的Actions並沒有直接傳送給Dispatcher或者Store,而是交於正在監聽的Model
-
徹底的響應式,並且只要所有的組件都遵循MVI模式就能保證整體架構的fractal特性
Clean Architecture
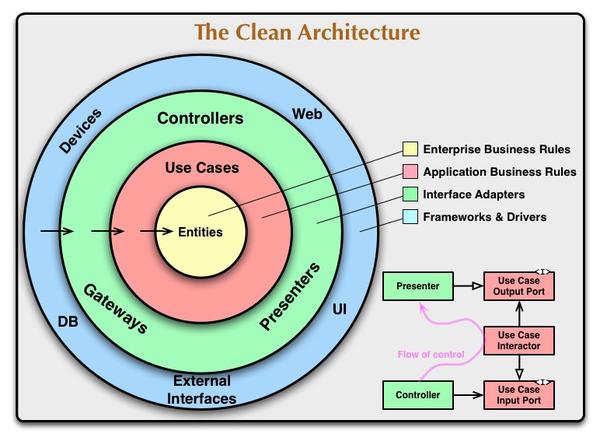
 Uncle Bob 提出 Clean Architecture 最早並不是專門面向於GUI應用程序,而是描述了一種用於構建可擴展、可測試軟件系統的概要原則。 Clean Architecture 可能運用於構建網站、Web 應用、桌面應用以及移動應用等不同領域場景的軟件開發中。其定義的基本原則保證了關註點分離以及整個軟件項目的模塊性與可組織性,也就是我們在上文提及的 GUI 應用程序架構中所需要考量的點。 Clean Architecture 中最基礎的理論當屬所謂的依賴原則(Dependency Rule),在依賴洋蔥圖中的任一內層模塊不應該了解或依賴於任何外層模塊。換言之,我們定義在外層模塊中的代碼不應該被內層模塊所引入,包括變量、函數、類等等任何的軟件實體。除此之外,Clean Architecture 還強制規定了所有鄰接圈層之間的交互與通信應當以抽象方式定義,譬如在 Android 中應該利用 Java 提供的 POJOs 以及 Interfaces,而 iOS 中應該使用 Protocols 或者標準類。這種強制定義也就保證了不同層之間的組件完全解耦合,並且能夠很方便地更改或者 Mock 測試,而不會影響到其他層的代碼。Clean Architecture 是非常理想化的架構定義模式,也僅是提出了一些基本的原則,其在 iOS 的具體實踐也就是所謂的 VIPER 架構。
Android 程序架構: MVC、MVP、MVVM、Unidirectional、Clean...
