【WinRT】【譯】【加工】在 XAML 中製作圓形圖片
原文地址:http://timheuer.com/blog/archive/2015/05/06/making-circular-images-in-xaml-easily.aspx
前陣子似乎一些比較酷的程式開始使用圓形頭像來取代之前方形或者圓角邊的顯示方式了。我(原文作者。下文中如果沒特別提到,均指原文作者)在兩年前注意到一些 App 開始這樣做的時候,做出了一個偏激的發言:
看看吧,程式裡會越來越多圓形的頭像了,方形的將不會再有了
——Tim Heuer(@timheuer) 2013 年 5 月 23 日
現在,這似乎變成一種流行的趨勢了,因為大家都是這麼做,我想使用 XAML 來開發的程式猿們都知道怎麼實現的吧。然而,我卻仍然看到有很多人在問這個問題,一些人嘗試去實現,卻變得更加複雜。因此,我想我應該發表一篇部落格來闡述這個問題。我曾經看到過愚蠢的人們將原來的圖片通過演算法來裁剪,然後儲存到硬碟,再顯示給他們的使用者看。這是完全沒必要的,其實我們很簡單就可以做到這種顯示效果。
<Ellipse Width="250" Height="250">
    <Ellipse.Fill>
        <ImageBrush ImageSource="ms-appx:///highfive.jpg" />
    </Ellipse.Fill>
</Ellipse>
你會看見,第三行我們使用一個 ImageBrush 來填充一個 Ellipse。使用一個 Ellipse 可以幫助我們得到一個精確的圓形裁剪,並且不會出現毛邊的狀況。上面這段程式碼會顯示成如下效果:
現在,儘管這是 ok 的。但是,在 Windows 8.1 中,使用 ImageBrush 將不會得到自動根據需要渲染大小來進行解碼的功能。
注意:自動根據需要渲染大小來解碼的這個功能是指即使一個圖片是比較大的,但只解碼需要渲染的大小。所以,如果你有一個 2000 畫素乘以 2000 畫素大小的圖片,但僅僅需要渲染成 100 畫素乘以 100 畫素大小的時候,我們將圖片解碼為 100 畫素乘以 100 畫素的話,就可以節省大量的記憶體了。
對於絕大部分的程式來說,可能已經存放好符合我們所需要的大小了。這是沒問題的。然而,對於社交程式或者其它你不知道圖片來源的程式,它們上傳到伺服器的時候是不會對圖片調整大小的。那麼,你將會想通過解碼到指定的大小來節省你的記憶體。這是很容易在 XAML 中做到的,僅僅需要複雜一點的語法。將上面那段 XAML 修改成這樣子:
<Ellipse Width="250" Height="250">
    <Ellipse.Fill>
        <ImageBrush>
            <ImageBrush.ImageSource>
                <BitmapImage DecodePixelHeight="250" DecodePixelWidth="250" UriSource="ms-appx:///highfive.jpg" />
            </ImageBrush.ImageSource>
        </ImageBrush>
    </Ellipse.Fill>
</Ellipse>
不需要很大的改動,在第 5 行使用 DecodePixelHeight 和 DecodePixelWidth 來告訴系統框架解碼的大小。渲染出來的效果跟上面是一樣的。當你需要顯示比原圖小的時候,這個技巧是十分有效的,而不是去使用其它奇淫技巧。
所以你們快點去幫助那些為了顯示圓形頭像而陷入發狂狀態的碼農們!希望能夠幫到他們。
譯者(h82258652)注:本文為意譯,儘可能將原文作者想告訴大家的東西翻譯過來給大家。如果有任何疑難,請查閱原文。謝謝!
下面進入譯者我的加工部分:
一般來說,我們還是比較習慣做成一個控制元件的,總不可能每次用到圓形影象的話,去寫上面這麼一大堆。下面我們就來動手幹!
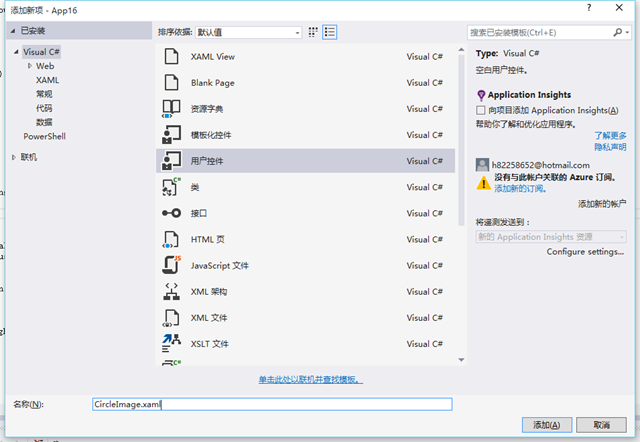
在 Visual Studio 中新建一個使用者控制元件(UserControl),我們命名為 CircleImage。
然後在後臺程式碼中定義一個依賴屬性 Source,表示圖片的源。由於 BitmapImage 的 UriSource 是 Uri 型別的,因此我們的 Source 屬性也是 Uri 型別。Source 變化時,我們設定到 XAML 中的 BitmapImage 的 UriSource 屬性上去。
public static readonly DependencyProperty SourceProperty = DependencyProperty.Register(nameof(Source), typeof(Uri), typeof(CircleImage), new PropertyMetadata(null, SourceChanged));

private static void SourceChanged(DependencyObject d, DependencyPropertyChangedEventArgs e)
{
    var obj = (CircleImage)d;
    var value = (Uri)e.NewValue;
    obj.bitmapImage.UriSource = value;
}

public Uri Source
{
    get
    {
        return (Uri)GetValue(SourceProperty);
    }
    set
    {
        SetValue(SourceProperty, value);
    }
}
然後開始編寫前臺 XAML:
<UserControl
    x:Class="MyApp.CircleImage"
    xmlns="http://schemas.microsoft.com/winfx/2006/xaml/presentation"
    xmlns:x="http://schemas.microsoft.com/winfx/2006/xaml"
    xmlns:local="using:MyApp"
    xmlns:d="http://schemas.microsoft.com/expression/blend/2008"
    xmlns:mc="http://schemas.openxmlformats.org/markup-compatibility/2006"
    mc:Ignorable="d"
    d:DesignHeight="300"
    d:DesignWidth="400">
    <Ellipse>
        <Ellipse.Fill>
            <ImageBrush>
                <ImageBrush.ImageSource>
                    <BitmapImage x:Name="bitmapImage"
                                 DecodePixelWidth="1"
                                 DecodePixelHeight="1" />
                </ImageBrush.ImageSource>
            </ImageBrush>
        </Ellipse.Fill>
    </Ellipse>
</UserControl>
將 BitmapImage 命名為 bitmapImage,給上面的後臺 cs 程式碼使用。
這裡可能你會奇怪,為什麼我將解碼的大小寫成了 1?這是因為,如果解碼大小寫成小於 1 的整數的話,就等於沒有自動根據渲染大小來解碼的功能了,那就跟一開始原文作者的效果一樣。所以這裡我先寫成 1,執行的時候再根據控制元件的大小來動態調整。
那麼既然要動態調整,那麼我們必須得完善後臺程式碼了,新增一些程式碼上去,修改成這樣:
public sealed partial class CircleImage : UserControl
{
    public static readonly DependencyProperty SourceProperty = DependencyProperty.Register(nameof(Source), typeof(Uri), typeof(CircleImage), new PropertyMetadata(null, SourceChanged));

    private static void SourceChanged(DependencyObject d, DependencyPropertyChangedEventArgs e)
    {
        var obj = (CircleImage)d;
        var value = (Uri)e.NewValue;
        obj.bitmapImage.UriSource = value;
    }

    public Uri Source
    {
        get
        {
            return (Uri)GetValue(SourceProperty);
        }
        set
        {
            SetValue(SourceProperty, value);
        }
    }

    public CircleImage()
    {
        this.InitializeComponent();
        this.SizeChanged += CircleImage_SizeChanged;// 監聽控制元件大小發生變化。
    }

    private void ReSize()
    {
        // 計算新的解碼大小,向上取整。
        int width = (int)Math.Ceiling(this.ActualWidth);
        int height = (int)Math.Ceiling(this.ActualHeight);

        // 確保解碼大小必須大於 0,因為上面的結果可能為 0。
        bitmapImage.DecodePixelWidth = Math.Max(width, 1);
        bitmapImage.DecodePixelHeight = Math.Max(height, 1);

        // 讓 BitmapImage 重新渲染。
        var temp = bitmapImage.UriSource;
        bitmapImage.UriSource = null;
        bitmapImage.UriSource = temp;
    }

    private void CircleImage_SizeChanged(object sender, SizeChangedEventArgs e)
    {
        ReSize();
    }
}
這樣我們就完成了這個控制元件了,接下來我們來測試下究竟這個東西威力有多大。
測試:
測試圖片使用我部落格的背景圖片,足夠大的了,1920*1080,相信應該會吃掉不少記憶體^-^。
圖片地址:http://images.cnblogs.com/cnblogs_com/h82258652/693238/o_wallpaper_summer2013_1920X1080.jpg
測試程式程式碼:
前臺 XAML 程式碼:
<Page
    x:Class="MyApp.MainPage"
    xmlns="http://schemas.microsoft.com/winfx/2006/xaml/presentation"
    xmlns:x="http://schemas.microsoft.com/winfx/2006/xaml"
    xmlns:local="using:MyApp"
    xmlns:d="http://schemas.microsoft.com/expression/blend/2008"
    xmlns:mc="http://schemas.openxmlformats.org/markup-compatibility/2006"
    mc:Ignorable="d">
    <Grid Background="{ThemeResource ApplicationPageBackgroundThemeBrush}">
        <Grid.RowDefinitions>
            <RowDefinition Height="Auto" />
            <RowDefinition />
            <RowDefinition />
        </Grid.RowDefinitions>
        <StackPanel Grid.Row="0" HorizontalAlignment="Center" Orientation="Horizontal">
            <Button Content="載入舊版" Click="BtnOld_Click" />
            <Button Content="載入新版" Click="BtnNew_Click" />
        </StackPanel>
        <GridView Grid.Row="1" x:Name="gvwBigMemory">
            <GridView.ItemTemplate>
                <DataTemplate>
                    <Ellipse Width="100" Height="100">
                        <Ellipse.Fill>
                            <ImageBrush ImageSource="http://images.cnblogs.com/cnblogs_com/h82258652/693238/o_wallpaper_summer2013_1920X1080.jpg" />
                        </Ellipse.Fill>
                    </Ellipse>
                </DataTemplate>
            </GridView.ItemTemplate>
        </GridView>
        <GridView Grid.Row="2" x:Name="gvwMinMemory">
            <GridView.ItemTemplate>
                <DataTemplate>
                    <local:CircleImage Width="100" Height="100" Source="http://images.cnblogs.com/cnblogs_com/h82258652/693238/o_wallpaper_summer2013_1920X1080.jpg" />
                </DataTemplate>
            </GridView.ItemTemplate>
        </GridView>
    </Grid>
</Page>
都放在 GridView 裡面,大小都設定為 100*100。
後臺程式碼:
public sealed partial class MainPage : Page
{
    public MainPage()
    {
        this.InitializeComponent();
    }

    private void BtnOld_Click(object sender, RoutedEventArgs e)
    {
        gvwBigMemory.ItemsSource = Enumerable.Range(1, 100);
    }

    private void BtnNew_Click(object sender, RoutedEventArgs e)
    {
        gvwMinMemory.ItemsSource = Enumerable.Range(1, 100);
    }
}
很簡單,就是讓 GridView 載入 100 個。
好,走起!
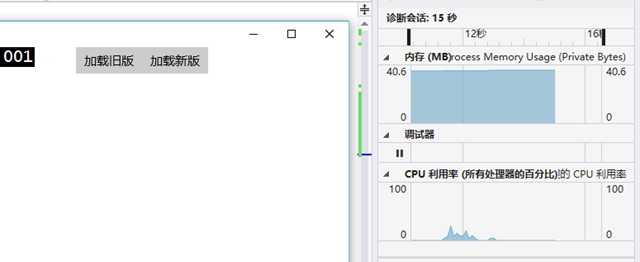
初始執行佔用 40.6 MB 記憶體,當然這個值可能下次執行就不一樣了,多少會有點波動。
接下來我們載入舊版:
令人吃驚,一瞬間就跑到 250.6 MB 記憶體了。
那我們再來看看新的版本,記得先將上面這個關掉,重新開啟,否則影響結果。
新版:
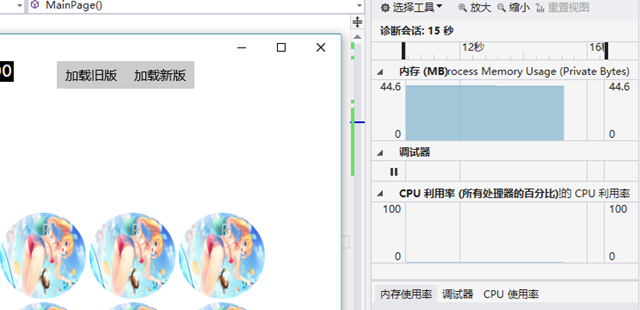
44.6 MB!基本沒發生任何的變化。可見威力很強大,說明我們的程式碼起作用了。
結語:
可以見到這點小小的優化能帶來多大的影響。另外由於 GridView 預設使用了虛擬化,所以實際上並沒有載入到 100 個,但是仍然可以見到舊版的記憶體佔用十分厲害, 所以根本沒法想象真真正正載入 100 個的時候有多壯觀。小小的細節可能會引起巨大的變化,考慮到還有眾多 512 MB 記憶體的 Windows Phone 使用者,這點小小的細節仍然很有必要去做的。


