
Android Dialog用法
摘要: 建立對話方塊 一個對話方塊一般是一個出現在當前Activity之上的一個小視窗. 處於下面的Activity失去焦點, 對話方塊接受所有的使用者互動. 對話方塊一般用於提示資訊和與當前應用程式直接相關的小功能.Android API 支援下列型別 ...
建立對話方塊
一個對話方塊一般是一個出現在當前Activity之上的一個小視窗. 處於下面的Activity失去焦點, 對話方塊接受所有的使用者互動. 對話方塊一般用於提示資訊和與當前應用程式直接相關的小功能.
Android API 支援下列型別的對話方塊物件:
警告對話方塊 AlertDialog: 一個可以有0到3個按鈕, 一個單選框或複選框的列表的對話方塊. 警告對話方塊可以建立大多數的互動介面, 是推薦的型別.
進度對話方塊 ProgressDialog: 顯示一個進度環或者一個進度條. 由於它是AlertDialog的擴充套件, 所以它也支援按鈕.
日期選擇對話方塊 DatePickerDialog: 讓使用者選擇一個日期.
時間選擇對話方塊 TimePickerDialog: 讓使用者選擇一個時間.
如果你希望自定義你的對話方塊, 可以擴充套件Dialog類.
Showing a Dialog 顯示對話方塊
一個對話方塊總是被建立和顯示為一個Activity的一部分. 你應該在Activity的onCreateDialog(int)中建立對話方塊. 當你使用這個回撥函式時,Android系統自動管理每個對話方塊的狀態並將它們和Activity連線, 將Activity變為對話方塊的"所有者". 這樣,每個對話方塊從Activity繼承一些屬性. 例如,當一個對話方塊開啟時, MENU鍵會顯示Activity的選單, 音量鍵會調整Activity當前使用的音訊流的音量.
注意: 如果你希望在onCreateDialog()方法之外建立對話方塊, 它將不會依附在Activity上. 你可以使用setOwnerActivity(Activity)來將它依附在Activity上.
當你希望顯示一個對話方塊時, 呼叫showDialog(int)並將對話方塊的id傳給它.
當一個對話方塊第一次被請求時,Android呼叫onCreateDialog(int). 這裡是你初始化對話方塊的地方. 這個回撥函式傳入的id和showDialog(int)相同. 建立對話方塊之後,將返回被建立的物件.
在對話方塊被顯示之前,Android還會呼叫onPrepareDialog(int, Dialog). 如果你希望每次顯示對話方塊時有動態更改的內容, 那麼就改寫這個函式. 該函式在每次一個對話方塊開啟時都呼叫. 如果你不定義該函式,則對話方塊每次開啟都是一樣的. 該函式也會傳入對話方塊的id以及你在onCreateDialog()中建立的Dialog物件.
最好的定義onCreateDialog(int) 和onPrepareDialog(int, Dialog) 的方法就是使用一個switch語句來檢查傳入的id. 每個case建立相應的對話方塊. 例如, 一個遊戲使用兩個對話方塊: 一個來指示遊戲暫停,另一個指示遊戲結束. 首先, 為它們定義ID:static final int DIALOG_PAUSED_ID = 0;
static final int DIALOG_GAMEOVER_ID = 1;
然後, 在onCreateDialog(int)中加入一個switch語句:
[java] view plaincopy
- protected Dialog onCreateDialog(int id) {
- Dialog dialog;
- switch(id) {
- case DIALOG_PAUSED_ID:
- // do the work to define the pause Dialog
- break;
- case DIALOG_GAMEOVER_ID:
- // do the work to define the game over Dialog
- break;
- default:
- dialog = null;
- }
- return dialog;
- }
注意: 在這個例子中, case語句為空因為定義Dialog的程式在後面會有介紹.
在需要顯示對話方塊是, 呼叫showDialog(int), 傳入對話方塊的id:
showDialog(DIALOG_PAUSED_ID);Dismissing a Dialog 解除對話方塊
當你準備關閉對話方塊時, 你可以使用dismiss()函式. 如果需要的話, 你也可以從Activity呼叫dismissDialog(int), 二者效果是一樣的.
如果你使用onCreateDialog(int)來管理你的對話方塊的狀態, 那麼每次你的對話方塊被解除時, 該對話方塊物件的狀態會被Activity儲存. 如果你決定你不再需要這個物件或者需要清除對話方塊的狀態, 那麼你應該呼叫 removeDialog(int). 這將把所有該物件的內部引用移除, 如果該對話方塊在顯示的話將被解除.
Using dismiss listeners 使用解除監聽器
如果你希望在對話方塊解除時執行某些程式, 那麼你應該給對話方塊附加一個解除監聽器.
首先定義DialogInterface.OnDismissListener介面. 這個介面只有一個方法, onDismiss(DialogInterface), 該方法將在對話方塊解除時被呼叫.
然後將你的OnDismissListener實現傳給setOnDismissListener().
然而,注意對話方塊也可以被"取消". 這是一個特殊的情形, 它意味著對話方塊被使用者顯式的取消掉. 這將在使用者按下"back"鍵時, 或者對話方塊顯式的呼叫cancel()(按下對話方塊的cancel按鈕)時發生. 當一個對話方塊被取消時, OnDismissListener將仍然被通知, 但如果你希望在對話方塊被顯示取消(而不是正常解除)時被通知, 則你應該使用setOnCancelListener()註冊一個DialogInterface.OnCancelListener.
Creating an AlertDialog 建立警告對話方塊
An AlertDialog is an extension of the Dialog class. It is capable of constructing most dialog user interfaces and is the suggested dialog type. You should use it for dialogs that use any of the following features:
一個警告對話方塊是對話方塊的一個擴充套件. 它能夠建立大多數對話方塊使用者介面並且是推薦的對話方塊類新星. 對於需要下列任何特性的對話方塊,你都應該使用它:
一個標題
一條文字訊息
1個-3個按鈕
一個可選擇的列表(單選框或者複選框)
要建立一個AlertDialog, 使用AlertDialog.Builder子類. 使用AlertDialog.Builder(Context)來得到一個Builder, 然後使用該類的公有方法來定義AlertDialog的屬性. 設定好以後, 使用create()方法來獲得AlertDialog物件.
下面的主題展示瞭如何為AlertDialog定義不同的屬性, 使用AlertDialog.Builder類. 如果你使用這些示例程式碼, 你可以在onCreateDialog()中返回最後的Dialog物件來獲得圖片中對話方塊的效果.
Adding buttons 增加按鈕
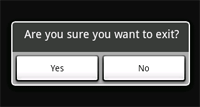
要建立一個如圖所示的視窗, 使用set...Button()方法:
[java] view plaincopy
- AlertDialog.Builder builder = new AlertDialog.Builder(this);
- builder.setMessage("Are you sure you want to exit?")
- .setCancelable(false)
- .setPositiveButton("Yes", new DialogInterface.OnClickListener() {
- public void onClick(DialogInterface dialog, int id) {
- MyActivity.this.finish();
- }
- })
- .setNegativeButton("No", new DialogInterface.OnClickListener() {
- public void onClick(DialogInterface dialog, int id) {
- dialog.cancel();
- }
- });
- AlertDialog alert = builder.create();
首先,使用setMessage(CharSequence)為對話方塊增加一條訊息。 然後, 開始連續呼叫方法, 使用setCancelable(boolean)將對話方塊設為不可取消(不能使用back鍵來取消)。對每一個按鈕,使用set...Button()方法,該方法接受按鈕名稱和一個DialogInterface.OnClickListener,該監聽器定義了當使用者選擇該按鈕時應做的動作。
注意:對每種按鈕型別,只能為AlertDialog建立一個。也就是說,一個AlertDialog不能有兩個以上的"positive"按鈕。這使得可能的按鈕數量最多為三個:肯定、否定、中性。這些名字和實際功能沒有聯絡,但是將幫助你記憶它們各做什麼事情。
Adding a list 增加列表
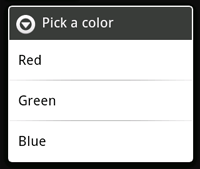
要建立一個具有可選項的AlertDialog,使用setItems()方法:
[java] view plaincopy
- final CharSequence[] items = {"Red", "Green", "Blue"};
- AlertDialog.Builder builder = new AlertDialog.Builder(this);
- builder.setTitle("Pick a color");
- builder.setItems(items, new DialogInterface.OnClickListener() {
- public void onClick(DialogInterface dialog, int item) {
- Toast.makeText(getApplicationContext(), items[item], Toast.LENGTH_SHORT).show();
- }
- });
- AlertDialog alert = builder.create();
首先增加一個標題。然後使用setItems()增加一個可選列表,該列表接受一個選項名稱的列表和一個DialogInterface.OnClickListener, 後者定義了選項對應的響應。
Adding checkboxes and radio buttons 增加單選框和複選框

要建立一個帶有多選列表或者單選列表的對話方塊, 使用setMultiChoiceItems()和setSingleChoiceItems()方法。如果你在onCreateDialog()中建立可選擇列表, Android會自動管理列表的狀態. 只要activity仍然活躍, 那麼對話方塊就會記住剛才選中的選項,但當用戶退出activity時,該選擇丟失。
注意: 要在你的acitivity離開和暫停時儲存選擇, 你必須在activity的宣告週期中正確的儲存和恢復設定。為了永久性儲存選擇,你必須使用資料儲存技術中的一種。
要建立一個具有單選列表的AlertDialog,只需將一個例子中的setItems()換成 setSingleChoiceItems():
[java] view plaincopy
- final CharSequence[] items = {"Red", "Green", "Blue"};
- AlertDialog.Builder builder = new AlertDialog.Builder(this);
- builder.setTitle("Pick a color");
- builder.setSingleChoiceItems(items, -1, new DialogInterface.OnClickListener() {
- public void onClick(DialogInterface dialog, int item) {
- Toast.makeText(getApplicationContext(), items[item], Toast.LENGTH_SHORT).show();
- }
- });
- AlertDialog alert = builder.create();
第二個引數是預設被選中的選項位置,使用“-1”來表示預設情況下不選中任何選項。
Creating a ProgressDialog 建立進度對話方塊
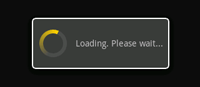
一個ProgressDialog(進度對話方塊)是AlertDialog的擴充套件。它可以顯示一個進度的動畫——進度環或者進度條。這個對話方塊也可以提供按鈕,例如取消一個下載等。
開啟一個進度對話方塊很簡單,只需要呼叫 ProgressDialog.show()即可。例如,上圖的對話方塊可以不通過onCreateDialog(int),而直接顯示:
ProgressDialog dialog = ProgressDialog.show(MyActivity.this, "",
"Loading. Please wait...", true);
第一個引數是應用程式上下文。第二個為對話方塊的標題(這裡為空),第三個為對話方塊內容, 最後一個為該進度是否為不可確定的(這隻跟進度條的建立有關,見下一節)。
進度對話方塊的預設樣式為一個旋轉的環。如果你希望顯示進度值,請看下一節。
Showing a progress bar 顯示進度條
使用一個動畫進度條來顯示進度:
使用 ProgressDialog(Context)建構函式來初始化一個ProgressDialog物件。
將進度樣式設定為"STYLE_HORIZONTAL",使用setProgressStyle(int)方法。並且設定其它屬性,例如內容等。
在需要顯示時呼叫show()或者從onCreateDialog(int)回撥函式中返回該ProgressDialog。
你可以使用 setProgress(int)或者incrementProgressBy(int)來增加顯示的進度。
例如,你的設定可能像這樣:ProgressDialog progressDialog;
progressDialog = new ProgressDialog(mContext);
progressDialog.setProgressStyle(ProgressDialog.STYLE_HORIZONTAL);
progressDialog.setMessage("Loading...");
progressDialog.setCancelable(false);
設定很簡單。大部分建立進度對話方塊需要的程式碼是在更新它的程序中。你可能需要在一個新的執行緒中更新它,並使用Handler來將進度報告給Activity。如果你不熟悉使用Handler和另外的執行緒,請看下列例子,該例子使用了一個新的執行緒來更新進度。
Example ProgressDialog with a second thread 例--使用一個執行緒來顯示進度對話方塊
這個例子使用一個執行緒來跟蹤一個程序的進度(其實為從1數到100)。每當進度更新時,該執行緒通過Handler給主activity傳送一個訊息。主Activity更新ProgressDialog.package com.example.progressdialog;
[java] view plaincopy
- import android.app.Activity;
- import android.app.Dialog;
- import android.app.ProgressDialog;
- import android.os.Bundle;
- import android.os.Handler;
- import android.os.Message;
- import android.view.View;
- import android.view.View.OnClickListener;
- import android.widget.Button;
- public class NotificationTest extends Activity {
- static final int PROGRESS_DIALOG = 0;
- Button button;
- ProgressThread progressThread;
- ProgressDialog progressDialog;
- /** Called when the activity is first created. */
- public void onCreate(Bundle savedInstanceState) {
- super.onCreate(savedInstanceState);
- setContentView(R.layout.main);
- // Setup the button that starts the progress dialog
- button = (Button) findViewById(R.id.progressDialog);
- button.setOnClickListener(new OnClickListener(){
- public void onClick(View v) {
- showDialog(PROGRESS_DIALOG);
- }
- });
- }
- protected Dialog onCreateDialog(int id) {
- switch(id) {
- case PROGRESS_DIALOG:
- progressDialog = new ProgressDialog(NotificationTest.this);
- progressDialog.setProgressStyle(ProgressDialog.STYLE_HORIZONTAL);
- progressDialog.setMessage("Loading...");
- progressThread = new ProgressThread(handler);
- progressThread.start();
- return progressDialog;
- default:
- return null;
- }
- }
- // Define the Handler that receives messages from the thread and update the progress
- final Handler handler = new Handler() {
- public void handleMessage(Message msg) {
- int total = msg.getData().getInt("total");
- progressDialog.setProgress(total);
- if (total >= 100){
- dismissDialog(PROGRESS_DIALOG);
- progressThread.setState(ProgressThread.STATE_DONE);
- }
- }
- };
- /** Nested class that performs progress calculations (counting) */
- private class ProgressThread extends Thread {
- Handler mHandler;
- final static int STATE_DONE = 0;
- final static int STATE_RUNNING = 1;
- int mState;
- int total;
- ProgressThread(Handler h) {
- mHandler = h;
- }
- public void run() {
- mState = STATE_RUNNING;
- total = 0;
- while (mState == STATE_RUNNING) {
- try {
- Thread.sleep(100);
- } catch (InterruptedException e) {
- Log.e("ERROR", "Thread Interrupted");
- }
- Message msg = mHandler.obtainMessage();
- Bundle b = new Bundle();
- b.putInt("total", total);
- msg.setData(b);
- mHandler.sendMessage(msg);
- total++;
- }
- }
- /* sets the current state for the thread,
- * used to stop the thread */
- public void setState(int state) {
- mState = state;
- }
- }
- }
Creating a Custom Dialog 建立自定義對話方塊
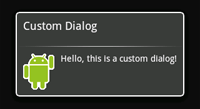
如果你想自定義一個對話方塊,你可以使用佈局元素來創造你的對話方塊的佈局。定義好佈局後,將根View物件或者佈局資源ID傳給setContentView(View).
例如,建立如圖所示的對話方塊:
建立一個xml佈局custom_dialog.xml:
[xhtml] view plaincopy
- http://schemas.android.com/apk/res/android"
- android:id="@+id/layout_root"
- android:orientation="horizontal"
- android:layout_width="fill_parent"
- android:layout_height="fill_parent"
- android:padding="10dp"
- >
- android:layout_width="wrap_content"
- android:layout_height="fill_parent"
- android:layout_marginRight="10dp"
- />
- android:layout_width="wrap_content"
- android:layout_height="fill_parent"
- android:textColor="#FFF"
- />
該xml定義了一個LinearLayout中的一個ImageView 和一個TextView。
將以上佈局設為對話方塊的content view,並且定義ImageView 和 TextView的內容:
[java] view plaincopy
- Context mContext = getApplicationContext();
- Dialog dialog = new Dialog(mContext);
- dialog.setContentView(R.layout.custom_dialog);
- dialog.setTitle("Custom Dialog");
- TextView text = (TextView) dialog.findViewById(R.id.text);
- text.setText("Hello, this is a custom dialog!");
- ImageView image = (ImageView) dialog.findViewById(R.id.image);
- image.setImageResource(R.drawable.android);
在初始化Dialog之後,使用setContentView(int),將佈局資源id傳給它。現在Dialog有一個定義好的佈局,你可以使用findViewById(int)來找到該元素的id並修改它的內容。
使用前面所講的方法顯示對話方塊。
一個使用Dialog類建立的對話方塊必須有一個標題。如果你不呼叫setTitle(),那麼標題區域會保留空白。如果你不希望有一個標題,那麼你應該使用AlertDialog類來建立自定義對話方塊。然而,由於一個AlertDialog使用AlertDialog.Builder類來建立最方便,所以你沒有方法使用setContentView(int),而是隻能使用setView(View)。該方法接受一個View物件,所以你需要從xml中展開你的根View。
要展開一個xml佈局,使用 getLayoutInflater() (或 getSystemService())取得LayoutInflater,然後呼叫inflate(int, ViewGroup),第一個引數為佈局id,而第二個引數為根view的id。現在,你可以使用展開後的佈局來找到View物件並定義ImageView和TextView元素的內容。然後例項化AlertDialog.Builder並使用setView(View)來為對話方塊設定展開後的佈局。例如:
[java] view plaincopy
- AlertDialog.Builder builder;
- AlertDialog alertDialog;
- Context mContext = getApplicationContext();
- LayoutInflater inflater = (LayoutInflater) mContext.getSystemService(LAYOUT_INFLATER_SERVICE);
- View layout = inflater.inflate(R.layout.custom_dialog,
- (ViewGroup) findViewById(R.id.layout_root));
- TextView text = (TextView) layout.findViewById(R.id.text);
- text.setText("Hello, this is a custom dialog!");
- ImageView image = (ImageView) layout.findViewById(R.id.image);
- image.setImageResource(R.drawable.android);
- builder = new AlertDialog.Builder(mContext);
- builder.setView(layout);
- alertDialog = builder.create();
使用AlertDialog來自定義對話方塊,可以利用其內建特性例如按鈕、選擇列表、標題、圖示等。