
TensorFlow訓練的模型引數(W和B)利用np.savez()儲存和用cnpy庫C++讀取
一、背景
大家經常會在Python環境下用TensorFlow訓練自己的深度學習模型。為了日後能夠使用訓練好的模型,在Python環境下,TensorFlow提供了
tf.train.Saver但實際情況是:大多數人會用Python環境下TensorFlow訓練模型,而在實際的預測任務時,希望用C/C++語言來實現模型並載入已經訓練好的引數進行預測。雖然TensorFlow也提供了C++介面,但有幾個現實問題困擾著我們:
1、直接用tf.train.Saver類儲存的模型資料量很大,AlexNet幾十個卷積核時的模型約為兩三百兆,還是很大的!
2、C++編譯TensorFlow很麻煩
3、沒經過精簡的TensorFlow比較龐大,在移動端幾乎執行不起來!
號外:最近Google針對移動端深度學習框架釋出了TensorFlow Lite,據說連訓練模型都能在手機上跑了!這豈不是可以邊學習邊預測了!要這樣的話手機就真的智慧了!
----分割線----
另外:opencv3.3也已經實現了直接載入TensorFlow模型的DNN模組!具體可閱讀:
https://github.com/opencv/opencv/tree/master/modules/dnn二、Python環境下用numpy.savez()函式存模型的權值矩陣W和偏置B
其實訓練模型,最主要的就是訓練權值W和偏置B。只有把這些資料存下來,就意味著把模型存下來了!然後你可以用任意語言重寫模型,載入這些訓練好的W和B就行了!下邊舉例介紹在Python環境下用numpy提供的savez()函式儲存W和B。
直接貼程式碼:
上邊程式碼中,實現了一個卷積層,每個卷積核大小3*3。由於定義的輸入資料(影象)有兩個通道,針對每個通道的卷積核有4個。所以卷積核的數量為2*4 = 8個。其中的W和B都用隨機值填充(就當時訓練好的資料哈)!# -*- coding=UTF-8 -*- import sys import os import random import cv2 import math import numpy as np import tensorflow as tf def weight_variable(shape): initial = tf.truncated_normal(shape, mean = 0.0, stddev = 0.1, dtype = tf.float32) return tf.Variable(initial) def bias_varibale(shape): initial = tf.constant(0.123, shape = shape) return tf.Variable(initial) def conv2d(x, w): # x shape is [batch, image_hei, image_wid, image_channel] # w shape is [kernel_hei, kernel_hei, image_channel, kernel_number] return tf.nn.conv2d(x, w, strides=[1,1,1,1], padding='SAME') # input data format inShape = (5, 5, 2) # (rows, cols, channels) # for simpllicity, here we use one sample as input, # this means the batch = 1 aSample = weight_variable([1, inShape[0], inShape[1], inShape[2]]) # define CNN model -----------------------------# # Layer 0 : convolutional layer L0_KerSize = 3 L0_KerNum = 4 L0_W = weight_variable ([L0_KerSize, L0_KerSize, inShape[2], L0_KerNum]) L0_B = bias_varibale ([L0_KerNum]) L0_Out = tf.nn.relu(conv2d(aSample, L0_W) + L0_B) with tf.Session() as session: session.run(tf.initialize_all_variables()) W = session.run(L0_W) print '---- L0_W.shape = ', W.shape, '----' print '>> The 1st kernel for the 1st channel of input data: ' print W[:, :, 0, 0] print '>> The 2cd kernel for the 1st channel of input data: ' print W[:, :, 0, 1] rs = session.run(L0_Out) B = session.run(L0_B) print '---- L0_B.shape = ', B.shape, '----' print B print '---- L0_Out.shape = ', rs.shape, '----' print rs[0,:,:,0] print rs[0,:,:,1] print rs[0,:,:,2] print rs[0,:,:,3] # save model np.savez('./model.npz', \ L0_W = session.run(L0_W), \ L0_B = session.run(L0_B)) # save the sample np.savez('./sample.npz', session.run(aSample))
執行上邊的程式碼,結果中有:

可以看到W的shape為[3,3,2,4],B的shape為[4];同時列出了針對第一個通道的前兩個卷積核的值,和B的值!
注意:B是針對輸出資料的,由於輸出資料為4通道,所以B就4個值。雖然有8個卷積核,但B和輸入通道數量無關!
在程式碼的最下邊的幾行,用numpy.savez()函式儲存了W和B,檔名為:model.npz。
三、在C++環境下用cnpy庫載入W和B
關於cnpy庫呢,是國外一小哥寫的,比較簡單!有原始碼:
https://github.com/rogersce/cnpy.git cnpy的安裝:
0. Git上clone原始碼
1. 沒安裝camke的童鞋,請自行安裝camke哈
2. cd到原始碼目錄下,終端輸入命令mkdir build建立一個build資料夾:create a build directory, say $HOME/build
3. cd $HOME/build
4. cmake /path/to/cnpy
5. make
6. make install
7. ldconfig設定環境
好,接下來貼出C++原始碼:
#include <iostream>
#include <stdio.h>
#include <unistd.h>
#include <stdlib.h>
#include <string.h>
#include <string>
#include <dirent.h>
#include <unistd.h>
#include <vector>
#include <sstream>
#include <fstream>
#include <sys/io.h>
#include <sys/times.h>
#include <iomanip>
#include <tuple>
using namespace std;

/************************************************
* About cnpy, Please consult: https://github.com/rogersce/cnpy.git
*
* npz_load(fname,varname) will load and return the NpyArray for
* data varname from the specified .npz file.
*
The data structure for loaded data is below.
Data is accessed via the data<T>() method, which returns
a pointer of the specified type (which must match the underlying
datatype of the data). The array shape and
word size are read from the npy header.

	struct NpyArray {
		std::vector<size_t> shape;
		size_t word_size;
		template<typename T> T* data();
	};
*/
#include "cnpy.h"
#include <complex>
#include <cstdlib>

static bool LoadModelFromFile(string strFile)
{
	if (access(strFile.c_str(), 0) == -1) {
		cout << ">> error. File not exists. Info = " << strFile.c_str() << endl;
		return false;
	}
	cnpy::npz_t npzData = cnpy::npz_load(strFile);

	// W ---------------------------------------//
	if (1) {
		cnpy::NpyArray arr = npzData["L0_W"];
		cout << ">> L0_W shape (";
		for (int i = 0; i < (int)arr.shape.size(); i++)
			cout << arr.shape[i] << ", " ;
		cout << ")" << endl;

		// Please attention: if dtype = tf.float32 in tensorflow, here the data type
		// must be float, if you use double, the data will be wrong.
		float *mv1 = arr.data<float>();
		int nOffset0 = arr.shape[1]*arr.shape[2]*arr.shape[3];
		int nOffset1 = arr.shape[2]*arr.shape[3];
		int nOffset2 = arr.shape[3];
		cout << mv1[0] << endl;

		cout << ">> The 1st kernel for the 1st channel of input data:" << endl;
		for (int r = 0; r < arr.shape[0]; r++) {
			for (int c = 0; c < arr.shape[1]; c++) {
				for (int chan = 0; chan < arr.shape[2]; chan++) {
					if (chan != 0)
						continue;
					for (int k = 0; k < arr.shape[3]; k++) {
						if (k != 0)
							continue;
						cout << setw(12) << setiosflags(ios::fixed) << setprecision(5)
							 << mv1[r*nOffset0 + c*nOffset1 + chan*nOffset2 + k];
						if (c == arr.shape[1] - 1)
							cout << endl;
					}
				}
			}
		}
	}

	// B ---------------------------------------//
	if (1) {
		cnpy::NpyArray arr = npzData["L0_B"];
		cout << ">> L0_B shape (";
		for (int i = 0; i < (int)arr.shape.size(); i++)
			cout << arr.shape[i] << ", " ;
		cout << ")" << endl;

		float *mv1 = arr.data<float>();
		for (int i = 0; i < arr.shape[0]; i++) {
			cout << setw(12) << setiosflags(ios::fixed) << setprecision(5) << mv1[i];
		}
		cout << endl;
	}

	return true;
}

int main(int argc, char** argv)
{
	cout << "# STA ##############################" << endl;
    cout << "\n" << endl;

    LoadModelFromFile("./model.npz");

    cout << "\n" << endl;
    cout << "# END ##############################" << endl;
    return 0;
}
針對第一個通道的第一個卷積核:
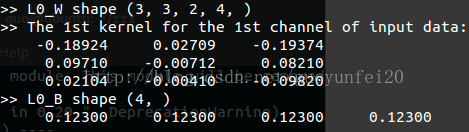
針對第一個通道的第二個卷積核:

可以看出資料是一致的!需要注意的是:如果TensorFlow中的資料型別為tf.float32,則cnpy中要用float,不能用double,否則資料就亂了!!!
忘了貼makefile了:
CPP=g++

CPPFLAGS+=-fpermissive -Wsign-compare  -Ofast -std=c++11

INCLUDE+=-I/usr/local/include/
MKDEP=gcc -E -MM
LIBINC=-L/usr/local/lib

SRCS =

DESS = 1.cpp

OBJS=$(SRCS:%.cpp=%.o)

EXES=$(DESS:%.cpp=%.exec)

LIBS= -lcnpy -lz

all: $(OBJS) $(EXES)

.cpp.o:
	$(CPP) $(CPPFLAGS) $(INCLUDE) -c $< -o [email protected]

%.exec:	%.cpp $(OBJS) .depend
	$(CPP) $(CPPFLAGS) $(INCLUDE) $< -o [email protected] $(LIBINC) $(OBJS) $(LIBS)


.depend: makefile
	$(MKDEP) $(INCLUDE) $(SRCS) $(DESS) --std=c++11 > .depend

ifeq (.depend,$(wildcard .depend))
include .depend
endif

clean:
	$(RM) $(OBJS) .depend
$(RM) $(EXES) .depend以上檔案可git下載:[email protected]:guoyunfei20/writewandb_loadincpp.git
四、什麼!如何用C++實現TensorFlow訓練的模型用於預測(前向傳播)?
當然是依靠Eigen了,後續貼程式碼哈!