Android炫酷的Toolbar+Bottom+Fab懸浮按鈕顯示、隱藏、漸變的各種實現姿勢
前言
由於手機螢幕大小的限制,各種控制元件需要根據需求進行顯示,隱藏,移動等,以增加視覺效果,使用者體驗。就拿目前市場上常見的APP如知乎、QQ、淘寶、美團等來說,在他們的APP裡面隨處可見一些比較優美的處理方案。本文主要將一些常見的需要對控制元件進行顯示、隱藏、漸變的場景進行整理了一番。如:點選螢幕Toolbar,bottom的顯示隱藏;滑動Scrollview/Webview/Recyclerview顯示隱藏,透明度漸變;Fab懸浮按鈕滑動縮放顯示隱藏(是通過自定義Behavior實現)文章原創,轉載請註明地址:小嵩的CSDN部落格,地址:http://blog.csdn.net/qq_22393017
由於實現方案比較多,加上篇幅問題。這篇文章重點寫了知乎效果的程式碼,淘寶/QQ空間標題漸變效果的另外寫了一篇,地址:精仿淘寶標題欄透明度漸變效果。仿美團的效果demo還在完善,持續更新中,歡迎討論交流~
效果預覽
1.知乎的標題欄和底部欄顯示隱藏:
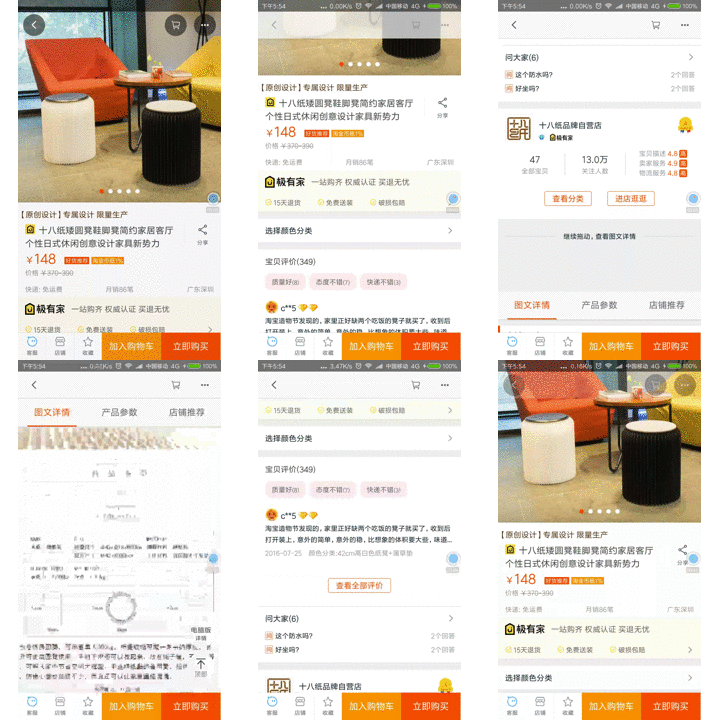
2.淘寶、QQ空間標題欄漸變:
3.美團網,大眾點評頂部懸浮:
效果演示完了,那麼接下來開始分析,討論實現思路。
思路
第1種-知乎首頁的效果
實現方案比較多,這裡就講主要的三種思路:
一、通過監聽Srcollview/Recyclerview等控制元件的滑動,獲取Y軸的移動距離,然後判斷是上滑還是下滑,對Header 和Footer進行設定顯隱動畫。
二、同樣是通過監聽控制元件的滑動事件,獲取Y軸的移動距離,但在監聽回撥方法中,則是通過View.setTranslationY()方法動態設定Header和Footer的移動距離,並且新增一個Header和Footer移動距離的閥值,最大移動距離為不可見為止。
三、通過Behavior 進行巢狀滑動來設定Header 和Footer的顯示與隱藏,可用系統預設的,也可自定義,自定義的Behavior文章末尾有demo程式碼,可自行下載參考。關於Behavior,不瞭解的話可以搜一下相關方面的知識補習一下推薦連結:
授人予魚不如授人以漁,思路理解了之後其實程式碼也很簡單,前面兩種方案無非就是通過監聽螢幕或者控制元件滑動事件來對View進行處理,而Behavior也是因為基於開發中經常需要處理各種控制元件的協調,Google才推出了這個協調佈局的方案。
第2種-淘寶/QQ空間的效果
即頭部漸變的實現方案,其實原理是一樣的。兩者區別只是一個是平移,一個是透明度變化。平移是通過View.setTranslationY()或者設定平移動畫的方法。漸變則是通過 View.setAlpha(alpha)或者設定alpha動畫的方法。setAlpha(alpha)這個透明度的alpha值,可以是(頭部已滑動距離)/(頭部總高度)的百分比,也可以自己根據業務需求改成其他的,百分比計算的參考程式碼如下:
 float percent = (float)Math.abs(distance)/(float)Math.abs(mMinHeaderTranslation);
    //如果是設定背景透明度,則傳入的引數是int型別,取值範圍0-255
    //如果設定控制元件透明度,傳入的引數是float型別,取值範圍0.0-1.0
    //alpha 值越小越透明
    float falpha = 1-percent;
    int alpha = (int)(falpha * 255);
第3種-美團/大眾點評的效果,有兩種實現思路:
第一種是:通過兩套佈局,一套固定在頭部,一套巢狀在Scrollview裡面,當滑動到需要懸浮的地方時,通過addview 的方式將需要懸浮的控制元件新增到固定在頭部的容器裡面。具體實現程式碼可參考這篇部落格http://blog.csdn.net/xiaanming/article/details/17761431
這裡我就把思路說一下,看圖:
第二種是:Headview+Scrollview 的佈局,監聽Scrollview的滑動,然後用介面回撥,在Activity中對Headview設定View.setTranslationY(dy)方法,當滑動到需要懸浮的地方時,即達到閥值時,不再對Headview進行平移。
上滑的時候:
下滑時:
┈┈┈┈┈┈┈┈┈◆┈┈┈┈┈┈┈┈┈◆┈┈┈┈┈┈┈┈┈◆┈┈┈┈┈┈┈┈分隔線◆┈┈┈┈┈┈┈┈┈◆┈┈┈┈┈┈┈┈┈◆┈┈┈┈┈┈┈┈┈◆┈┈┈┈┈┈┈┈┈◆┈┈┈┈┈┈┈┈
思路講解完了,沒程式碼說個egg,so…我整合了一下,寫了個demo,是關於知乎首頁標題欄,底部,Fab顯示隱藏的,提供了:螢幕點選、webview、scrollview、recyclerview、MD 包自帶behavior,自定義behavior的實現方案,可自行下載檢視。
程式碼部分解讀
文章就通過ScrollView的程式碼,演示一下知乎首頁的大致實現步驟,後面兩種效果可根據思路實現,操作起來也不難(文章底部有demo下載連結):
Step one
自定義ScrollView,在 onScrollChanged 中新增介面的onScroll方法對其監聽:
package com.hideorshowdemo.widget;

import android.content.Context;
import android.util.AttributeSet;
import android.widget.ScrollView;

/**
 * TODO<自定義監聽滑動的ScrollView>
 *
 * @author: 小嵩
 * @date: 2017/1/9 11:37
 */

public class ObservableScrollView extends ScrollView {

    private ScrollViewListener scrollViewListener = null;

    public ObservableScrollView(Context context) {
        super(context);
    }

    public ObservableScrollView(Context context, AttributeSet attrs,
                                int defStyle) {
        super(context, attrs, defStyle);
    }

    public ObservableScrollView(Context context, AttributeSet attrs) {
        super(context, attrs);
    }

    public void setOnScrollListener(ScrollViewListener scrollViewListener) {
        this.scrollViewListener = scrollViewListener;
    }

    @Override
    protected void onScrollChanged(int x, int y, int oldx, int oldy) {
        super.onScrollChanged(x, y, oldx, oldy);
        if (scrollViewListener != null) {

            if (oldy < y && ((y - oldy) > 15)) {// 滑動距離超過15畫素,翻向底部,控制元件向上滑動
                scrollViewListener.onScroll(y - oldy);

            } else if (oldy > y && (oldy - y) > 15) {// 滑動距離超過15畫素,向下滑動,翻向頂部
                scrollViewListener.onScroll(y - oldy);
            }

        }
    }

    public  interface ScrollViewListener{//dy Y軸滑動距離
         void onScroll(int dy);
    }
}
Step two
XML佈局中引用自定義的ScrollView :
<RelativeLayout xmlns:android="http://schemas.android.com/apk/res/android"
    android:layout_width="match_parent"
    android:layout_height="match_parent"
    android:orientation="vertical">


    <LinearLayout
        android:id="@+id/content"
        android:layout_width="match_parent"
        android:layout_height="match_parent"
        android:orientation="vertical">


   <com.hideorshowdemo.widget.ObservableScrollView
       android:id="@+id/scrollView"
       android:layout_width="match_parent"
       android:layout_height="match_parent">

    <LinearLayout
        android:layout_width="match_parent"
        android:layout_height="wrap_content"
        android:orientation="vertical">

       <include layout="@layout/empty_layout"/>

        <TextView
            android:layout_width="match_parent"
            android:layout_height="match_parent"
            android:padding="10dp"
            android:textSize="20dp"
            android:lineSpacingExtra="10dp"
            android:text="@string/TextContent"
            android:gravity="center"/>
    </LinearLayout>
   </com.hideorshowdemo.widget.ObservableScrollView>
</LinearLayout>

    <include layout="@layout/layout_toolbar"/>

    <LinearLayout
        android:id="@+id/lv_bottom"
        android:layout_width="match_parent"
        android:layout_height="wrap_content"
        android:orientation="vertical"
        android:layout_alignParentBottom="true">

        <include layout="@layout/layout_bottom"/>

    </LinearLayout>

</RelativeLayout>
Step three:
在Activity中初始化ScrollView,並實現介面回撥方法:
package com.hideorshowdemo.activity;

import android.os.Bundle;
import android.support.v7.app.AppCompatActivity;
import android.support.v7.widget.Toolbar;
import android.view.View;
import android.widget.ImageView;
import android.widget.LinearLayout;

import com.hideorshowdemo.R;
import com.hideorshowdemo.utils.HideAnimationUtils;
import com.hideorshowdemo.widget.ObservableScrollView;

import butterknife.Bind;
import butterknife.ButterKnife;
import butterknife.OnClick;

/**
 * TODO<ScrollView示例>
 *
 * @author: 小嵩
 * @date: 2017/1/9 11:24
 * @version: V1.0
 */

public class ScrollViewActivity extends AppCompatActivity {

    @Bind(R.id.iv_back)
    ImageView ivBack;
    @Bind(R.id.toolbar)
    Toolbar toolbar;
    @Bind(R.id.scrollView)
    ObservableScrollView scrollView;
    @Bind(R.id.lv_bottom)
    LinearLayout lvBottom;

    private boolean isShowing = true;

    @Override
    protected void onCreate(Bundle savedInstanceState) {
        super.onCreate(savedInstanceState);
        setContentView(R.layout.activity_scrollview);
        ButterKnife.bind(this);
        initView();
    }

    private void initView() {
        scrollView.setOnScrollListener(new ObservableScrollView.ScrollViewListener() {//滑動事件回撥監聽(一次滑動的過程會觸發多次,通過isShowing來防止對頭部和底部多次設定顯示與隱藏)
            @Override
            public void onScroll(int dy) {
                if (dy > 0 && isShowing) {//手指往上滑,並且標題欄已經顯示,則隱藏底部欄
                    isShowing = false;
                    new HideAnimationUtils(false, toolbar,lvBottom);
                } else if (dy <= 0 && !isShowing) {//往下滑,已隱藏,則顯示
                    isShowing = true;
                    new HideAnimationUtils(true, toolbar,lvBottom);
                }
            }
        });
    }

    @OnClick(R.id.iv_back)
    public void OnClick(View v) {
        switch (v.getId()) {
            case R.id.iv_back:
                finish();
                break;
        }
    }


    @Override
    protected void onDestroy() {
        ButterKnife.unbind(this);
        super.onDestroy();
    }
}
其中HideAnimationUtils是我封裝的動畫工具類,由於動畫效果是統一的,在各個Activity中呼叫,能減少程式碼冗餘,可自行根據需求更改或捨棄。
package com.hideorshowdemo.utils;

import android.view.View;
import android.view.animation.TranslateAnimation;


/**
 * TODO<標題欄動畫顯示隱藏的工具類>
 *
 * @author: 小嵩
 * @date: 2017/1/9 11:16
 * @version: V1.0
 */

public class HideAnimationUtils {

    private Boolean Show;
    private View view_title;
    private View view_bottom;

    public HideAnimationUtils(Boolean show, View title, View bottom) {
        this.Show = show;
        this.view_title = title;
        this.view_bottom = bottom;
        ShowOrHideTitle();
        ShowOrHideBottom();
    }

    private void ShowOrHideTitle(){//標題欄
        int fromY;//0表示控制元件Y軸起點
        int toY;//正值表示下移,負值上移
        if (Show) {//顯示
            fromY = -view_title.getHeight();
            toY = 0;
        } else {//隱藏
            fromY = 0;
            toY = -view_title.getHeight();
        }
        final TranslateAnimation animation;//平移動畫
        animation = new TranslateAnimation(0, 0, fromY, toY);
        animation.setDuration(400);//設定動畫持續毫秒
        animation.setFillAfter(true);//動畫執行完後是否停留在執行完的狀態
        view_title.startAnimation(animation);
    }

    private void ShowOrHideBottom(){//底部欄
        int fromY;//0表示控制元件Y軸起點
        int toY;//正值表示下移,負值上移
        if (Show) {//顯示
            fromY = view_bottom.getHeight();
            toY = 0;
        } else {//隱藏
            fromY = 0;
            toY = view_bottom.getHeight();
        }
        final TranslateAnimation animation;//平移動畫
        animation = new TranslateAnimation(0, 0, fromY, toY);
        animation.setDuration(400);//設定動畫持續毫秒
        animation.setFillAfter(true);//動畫執行完後是否停留在執行完的狀態
        view_bottom.startAnimation(animation);
    }
}
大功告成,效果如下:
點選螢幕顯示隱藏效果:
自定義Behavior,實現滑動時fab懸浮按鈕縮放的效果:


