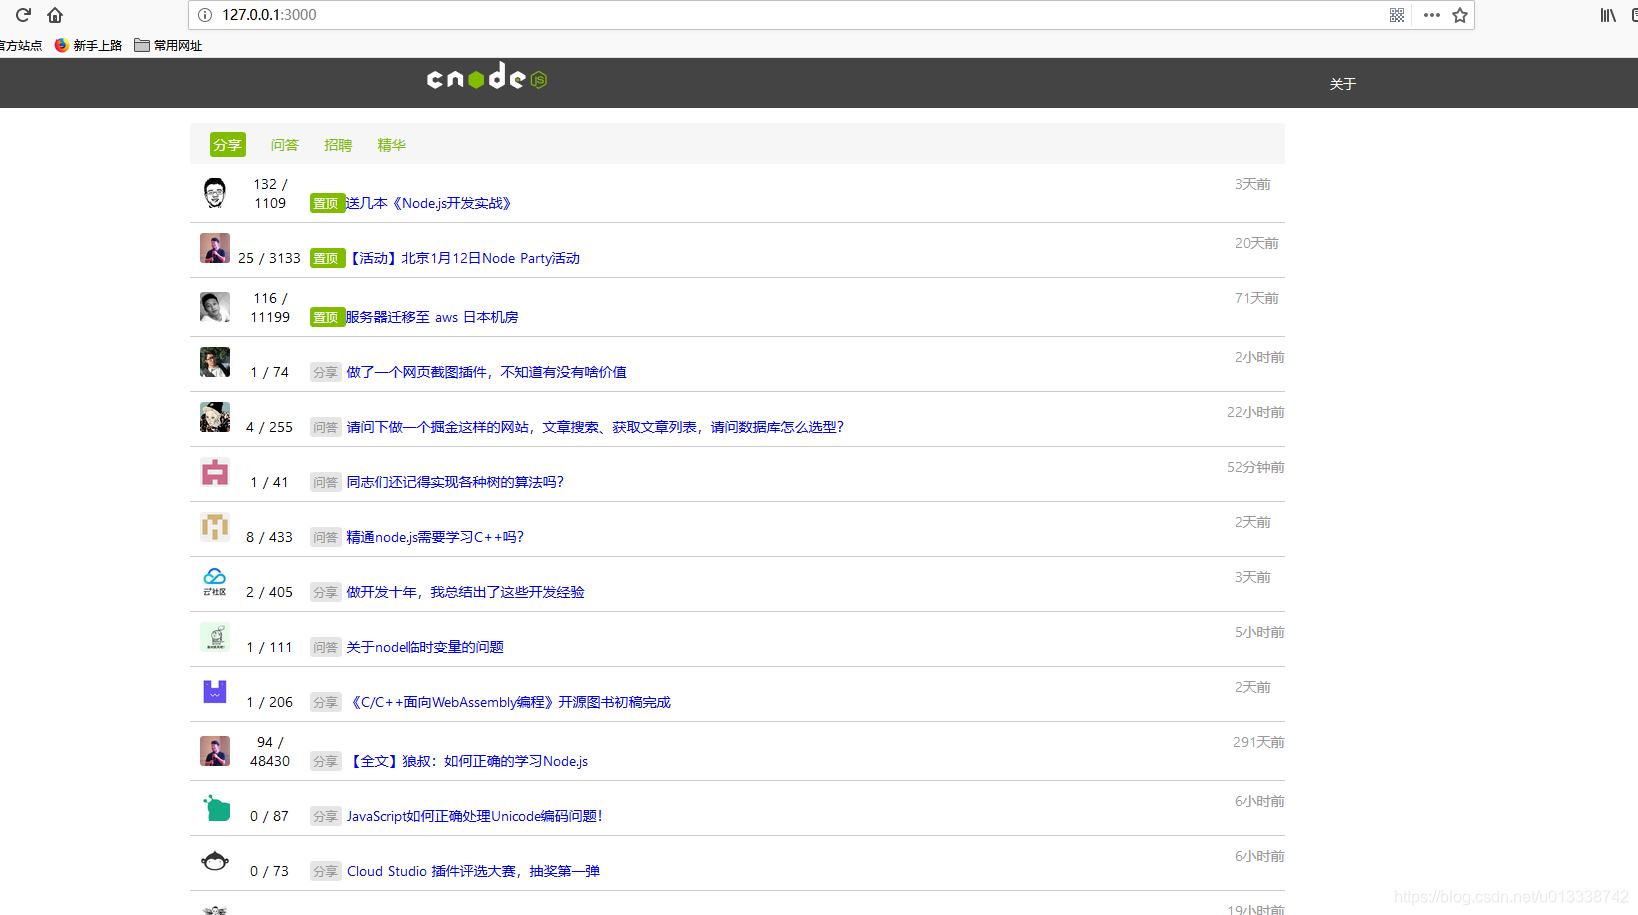
老弟,來了?VUE+Nuxt.js+Koa+Vuex入門教程(一)仿寫一個cnode網站
if(有工作){
	if(工作地址 ==  "深圳" || 工作地址 ==  "廣州" ){
		do(請聯絡作者,qq:1172081598)
	}
}
何為Nuxt.js
Nuxt.js是一個vue的服務端渲染的框架,集成了express框架,sass/less框架等等,ui框架如Bootstrap,Vuetify,Bulma,Tailwind,Element UI,Ant Design Vue,Buefy,方便的整合拓展其他框架,如EsLint等等,自動化打包,程式碼改動自動更新(伺服器,前端程式碼),讓開發變得簡單。
開始安裝
文件地址在這: nuxt.js
首先你必須安裝了node環境, npm(或者 yarn);
npx create-nuxt-app <專案名>
安裝到中間的時候, 會讓你選擇開發的框架
ui框架我選擇了element-ui, 伺服器框架選擇了koa,還有可以選擇預編譯樣式框架sass / less;
選擇完成之後就會進行安裝,需要等待一段時間。(如果沒有v皮N的話,建議選擇淘寶源,進行npm安裝module的時候會快很多)
$ npm config set registry https://registry.npm.taobao.org
– 配置後可通過下面方式來驗證是否成功
$ npm config get registry
-- 或 npm info express
然後我們看到nuxt.config.js, 這個是nuxt專案的配置檔案,
const pkg = require('./package')

module.exports = {
  mode: 'universal',

  /*
  ** Headers of the page
  */
  head: {
    title: pkg.name,
    meta: [
      { charset: 'utf-8' },
      { name: 'viewport', content: 'width=device-width, initial-scale=1' },
      { hid: 'description', name: 'description', content: pkg.description }
    ],
    link: [
      { rel: 'icon', type: 'image/x-icon', href: '/favicon.ico' }
    ]
  },

  /*
  ** Customize the progress-bar color
  */
  loading: { color: '#fff' },

  /*
  ** Global CSS 全域性的css,公共的css引用也在這
  */
  css: [
    'element-ui/lib/theme-chalk/index.css'
  ],

  /*
  ** Plugins to load before mounting the App
  */
  plugins: [
    '@/plugins/element-ui'
  ],

  /*
  ** Nuxt.js modules
  */
  modules: [
    // Doc: https://github.com/nuxt-community/axios-module#usage
    '@nuxtjs/axios'
  ],
  /*
  ** Axios module configuration
  */
  axios: {
    // See https://github.com/nuxt-community/axios-module#options
  },

  /*
  ** Build configuration
  */
  build: {
    /*
    ** webpack 的配置項在這裡拓展
    **比如啟用eslint
    */
    extend(config, ctx) {
       // Run ESLint on save
      // if (ctx.isDev && ctx.isClient) {
        // config.module.rules.push({
        //   enforce: 'pre',
        //   test: /\.(js|vue)$/,
        //   loader: 'eslint-loader',
        //   exclude: /(node_modules)/
        // })
      // }
    }
  }
}
然後我們看pages/index.vue,我們記住vue裡面template只有一個根元素,如果有多個就會報錯,
<template>
  <div>
    <head1/>

    <div class="m" v-loading.lock='loading'>
      <div class="main">
        <div class="content">
          <div class="pannel">
            <div class="b_head">
              <a class="currentTab tab" href="/?tab=share">分享</a>
              <a class="tab" href="/?tab=ask">問答</a>
              <a class="tab" href="/?tab=job">招聘</a>
              <a class="tab" href="/?tab=good">精華</a>
            </div>
          </div>

          <div class="secDiv" v-loading.lock="loading">
            <div v-for="item of articleListsData" :key='item.length' class="cell">
              <nuxt-link  :to="item.author.avatar_url" :title='item.author.loginname'>
                <img :src="item.author.avatar_url" :title='item.author.loginname' class="headImg">
              </nuxt-link>
              <span class="count_reply pull_left">
                <span class="count_replyNum">{{item.reply_count}}</span>
                <span>/</span>
                <span class="visit_count">{{item.visit_count}}</span>
              </span>


              <div class="topic_title_wrapper textD">
                <span class="put_top" v-if="item.top">
                  置頂
                </span>
                <span class="topiclist-tab" v-else-if="item.tab">{{item.tab == 'ask' ? '問答': item.tab == 'share'? '分享': '' }}</span>
                <nuxt-link :to='"/topic/" + item.id' class="topic_title">{{item.title}}</nuxt-link>

              </div>

              <span class="pull_right">

               <span class="last_active_time">{{dealTime(item.create_at)}}</span>
              </span>
            </div>

          </div>

        </div>
        <div class="aside">
          {{ip}}
        </div>
      </div>

    </div>
    <div class="next"><input type="button" value="下一頁" @click="getData()"></div>
  </div>

</template>

<script>
  import Logo from '~/components/Logo.vue';
  import head1 from '~/components/header.vue';
  // import body1 from '~/components/body.vue';
  import axios from 'axios'
  import { mapState } from 'vuex'
  export default {
    components: {
      Logo,
      head1,
    },
    transition: 'page',
    data() {
      return {
        loading: true,
        ip: ''
      }

    },
    computed: mapState([
          'articleLists'
      ]),
    asyncData(context){


      return axios.get('https://cnodejs.org/api/v1/topics?pages=1&limit=30&mdrender=false')
      .then(res => ({
        articleListsData: res.data.data,
        loading: false
      })).catch(res =>{
        throw new Error('Maisec.vue: ', res)
      })

    },
    methods: {
      async fetchSomething() {
        const ip = await this.$axios.$get('http://icanhazip.com')
        this.ip = ip
      },
      getData (){
         this.fetchSomething()
         this.$store.dispatch('getArticleLists')
      },
      dealTime(time){
        let now = (new Date()).getTime();
        time = (new Date(time)).getTime();
        let res = (now-time)/1000,
          str = '';
        if (res/(60*60*24) > 1){
          str = Math.floor(res/(60*60*24)) + '天前'
        }else if (res/(60*60) > 1){
          str = Math.floor(res/(60*60)) + '小時前'
        }else{
           str = Math.floor(res/(60)) + '分鐘前'
        }
        return str
      }
    },
    watch:{
      articleLists(val){
        this.articleListsData = this.articleLists
      }
    }

  }
</script>

<style scoped type="text/css">
  body{
    background: #e5e5e5;
  }
  a{
   text-decoration: none;
  }
  .secDiv .cell:hover{
    background: #e5e5e5;
  }

  .secDiv .cell:nth-child(1){
    border-top: none;
  }

  .secDiv .inner .unstyled li div, .topic_title_wrapper, .user_name, a.dark, a.topic_title{
    text-overflow: ellipsis;
  }

  .count_reply{
    width: 70px;
    display: inline-block;
    text-align: center;
  }

  .cell{
    padding-right: 10px;
    border-top: 1px solid #ccc;
    background: #fff;
    position: relative;
    padding: 10px 0 10px 10px;
    font-size: 14px;
  }

  .last_active_time{
    display: inline-block;
    min-width: 50px;
    color: #999;
    white-space: nowrap;
  }

  .pull_right{
    float: right;
  }
  .topiclist-tab{
    background: #e5e5e5;
    color: #999;
    padding: 2px 4px;
    border-radius: 3px;
    font-size: 12px;
  }

  .put_top{
    padding: 2px 4px;
    background: #80bd01;
    border-radius: 3px;
    color: #fff;
    font-size: 12px;
  }
  .m{
    width: 100%;
    display:flex;
    justify-content: center;
  }
  .main{
    width: 90%; min-height: 400px; max-width: 1400px; height: 957px; margin: 15px auto;
  }

  .content{
    padding: 0;
    margin-right: 305px;
  }

  .b_head{
    width: 100%; padding: 10px;
    background: #f6f6f6; border-radius: 3px 3px 0 0;


  }

  .b_head  a{
    color: #80bd01;
  }
  .tab{margin: 0 10px; font-size: 14px;}

  .b_head .currentTab{background: #80bd01; color: #fff; padding: 3px 4px; border-radius: 3px; }

  .headImg{
    width: 30px;
    height: 30px;
    border-radius: 3px;
  }

  .aside{ width:290px; font-size: 14px; float: right;}

.container {
  min-height: 100vh;

}

.title {
  font-family: 'Quicksand', 'Source Sans Pro', -apple-system, BlinkMacSystemFont,
    'Segoe UI', Roboto, 'Helvetica Neue', Arial, sans-serif;
  display: block;
  font-weight: 300;
  font-size: 100px;
  color: #35495e;
  letter-spacing: 1px;
}

.subtitle {
  font-weight: 300;
  font-size: 42px;
  color: #526488;
  word-spacing: 5px;
  padding-bottom: 15px;
}

.links {
  padding-top: 15px;
}

.topic_title_wrapper{
  white-space: nowrap;
}

.textD{
  display: inline-block;
}
</style>
我們把頭部導航欄寫成元件, 在components資料夾新建一個檔案header.vue
<template>
	<div>
		<div class="navbar">
			<div class="navInner">
				<div class="navContainer">
					<div class="logo">
						<a href="/"><img src="../static/img/cnodejs_light.svg" class="navLogo"> </a>
					</div>

					<div class="about">
						<a href="/about">關於</a>
					</div>
				</div>
			</div>
		</div>
	</div>
</template>

<style type="text/css" scoped="scoped">

.navbar{
	height: 50px; line-height: 50px; font-size: 13px;  background: #444; width: 100%; color: #80bd01;
}

.navInner{
	width: 90%;
	margin: auto;

}

.navInner a{
	color: #fff;
	text-decoration: none;
	}

.navContainer{
	width: 100%;
	min-width: 960px;
	margin: 0 auto;
	display: flex;
	justify-content: space-around;
}

.logo{
	height: 100%;
}

@media screen and (max-width: 979px ){
	.navInner{
		width: 100%
	}
}
.navLogo{
	width: 128px; height: 28px;
}
</style>
在store資料夾下新建actions.js:
主要是處理獲取資料的函式
import axios from 'axios'

export default{
	getArticleLists(context) {
		context.commit('addArticleNumber')
		const number = context.getters.getArticleNumber
		axios.get(`https://cnodejs.org/api/v1/topics?pages=1&limit=${number}&mdrender=false`)
		.then(res =>{
			context.commit('addArticleLists', res.data.data)
		}).catch(res =>{
			throw new Error('err: ', res)
		})
	}
}
store下新建getters.js:
主要是暴露函式
export default {
	getArticleLists: state => state.articleLists,
	getArticleNumber: state => state.articleNumber,
	getArticle: state => state.article,
	getArticleAuthor: state => state.articleAuthor,
	getUserInfo: state => state.userInfo
}
在store下新建index.js:
主要是初始化Vuex:
import Vuex from 'vuex'
import mutations from './mutations'
import actions from './actions'
import getters from './getters'
import state from './state'


const createStore = ()=> new Vuex.Store({
	state,
	getters,
	mutations,
	actions
})


export default createStore
在store下新建mutations.js:
這裡主要是為了改變vuex裡面的數值
export default{
	addArticleLists(state, articleLists){
		state.articleLists = articleLists
	},
	addArticleNumber(state){
		state.articleNumber += 10
	}
}
接著, 使用命令列:
npm run dev
就可以在瀏覽器開啟http://127.0.0.1:3000檢視效果了

