
React Native 使用react-native-image-picker庫實現圖片上傳功能
react-native-image-picker作為一個整合相機和相簿的功能的第三方庫,因為其使用相對簡單受到前端開發人員的喜愛。
react-native-image-picker使用
1, 首先,安裝下該外掛。
npm install react-native-image-picker@latest --save2, 針對Android和iOS平臺分別進行配置
## android 平臺配置
1,在android/settings.gradle檔案中新增如下程式碼:
include ':react-native-image-picker'
project(':react-native-image-picker' 2,在android/app/build.gradle檔案的dependencies中新增如下程式碼:
compile project(':react-native-image-picker')3,在AndroidManifest.xml檔案中新增許可權:
<uses-permission android:name="android.permission.CAMERA" />
<uses-permission 4,最後在MainApplication.Java檔案中新增如下程式碼:
import com.imagepicker.ImagePickerPackage;
 new ImagePickerPackage()
這樣Android環境就配置好了。
iOS平臺配置
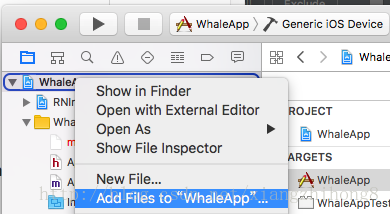
1,開啟Xcode開啟專案,點選根目錄,右鍵選擇 Add Files to ‘XXX’,選中專案中的該路徑下的檔案即可:node_modules -> react-native-image-picker -> ios -> select RNImagePicker.xcodeproj
2,新增成功後使用link命令:react-native link react-native-image-picker 。
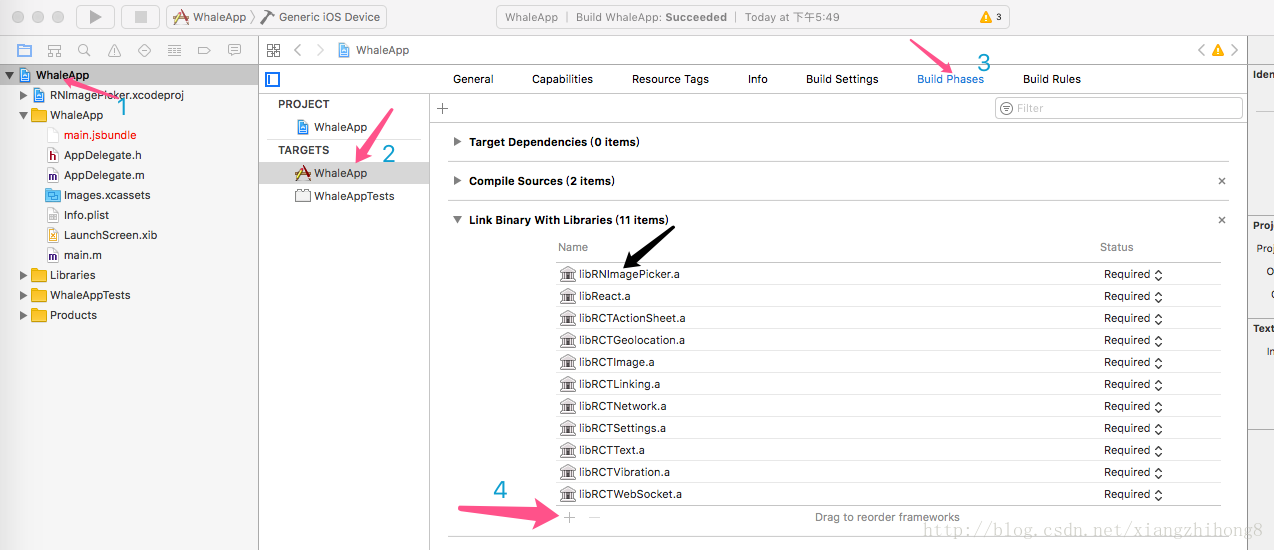
3,開啟專案依次使用Build Phases -> Link Binary With Libraries將RNImagePicker.a新增到專案依賴。
4,對於iOS 10+裝置,需要在info.plist中配置NSPhotoLibraryUsageDescription和NSCameraUsageDescription。

react-native-image-picker示例
為了專案使用的方便,我們將其封裝為一個元件CameraButton.js。程式碼如下:
import React from 'react'
import {
    TouchableOpacity,
    StyleSheet,
    Platform,
    ActivityIndicator,
    View,
    Text,
    ToastAndroid
} from 'react-native'

var ImagePicker = require('react-native-image-picker');
import Icon from 'react-native-vector-icons/Ionicons';

const options = {
    title: '選擇圖片',
    cancelButtonTitle: '取消',
    takePhotoButtonTitle: '拍照',
    chooseFromLibraryButtonTitle: '圖片庫',
    cameraType: 'back',
    mediaType: 'photo',
    videoQuality: 'high',
    durationLimit: 10,
    maxWidth: 600,
    maxHeight: 600,
    aspectX: 2,
    aspectY: 1,
    quality: 0.8,
    angle: 0,
    allowsEditing: false,
    noData: false,
    storageOptions: {
        skipBackup: true,
        path: 'images'
    }
};

class CameraButton extends React.Component {
    constructor(props){
        super(props);
        this.state = {
            loading:false
        }
    }
    render() {
        const {photos,type} = this.props;
        let conText;
        if(photos.length > 0){
            conText = (<View style={styles.countBox}>
                <Text style={styles.count}>{photos.length}</Text>
            </View>);
        }
        return (
            <TouchableOpacity
                onPress={this.showImagePicker.bind(this)}
                style={[this.props.style,styles.cameraBtn]}>
                <View>
                    <Icon name="md-camera" color="#aaa" size={34}/>
                    {conText}
                </View>
            </TouchableOpacity>
        )
    }

    showImagePicker() {
        ImagePicker.showImagePicker(options, (response) => {
            if (response.didCancel) {
                console.log('User cancelled image picker');
            }
            else if (response.error) {
                console.log('ImagePicker Error: ', response.error);
            }

            else {

                let source;

                if (Platform.OS === 'android') {
                    source = {uri: response.uri, isStatic: true}
                } else {
                    source = {uri: response.uri.replace('file://', ''), isStatic: true}
                }


                let file;
                if(Platform.OS === 'android'){
                    file = response.uri
                }else {
                    file = response.uri.replace('file://', '')
                }


                this.setState({
                    loading:true
                });
                this.props.onFileUpload(file,response.fileName||'未命名檔案.jpg')
                .then(result=>{
                    this.setState({
                        loading:false
                    })
                })
            }
        });
    }
}
const styles = StyleSheet.create({
    cameraBtn: {
        padding:5
    },
    count:{
        color:'#fff',
        fontSize:12
    },
    fullBtn:{
        justifyContent:'center',
        alignItems:'center',
        backgroundColor:'#fff'
    },
    countBox:{
        position:'absolute',
        right:-5,
        top:-5,
        alignItems:'center',
        backgroundColor:'#34A853',
        width:16,
        height:16,
        borderRadius:8,
        justifyContent:'center'
    }
});

export default CameraButton;
然後在需要使用的地方引入。
import CameraButton from '../../component/huar/cameraButton'


                    <CameraButton style={styles.cameraBtn}
                                  photos={[]}
                                  onFileUpload={this.onFileUpload} />
點選上傳事件:
    onFileUpload(file, fileName){
        return this.props.uploadAvatar({
            id: this.props.user.ID,
            type:'logo',
            obj:'user',
            corpId: this.props.cropId
        }, file, fileName)}
 Action請求程式碼:
function actions(dispatch) {
    return {
        fileUrl,fileName)=>dispatch(Actions.uploadAvatar(params, fileUrl,fileName))
    }
}
actions中的uploadAvatar函式如下。
function uploadAvatar(params, fileUrl, fileName) {
    return dispatch=> {
        return UserService.uploadImage(params, fileUrl, fileName)
            .then(result=> {
                dispatch({
                    type: UPDATE_AVATAR,
                    path: result.path
                })
                return result
            })
    }
}

//UserService.uploadImage程式碼如下
export function uploadImage(params, fileUrl,fileName) {
    return http.uploadFile(`${config.UploadImage}`, params, fileUrl,fileName)
}
UserService函式的http非同步上傳圖片程式碼如下:
let queryString = require('query-string');
import Storage from './storage'
import {
    Platform
} from 'react-native'

const os = Platform.OS;

async function uploadFile(url, params, fileUrl,fileName) {
    let Access_Token = await Storage.getItem('Access_Token');
    let data = new FormData();

    data.append('file', {
        uri: fileUrl,
        name: fileName,
        type: 'image/jpeg'
    });

    Object.keys(params).forEach((key)=> {
        if (params[key] instanceof Date) {
            data.append(key, value.toISOString())
        } else {
            data.append(key, String(params[key]))
        }
    });

    const fetchOptions = {
        method: 'POST',
        headers: {
            'Accept': 'application/json',
            'Access_Token': Access_Token ? Access_Token : '',
            'UserAgent':os
        },
        body: data
    };


    return fetch(url, fetchOptions)
        .then(checkStatus)
        .then(parseJSON)
}
封裝上傳
如果上面的實現看的比較複雜,那麼我們做如下的封裝:
let common_url = 'http://192.168.1.1:8080/';  //伺服器地址
let token = '';   //使用者登陸後返回的token

function uploadImage(url,params){
    return new Promise(function (resolve, reject) {
        let formData = new FormData();
        for (var key in params){
            formData.append(key, params[key]);
        }
        let file = {uri: params.path, type: 'application/octet-stream', name: 'image.jpg'};
        formData.append("file", file);
        fetch(common_url + url, {
            method: 'POST',
            headers: {
                'Content-Type': 'multipart/form-data;charset=utf-8',
                "x-access-token": token,
            },
            body: formData,
        }).then((response) => response.json())
            .then((responseData)=> {
                console.log('uploadImage', responseData);
                resolve(responseData);
            })
            .catch((err)=> {
                console.log('err', err);
                reject(err);
            });
    });
}
然後在使用的地方:
let params = {
    userId:'abc12345',   //使用者id
    path:'file:///storage/emulated/0/Pictures/image.jpg'    //本地檔案地址
}
uploadImage('app/uploadFile',params )
    .then( res=>{
        //請求成功
        if(res.header.statusCode == 'success'){
            //這裡設定伺服器返回的header中statusCode為success時資料返回成功
            upLoadImgUrl = res.body.imgurl;  //伺服器返回的地址
        }else{
             //伺服器返回異常,設定伺服器返回的異常資訊儲存在 header.msgArray[0].desc
            console.log(res.header.msgArray[0].desc);
        }
    }).catch( err=>{
         //請求失敗
    })