Android 自定義view-如何設定TextView drawableLeft 圖片大小?
2017/09/07更新
開發過程中,越發強烈的覺得需要對TextView進一步封裝
1.TextView需要設定背景或者邊框時需要編寫大量的selector,稍微修改一下樣式又得編寫一個新的selector,這個實在不能忍!
2.使用原生TextView的drawableLeft能夠減少佈局程式碼,無奈icon大小不能設定,只能眼巴巴找美工切圖,我們是一個有節氣的程式設計師,這個也不能忍
3. 當TextView不同狀態下的文字顏色,背景邊框等等需要通過Java程式碼編寫亂七八糟的邏輯,為了程式碼可維護性我們必須要編寫一個便於實現這些功能的控制元件:RTextView

沒錯這個就是RTextView的效果,很強大有木有?一個控制元件搞定所有優美佈局的既視感,關鍵是方便。真的很好用,筆者已經將該控制元件應用到專案中,看官們可以以不到github瞭解詳情
以下內容為原始文章,也是封裝控制元件的最初想法
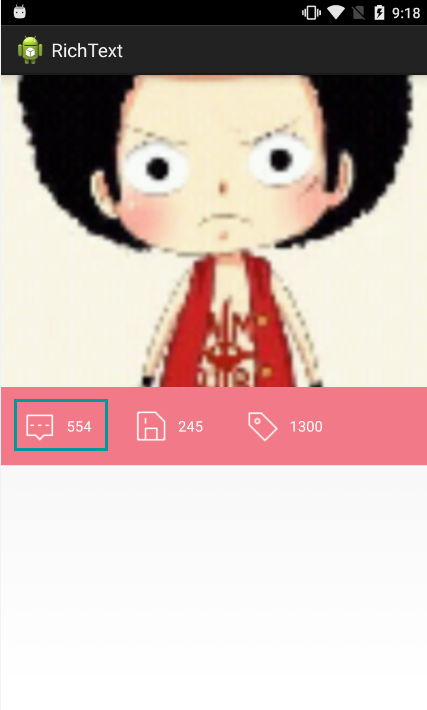
如上圖所述,綠色框框中的佈局你會怎麼實現?
大概有兩種方式解決
方法1:一個LinearLayout裡面放一個ImageView和一個TextView
方法2:一個TextView然後設定drawableLeft
實現是沒有問題,但是我有強迫症,總覺得他們不完美,來說說兩種方法的缺點
方法1:靠,這是什麼鬼,不覺得巨麻煩嗎?要寫三個控制元件,還要巢狀。要是一行多幾個這樣的控制元件,一整個頁面得巢狀多少層啊?不行!
方法2:這個好像不錯哦,直接設定drawableLeft(四個方向都行)搞定。但是!這個drawable的大小是不能夠通過程式碼設定大小的!只能叫UI裁剪成合適的圖片。臥槽,一定得裁剪到剛好合適?怎麼樣才合適?看著差不多就好了?所以還是個坑!也不行!
知識是要拿來用的,不是會自定義view嗎?那就自己寫啊。
需求:text的四周可以設定輔助圖示,並且可以設定圖示的大小!還要可以設定圖片和文字的間距
OK,需求明確了,我一開始想繼承RelativeLayout來實現。後來想想TextView都有drawableLeft 之類的屬性,肯定可以從這裡入手更簡單。只要可以改變drawable的大小就好了。
仔細看了TextView相關的API
1.可以獲取到drawable的列表(因為四個方向都可以設定)
2.但是無法獲取到是哪一個方向上設定的drawable
3.可以通過程式碼設定drawableLeft 效果
1.自定義View的屬性
既然無法獲取到是哪一個方向上的drawable,那就自己定義一個方向的屬性,並且自己定一個drawable的屬性。
按照需求,屬性有:drawable,drawable寬寬,drawable高度,drawable方向
我們在 /value/attrs.xml 中這麼寫:
    <!-- RichText -->
    <declare-styleable name="RichText">
        <attr name="drawable_src" format="reference" />
        <attr name="drawable_height" format="dimension" />
        <attr name="drawable_width" format="dimension" />
        <attr name="drawable_location">
            <enum name="left" value="1" />
            <enum name="top" value="2" />
            <enum name="right" value="3" />
            <enum name="bottom" value="4" />
        </attr>
    </declare-styleable>
2.在View的構造方法中獲得我們自定義的屬性
public class RichText extends TextView {

    public static final int LEFT = 1, TOP = 2, RIGHT = 3, BOTTOM = 4;

    private int mHeight, mWidth;

    private Drawable mDrawable;

    private int mLocation;

    public RichText(Context context) {
        this(context, null);
    }

    public RichText(Context context, AttributeSet attrs) {
        super(context, attrs);

        TypedArray a = context.obtainStyledAttributes(attrs,
                R.styleable.RichText);

        mWidth = a
                .getDimensionPixelSize(R.styleable.RichText_drawable_width, 0);
        mHeight = a.getDimensionPixelSize(R.styleable.RichText_drawable_height,
                0);
        mDrawable = a.getDrawable(R.styleable.RichText_drawable_src);
        mLocation = a.getInt(R.styleable.RichText_drawable_location, LEFT);

        a.recycle();
        //繪製Drawable寬高,位置
        drawDrawable();

    }
    }
程式碼很簡單,獲取自定義的四個屬性值,需要注意的是,這裡繼承TextView
這裡不用重新計算寬高,因為TextView 會幫我們計算,這就是繼承自帶控制元件的好處
接下來也不用重寫onDraw方法,因為這裡沒有什麼需要繪製的
3.繪製Drawable寬高,位置
接下來直奔主題,直接繪製drawable寬高,位置(相對於text的方向)
其實關鍵方法就一個
textView.setCompoundDrawablesWithIntrinsicBounds(drawable, null, null, null);引數分表代表左,上,右,下。不設定就使用null
靠,寫著寫著發現好坑哦,就一個關鍵方法還特意寫一篇部落格。算了,還是繼續寫吧。
    /**
     * 繪製Drawable寬高,位置
     */
    public void drawDrawable() {

        if (mDrawable != null) {
            Bitmap bitmap = ((BitmapDrawable) mDrawable).getBitmap();
            Drawable drawable;
            if (mWidth != 0 && mHeight != 0) {

                drawable = new BitmapDrawable(getResources(), getBitmap(bitmap,
                        mWidth, mHeight));

            } else {
                drawable = new BitmapDrawable(getResources(),
                        Bitmap.createScaledBitmap(bitmap, bitmap.getWidth(),
                                bitmap.getHeight(), true));
            }

            switch (mLocation) {
            case LEFT:
                this.setCompoundDrawablesWithIntrinsicBounds(drawable, null,
                        null, null);
                break;
            case TOP:
                this.setCompoundDrawablesWithIntrinsicBounds(null, drawable,
                        null, null);
                break;
            case RIGHT:
                this.setCompoundDrawablesWithIntrinsicBounds(null, null,
                        drawable, null);
                break;
            case BOTTOM:
                this.setCompoundDrawablesWithIntrinsicBounds(null, null, null,
                        drawable);
                break;
            }
        }

    }
這個方法是設定Drawable的寬高和位置。程式碼很簡單。
判斷是否設定了Drawable(別忘了我們本身可是TextView啊)
如果Drawable不為空,則判斷寬高是否設定,如果設定了寬高則繪製成指定的寬高,否則按Drawable原圖大小繪製
根據指定方向在text對應的位置設定Drawable
這裡需要注意的是,直接繪製成為指定的寬高,執行效果發現Drawable會被從左上角開始裁剪成為指定的大小。
所以我們需要根據Drawable原來的大小和目標寬高進行裁剪(縮放)
    /**
     * 縮放圖片
     *
     * @param bm
     * @param newWidth
     * @param newHeight
     * @return
     */
    public Bitmap getBitmap(Bitmap bm, int newWidth, int newHeight) {
        // 獲得圖片的寬高
        int width = bm.getWidth();
        int height = bm.getHeight();
        // 計算縮放比例
        float scaleWidth = (float) newWidth / width;
        float scaleHeight = (float) newHeight / height;
        // 取得想要縮放的matrix引數
        Matrix matrix = new Matrix();
        matrix.postScale(scaleWidth, scaleHeight);
        // 得到新的圖片
        return Bitmap.createBitmap(bm, 0, 0, width, height, matrix, true);
    }
這樣繪製的Drawable才是完整的,按照我們想要的大小縮放後的Drawable
4.佈局檔案中使用
    <cn.r.richtext.android.widget.RichText
            xmlns:view="http://schemas.android.com/apk/res-auto"
            android:layout_width="wrap_content"
            android:layout_height="wrap_content"
            android:layout_margin="20dp"
            android:drawablePadding="8dp"
            android:gravity="center"
            android:text="554"
            android:textColor="#FFFFFF"
            view:drawable_height="35dp"
            view:drawable_location="left"
            view:drawable_src="@drawable/preview_comment_icon"
            view:drawable_width="35dp" />
恩恩,真正的soeasy!媽媽再也不用擔心我巢狀太多佈局了。一個控制元件搞定
這裡說明一下,這裡是繼承TextView所以TextView的所有屬性都是可用的,
比如:設定文字和圖示之間的間距( android:drawablePadding=”8dp”)
比如:如果圖示較大,文字的對齊方式( android:gravity=”center”)
等等,,,
雖然超簡單,但是我忽然愛上這個控制元件了,因為超方便。


