
MySQL資料庫使用——MySQL在C/C++的API介面
直接操作MySQL,輸入命令效率低,將MySQL嵌入程式中,封裝介面,讓程式去訪問MySQL,才能最大效益利用MySQL。
MySQL C API移植
包含MySQL的工程檔案不應直接關聯電腦已安裝的MySQL,因為不同電腦伺服器安裝的位置不一樣,每次移植都需要重新部署安裝環境。應該將MySQL的標頭檔案以及操作的庫檔案一併拷貝到工程檔案中,這樣即使移植到別的安裝有MySQL電腦或伺服器,就不需要重新定位標頭檔案以及相關的庫檔案,直接操作訪問資料庫。除非隨著MySQL的版本升級導致介面引數改變,否則就可以直接利用。
移植之後即使裝置沒裝MySQL也可以編譯程式碼,只是沒有MySQL不能執行而已,工程不因裝置未MySQL而不能編譯通過。
移植MySQL標頭檔案
在linux中構建的Makefile工程要安裝libmysqlclient-dev才能使用API介面的標頭檔案。
命令:sudo apt-get install libmysqlclient-dev
安裝好後的標頭檔案在:/usr/include/mysql
[email protected]:/usr/include$ ls mysql/
big_endian.h my_global.h plugin_audit.h
binary_log_types.h my_list.h plugin_auth_common.h Windows的MySQL標頭檔案即在安裝目錄裡面。
MySQL標頭檔案:C:\Program Files\MySQL\MySQL Server 5.7\include\
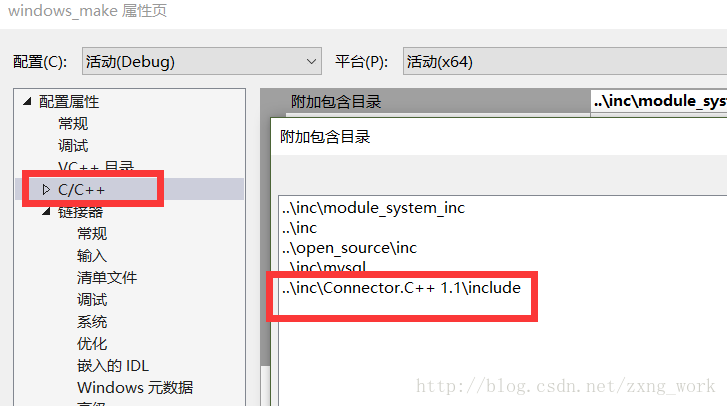
C++操作標頭檔案:C:\Program Files\MySQL\Connector.C++ 1.1windows和linux的標頭檔案結構略有差異,但大體都是相等的,此次移植是linux的MySQL標頭檔案。
不推薦使用C++操作標頭檔案,因為需要用到boost庫,boost庫安裝編譯繁瑣。
將標頭檔案全部複製到工程標頭檔案中。
命令:test_makefile/inc$ cp /usr/include/mysql/ ./ -rf
複製之後的工程標頭檔案目錄如下圖所示

Makefile工程:
將標頭檔案加入到Makefile中,編輯Makefile。
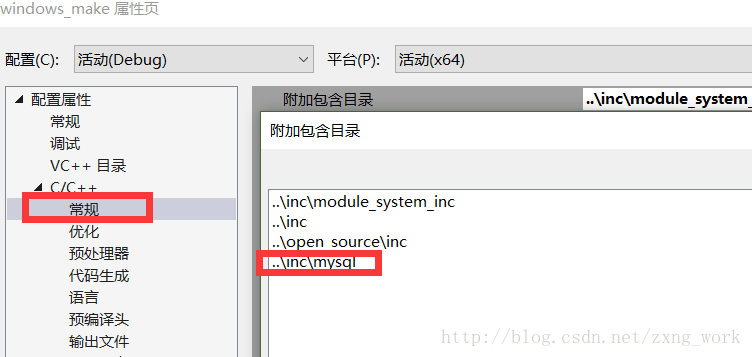
NC += -I$(DIR)/inc/mysqlVisual Studio工程
引用標頭檔案如下圖所示
移植MySQL庫檔案
Makefile工程
由於Makefile工程移植的庫檔案為.so或.a的庫檔案,因此一定要移植Linux下的MySQL庫檔案。
同標頭檔案一樣,linux要安裝libmysqlclient-dev才能使用API介面的標頭檔案。
命令:
sudo apt-get install libmysqlclient-dev
安裝好後的庫檔案在:/usr/lib/mysql和/usr/lib下
Visual Studio工程
與Linux不同的是,Visual Studio工程移植的庫檔案為.lib或.dll的庫檔案。
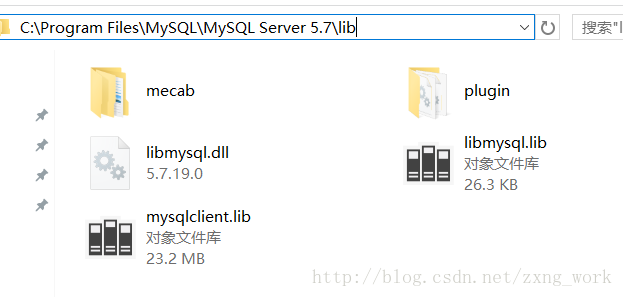
庫檔案位置:
C:\Program Files\MySQL\MySQL Server 5.7\lib
檔案位置即MySQL安裝位置。
如下圖所示
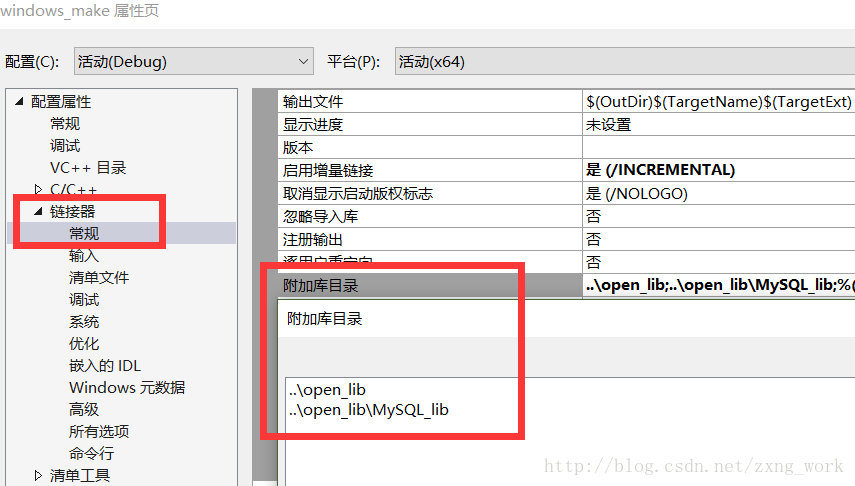
將庫檔案全部拷貝到工程庫檔案目錄下
├── open_lib
│ ├── MySQL_lib
│ │ ├── libmysql.dll
│ │ ├── libmysql.lib
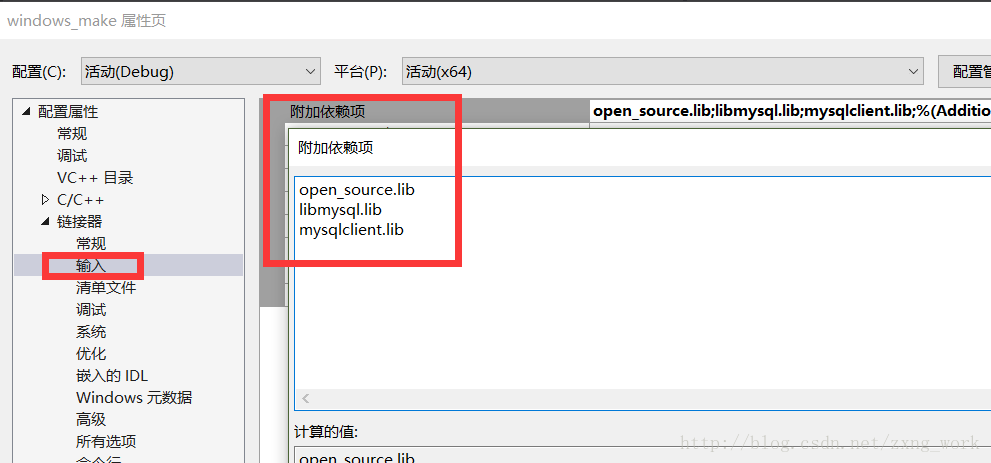
│ │ └── mysqlclient.lib專案引用庫檔案,如下圖所示
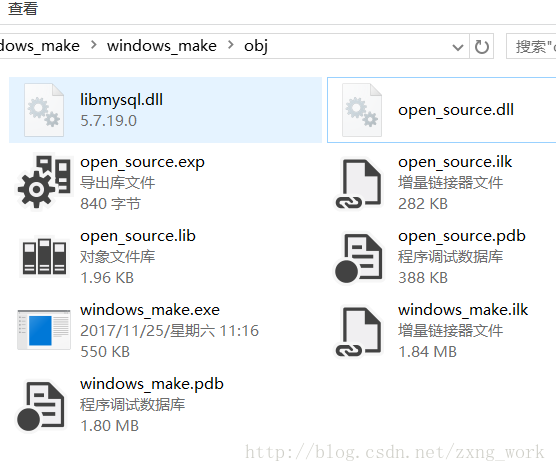
新增工程執行環境dll。為保證程式執行後不需要依賴系統的環境變數,需要將dll放到編譯器的輸出資料夾中,如定義了obj為輸出資料夾,就dll放到該資料夾中。如下圖所示。
新增MySQL示例
工程新增MySQL示例測試MySQL移植工程。
module_MySQL.cpp
#include "module_MySQL.h"
#include <iostream>
#include <string>
#include <mysql/mysql.h>

using namespace std;

void TestMySQL(void)
{
    cout << __FUNCTION__ << " is called." << endl;

    MYSQL mysql;
    mysql_init(&mysql);
    mysql_real_connect(&mysql, "localhost", "zxpro-admin", "qwerty", "zx_mysql", 3306, NULL, 0);

    //MySQL命令
    string sql = "select * from zx_users;";
    mysql_query(&mysql, sql.c_str());

    try
    {
        MYSQL_RES *result = mysql_store_result(&mysql);
        if (!result)
            throw string("MySQL not result!");

        //獲取欄位數量
        int num_fields = mysql_num_fields(result);
        if(0 == num_fields)
            throw string("MySQL fields number is 0!");

        //獲取欄位名
        MYSQL_FIELD *fields = mysql_fetch_fields(result);
        if (!fields)
            throw string("MySQL fields fetch is error!");

        for (int i = 0; i < num_fields; i++)
        {
            cout << "field " << i << " name is " << fields[i].name << endl;
        }

        cout << "MySQL is OK." << endl;
    }
    catch (string &error_msg)
    {
        cout << error_msg << endl;
    }
    catch (...)
    {
        cout << "MySQL operation is error!" << endl;
    }

    mysql_close(&mysql);
}
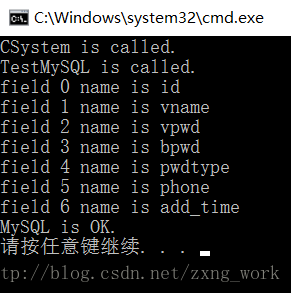
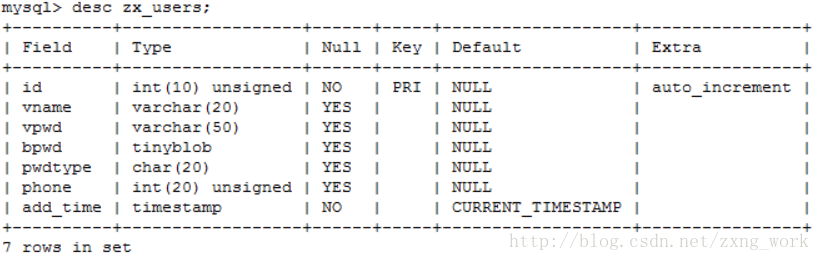
資料庫結構下圖所示。
示例工程執行結果如下圖所示。
MySQL C API
標頭檔案包含
要使用MySQL的介面API,需要包含標頭檔案
#include <mysql/mysql.h>
登入MySQL:mysql_init(),mysql_real_connect()
函式原型:
MYSQL * STDCALL mysql_init(MYSQL *mysql);
//成功返回*mysql指標,失敗返回NULL。

MYSQL * STDCALL mysql_real_connect(MYSQL *mysql,
                                const char *host,   //MySQL的IP,遠端登入輸入遠端登入的IP地址
                                const char *user,   //登入使用者
                                const char *passwd, //登入密碼
                                const char *db,     //使用的資料庫名稱
                                unsigned int port,  //MySQL埠
                                const char *unix_socket,    //是否使用socket機制登入,NULL:否
                                unsigned long clientflag);  //連線標誌,通常為0

//成功返回*mysql指標,失敗返回NULL。
clientflag連線標誌在檔案:mysql_com.h 以#define CLIENT_*定義
以下擷取片段:
#define CLIENT_LONG_PASSWORD        1           /* new more secure passwords */
#define CLIENT_FOUND_ROWS           2           /* Found instead of affected rows */
#define CLIENT_LONG_FLAG            4           /* Get all column flags */
#define CLIENT_CONNECT_WITH_DB      8           /* One can specify db on connect */
#define CLIENT_NO_SCHEMA            16          /* Don't allow database.table.column */
#define CLIENT_COMPRESS             32          /* Can use compression protocol */
#define CLIENT_ODBC                 64          /* Odbc client */
#define CLIENT_LOCAL_FILES          128         /* Can use LOAD DATA LOCAL */
#define CLIENT_IGNORE_SPACE         256         /* Ignore spaces before '(' */
#define CLIENT_PROTOCOL_41          512         /* New 4.1 protocol */
#define CLIENT_INTERACTIVE          1024        /* This is an interactive client */
#define CLIENT_SSL                  2048        /* Switch to SSL after handshake */
#define CLIENT_IGNORE_SIGPIPE       4096        /* IGNORE sigpipes */
#define CLIENT_TRANSACTIONS         8192        /* Client knows about transactions */
#define CLIENT_RESERVED             16384       /* Old flag for 4.1 protocol  */
#define CLIENT_RESERVED2            32768       /* Old flag for 4.1 authentication */
示例:登入MySQL資料庫
    try
    {
        if (!mysql_init(&mysql))
            throw string("MySQL init is error!");

        if (!mysql_real_connect(&mysql, "localhost", "zxpro-admin", "qwerty", "zx_mysql", 3306, NULL, 0))
            throw string("MySQL connect is error!");

    catch (string &error_msg)
    {
        cout << error_msg << endl;
    }
    catch (...)
    {
        cout << "MySQL operation is error!" << endl;
    }

    mysql_close(&mysql);
操作MySQL:mysql_query()
函式原型:
int STDCALL mysql_query(MYSQL *mysql,   //MySQL操作結構體
                        const char *q); //操作命令

//成功返回0,失敗返回1
失敗時呼叫mysql_error(),返回值為具體失敗的描述
示例:操作MySQL資料庫
    try
    {
        …………………

        string sql = "SELECT * from zx_users;";
        if (mysql_query(&mysql, sql.c_str()))
        {
            string err_string = mysql_error(&mysql);

            if(err_string.empty())
                throw string("MySQL query is error!");
            else
                throw err_string;
        }
        ………………
    }
    catch (string &error_msg)
    {
        cout << error_msg << endl;
    }
    catch (...)
    {
        cout << "MySQL operation is error!" << endl;
    }

    mysql_close(&mysql);
命令錯誤時的列印如下圖所示:

關閉MySQL:mysql_close()
函式原型:
void STDCALL mysql_close(MYSQL *sock);示例:關閉MySQL資料庫
mysql_close(&mysql);讀取MySQL資料:mysql_store_result ()
獲取命令結果函式 :mysql_store_result()
讀取欄位函式 :mysql_fetch_fields()
讀取欄位數量函式 :mysql_num_fields()
讀取資料函式 :mysql_fetch_row()
釋放結果函式 :mysql_free_result(result);
函式原型
MYSQL_RES * STDCALL mysql_store_result(MYSQL *mysql);
unsigned int STDCALL mysql_num_fields(MYSQL_RES *res);
MYSQL_FIELD * STDCALL mysql_fetch_fields(MYSQL_RES *res);

typedef char **MYSQL_ROW;       /* return data as array of strings */
MYSQL_ROW   STDCALL mysql_fetch_row(MYSQL_RES *result);
void STDCALL mysql_free_result(MYSQL_RES *result);
mysql_fetch_fields返回的是欄位型別,包括欄位名,欄位長度等欄位屬性
MYSQL_FIELD結構體定義:mysql.h
typedef struct st_mysql_field {
  char *name;                   /* Name of column */

    ………………………….
} MYSQL_FIELD;
讀取具體資料重點:
mysql_fetch_row返回的是一個char型的雙指標,指向對應欄位數量的陣列。數組裡面的資料資料以string的形式展現,若欄位為空,內容為NULL。讀完一組欄位後再呼叫則指向下一個欄位,到底則返回NULL。
測試程式
    try
    {
………………………………….

//MySQL命令
        string sql = "SELECT * from zx_users;";
        if (mysql_query(&mysql, sql.c_str()))
        {
            string err_string = mysql_error(&mysql);

            if(err_string.empty())
                throw string("MySQL query is error!");
            else
                throw err_string;
        }
        cout << "MySQL : " << sql << endl;

        MYSQL_RES *result = mysql_store_result(&mysql);
        if (!result)
            throw string("MySQL not result!");
        //獲取欄位數量
        int num_fields = mysql_num_fields(result);
        if(0 == num_fields)
            throw string("MySQL fields number is 0!");
        //獲取欄位名
        MYSQL_FIELD *fields = mysql_fetch_fields(result);
        if (!fields)
            throw string("MySQL fields fetch is error!");

        for (int i = 0; i < num_fields; i++)
        {
            cout << " " << fields[i].name;
        }
        cout << endl;

        while (MYSQL_ROW row = mysql_fetch_row(result)) //獲取整條資料內容
        {
            for (int i = 0; i < num_fields; i++)
            {
                if (NULL == row[i])
                {
                    cout << " NULL";
                }
                else
                {
                    cout << " " << row[i];
                }
            }
            cout << endl;
        }

        mysql_free_result(result);

        cout << "MySQL is OK." << endl;
    }
    catch (string &error_msg)
    {
        cout << error_msg << endl;
    }
    catch (...)
    {
        cout << "MySQL operation is error!" << endl;
    }
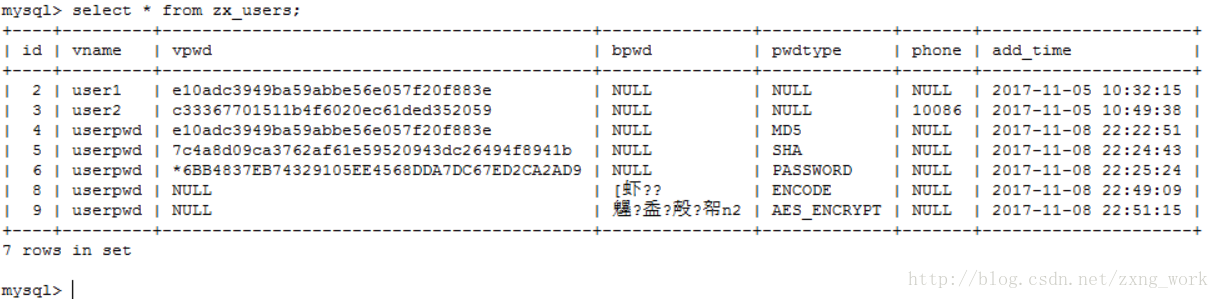
資料庫資料如下圖所示
函式API讀取資料執行結果如下圖所示。

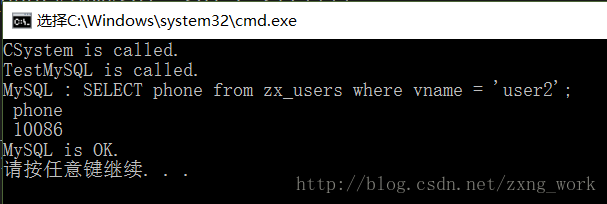
讀取過濾的MySQL命令:SELECT phone from zx_users where vname = ‘user2’;
讀取結果如下圖所示。
MySQL C++ API移植
之所以將C++的API與C分分離,因為C++可以用C的API,但C++可以將操作封裝到類裡面,但需要安裝boost庫支援。需要重新配置C++的標頭檔案和庫檔案。
使用條件:

Windows在安裝MySQL的時候已經安裝了相應的庫和標頭檔案。
Linux安裝時沒有包含,需要到MySQL官網下載相應的庫和標頭檔案。
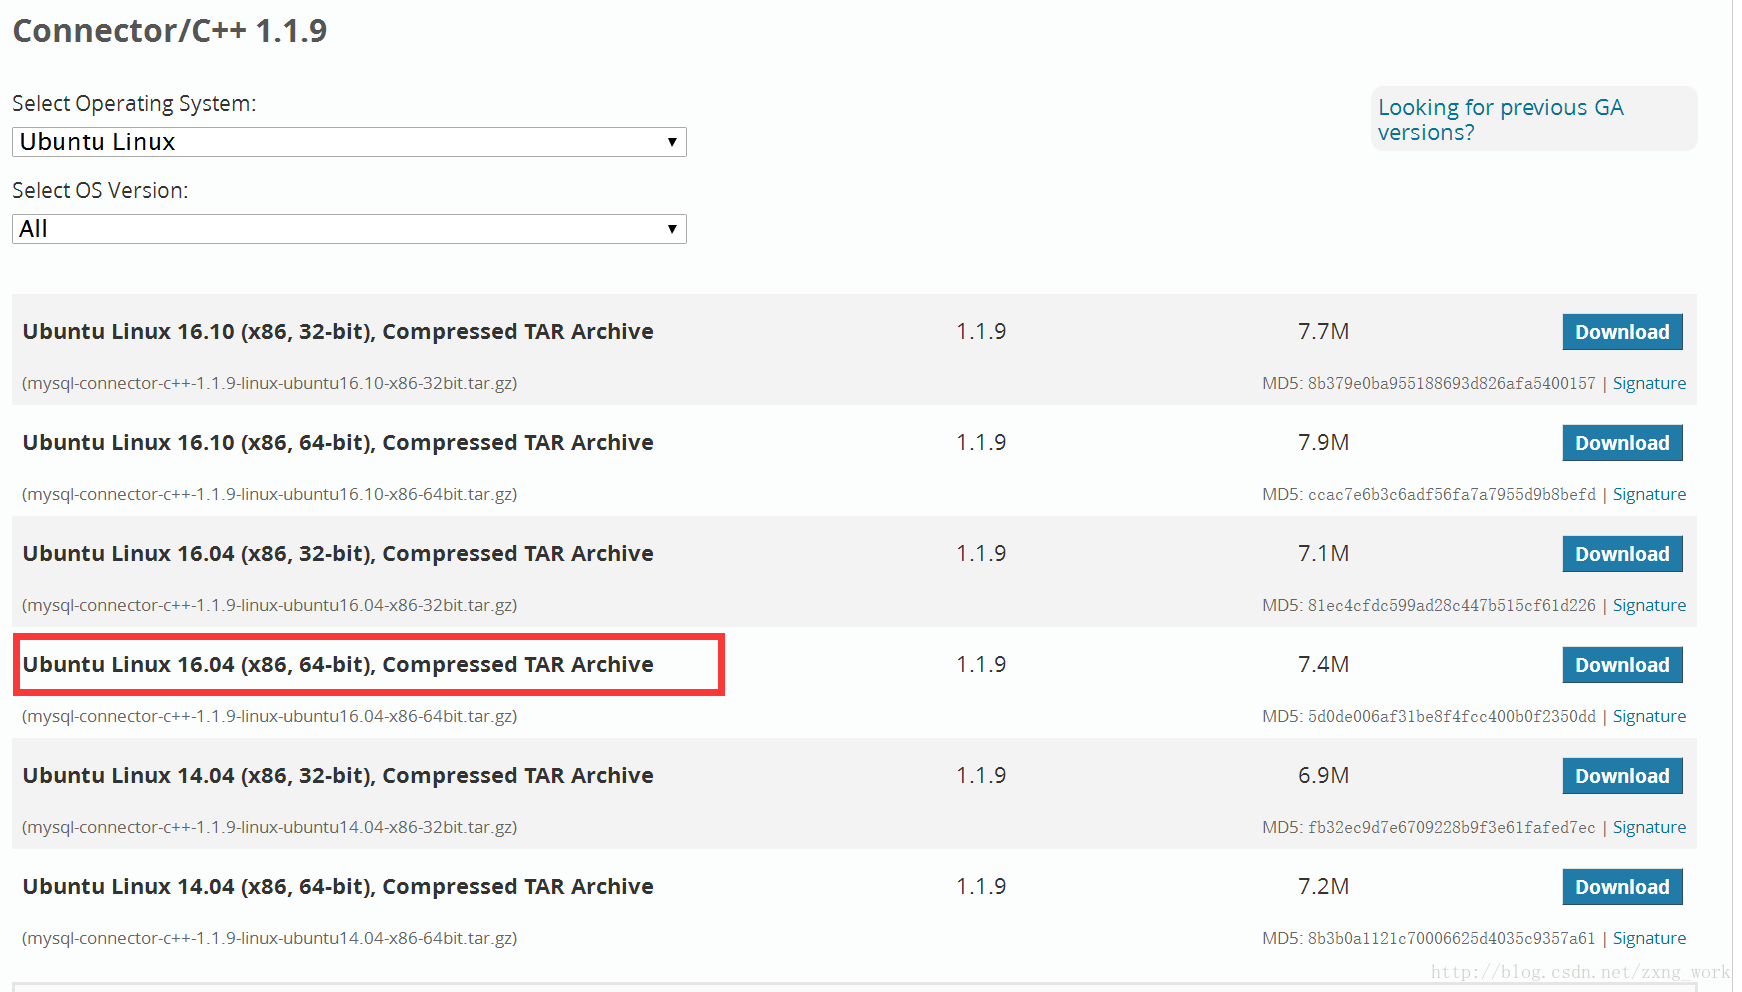
官網下載地址:
https://dev.mysql.com/downloads/connector/cpp/
如下圖所示。
移植MySQL C++標頭檔案
要使用C++類封裝的API,必須重新移植其標頭檔案和庫檔案,移植後可以不用C API的標頭檔案。
Makefile工程
解壓下載好的檔案,解壓後工程如下所示
~/Tools/mysql_connector_cpp$ tree
.
├── COPYING
├── include
│   ├── cppconn
│   │   ├── build_config.h
│   │   ├── config.h
│   │   ├── connection.h
│   │   ├── datatype.h
│   │   ├── driver.h
│   │   ├── exception.h
│   │   ├── metadata.h
│   │   ├── parameter_metadata.h
│   │   ├── prepared_statement.h
│   │   ├── resultset.h
│   │   ├── resultset_metadata.h
│   │   ├── sqlstring.h
│   │   ├── statement.h
│   │   ├── variant.h
│   │   ├── version_info.h
│   │   └── warning.h
│   ├── mysql_connection.h
│   ├── mysql_driver.h
│   └── mysql_error.h
├── lib
│   ├── libmysqlcppconn.so -> libmysqlcppconn.so.7
│   ├── libmysqlcppconn.so.7 -> libmysqlcppconn.so.7.1.1.9
│   ├── libmysqlcppconn.so.7.1.1.9
│   └── libmysqlcppconn-static.a
├── Licenses_for_Third-Party_Components.txt
└── README

3 directories, 26 files
~/Tools/mysql_connector_cpp$
將標頭檔案拷貝到工程的標頭檔案inc中
~/inc/Connector.C++ 1.1$ tree
.
├── COPYING.txt
├── include
│   ├── cppconn
│   │   ├── build_config.h
│   │   ├── config.h
│   │   ├── connection.h
│   │   ├── datatype.h
│   │   ├── driver.h
│   │   ├── exception.h
│   │   ├── metadata.h
│   │   ├── parameter_metadata.h
│   │   ├── prepared_statement.h
│   │   ├── resultset.h
│   │   ├── resultset_metadata.h
│   │   ├── sqlstring.h
│   │   ├── statement.h
│   │   ├── variant.h
│   │   ├── version_info.h
│   │   └── warning.h
│   ├── mysql_connection.h
│   ├── mysql_driver.h
│   └── mysql_error.h
├── Licenses_for_Third-Party_Components.txt
└── README.txt

2 directories, 22 files
~/inc/Connector.C++ 1.1$
將標頭檔案新增到Makefile工程中,編輯Makefile
INC += -I$(DIR)/mysql_connector_cpp/includeVisual Studio工程
Windows在安裝MySQLd的時候已經安裝了相應的庫和標頭檔案。
C++操作標頭檔案:
C:\Program Files\MySQL\Connector.C++ 1.1
檔案結構如下所示
~/Connector.C++ 1.1$ tree
.
├── COPYING.txt
├── include
│   ├── cppconn
│   │   ├── build_config.h
│   │   ├── config.h
│   │   ├── connection.h
│   │   ├── datatype.h
│   │   ├── driver.h
│   │   ├── exception.h
│   │   ├── metadata.h
│   │   ├── parameter_metadata.h
│   │   ├── prepared_statement.h
│   │   ├── resultset.h
│   │   ├── resultset_metadata.h
│   │   ├── sqlstring.h
│   │   ├── statement.h
│   │   ├── variant.h
│   │   ├── version_info.h
│   │   └── warning.h
│   ├── mysql_connection.h
│   ├── mysql_driver.h
│   └── mysql_error.h
├── lib
│   └── opt
│       ├── mysqlcppconn.dll
│       ├── mysqlcppconn.lib
│       └── mysqlcppconn-static.lib
├── Licenses_for_Third-Party_Components.txt
└── README.txt

4 directories, 25 files
~/Connector.C++ 1.1$
引用標頭檔案如下圖所示
移植MySQL C++庫檔案
Makefile工程
將庫檔案拷貝到工程的庫目錄中
~/open_lib$ tree
.
├── gtest.a
├── libmysqlclient.so
└── MySQL_lib
    ├── libmysqlcppconn.so
    ├── libmysqlcppconn.so.7
    ├── libmysqlcppconn.so.7.1.1.9
    ├── libmysqlcppconn-static.a
    ├── libmysql.dll
    ├── libmysql.lib
    ├── mysqlclient.lib
    ├── mysqlcppconn.dll
    ├── mysqlcppconn.lib
    └── mysqlcppconn-static.lib

1 directory, 12 files
~/open_lib$
庫檔案編譯新增到Makefile工程中,編輯Makefile
MYSQL_LIB += -L$(DIR)/open_lib/MySQL_lib -lmysqlcppconnVisual Studio工程
庫檔案位置:C:\Program Files\MySQL\Connector.C++ 1.1\lib\opt
檔案位置即MySQL安裝位置。
如下圖所示

將庫檔案全部拷貝到工程庫檔案目錄下
├── open_lib
│   ├── MySQL_lib
│   │   ├── libmysql.dll
│   │   ├── libmysql.lib
│   │   ├── mysqlclient.lib
│   │   ├── mysqlcppconn.dll
│   │   ├── mysqlcppconn.lib
│   │   └── mysqlcppconn-static.lib
專案引用庫檔案,如下圖所示
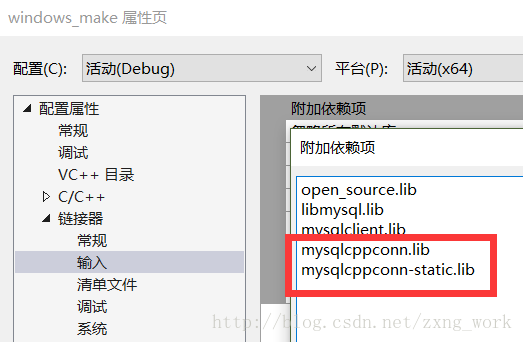
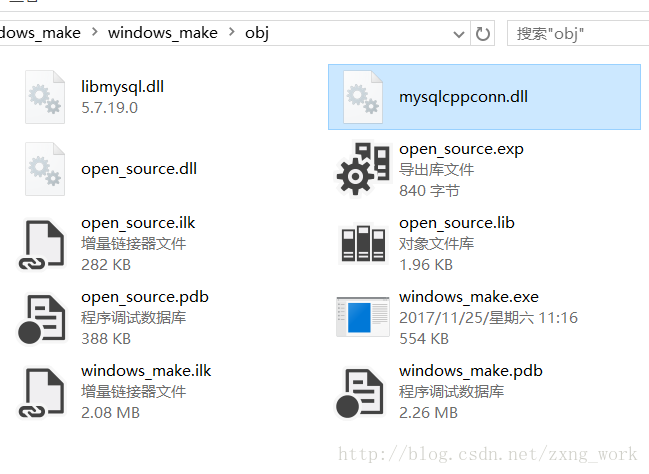
新增工程執行環境dll。為保證程式執行後不需要依賴系統的環境變數,需要將dll放到編譯器的輸出資料夾中,如定義了obj為輸出資料夾,就dll放到該資料夾中。如下圖所示。
引用boost庫
MySQL的C++操作函式需要boost庫的支援,因此將編譯好的boost庫標頭檔案位置以及庫路徑新增進工程中。
引用boost庫標頭檔案和庫檔案:
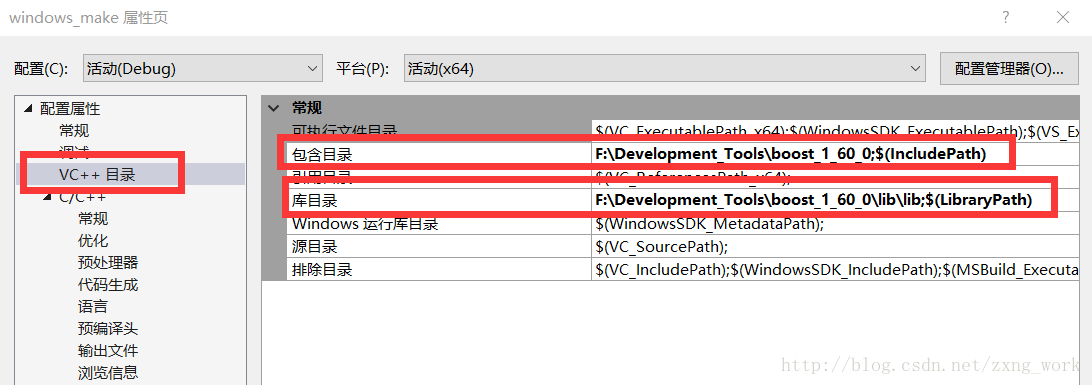
因為boost庫比較大一般引用的是電腦的路徑,為了與可移植的工程配置分開,將boost庫標頭檔案和庫檔案在工程配置的VC++目錄中,如下圖所示。
新增完畢之後不需要在聯結器上新增庫檔案。
Linux的由於boost庫新增進系統變數中,編譯時直接呼叫標頭檔案即可。
沒有新增的需要編輯/etc/profile檔案
export BOOST_INCLUDE=/home/ghost/Tools/boost_1_60_0:$CPLUS_INCLUDE_PATH
export BOOST_LIBRARY=/home/ghost/Tools/boost_1_60_0/stage/lib:$LIBRARY_PATH
export BOOST_LD_LIBRARY=/home/ghost/Tools/boost_1_60_0/stage/lib:$LD_LIBRARY_PATH
新增MySQL示例
工程新增MySQL示例測試MySQL移植工程。
module_MySQLcpp.cpp
#include "module_MySQLcpp.h"
#include <iostream>
#include <string>
#include <vector>

#include <mysql_driver.h>
#include <mysql_connection.h>
#include <cppconn/statement.h>
#include <cppconn/prepared_statement.h>
#include <cppconn/driver.h>
#include <cppconn/metadata.h>
#include <cppconn/exception.h>

using namespace std;
using namespace sql;

void TestCppSQL(void)
{

    std::string sql = " SELECT * from zx_users where vname = 'user2';";
    try
    {
        sql::mysql::MySQL_Driver *pMysqldriver = mysql::get_mysql_driver_instance();
        if (NULL == pMysqldriver)
            throw string("MySQL get_mysql_driver_instance is Error.");

        sql::Connection *pMysqlconnection = pMysqldriver->connect("localhost",
                                                                    "zxpro-admin",
                                                                    "qwerty");
        if (NULL == pMysqlconnection)
            throw string("MySQL connect is Error.");

        Statement *pMysqlstat = pMysqlconnection->createStatement();
        if (NULL == pMysqlstat)
            throw string("MySQL createStatement is Error.");

        if(pMysqlstat->execute("use zx_mysql;"))
            throw string("MySQL execute is Error.");

        sql::ResultSet *result = pMysqlstat->executeQuery(sql.c_str());
        if(NULL == result)
            throw string("MySQL executeQuery is Error.");
        while (result->next())
        {
            cout << "-----------------" << endl;
            cout << "vname is       : " << result->getString("vname").c_str() << endl;
            cout << "vpwd is        : " << result->getString("vpwd").c_str() << endl;
            string pwdtype = result->getString("pwdtype").c_str();
            cout << "pwdtype is     : " << (pwdtype.empty() ? "NULL" : pwdtype) << endl;
            string phone = result->getString("phone").c_str();
            cout << "phone is       : " << (phone.empty() ? "NULL" : phone) << endl;
            cout << "add_time is    : " << result->getString("add_time").c_str() << endl;
            cout << endl;
        }

        cout << "MySQL is OK." << endl;

        delete result;
        result = NULL;

        delete pMysqlstat;
        pMysqlstat = NULL;

        pMysqlconnection->close();
        delete pMysqlconnection;
        pMysqlconnection = NULL;
    }
    catch (const SQLException &CMysqlErr)
    {
        cout << "SQL what       :" << CMysqlErr.what() << endl;
        cout << "SQL Error code :" << CMysqlErr.getErrorCode() << endl;
        cout << "SQL State          :" << CMysqlErr.getSQLStateCStr() << endl;
    }
    catch (const std::string &Err_Msg)
    {
        cout << Err_Msg << endl;
    }
    catch (const std::exception &Err)
    {
        cout << "exception  what :"<< Err.what() << endl;
    }
    catch (...)
    {
        cout << "MySQL operation is error!" << endl;
    }
}
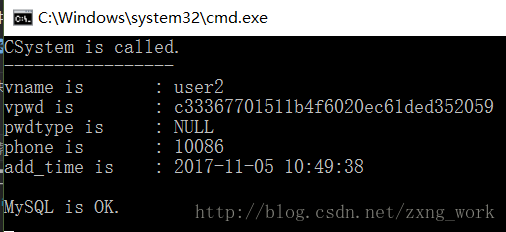
示例工程執行結果如下圖所示。
MySQL C++ API
標頭檔案包含
要使用MySQL的介面API,需要包含標頭檔案
#include <mysql_driver.h>
#include <mysql_connection.h>
#include <cppconn/statement.h>
#include <cppconn/prepared_statement.h>
#include <cppconn/driver.h>
#include <cppconn/metadata.h>
#include <cppconn/exception.h>

//使用MySQL名稱空間
using namespace sql;
MySQL異常類:SQLException
類的說明
class CPPCONN_PUBLIC_FUNC SQLException : public std::runtime_error類的介面呼叫
    catch (SQLException &CMysqlErr)
    {
        cout << "SQL what           :" << CMysqlErr.what() << endl;
        cout << "SQL Error code :" << CMysqlErr.getErrorCode() << endl;
        cout << "SQL State          :" << CMysqlErr.getSQLStateCStr() << endl;
    }
類的列印,如輸入錯誤SQL命令,MySQL函式拋異常,捕獲到的異常列印資訊為
錯誤MySQL指令:std::string sql = “SELECC * from zx_users;”;
CSystem is called.
SQL what       :You have an error in your SQL syntax; check the manual that corresponds to your MySQL server version for the right syntax to use near 'SELECC * from zx_users' at line 1
SQL Error code :1064
SQL State      :42000
登入MySQL:mysql::get_mysql_driver_instance()
函式原型:
CPPCONN_PUBLIC_FUNC MySQL_Driver * get_driver_instance();
static inline MySQL_Driver * get_mysql_driver_instance() { return get_driver_instance(); }
動態庫函式定義
#if defined(_WIN32)
 // mysqlcppconn_EXPORTS is added by cmake and defined for dynamic lib build only
  #ifdef mysqlcppconn_EXPORTS
    #define CPPCONN_PUBLIC_FUNC __declspec(dllexport)
  #else
    // this is for static build
    #ifdef CPPCONN_LIB_BUILD
      #define CPPCONN_PUBLIC_FUNC
    #else
      // this is for clients using dynamic lib
      #define CPPCONN_PUBLIC_FUNC __declspec(dllimport)
    #endif
  #endif
#else
  #define CPPCONN_PUBLIC_FUNC
#endif
MySQL驅動操作類:
class CPPCONN_PUBLIC_FUNC MySQL_Driver : public sql::Driver
{
    boost::scoped_ptr< ::sql::mysql::NativeAPI::NativeDriverWrapper > proxy;

public:
    MySQL_Driver();
    MySQL_Driver(const ::sql::SQLString & clientLib);

    virtual ~MySQL_Driver();

        sql::Connection * connect(const sql::SQLString& hostName, //MySQL的IP,遠端登入輸入遠端登入的IP地址
                                const sql::SQLString& userName,   //登入使用者
                                const sql::SQLString& password);  //登入密碼

    sql::Connection * connect(sql::ConnectOptionsMap & options);

    int getMajorVersion();

    int getMinorVersion();

    int getPatchVersion();

    const sql::SQLString & getName();

    void threadInit();

    void threadEnd();

private:
    /* Prevent use of these */
    MySQL_Driver(const MySQL_Driver &);
    void operator=(MySQL_Driver &);
};
C++操作函式登入MySQL的步驟
    sql::mysql::MySQL_Driver *pMysqldriver = mysql::get_mysql_driver_instance();
    if (nullptr == pMysqldriver)
            throw string("MySQL_Driver is error");

    sql::Connection *pMysqlconnection = pMysqldriver->connect("localhost",
                                                                "zxpro-admin",
                                                                "qwerty");

//指定埠用此登入
sql::Connection *pMysqlconnection = pMysqldriver->connect("tcp://localhost:3306", //指定埠
                                                            "zxpro-admin",
                                                            "qwerty");

    if (nullptr == pMysqlconnection)
        throw string("MySQL Connection is error!");
操作MySQL:execute(),executeQuery(),executeUpdate()
使用前通過連線得到的指標先呼叫建立語句函式:createStatement()
        Statement *pMysqlstat = pMysqlconnection->createStatement();
        pMysqlstat->execute("use zx_mysql;");
        sql::ResultSet *result = pMysqlstat->executeQuery(sql.c_str());
函式原型
virtual Statement *createStatement() = 0;
virtual bool execute(const sql::SQLString& sql) = 0;
virtual ResultSet * executeQuery(const sql::SQLString& sql) = 0;
virtual int executeUpdate(const sql::SQLString& sql) = 0;
重點:
sql::SQLString不能接收std::string直傳,需要呼叫c_str()轉成C字串的形式傳。
三個函式都是可以執行操作MySQL,從返回值可以看出其功能。
bool execute()              :返回的是語句的操作成功與失敗。
ResultSet * executeQuery()  :返回類指標ResultSet,說明需要獲得MySQL語句查詢的結果
int executeUpdate           :返回整型,說明返回被更新的個數
可以根據語句的需要呼叫不同的執行函式:
mysql> select vname, phone from zx_users where pwdtype = 'MD5';
+-----------+-----------+
| vname     | phone     |
+-----------+-----------+
| user1     | 123456    |
| userpwd   | NULL      |
+-----------+-----------+
2 rows in set

mysql> update zx_users set phone = 321654 where pwdtype = 'MD5';
Query OK, 2 rows affected
Rows matched: 2  Changed: 2  Warnings: 0

mysql> use zx_mysql;
Database changed
關閉MySQL:close()
呼叫類sql::Connection的關閉函式close()來關閉MySQL的連線。
pMysqlconnection->close();
讀取MySQL資料:executeQuery()
呼叫該函式後,會獲得資料結果類ResultSet的指標。
ResultSet類定義標頭檔案:Connector.C++ 1.1\include\cppconn\resultset.h
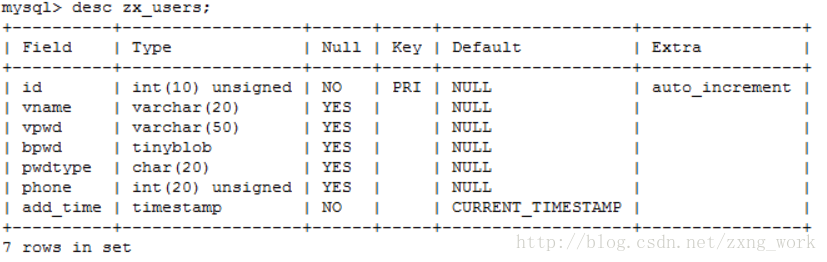
結果通過字串描述的欄位獲取MySQL欄位中的資料內容,前提是需要知道該欄位的資料型別,檢視欄位型別命令:DESC
其中Type即欄位的型別。
    cout << "vname is       : " << result->getString("vname").c_str() << endl;
    string phone = result->getString("phone").c_str();
    cout << "phone is       : " << (phone.empty() ? "NULL" : phone) << endl;
ResultSet類讀取資料函式原型
    //獲取字元型資料
    virtual SQLString getString(const sql::SQLString& columnLabel) const = 0;

    //獲取int型資料
    virtual int32_t     getInt(const sql::SQLString& columnLabel) const = 0;
    virtual uint32_t    getUInt(const sql::SQLString& columnLabel) const = 0;
    virtual int64_t     getInt64(const sql::SQLString& columnLabel) const = 0;
    virtual uint64_t    getUInt64(const sql::SQLString& columnLabel) const = 0;

    //獲取二進位制資料
    virtual std::istream * getBlob(const sql::SQLString& columnLabel) const = 0;
欄位描述字元串同樣不能直接傳string,需要呼叫c_str()轉成C字串的形式傳。
測試程式
std::string sql = "SELECT * from zx_users;";
try
{
………
sql::ResultSet *result = pMysqlstat->executeQuery(sql.c_str());
if(NULL == result)
throw string("MySQL executeQuery is Error.");
while (result->next())
{
cout <<
相關推薦
C++連線MySQL資料庫(利用API)
一般C/C++與資料庫相連有兩種方法。
利用ODBC,ADO,或者JDBC
用ODBC,ADO,JDBC等這些介面,利用裡面的方法來進行與資料庫的連線,簡化對資料庫的操作,方便對資料庫進行管理。
介面的區別可以參考以下文章
不過注意的是C/C++
分享幾本比較好的pdf書籍,包括oracle資料庫,mysql資料庫,C語言程式設計,java程式設計,以及linux作業系統等
1.個人認為最好的oracle資料庫學習書籍,找了很久,發現內容最全講解最清晰《Oracle PL/SQL程式設計》上下
連結:https://pan.baidu.com/s/1VxvbW070_-KEFKEwY0iFCg
提取碼:rm1e
2.《linux系統程式設計
10款最好用的MySQL資料庫客戶端圖形介面管理工具
MySQL 在過去由於效能高、成本低、可靠性好,已經成為最流行的開源資料庫,因此被廣泛地應用在 Internet 上的中小型網站中。隨著 MySQL 的不斷成熟,它也逐漸用於更多大規模網站和應用,比如維基百科、Google 和 Facebook 等網站。非常流行的開源軟
sqlite的C/C++ API介面的基礎操作與事務
一、C/C++ 介面 API
主要通過通過sqlite3_open,sqlite3_exec和qlite3_close來實現一個簡單的資料庫操作。
1.1、sqlite3_open
sqlite3_open(const char *filename, sqlit
sqlite之我見--C/C++ API介面示例 .
在之前的兩篇博文中,分別介紹了SQLITE的基礎知識和操作,C/C++ 的一些常用API
本文中,我會給大家用幾個小程式示例SQLITE C/C++ API的使用。
1.我們看下最簡單的sqlite程式,通過sqlite3_open, sqlite3_exec, sq
MySQL資料庫使用——MySQL在C/C++的API介面
直接操作MySQL,輸入命令效率低,將MySQL嵌入程式中,封裝介面,讓程式去訪問MySQL,才能最大效益利用MySQL。
MySQL C API移植
包含MySQL的工程檔案不應直接關聯電腦已安裝的MySQL,因為不同電腦伺服器安裝的位置不一樣,每次
C++ API方式連線mysql資料庫實現增刪改查
轉自
http://www.bitscn.com/pdb/mysql/201407/226252.html
一、環境配置
1,裝好mysql,新建一個C++控制檯工程(從最簡單的弄起,這個會了,可以往任何c++工程移植),在vs2010中設定,工程--屬性--VC++目
採用C/S架構完成使用者註冊並連線Mysql資料庫(介面winform)
語言:C#開發平臺:VS2017對於C/S架構的一些基本互動我前面已經寫過了,這裡就不再贅述,C#並沒有直接連線資料庫的東西,需要匯入資料庫的外掛才能驅動資料庫操作,using MySql.Data.MySqlClient;也就是引如這個名稱空間,這個空間來自Mysql下的一
Mysql的C語言API介面在專案中的使用
#include "Mysql.h"
int Mysql::select_user_store(char *sql,char *user_info)
{
int reta = mysql_real_query1(sql);
if (
Python爬蟲-利用百度地圖API介面爬取資料並儲存至MySQL資料庫
首先,我這裡有一份相關城市以及該城市的公園數量的txt檔案:
其次,利用百度地圖API提供的介面爬取城市公園的相關資訊。
所利用的API介面有兩個:
1、http://api.map.baidu.com/place/v2/search?q=公園&
C# 實現 MySql資料庫連線 登入並跳轉介面
前言:連線上篇文章,在上文C#登入並跳轉介面基礎上,修改登入視窗使用者資訊的驗證方式,從簡單字串匹配判斷,改進到連線MySql資料庫進行驗證。正文:1.Mysql資料庫的建立2.Visual Studio 2017 的設定(2) 安裝好以後,找到它的安裝路徑,一般都是C:\P
C++連線mysql資料庫的兩種方法(ADO連線和mysql api連線)
【原文 http://www.jb51.net/article/44262.htm 】
現在正做一個介面,通過不同的連線字串操作不同的資料庫。要用到mysql資料庫,C++連線mysql有2種方法:利用ADO連線、利用mysql自己的api函式進行連線,下面看看如何用吧。
C API--linux上c語言讀取資料庫內容(mysql)
這裡歸納了C API可使用的函式,詳見MYSQL手冊
函式
描述
mysql_affected_rows()
返回上次UPDATE、DELETE或INSERT查詢更改/刪除/插入的行數。
mysql_autocommit()
切換 autocommit模式,ON/OFF
mysql
Json訪問Mysql資料庫返回json資料 (API介面)
因為畢業設計的課題需要從服務端解析json資料,從而展示到安卓UI介面
所以我需要自學服務端的一些知識
在網上看了一些教程,結合自己的實際操作,做了以下一個demo以進行測試
第一步,準備資料庫
我首先準備好了一個excel 表 ,用於存放我們需要解析的
用C api 連線mysql資料庫的 開發例項
1. 下載mysql c connector 安裝包; 有兩種方法:
1 下載tar檔案, 將其中的的 lib, include , bin 都放在 /usr/local 相應的目錄下;
2. 也可配置連
C#怎樣連結mysql資料庫
C#一般連結sqlserver資料庫,當然也會連結oracle。C#和MYSQL搭配貌似不多見哦
下面說說方法。
1、下載連結庫檔案,MySql.Data.dll
MySql.Data.rar
2、工程引用檔案,並在類檔案中應用using
using MySql.Data; using MySql.
c#Mysql資料庫
/// <summary>
/// 建立mysql資料庫連結
/// </summary>
sqlite3- SQLite資料庫的DB-API 2.0介面
sqlite3- SQLite資料庫的DB-API 2.0介面
SQLite是一個C庫,它提供了一個基於磁碟的輕量級資料庫,它不需要單獨的伺服器程序,並允許使用SQL查詢語言的非標準變體訪問資料庫。某些應用程式可以使用SQLite進行內部資料儲存。也可以使用SQLite對應用程式進行原型
vs2013下c++連線mysql資料庫
本文使用的是mysql提供的api來進行連線,這樣使用比較方便。
開發環境:mysql 5.6+vs2013+win8.1作業系統
步驟1: 要使用mysql的api,需要mysql安裝目錄下include 和 lib 兩個資料夾的東西,如果你用的是wamp或者php
Zookeeper C API之介面描述
Zookeeper C API介面大部分以zoo_開頭,少量介面以zookeeper_開頭。 除了初始化/銷燬控制代碼、設定日誌等級/日誌流以及一些輔助功能的API外,Zookeeper C API介面分為同步介面和非同步介面:同步介面以zoo_開頭、非同步介面以zoo_a開頭。
1、初