搭建完全分離式LNMP平臺的簡單案例
阿新 • • 發佈:2019-01-08
案例拓撲圖
安裝配置nginx伺服器
編譯安裝nginx時,需要事先安裝 開發包組"Development Tools"和"Server Platform Development",同時還需專門安裝pcre-devel包。
- # yum -y groupinstall "Development Tools"
- # yum -y groupinstall "Server Platform Development"
- # yum -y install pcre-devel
首先新增nginx使用者組和nginx使用者
- # groupadd -r nginx
- # useradd -g nginx -r nginx
建立編譯安裝是所需要的目錄
- # mkdir -pv /var/tmp/nginx/client
編譯安裝nginx
- # tar xf nginx-1.4.7.tar.gz
- # cd nginx-1.4.7
- # ./configure \
- --prefix=/usr/local/nginx \
- --sbin-path=/usr/local/nginx/sbin/nginx \
- --conf-path=/etc/nginx/nginx.conf \
- --error-log-path=/var/log/nginx/error.log \
- --http-log-path=/var/log/nginx/access.log \
- --pid-path=/var/run/nginx/nginx.pid \
- --lock-path=/var/lock/nginx.lock \
- --user=nginx \
- --group=nginx \
- --with-http_ssl_module \
- --with-http_flv_module \
- --with-http_stub_status_module \
- --with-http_gzip_static_module \
- --http-client-body-temp-path=/var/tmp/nginx/client/ \
- --http-proxy-temp-path=/var/tmp/nginx/proxy/ \
- --http-fastcgi-temp-path=/var/tmp/nginx/fcgi/ \
- --http-uwsgi-temp-path=/var/tmp/nginx/uwsgi \
- --http-scgi-temp-path=/var/tmp/nginx/scgi \
- --with-pcre
- # make && make install
為nginx提供SysV init指令碼
- # vim /etc/rc.d/init.d/nginx
- #!/bin/sh
- #
- # nginx - this script starts and stops the nginx daemon
- #
- # chkconfig: - 85 15
- # description: Nginx is an HTTP(S) server, HTTP(S) reverse \
- # proxy and IMAP/POP3 proxy server
- # processname: nginx
- # config: /etc/nginx/nginx.conf
- # config: /etc/sysconfig/nginx
- # pidfile: /var/run/nginx.pid
- # Source function library.
- . /etc/rc.d/init.d/functions
- # Source networking configuration.
- . /etc/sysconfig/network
- # Check that networking is up.
- [ "$NETWORKING" = "no" ] && exit 0
- nginx="/usr/local/nginx/sbin/nginx"
- prog=$(basename $nginx)
- NGINX_CONF_FILE="/etc/nginx/nginx.conf"
- [ -f /etc/sysconfig/nginx ] && . /etc/sysconfig/nginx
- lockfile=/var/lock/subsys/nginx
- make_dirs() {
- # make required directories
- user=`nginx -V 2>&1 | grep "configure arguments:" | sed 's/[^*]*--user=\([^ ]*\).*/\1/g' -`
- options=`$nginx -V 2>&1 | grep 'configure arguments:'`
- for opt in $options; do
- if [ `echo $opt | grep '.*-temp-path'` ]; then
- value=`echo $opt | cut -d "=" -f 2`
- if [ ! -d "$value" ]; then
- # echo "creating" $value
- mkdir -p $value && chown -R $user $value
- fi
- fi
- done
- }
- start() {
- [ -x $nginx ] || exit 5
- [ -f $NGINX_CONF_FILE ] || exit 6
- make_dirs
- echo -n $"Starting $prog: "
- daemon $nginx -c $NGINX_CONF_FILE
- retval=$?
- echo
- [ $retval -eq 0 ] && touch $lockfile
- return $retval
- }
- stop() {
- echo -n $"Stopping $prog: "
- killproc $prog -QUIT
- retval=$?
- echo
- [ $retval -eq 0 ] && rm -f $lockfile
- return $retval
- }
- restart() {
- configtest || return $?
- stop
- sleep 1
- start
- }
- reload() {
- configtest || return $?
- echo -n $"Reloading $prog: "
- killproc $nginx -HUP
- RETVAL=$?
- echo
- }
- force_reload() {
- restart
- }
- configtest() {
- $nginx -t -c $NGINX_CONF_FILE
- }
- rh_status() {
- status $prog
- }
- rh_status_q() {
- rh_status >/dev/null 2>&1
- }
- case "$1" in
- start)
- rh_status_q && exit 0
- $1
- ;;
- stop)
- rh_status_q || exit 0
- $1
- ;;
- restart|configtest)
- $1
- ;;
- reload)
- rh_status_q || exit 7
- $1
- ;;
- force-reload)
- force_reload
- ;;
- status)
- rh_status
- ;;
- condrestart|try-restart)
- rh_status_q || exit 0
- ;;
- *)
- echo $"Usage: $0 {start|stop|status|restart|condrestart|try-restart|reload|force-reload|configtest}"
- exit 2
- esac
為此指令碼賦予執行許可權
- # chmod +x /etc/rc.d/init.d/nginx
將nginx服務新增至服務管理列表,並讓其開機自動啟動
- # chkconfig --add nginx
- # chkconfig nginx on
編輯配置檔案/etc/nginx/nginx.conf,在server段內新增如下內容
- location ~ \.php$ {
- fastcgi_pass 10.170.2.90:9000;
- fastcgi_index index.php;
- fastcgi_param SCRIPT_FILENAME /var/www/html$fastcgi_script_name;
- include fastcgi_params;
- }
啟動nginx服務
- # vim /etc/init.d/nginx start
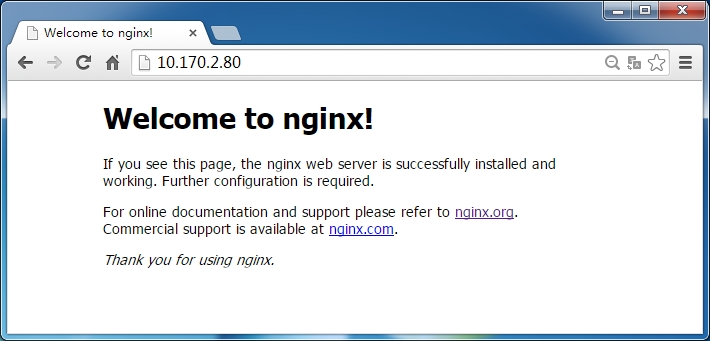
測試nginx是否工作起來,在瀏覽器中鍵入10.170.2.80,可以得到如下頁面
安裝PHP伺服器
編譯安裝php
- # tar xf php-5.4.26.tar.bz2
- # cd php-5.4.26
- # ./configure --prefix=/usr/local/php5 --with-mysql=mysqlnd--with-pdo-mysql=mysqlnd--with-mysqli=mysqlnd --with-openssl --enable-mbstring --with-freetype-dir --with-jpeg-dir --with-png-dir --with-zlib --with-libxml-dir=/usr --enable-xml --enable-sockets --enable-fpm --with-mcrypt --with-config-file-path=/etc --with-config-file-scan-dir=/etc/php.d --with-bz2
- # make && make install
為php提供配置檔案
- # cp php.ini-production /etc/php.ini
配置php-fpm
- # cp sapi/fpm/init.d.php-fpm /etc/rc.d/init.d/php-fpm
- # chmod +x /etc/rc.d/init.d/php-fpm
- # chkconfig --add php-fpm
- # chkconfig php-fpm on
- # cp /usr/local/php5/etc/php-fpm.conf.default /usr/local/php5/etc/php-fpm.conf
編輯配置檔案/usr/local/php5/etc/php-fpm.conf,將以下選項修改為相對應的值
- pm.max_children = 50
- pm.start_servers = 5
- pm.min_spare_servers = 2
- pm.max_spare_servers = 8
- pid = /usr/local/php5/var/run/php-fpm.pid
在/var/www/html目錄下提供測試頁面index.php,其內容為
- <h1>hello,nginx</h1>
- <?php
- $link = mysql_connect('10.170.2.36','testuser','******');
- if ($link)
- echo "Success...";
- else
- echo "Failure...";
- mysql_close();
- phpinfo();
- ?>
啟動php-fpm服務
- # /etc/init.d/php-fpm start
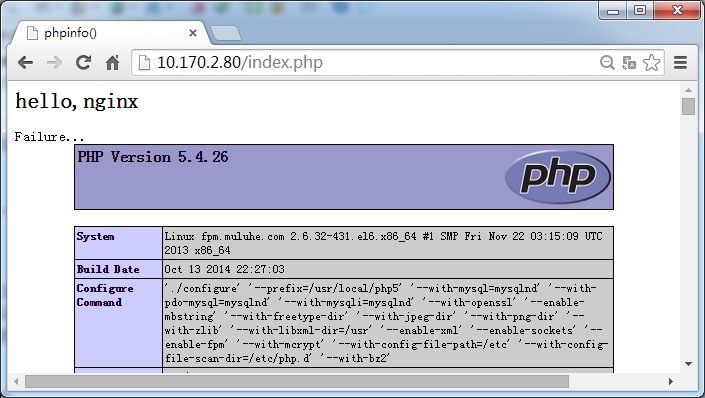
測試nginx伺服器與php伺服器是否能夠建立通訊,在瀏覽器中鍵入10.170.2.80/index.php,可以得到如下頁面
頁面中顯示Failure...,是因為後端的資料庫還沒有進行相應的配置
安裝MariaDB伺服器
編譯安裝mariadb-5.5.36
- # tar xf mariadb-5.5.36-linux-x86_64.tar.gz -C /usr/local
- # cd /usr/local/
- # ln -sv mariadb-5.5.36-linux-x86_64/ mysql
- # mkdir -pv /mysql/data
- # groupadd -r mysql
- # useradd -g mysql -s /sbin/nologin -M -d /mysql/data -r mysql
- # chown -R mysql:mysql /mysql
- # chown -R mysql:mysql /mysql/data
為資料庫提供配置檔案:
- # cd mysql
- # mkdir /etc/mysql
- # chown -R root.mysql ./*
- # cp support-files/my-large.cnf /etc/mysql/my.cnf
- 修改檔案/etc/mysql/my.cnf檔案內容,在thread_concurrency = 8行下新增一行:
- datadir = /mysql/data
為資料庫提供SysV啟動指令碼,並設定為開機啟動:
- # cp support-files/mysql.server /etc/init.d/mysqld
- # chkconfig --add mysqld
- # chkconfig mysqld on
初始化資料庫並啟動資料庫:
- # echo "export PATH=/usr/local/mysql/bin:$PATH" > /etc/profile.d/mysql.sh
- # source /etc/profile.d/mysql.sh
- # echo "/usr/local/mysql/lib" > /etc/ld.so.conf.d/mysql.conf
- # ldconfig
- # ln -sv /usr/local/mysql/include/ /usr/include/mysql
- # scripts/mysql_install_db --user=mysql--datadir=/mysql/data/
- # /etc/init.d/mysqld start
建立資料庫並授權:
- MariaDB [(none)]> CREATE DATABASE testdb;
- MariaDB [(none)]> GRANT ALL ON testdb.* TO [email protected]'10.170.2.%' IDENTIFIED BY '******';
- MariaDB [(none)]> FLUSH PRIVILEGES;
整體測試LNMP平臺
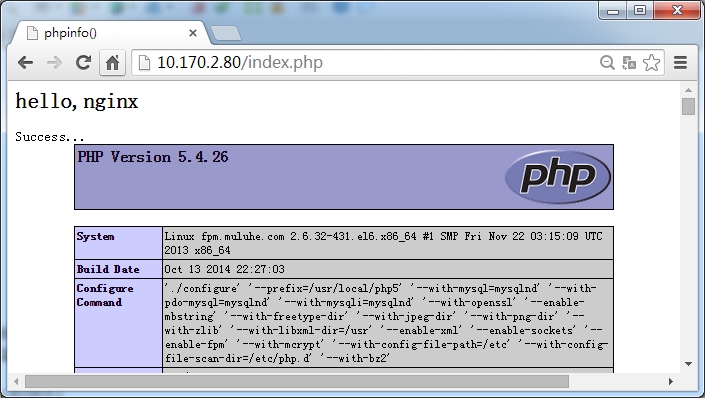
在瀏覽器中鍵入10.170.2.80/index.php,可以得到如下頁面
這次可以看到頁面中顯示Success...資訊。
FROM: http://os.51cto.com/art/201410/454231.htm


