
Android: ListView 和重寫後 MyListView 的簡單使用
阿新 • • 發佈:2019-01-09
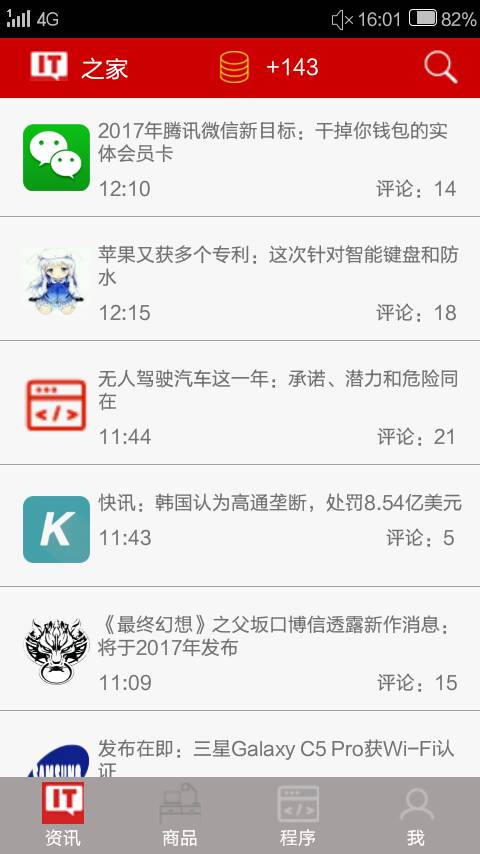
什麼是 ListView ?它有什麼用?
如這個頁面,多個新聞資訊:,一個個在xml寫是不可能的!
所以,我們需要用ListView迴圈寫!
一個LinearLayout 佈局中,
就一個圖片,一個標題,一個時間,一個評論數量!是不是很少啊?
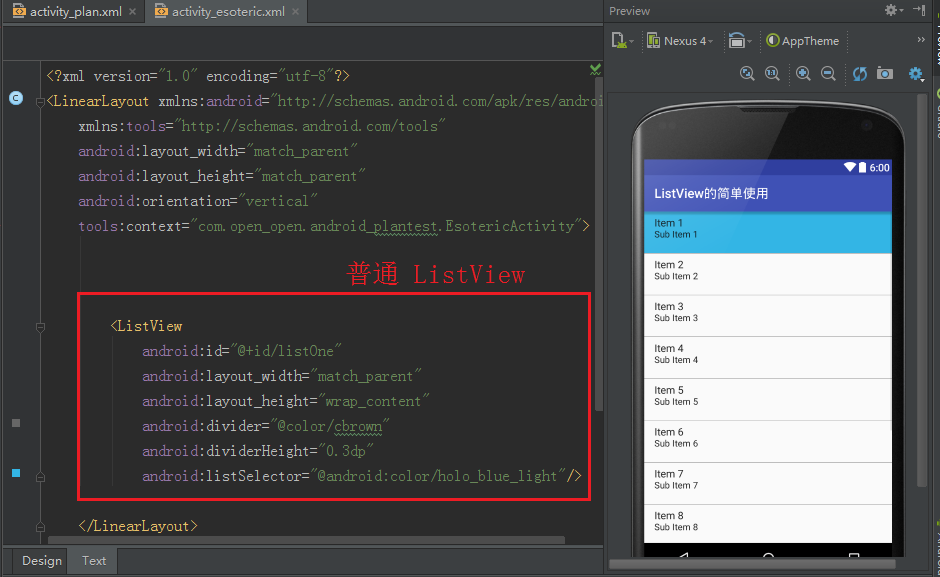
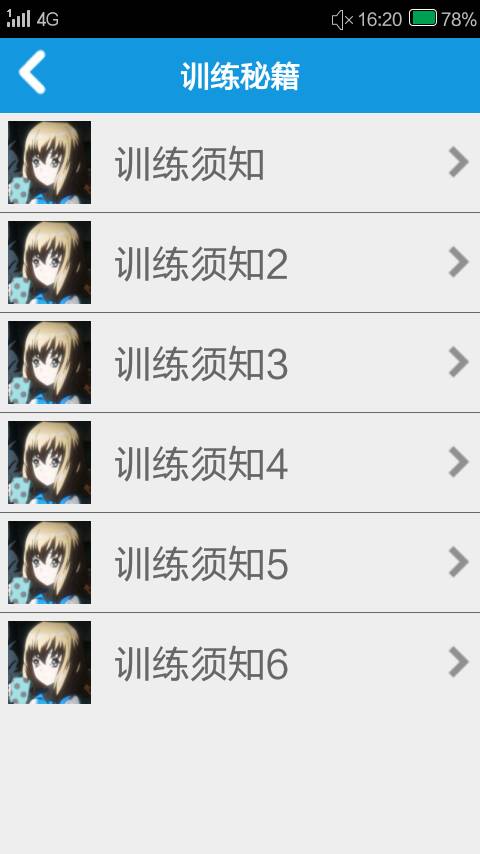
一、普通的ListView 例子
為了方便大家理解,我就寫個超級簡單的例子吧:
程式碼的組成:一個方法,2個xml頁面,圖片若張(自備)
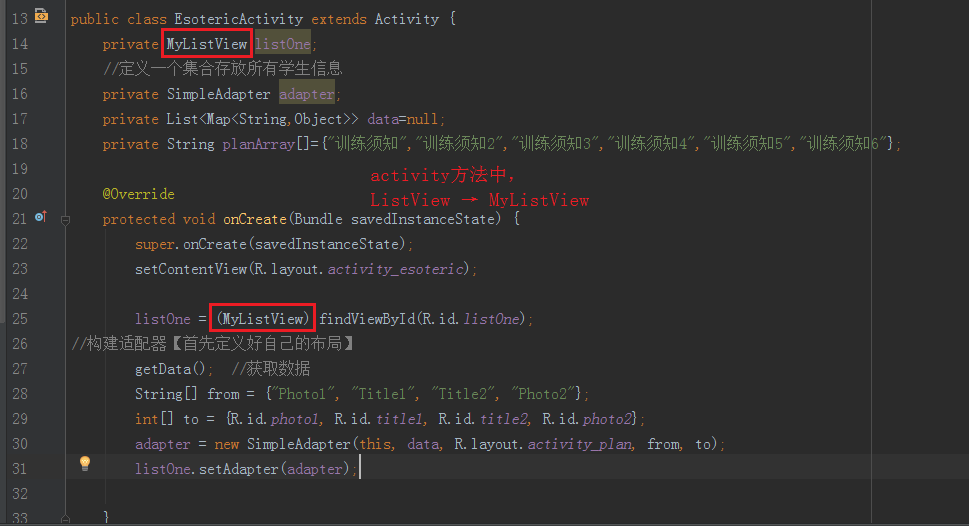
1、EsotericActivity.java
(我這裡的xml 很多重複,所以我用了迴圈,但是有時候還是不能偷懶)
package com.open_open.android_plantest;

import android.app.Activity;
import android.os.Bundle;
import android.widget.ListView;
import android.widget.SimpleAdapter;

import java.util.ArrayList;
import java.util.HashMap;
import java.util.List;
import java.util.Map;

public class EsotericActivity extends Activity {
    private ListView listOne;
    //定義一個集合存放所有學生資訊
    private SimpleAdapter adapter;
    private List<Map<String,Object>> data=null;
    private String planArray[]={"訓練須知","訓練須知2","訓練須知3","訓練須知4","訓練須知5","訓練須知6"};

    @Override
    protected void onCreate(Bundle savedInstanceState) {
        super.onCreate(savedInstanceState);
        setContentView(R.layout.activity_esoteric);

        listOne = (ListView) findViewById(R.id.listOne);
//構建介面卡【首先定義好自己的佈局】
        getData();  //獲取資料
        String[] from = {"Photo1", "Title1", "Title2", "Photo2"};
        int[] to = {R.id.photo1, R.id.title1, R.id.title2, R.id.photo2};
        adapter = new SimpleAdapter(this, data, R.layout.activity_plan, from, to);
        listOne.setAdapter(adapter);

    }
    private void getData() {
        data = new ArrayList<Map<String, Object>>();
//構建一項內容
        Map<String, Object> item = new HashMap<String, Object>();

        for(int i=0;i<planArray.length;i++){
            item = new HashMap<String, Object>();
            item.put("Photo1", R.drawable.plan1);
            item.put("Title1", planArray[i]);
            item.put("Title2", "");
            item.put("Photo2", R.drawable.go_in);
            data.add(item);
        }
    }

}
正常的情況:getDate() 的寫法
private void getData() { data = new ArrayList<Map<String,Object>>(); //構建一項內容 Map<String,Object> item=new HashMap<String, Object>(); item=new HashMap<String,Object>(); item.put("Photo",R.drawable.intel); item.put("Title","Intel/英特爾 I7-4790K LGA 1150 4.0GHZ"); item.put("Test","英特爾官方旗艦店"); item.put("Comment","成交:14"); data.add(item); item=new HashMap<String,Object>(); item.put("Photo",R.drawable.intel); item.put("Title","英特爾至強/Xeon E5-2630v2 6核12執行緒2.6GHzDell/戴爾 E5-2630v2"); item.put("Test","酷睿專賣店"); item.put("Comment","成交:7"); data.add(item); item=newHashMap<String,Object>(); item.put("Photo",R.drawable.jijia); item.put("Title","GIGABYTE/技嘉GTX1080 Xtreme W-8G螢火蟲 水之力GTX1080遊戲顯示卡"); item.put("Test","技嘉旗艦店"); item.put("Comment","成交:13"); data.add(item); item=new HashMap<String,Object>(); item.put("Photo",R.drawable.shandi); item.put("Title","Sandisk/閃迪 SDSSDA-120G SSD筆記本 桌上型電腦電腦固態硬碟非128G"); item.put("Test","和瑟數碼專營店"); item.put("Comment","成交:1711"); data.add(item); item=new HashMap<String,Object>(); item.put("Photo",R.drawable.sanxing); item.put("Title","Kingston/金士頓 SV300S37A/120G"); item.put("Test","易華旗艦店"); item.put("Comment","成交:65"); data.add(item); item=new HashMap<String,Object>(); item.put("Photo",R.drawable.sanxing); item.put("Title","釋出在即:三星Galaxy C5 Pro獲Wi-Fi認證"); item.put("Test","三星旗艦店"); item.put("Comment","成交:142"); data.add(item); item=new HashMap<String,Object>(); item.put("Photo",R.drawable.leishe); item.put("Title","Razer/雷蛇 煉獄蝰蛇 3500dpi 鐳射 5個"); item.put("Test","雷蛇億果專賣店 "); item.put("Comment","成交:2w"); data.add(item); }
2、activity_esoteric.xml
<?xml version="1.0" encoding="utf-8"?>
<LinearLayout xmlns:android="http://schemas.android.com/apk/res/android"
    xmlns:tools="http://schemas.android.com/tools"
    android:layout_width="match_parent"
    android:layout_height="match_parent"
    android:orientation="vertical"
    tools:context="com.open_open.android_plantest.EsotericActivity">

        <LinearLayout
            android:layout_width="match_parent"
            android:layout_height="50dp"
            android:background="@color/cblue"
            android:orientation="horizontal"
            android:gravity="center">

            <RelativeLayout
                android:layout_width="match_parent"
                android:layout_height="wrap_content">
                <ImageView
                    android:layout_width="wrap_content"
                    android:layout_height="wrap_content"
                    android:src="@drawable/go_back"
                    android:gravity="left"
                    android:layout_margin="5dp"/>
                <TextView
                    android:layout_width="wrap_content"
                    android:layout_height="wrap_content"
                    android:text="訓練祕籍"
                    android:textSize="20dp"
                    android:textColor="@android:color/white"
                    android:textStyle="bold"
                    android:layout_margin="10dp"
                    android:layout_centerHorizontal="true" />
            </RelativeLayout>
        </LinearLayout>

        <ListView
            android:id="@+id/listOne"
            android:layout_width="match_parent"
            android:layout_height="wrap_content"
            android:divider="@color/cbrown"
            android:dividerHeight="0.3dp"
            android:listSelector="@android:color/holo_blue_light"/>

    </LinearLayout>
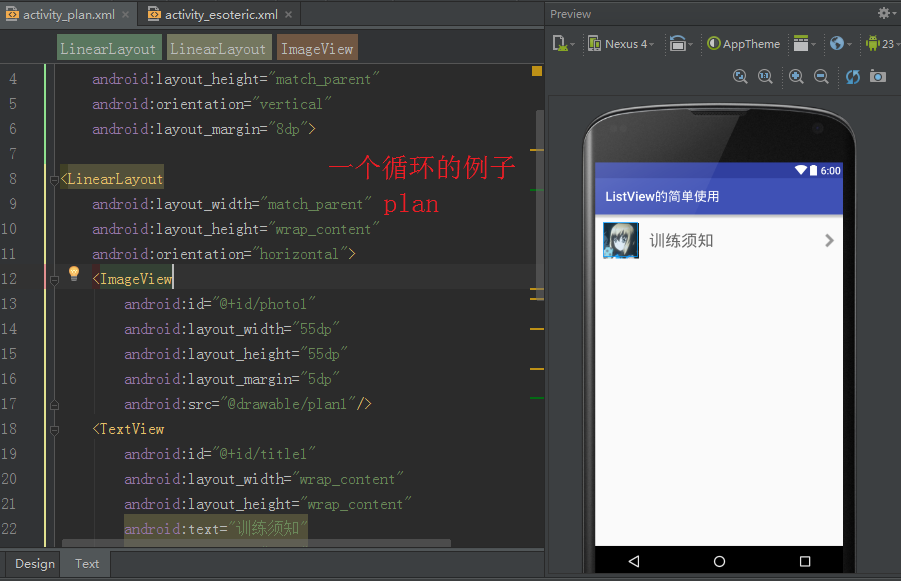
3.activity_plan.xml
我們有一個頭像photo1,一個標題title1, 一個隱藏的標題title 2(佔位,把圖示頂向右邊),
一個向右的圖示photo2!
<?xml version="1.0" encoding="utf-8"?>
<LinearLayout xmlns:android="http://schemas.android.com/apk/res/android"
    android:layout_width="match_parent"
    android:layout_height="match_parent"
    android:orientation="vertical"
    android:layout_margin="8dp">

<LinearLayout
    android:layout_width="match_parent"
    android:layout_height="wrap_content"
    android:orientation="horizontal">
    <ImageView
        android:id="@+id/photo1"
        android:layout_width="55dp"
        android:layout_height="55dp"
        android:layout_margin="5dp"
        android:src="@drawable/plan1"/>
    <TextView
        android:id="@+id/title1"
        android:layout_width="wrap_content"
        android:layout_height="wrap_content"
        android:text="訓練須知"
        android:textSize="25dp"
        android:textColor="@color/cbrown"
        android:layout_gravity="center"
        android:layout_marginLeft="10dp"/>

    <TextView
        android:id="@+id/title2"
        android:layout_width="wrap_content"
        android:layout_height="wrap_content"
        android:layout_weight="1"/>
    <ImageView
        android:id="@+id/photo2"
        android:layout_width="wrap_content"
        android:layout_height="wrap_content"
        android:src="@drawable/go_in"
        android:layout_gravity="center"/>
</LinearLayout>

</LinearLayout>
結果:
二、重寫ListView 的例子!
有時候,我們的佈局不是LinearLayout 那麼簡單,
由於頁面比較長,我們使用了 ScrollView 可滑動佈局!
但是ScrollView 佈局中,ListView 只顯示一行資料啊!
這個時候,我們就需要用到MyListView !
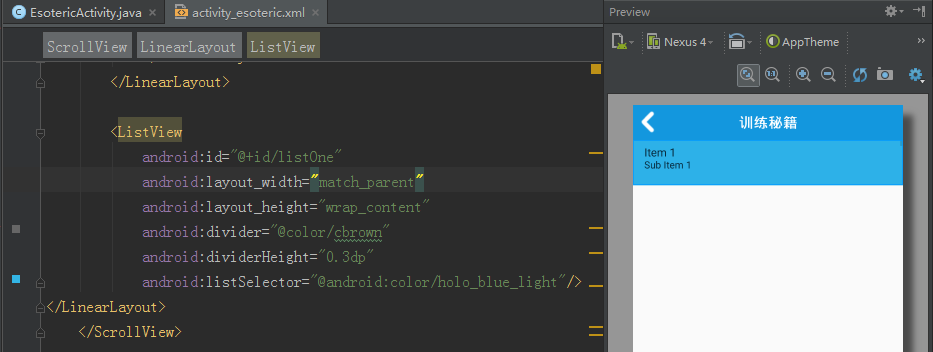
MyListView : 如圖,好像一行都不顯示了? #滑稽
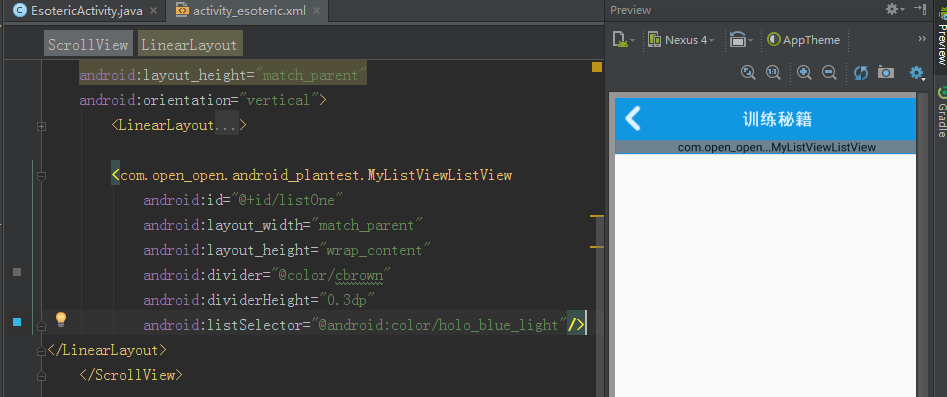
別擔心!雖然在studio 中不顯示,但是在手機中,虛擬機器中還是正常的!
我們重寫一下ListView !
1、MyListView.java (新建一個activity ,但是沒有xml )
package com.open_open.android_plantest;

import android.content.Context;
import android.util.AttributeSet;
import android.widget.ListView;

/**
 * Created by Administrator on 2016/12/28.
 */

public class MyListView extends ListView {

    public MyListView(Context context) {
        // TODO Auto-generated method stub
        super(context);
    }

    public MyListView(Context context, AttributeSet attrs) {
        // TODO Auto-generated method stub
        super(context, attrs);
    }

    public MyListView(Context context, AttributeSet attrs, int defStyle) {
        // TODO Auto-generated method stub
        super(context, attrs, defStyle);
    }

    @Override
    protected void onMeasure(int widthMeasureSpec, int heightMeasureSpec) {
        // TODO Auto-generated method stub
        int expandSpec = MeasureSpec.makeMeasureSpec(Integer.MAX_VALUE >> 2,
                MeasureSpec.AT_MOST);
        super.onMeasure(widthMeasureSpec, expandSpec);
    }
}
改完後,看看自己的專案是不是照樣可以用呢?
PS : ListView 也自帶可 滑動的效果!