
Road Hackers百度開源提供智慧駕駛H5(h5py)格式檔案資料讀取說明
阿新 • • 發佈:2019-01-09
部落格說明:
部落格內容用於學習與分享,有問題歡迎大家討論留言。
關於作者:
程式設計師:楊洪(ellende)
blog: http://blog.csdn.NET/ellende
email: [email protected]
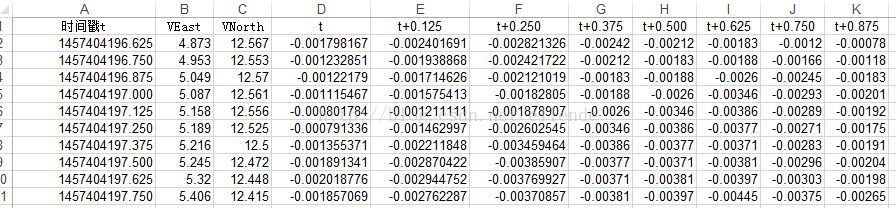
存入到excel表格中,資料格式如下: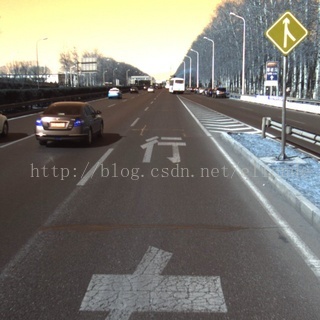
部落格內容用於學習與分享,有問題歡迎大家討論留言。
關於作者:
程式設計師:楊洪(ellende)
blog: http://blog.csdn.NET/ellende
email: [email protected]
轉載請註明出處,引用部分網上部落格,若有侵權還請作者聯絡與我。
本文針對百度開源提供的智慧駕駛平臺H5資料進行讀取,通過python解析H5格式檔案。
百度資料下載地址:
http://roadhackers.baidu.com/#downloads
下載包含三個檔案:訓練集資料(4.xG),訓練集結果(幾兆),測試集資料(5.xG),解壓後資料量更大,以下分別進行資料解析說明。
1.訓練集結果
#!usr/bin/python
# -*- coding: utf-8 -*-

import cv2
import numpy as np
import h5py
import xlwt
from datetime import datetime


def write_data_to_excel(name,result):

    # 例項化一個Workbook()物件(即excel檔案)
    wbk = xlwt.Workbook()
    # 新建一個名為Sheet1的excel sheet。此處的cell_overwrite_ok =True是為了能對同一個單元格重複操作。
    sheet = wbk.add_sheet('Sheet1',cell_overwrite_ok=True)
    # 獲取當前日期,得到一個datetime物件如:(2016, 8, 9, 23, 12, 23, 424000)
    today = datetime.today()
    # 將獲取到的datetime物件僅取日期如:2016-8-9
    today_date = datetime.date(today)
    # 遍歷result中的每個元素。
    for i in xrange(len(result)):
        #對result的每個子元素作遍歷,
        for j in xrange(len(result[i])):
            #將每一行的每個元素按行號i,列號j,寫入到excel中。
            sheet.write(i,j,result[i][j])
    # 以傳遞的name+當前日期作為excel名稱儲存。
    wbk.save(name+str(today_date)+'.xls')


f = h5py.File('D:\\AllDownloadFiles\\train-result-119\\119.h5', 'r')
dset = f[f.keys()[0]] #f.keys()只有一個鍵值:u'attrs'
data = np.array(dset[:,:])

# 資料寫入excel表格
write_data_to_excel('D:\\AllDownloadFiles\\train-result-119\\', data);
存入到excel表格中,資料格式如下:
2.訓練集資料
max_num限制最大個數,可以修改大小。#!usr/bin/python # -*- coding: utf-8 -*- import cv2 import numpy as np import h5py import xlwt def saveOnePic(fh, data_type, save_dir): #data_type = "%.3f" % float(index_num) dset = fh[data_type] data = np.array(dset[:,:,:]) # 儲存一個圖片 filePath = save_dir+'\\'+data_type+'.jpg' cv2.imwrite(filePath, data) if __name__=="__main__": f = h5py.File('D:\\AllDownloadFiles\\train-data-119\\119.h5', 'r') max_num = 100 file_len = len(f.keys()) for index in range(0,max_num-1): if index < file_len: index_type = f.keys()[index] saveOnePic(f, index_type, 'D:\\AllDownloadFiles\\train-data-119')
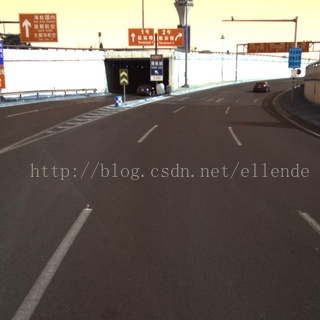
下面是解析出來的圖片:
3.測試集資料
#!usr/bin/python
# -*- coding: utf-8 -*-

import cv2
import numpy as np
import h5py
import xlwt

def saveOnePic(fh, data_type, save_dir):
    #data_type = "%.3f" % float(index_num)
    dset = fh[data_type]
    data = np.array(dset[:,:,:])

    # 儲存一個圖片
    filePath = save_dir+'\\'+data_type+'.jpg'
    cv2.imwrite(filePath, data)


if __name__=="__main__":
    f = h5py.File('D:\\AllDownloadFiles\\test-part01.h5\\testfile_part01.h5', 'r')

    max_num = 100
    file_len = len(f.keys())

    for index in range(0,max_num-1):
        if index < file_len:
            index_type = f.keys()[index]
            saveOnePic(f, index_type, 'D:\\AllDownloadFiles\\test-part01.h5')
max_num限制最大個數,可以修改大小。
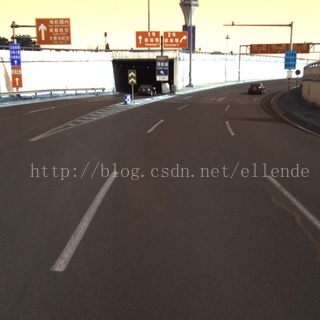
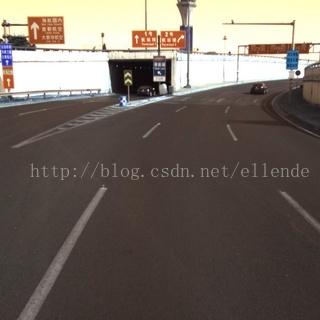
下面是解析出來的圖片:


解析完成,後面就可以用這些圖片資料進行演算法開發了,加油吧~