Tinyxml 建立xml 並以string形式進行解析 及中文處理
阿新 • • 發佈:2019-01-09
關於Tinyxml的故事就不多說了,本文主要講怎麼利用它建立xml文件 以 xml string形式在記憶體中解析xml ,以及關於UTF-8編碼格式的XML檔案如何寫入、顯示中文字串等細節問題。
下載Tinyxml Address:http://www.grinninglizard.com/tinyxml/
文件詳解Address:http://www.grinninglizard.com/tinyxmldocs/index.html
解壓後採用VS2010進行編譯,生成 靜態庫檔案–tinyxml.lib。建立工程並將下圖六個檔案新增到工程中,同時將tinyxml.lib檔案新增到工程(也可以直接copy到工程目錄下,採用#pragma 語句進行包含連線,本文就是這種方式。):
接下來就是code:
#include "tinyxml.h"
#include "tinystr.h"
#include <iostream>
#include <string>
#include <Windows.h>
using namespace std;
#pragma comment(lib,"tinyxml.lib")
// 中文字元轉UTF-8
void MBSToUTF8(char * utf8, int size, const char* mbs)
{
if (!utf8 || !mbs)
return ;
UINT nACP = GetACP();
int dwNum = MultiByteToWideChar(nACP, 0, mbs, -1, NULL, 0); // CP_ACP
if (dwNum <= 0)
return ;
wchar_t* pwText = NULL;
pwText = new wchar_t[dwNum + 1];
if (!pwText)
{
delete[] pwText;
return ;
}
memset(pwText, 0, dwNum * 2 + 2);
if (MultiByteToWideChar(nACP, 0 , mbs, -1, pwText, dwNum) == 0) // CP_ACP
{
delete[] pwText;
return ;
}
int dwCount = WideCharToMultiByte(CP_UTF8, 0, pwText, -1, NULL, 0, NULL, NULL);
if (dwCount <= 0)
{
delete[] pwText;
return ;
}
if (size < dwCount + 1)
{
delete[] pwText;
return ;
}
memset(utf8, 0, dwCount + 1);
if (WideCharToMultiByte(CP_UTF8, 0, pwText, -1, utf8, dwCount, NULL, NULL) == 0)
{
delete[] pwText;
return ;
}
delete[] pwText;
}
//UTF-8轉中文字元
void UTF8ToMBS(char * mbs, int size, const char* utf8)
{
if (!utf8 || !mbs)
return ;
int dwNum = MultiByteToWideChar(CP_UTF8, 0, utf8, -1, NULL, 0);
if (dwNum <= 0)
return ;
wchar_t* pwText = NULL;
pwText = new wchar_t[dwNum + 1];
if (!pwText)
{
delete[] pwText;
return ;
}
memset(pwText, 0, dwNum * 2 + 2);
if (MultiByteToWideChar(CP_UTF8, 0, utf8, -1, pwText, dwNum) == 0)
{
delete[] pwText;
return ;
}
UINT nACP = GetACP();
int dwCount = WideCharToMultiByte(nACP, 0, pwText, -1, NULL, 0, NULL, NULL); // CP_ACP
if (dwCount <= 0)
{
delete[] pwText;
return ;
}
if (size < dwCount + 1)
{
delete[] pwText;
return ;
}
memset(mbs, 0, dwCount + 1);
if (WideCharToMultiByte(nACP, 0, pwText, -1, mbs, dwCount, NULL, NULL) == 0) // CP_ACP
{
delete[] pwText;
return ;
}
delete[] pwText;
}
//建立xml
string CreateXMLFile()
{
TiXmlPrinter printer;
string xmlstr;
char utf8[32] = { 0 };
MBSToUTF8(utf8, sizeof(utf8), "周星星");
// 建立一個XML的文件物件。
TiXmlDocument *xmlDocument = new TiXmlDocument();
TiXmlDeclaration * decl = new TiXmlDeclaration("1.0", "UTF-8", "");
xmlDocument->LinkEndChild(decl);
// 根元素。
TiXmlElement *rootElement = new TiXmlElement("ROOT");
// 連線到文件物件, 作為根元素
xmlDocument->LinkEndChild(rootElement);
// 建立一個Book元素.
TiXmlElement *RegisterElement = new TiXmlElement("REGISTER");
// 連線到根元素, 就是根元素的子元素
rootElement->LinkEndChild(RegisterElement);
// 建立Name元素和ID元素
TiXmlElement *numberElement = new TiXmlElement("USER_ID");
TiXmlElement *nameElement = new TiXmlElement("USER_NAME");
// 連線
RegisterElement->LinkEndChild(numberElement);
RegisterElement->LinkEndChild(nameElement);
// 設定Name元素和Price元素的值。
TiXmlText *numberValue = new TiXmlText("12345");
numberElement->LinkEndChild(numberValue);
TiXmlText *nameValue = new TiXmlText(utf8);
nameElement->LinkEndChild(nameValue);
xmlDocument->Accept(&printer);
xmlstr = printer.CStr();
return xmlstr;
}
int main(int argc, char* argv[])
{
// 建立xml 並以string形式儲存
string xmlstr = CreateXMLFile();
cout << xmlstr;
//解析xml string
const char *content = xmlstr.c_str();
TiXmlDocument *doc = new TiXmlDocument();
doc->Parse(content);
if (&doc == NULL)
cout << "doc == NULL" << endl;
TiXmlHandle docHandle(doc);
TiXmlNode * Point_name= docHandle.FirstChild("ROOT").FirstChild("REGISTER").FirstChild("USER_NAME").ToElement();
TiXmlElement * elemElem = Point_name->ToElement();
const char *utf = elemElem->GetText();
//處理xml中的中文,確保其正確顯示
char chinese[32] = { 0 };
UTF8ToMBS(chinese, sizeof(chinese), utf);
cout << chinese << endl;
return 0;
}
// 以檔案的形式儲存xml檔案
/*bool CreateXMLFile(std::string& strFileName)
{
try
{
// 建立一個XML的文件物件。
TiXmlDocument *xmlDocument = new TiXmlDocument();
// 根元素。
TiXmlElement *rootElement = new TiXmlElement("Books");
// 連線到文件物件, 作為根元素
xmlDocument->LinkEndChild(rootElement);
// 建立一個Book元素.
TiXmlElement *bookElement = new TiXmlElement("Book");
// 連線到根元素, 就是根元素的子元素
rootElement->LinkEndChild(bookElement);
// 設定Book元素的屬性, 這裡是ID。
bookElement->SetAttribute("ID", "1");
// 建立Name元素和Price元素
TiXmlElement *nameElement = new TiXmlElement("Name");
TiXmlElement *priceElement = new TiXmlElement("Price");
// 連線
bookElement->LinkEndChild(nameElement);
bookElement->LinkEndChild(priceElement);
// 設定Name元素和Price元素的值。
TiXmlText *nameValue = new TiXmlText("葵花寶典");
nameElement->LinkEndChild(nameValue);
TiXmlText *priceValue = new TiXmlText("50.00");
priceElement->LinkEndChild(priceValue);
xmlDocument->SaveFile(strFileName.c_str()); // 儲存到檔案
}
catch (...)
{
return false;
}
return true;
}*/
// 以檔案的形式載入 解析
/*bool ReadXMLFile(std::string& szFileName)
{
try
{
// 建立一個XML的文件物件。
TiXmlDocument *xmlDocument = new TiXmlDocument(szFileName.c_str());
// 解析
xmlDocument->LoadFile();
// 獲得根元素
TiXmlElement *rootElement = xmlDocument->RootElement();
// 輸出根元素名稱
std::cout << rootElement->Value() << std::endl;
// 獲得第一個節點。
TiXmlElement *firstElement = rootElement->FirstChildElement();
// 獲得第一個Person的name節點和age節點和ID屬性。
TiXmlElement *nameElement = firstElement->FirstChildElement();
TiXmlElement *priceElement = nameElement->NextSiblingElement();
TiXmlAttribute *IDAttribute = firstElement->FirstAttribute();
// 輸出
std::cout << nameElement->FirstChild()->Value() << std::endl;
std::cout << priceElement->FirstChild()->Value() << std::endl;
std::cout << IDAttribute->Value() << std::endl;
}
catch (...)
{
return false;
}
return true;
}*/
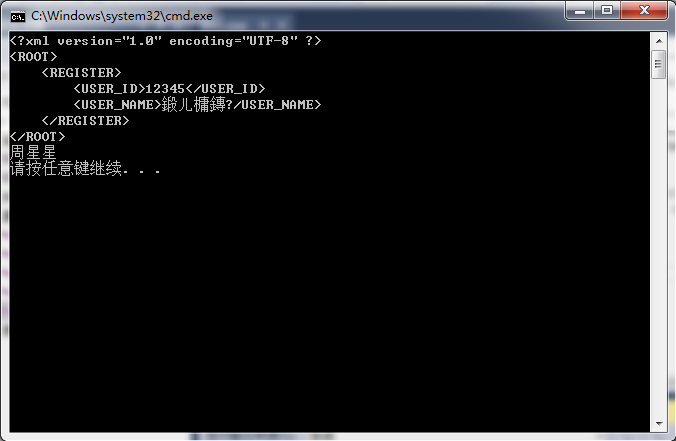
處理結果:
關於結果的幾點解釋:
1、xml 中的中文在window 視窗顯示為亂碼,完全不用驚訝,這個與資料編碼和預設開啟方式有關。如果你將該xml以UTF-8形式儲存,並以UTF-8形式開啟,完全可以正確顯示。
2、如果你將xml中 中文部分的編碼不進行UTF8ToMBS轉碼,顯示就會如1中所說的亂碼一樣。