
springboot+mybatis+SpringSecurity 實現使用者角色資料庫管理(一)
本文使用springboot+mybatis+SpringSecurity 實現使用者許可權資料庫管理
實現使用者和角色用資料庫儲存,而資源(url)和許可權的對應採用硬編碼配置。 也就是角色可以訪問的許可權通過硬編碼控制。角色和使用者的關係通過資料庫配置控制
本文使用者和角色的關係是多對多的關係。
SpringSecurity 驗證帳號密碼
首先在usernamePasswordAuthenticationFilter中來攔截登入請求,並呼叫AuthenticationManager。
AuthenticationManager呼叫Provider,provider呼叫userDetaisService來根據username獲取真實的資料庫資訊。
最終驗證帳號密碼的類是org.springframework.security.authentication.dao.DaoAuthenticationProvider這個流程雖然沒多麼複雜,但是花費我不少時間給理解到了。。。
本文結構:
1:資料庫表設計
2:springboot+mybatis 配置
3:業務實現
4:springSecurity整合
5:頁面實現
6:測試驗證
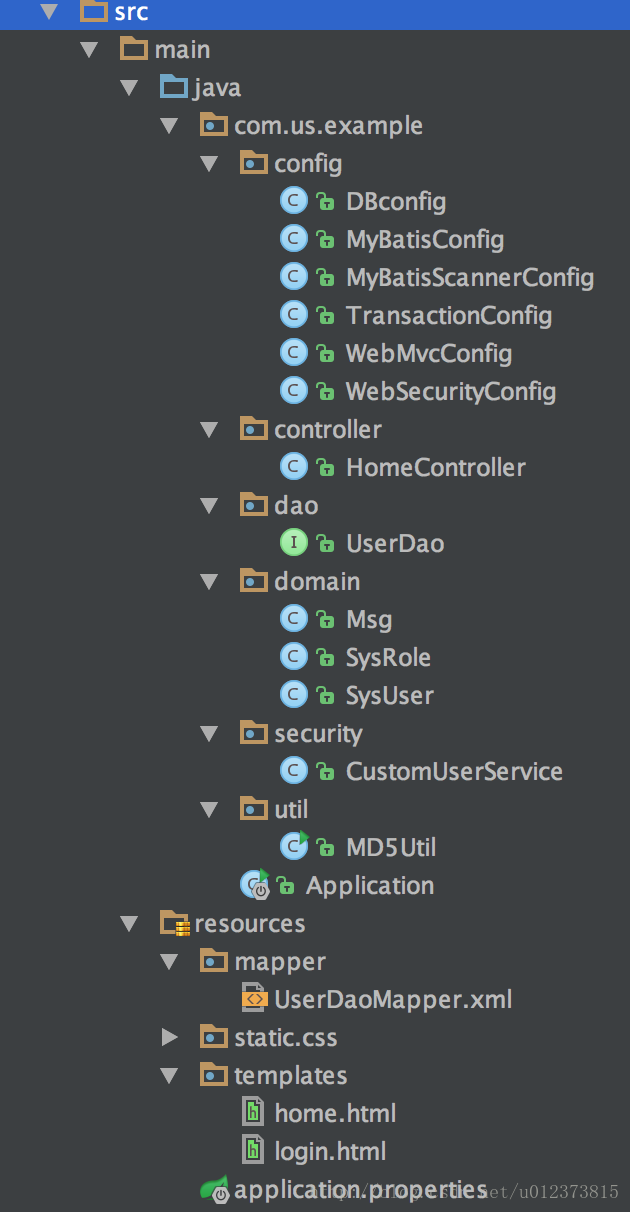
完整目錄結構如下:
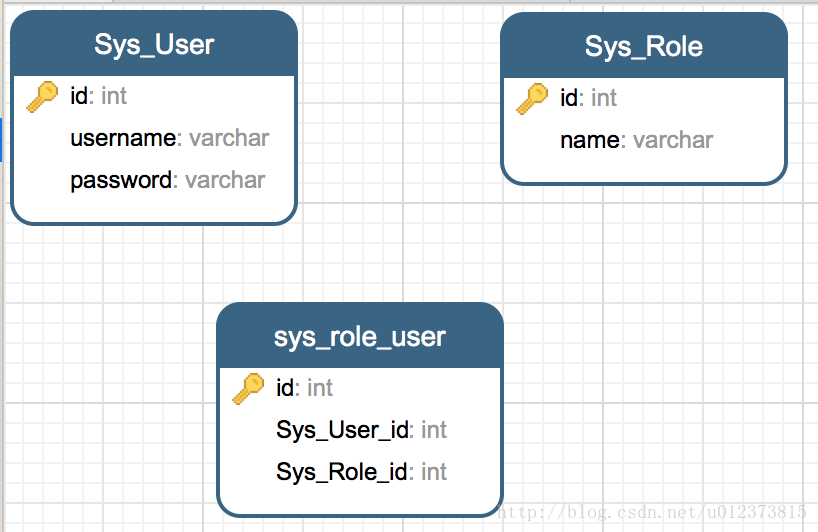
1:資料庫表設計
資料庫表有 使用者表,角色表,使用者角色關係表三張表:
插入資料
insert into SYS_USER (id,username, password) values (1,'admin', 'admin');
insert into SYS_USER (id,username, password) values (2,'abel', 'abel'); 2:springboot+mybatis 配置
2.1 springboot 配置
新建maven 工程,pom.xml 內容如下:
<?xml version="1.0" encoding="UTF-8"?>
<project xmlns="http://maven.apache.org/POM/4.0.0"
         xmlns:xsi="http://www.w3.org/2001/XMLSchema-instance"
         xsi:schemaLocation="http://maven.apache.org/POM/4.0.0 http://maven.apache.org/xsd/maven-4.0.0.xsd">
    <modelVersion>4.0.0</modelVersion>

    <groupId>com.us</groupId>
    <artifactId>springboot-security</artifactId>
    <version>1.0-SNAPSHOT</version>

    <parent>
        <groupId>org.springframework.boot</groupId>
        <artifactId>spring-boot-starter-parent</artifactId>
        <version>1.3.0.RELEASE</version>
    </parent>

    <properties>
        <start-class>com.us.Application</start-class>
        <maven.compiler.target>1.8</maven.compiler.target>
        <maven.compiler.source>1.8</maven.compiler.source>
        <mybatis.version>3.2.7</mybatis.version>
        <mybatis-spring.version>1.2.2</mybatis-spring.version>
    </properties>
    <dependencies>
        <!--springboot-->
        <dependency>
            <groupId>org.springframework.boot</groupId>
            <artifactId>spring-boot-starter-security</artifactId>
        </dependency>
        <dependency>
            <groupId>org.springframework.boot</groupId>
            <artifactId>spring-boot-starter-thymeleaf</artifactId>
        </dependency>
        <dependency>
            <groupId>org.thymeleaf.extras</groupId>
            <artifactId>thymeleaf-extras-springsecurity4</artifactId>
        </dependency>
        <!--db-->
        <dependency>
            <groupId>mysql</groupId>
            <artifactId>mysql-connector-java</artifactId>
            <version>6.0.5</version>
        </dependency>
        <dependency>
            <groupId>com.mchange</groupId>
            <artifactId>c3p0</artifactId>
            <version>0.9.5.2</version>
            <exclusions>
                <exclusion>
                    <groupId>commons-logging</groupId>
                    <artifactId>commons-logging</artifactId>
                </exclusion>
            </exclusions>
        </dependency>

        <!--mybatis-->
        <dependency>
            <groupId>org.springframework</groupId>
            <artifactId>spring-jdbc</artifactId>
        </dependency>
        <dependency>
            <groupId>org.mybatis</groupId>
            <artifactId>mybatis</artifactId>
            <version>${mybatis.version}</version>
        </dependency>
        <dependency>
            <groupId>org.mybatis</groupId>
            <artifactId>mybatis-spring</artifactId>
            <version>${mybatis-spring.version}</version>
        </dependency>
    </dependencies>

</project>
在com.us.example 目錄下新建 Application.java 啟動入口
package com.us.example;

import org.springframework.boot.autoconfigure.SpringBootApplication;
import org.springframework.context.ConfigurableApplicationContext;
import org.springframework.context.annotation.ComponentScan;

import static org.springframework.boot.SpringApplication.run;

/**
 * Created by yangyibo on 17/1/17.
 */

@ComponentScan(basePackages ="com.us.example")
@SpringBootApplication
public class Application {
    public static void main(String[] args) {
        ConfigurableApplicationContext run = run(Application.class, args);
    }
}
在src/resource/目錄下新建application.properties 配置檔案,配置spingboot 的配置資訊:
ms.db.driverClassName=com.mysql.jdbc.Driver
ms.db.url=jdbc:mysql://localhost:3306/cache?characterEncoding=utf-8&useSSL=false
ms.db.username=root
ms.db.password=admin
ms.db.maxActive=500

logging.level.org.springframework.security= INFO
spring.thymeleaf.cache=false
2.2 mybatis 配置
在com.us.example.config 包下新建 以下配置檔案,
DBconfig.java (配置資料來源)
package com.us.example.config;

import java.beans.PropertyVetoException;

import org.springframework.beans.factory.annotation.Autowired;
import org.springframework.context.annotation.Bean;
import org.springframework.context.annotation.Configuration;
import org.springframework.core.env.Environment;
import com.mchange.v2.c3p0.ComboPooledDataSource;
/**
 * Created by yangyibo on 17/1/18.
 */
@Configuration
public class DBconfig {
    @Autowired
    private Environment env;

    @Bean(name="dataSource")
    public ComboPooledDataSource dataSource() throws PropertyVetoException {
        ComboPooledDataSource dataSource = new ComboPooledDataSource();
        dataSource.setDriverClass(env.getProperty("ms.db.driverClassName"));
        dataSource.setJdbcUrl(env.getProperty("ms.db.url"));
        dataSource.setUser(env.getProperty("ms.db.username"));
        dataSource.setPassword(env.getProperty("ms.db.password"));
        dataSource.setMaxPoolSize(20);
        dataSource.setMinPoolSize(5);
        dataSource.setInitialPoolSize(10);
        dataSource.setMaxIdleTime(300);
        dataSource.setAcquireIncrement(5);
        dataSource.setIdleConnectionTestPeriod(60);
        return dataSource;
    }
}
MyBatisConfig.java (掃描mapper.xml檔案)
package com.us.example.config;

import org.mybatis.spring.SqlSessionFactoryBean;
import org.springframework.beans.factory.annotation.Autowired;
import org.springframework.context.ApplicationContext;
import org.springframework.context.annotation.Bean;
import org.springframework.context.annotation.ComponentScan;
import org.springframework.context.annotation.Configuration;

import javax.sql.DataSource;

@Configuration
@ComponentScan
public class MyBatisConfig {

    @Autowired
    private DataSource dataSource;

    @Bean(name = "sqlSessionFactory")
    public SqlSessionFactoryBean sqlSessionFactory(ApplicationContext applicationContext) throws Exception {
        SqlSessionFactoryBean sessionFactory = new SqlSessionFactoryBean();
        sessionFactory.setDataSource(dataSource);
        // sessionFactory.setPlugins(new Interceptor[]{new PageInterceptor()});
        sessionFactory.setMapperLocations(applicationContext.getResources("classpath*:mapper/*.xml"));
        return sessionFactory;
    }
}
MyBatisScannerConfig.java (dao 掃描器)
package com.us.example.config;

import org.mybatis.spring.mapper.MapperScannerConfigurer;
import org.springframework.context.annotation.Bean;
import org.springframework.context.annotation.Configuration;

@Configuration
public class MyBatisScannerConfig {
    @Bean
    public MapperScannerConfigurer MapperScannerConfigurer() {
        MapperScannerConfigurer mapperScannerConfigurer = new MapperScannerConfigurer();
        mapperScannerConfigurer.setBasePackage("com.us.example.dao");
        mapperScannerConfigurer.setSqlSessionFactoryBeanName("sqlSessionFactory");
        return mapperScannerConfigurer;
    }
}
TransactionConfig.java (開啟事物管理)
package com.us.example.config;

import org.springframework.beans.factory.annotation.Autowired;
import org.springframework.context.annotation.Bean;
import org.springframework.context.annotation.ComponentScan;
import org.springframework.context.annotation.Configuration;
import org.springframework.jdbc.datasource.DataSourceTransactionManager;
import org.springframework.transaction.PlatformTransactionManager;
import org.springframework.transaction.annotation.TransactionManagementConfigurer;

import javax.sql.DataSource;

@Configuration
@ComponentScan
public class TransactionConfig implements TransactionManagementConfigurer{
    @Autowired
    private DataSource dataSource;

    @Bean(name = "transactionManager")
    @Override
    public PlatformTransactionManager annotationDrivenTransactionManager() {
        return new DataSourceTransactionManager(dataSource);
    }

}
3:業務實現
3.1 java bean
有三個bean ,sysuser(使用者),sysrole(角色)msg(資訊,用於和頁面傳遞資訊使用)
sysuser.java
package com.us.example.domain;

import java.util.List;

/**
 * Created by yangyibo on 17/1/17.
 */

public class SysUser {
    private Integer id;
    private String username;
    private String password;

    private List<SysRole> roles;

    public Integer getId() {
        return id;
    }

    public void setId(Integer id) {
        this.id = id;
    }

    public String getUsername() {
        return username;
    }

    public void setUsername(String username) {
        this.username = username;
    }

    public String getPassword() {
        return password;
    }

    public void setPassword(String password) {
        this.password = password;
    }

    public List<SysRole> getRoles() {
        return roles;
    }

    public void setRoles(List<SysRole> roles) {
        this.roles = roles;
    }
}
SysRole.java
package com.us.example.domain;

/**
 * Created by yangyibo on 17/1/17.
 */

public class SysRole {

    private Integer id;
    private String name;
    public Integer getId() {
        return id;
    }
    public void setId(Integer id) {
        this.id = id;
    }
    public String getName() {
        return name;
    }
    public void setName(String name) {
        this.name = name;
    }
}
Msg.java
package com.us.example.domain;

/**
 * Created by yangyibo on 17/1/17.
 */

    public class Msg {
        private String title;
        private String content;
        private String etraInfo;

        public Msg(String title, String content, String etraInfo) {
            super();
            this.title = title;
            this.content = content;
            this.etraInfo = etraInfo;
        }
        public String getTitle() {
            return title;
        }
        public void setTitle(String title) {
            this.title = title;
        }
        public String getContent() {
            return content;
        }
        public void setContent(String content) {
            this.content = content;
        }
        public String getEtraInfo() {
            return etraInfo;
        }
        public void setEtraInfo(String etraInfo) {
            this.etraInfo = etraInfo;
        }

    }
3.2 dao 層實現
UserDao.java
package com.us.example.dao;

import com.us.example.config.MyBatisRepository;
import com.us.example.domain.SysUser;

public interface UserDao {
    public SysUser findByUserName(String username);
}
mapper.xml
在src/resource目錄下新建 mapper 資料夾,在mapper資料夾下新建UserDaomapper.xml檔案內容如下;
<?xml version="1.0" encoding="UTF-8" ?>
<!DOCTYPE mapper PUBLIC "-//mybatis.org//DTD Mapper 3.0//EN" "http://mybatis.org/dtd/mybatis-3-mapper.dtd">
<mapper namespace="com.us.example.dao.UserDao">
    <resultMap id="userMap" type="com.us.example.domain.SysUser">
        <id property="id" column="ID"/>
        <result property="username" column="username"/>
        <result property="password" column="PASSWORD"/>
        <collection property="roles" ofType="com.us.example.domain.SysRole">
            <result column="name" property="name"/>
        </collection>

    </resultMap>
    <select id="findByUserName" parameterType="String" resultMap="userMap">
        select u.*
        ,r.name
        from Sys_User u
        LEFT JOIN sys_role_user sru on u.id= sru.Sys_User_id
        LEFT JOIN Sys_Role r on sru.Sys_Role_id=r.id
        where username= #{username}
    </select>
</mapper>
由於本例較為簡單,所以就去掉了service 層。
4:springSecurity整合
新增springSecurity 配置,在com.us.example.config 包下,新建
WebSecurityConfig.java 配置檔案,用於管控登入訪問許可權
可以在WebSecurityConfig 中 使用 .antMatchers("/admin/**").hasRole("ROLE_ADMIN")
將url 許可權分配給角色
WebSecurityConfig.java
package com.us.example.config;

import com.us.example.security.CustomUserService;
import org.springframework.context.annotation.Bean;
import org.springframework.context.annotation.Configuration;
import org.springframework.security.config.annotation.authentication.builders.AuthenticationManagerBuilder;
import org.springframework.security.config.annotation.web.builders.HttpSecurity;
import org.springframework.security.config.annotation.web.configuration.WebSecurityConfigurerAdapter;
import org.springframework.security.core.userdetails.UserDetailsService;
/**
 * Created by yangyibo on 17/1/18.
 */
@Configuration
@EnableWebSecurity
public class WebSecurityConfig extends WebSecurityConfigurerAdapter {

    @Bean
    UserDetailsService customUserService(){ //註冊UserDetailsService 的bean
        return new CustomUserService();
    }
    @Override
    protected void configure(AuthenticationManagerBuilder auth) throws Exception {
        auth.userDetailsService(customUserService()); //user Details Service驗證

    }
    @Override
    protected void configure(HttpSecurity http) throws Exception {
        http.authorizeRequests()
                .anyRequest().authenticated() //任何請求,登入後可以訪問
                .and()
                .formLogin()
                .loginPage("/login")
                .failureUrl("/login?error")
                .permitAll() //登入頁面使用者任意訪問
                .and()
                .logout().permitAll(); //登出行為任意訪問


    }
}
CustomUserService.java
新建 CustomUserService 用於將使用者許可權交給 springsecurity 進行管控;
package com.us.example.security;

import com.us.example.dao.UserDao;
import com.us.example.domain.SysRole;
import com.us.example.domain.SysUser;
import org.springframework.beans.factory.annotation.Autowired;
import org.springframework.security.core.authority.SimpleGrantedAuthority;
import org.springframework.security.core.userdetails.UserDetails;
import org.springframework.security.core.userdetails.UserDetailsService;
import org.springframework.security.core.userdetails.UsernameNotFoundException;
import org.springframework.stereotype.Service;

import java.util.ArrayList;
import java.util.List;

/**
 * Created by yangyibo on 17/1/18.
 */
@Service
public class CustomUserService implements UserDetailsService { //自定義UserDetailsService 介面

    @Autowired
    UserDao userDao;

    @Override
    public UserDetails loadUserByUsername(String username) { //重寫loadUserByUsername 方法獲得 userdetails 型別使用者

        SysUser user = userDao.findByUserName(username);
        if(user == null){
            throw new UsernameNotFoundException("使用者名稱不存在");
        }
        List<SimpleGrantedAuthority> authorities = new ArrayList<>();
        //用於新增使用者的許可權。只要把使用者許可權新增到authorities 就萬事大吉。
        for(SysRole role:user.getRoles())
        {
            authorities.add(new SimpleGrantedAuthority(role.getName()));
            System.out.println(role.getName());
        }
        return new org.springframework.security.core.userdetails.User(user.getUsername(),
                user.getPassword(), authorities);
    }
}
5:頁面實現
在src/resource 目錄下新建static/css 目錄,並放入js 檔案 bootstrap.min.css (此檔案在本文原始碼裡有, 原始碼地址在文章底端)
在src/resource目錄下新建 templates 資料夾,裡面編寫靜態頁面
login.html
<!DOCTYPE html>
<html xmlns:th="http://www.thymeleaf.org">
<head>
<meta content="text/html;charset=UTF-8"/>
<title>登入頁面</title>
<link rel="stylesheet" th:href="@{css/bootstrap.min.css}"/>
<style type="text/css">
    body {
  padding-top: 50px;
}
.starter-template {
  padding: 40px 15px;
  text-align: center;
}
</style>
</head>
<body>

     <nav class="navbar navbar-inverse navbar-fixed-top">
      <div class="container">
        <div class="navbar-header">
          <a class="navbar-brand" href="#">Spring Security演示</a>
        </div>
        <div id="navbar" class="collapse navbar-collapse">
          <ul class="nav navbar-nav">
           <li><a th:href="@{/}"> 首頁 </a></li>

          </ul>
        </div><!--/.nav-collapse -->
      </div>
    </nav>
     <div class="container">

      <div class="starter-template">
       <p th:if="${param.logout}" class="bg-warning">已成功登出</p><!-- 1 -->
            <p th:if="${param.error}" class="bg-danger">有錯誤,請重試</p> <!-- 2 -->
            <h2>使用賬號密碼登入</h2>
            <form name="form" th:action="@{/login}" action="/login" method="POST"> <!-- 3 -->
                <div class="form-group">
                    <label for="username">賬號</label>
                    <input type="text" class="form-control" name="username" value="" placeholder="賬號" />
                </div>
                <div class="form-group">
                    <label for="password">密碼</label>
                    <input type="password" class="form-control" name="password" placeholder="密碼" />
                </div>
                <input type="submit" id="login" value="Login" class="btn btn-primary" />
            </form>
      </div>
    </div>
</body>
</html>
home.html
注意:本文是通過home.html 的sec:authorize="hasRole('ROLE_ADMIN') 實現角色許可權管理
<!DOCTYPE html>
<html xmlns:th="http://www.thymeleaf.org"
      xmlns:sec="http://www.thymeleaf.org/thymeleaf-extras-springsecurity4">
<head>
<meta content="text/html;charset=UTF-8"/>
<title sec:authentication="name"></title>
<link rel="stylesheet" th:href="@{css/bootstrap.min.css}" />
<style type="text/css">
body {
  padding-top: 50px;
}
.starter-template {
  padding: 40px 15px;
  text-align: center;
}
</style>
</head>
<body>
     <nav class="navbar navbar-inverse navbar-fixed-top">
      <div class="container">
        <div class="navbar-header">
          <a class="navbar-brand" href="#">Spring Security演示</a>
        </div>
        <div id="navbar" class="collapse navbar-collapse">
          <ul class="nav navbar-nav">
           <li><a th:href="@{/}"> 首頁 </a></li>
          </ul>
        </div><!--/.nav-collapse -->
      </div>
    </nav>


     <div class="container">

      <div class="starter-template">
        <h1 th:text="${msg.title}"></h1>

        <p class="bg-primary" th:text="${msg.content}"></p>

        <div sec:authorize="hasRole('ROLE_ADMIN')"> <!-- 使用者型別為ROLE_ADMIN 顯示 -->
            <p class="bg-info" th:text="${msg.etraInfo}"></p>
        </div>

        <div sec:authorize="hasRole('ROLE_USER')"> <!-- 使用者型別為 ROLE_USER 顯示 -->
            <p class="bg-info">無更多資訊顯示</p>
        </div>

        <form th:action="@{/logout}" method="post">
            <input type="submit" class="btn btn-primary" value="登出"/>
        </form>
      </div>

    </div>

</body>
</html>
6. controller
在com.us.example.controller 包下 編寫控制器 HomeController.java
HomeController.java
package com.us.example.controller;

import com.us.example.domain.Msg;
import org.springframework.stereotype.Controller;
import org.springframework.ui.Model;
import org.springframework.web.bind.annotation.RequestMapping;

/**
 * Created by yangyibo on 17/1/18.
 */
@Controller
public class HomeController {

    @RequestMapping("/")
    public String index(Model model){
        Msg msg =  new Msg("測試標題","測試內容","額外資訊,只對管理員顯示");
        model.addAttribute("msg", msg);
        return "home";
    }
}
相關推薦
springboot+mybatis+SpringSecurity 實現使用者角色資料庫管理(一)
本文使用springboot+mybatis+SpringSecurity 實現使用者許可權資料庫管理
實現使用者和角色用資料庫儲存,而資源(url)和許可權的對應採用硬編碼配置。 也就是角色可以訪問的許可權通過硬編碼控制。角色和使用者的關係通過資料庫配置控制
springboot+mybatis+SpringSecurity 實現用戶角色數據庫管理
.html ngs list css per title 。。 nfa from 本文使用springboot+mybatis+SpringSecurity 實現用戶權限數據庫管理
實現用戶和角色用數據庫存儲,而資源(url)和權限的對應采用硬編碼配置。 也就是角色可以訪問
springboot+mybatis+SpringSecurity 實現用戶角色數據庫管理(一)
lse level run filter attribute 用戶角色 tail nconf addview 本文使用springboot+mybatis+SpringSecurity 實現用戶權限數據庫管理
實現用戶和角色用數據庫存儲,而資源(url)和權限的對應采用硬
基於SpringBoot + Mybatis + webpack+VueJs + ElementUI編寫的管理系統(一)
寫在前面:第一篇主要寫Vue,第二篇主要寫SpringBoot(可能沒第二篇了。。)
一、基本思維
整個系統所採用的是前後端分離的理念,vue負責頁面展示,SpringBoot負責業務邏輯處理,這樣在編寫的過程中很容易發現問題的所在以及給後期維護減少了許
springBoot +mybatis 出現sql 語句在資料庫可以查詢到,但是賦值到實體類上就沒有的情況?
1.不要老是反覆檢視自己是否寫錯了,為啥有的能出來有的出不來?
可以檢視配置檔案中是否配置全:
如果在appli
IDEA+SpringBoot MyBatis Dynamic SQL的初體驗(一)
ybatis generator在2017年12月釋出了version 1.3.6,在該版本添加了新的TargetRuntime:
MyBatis Dynamic SQL(mybatis 動態SQL)
Mybatis Dynamic Sql與以前TargetRuntime相
IDEA+SpringBoot MyBatis Dynamic SQL的初體驗(一)
key dynamics table force exec tst ron annotate time ybatis generator在2017年12月發布了version 1.3.6,在該版本添加了新的TargetRuntime:
MyBatis Dynamic S
springboot +mybatis 實現一對多,多對一,多對多 【註解版】
MyBatis中的一對多 ,多對一,多對多【註解】
以下的例子就是針對 前端框架中所實現的 省-市-區 選擇框的資料介面
前端需要的介面型別:
後臺程式碼:
dao層:
ProvinceDAO
/**
*
* @author 鄔志斌
SpringBoot+mybatis+SpringSecurity+redis許可權管理系統原始碼
技術選型 後端 基礎框架:Spring Boot 2.0.4.RELEASE
持久層框架:Mybatis 3.4.5
安全框架: Spring Security 5.0.7
摸板引擎:Thymeleaf 3.0.9.RELEASE
資料庫連線池:阿里巴巴Druid 1.1
springboot mybatis 事務管理
private 測試 love cto frame update 數據源 ren jdbc 本文主要講述springboot提供的聲明式的事務管理機制。
一、一些概念
聲明式的事務管理是基於AOP的,在springboot中可以通過@Transactional註解的方式
企業分布式微服務雲SpringCloud SpringBoot mybatis (十六)Spring Boot中使用LDAP來統一管理用戶信息
數據庫表 repo on() intellij attr ads get 可選 mail LDAP簡介
LDAP(輕量級目錄訪問協議,Lightweight Directory Access Protocol)是實現提供被稱為目錄服務的信息服務。目錄服務是一種特殊的數據庫系
SpringBoot框架與MyBatis整合,連線Mysql資料庫
SpringBoot是一種用來簡化新Spring應用初始搭建及開發過程的框架,它使用特定方式來進行配置,使得開發人員不再需要定義樣板化的配置。MyBatis是一個支援普通SQL查詢、儲存和高階對映的持久層框架,它消除了幾乎所有的JDBC程式碼和引數的手工配置以及對結果集的檢索封裝,可以使用簡單的XML或註
使用SSM 或者 springboot +mybatis時,對資料庫的認證資訊(使用者名稱,密碼)進行加密。
通常情況下,為了提高安全性,我們需要對資料庫的認證資訊進行加密操作,然後在啟動專案的時候,會自動解密來核對資訊是否正確。下面介紹在SSM和springboot專案中分別是怎樣實現的。
無論是使用SSM還是springboot,首先我們需要一個加密工具,這裡我採用的是AES 高階加
springboot+mybatis+mysql+thymeleaf+jquery構建的小型圖書借閱管理系統
後端 1.springboot 2.mybatis資料庫 1.mysql前端 1.jquery 2.jquery-validate 3.html+css
專案架構
資料庫表結構設計
管理員執行介面
使用
1124——Vue+SpringBoot+Mybatis的簡單員工管理專案
本文專案參考自:https://github.com/boylegu/SpringBoot-vue
https://www.cnblogs.com/wlovet/p/8317282.html
為了完成此專案你需要會springBoot,mybatis的一些
1112_Vue+SpringBoot+Mybatis的簡單員工管理專案
Vue+SpringBoot+Mybatis的簡單員工管理專案
本文專案參考自:https://github.com/boylegu/SpringBoot-vue
https://www.cnblogs.com/wlovet/p/8317282.html
為了完成此專案你需要會sprin
【Springboot+mybatis】 解析Excel並批量匯入到資料庫
【Springboot+mybatis】 解析Excel並批量匯入到資料庫
置頂 2018年01月16日 20:05:52 冉野丶 閱讀數:4060 標籤: excel匯入資料庫 檔案上傳 excel解析 更多
個人分類: POI 工作問題歸納
版權宣告:本文為博主原創文章,未經博主允許不得
SpringBoot+mybatis+Shiro+redis許可權管理系統原始碼
演示地址: http://111.230.157.133/login
技術選型
後端
基礎框架:Spring Boot 2.0.4.RELEASE
持久層框架:Mybatis 3.4.5
安全框架:Apache Shiro 1.4.0 (店鋪裡面有 Spring Se
SpringBoot + mybatis + mysql應用過程中問題記錄-問題2(主從資料庫中從資料庫中也加了@Primary標籤的問題)
問題
Error starting ApplicationContext. To display the conditions report re-run your application with 'debug' enabled.
2018-09-18 17:38:51
02) SpringBoot 中Controller的使用、資料庫操作、事物管理、修改banner
1 Controller的使用
特點:程式設計技巧和SpringMVC幾乎完全一樣
注意:@RestController = @Controller + @ResponseBody
注意:讀取路徑引數和請求引數是利用的不通的註解實現,其中請求引數是可以設定預
springboot+mybatis+SpringSecurity 實現使用者角色資料庫管理(一)
本文使用springboot+mybatis+SpringSecurity 實現使用者許可權資料庫管理 實現使用者和角色用資料庫儲存,而資源(url)和許可權的對應採用硬編碼配置。 也就是角色可以訪問的許可權通過硬編碼控制。角色和使用者的關係通過資料庫配置控制
springboot+mybatis+SpringSecurity 實現用戶角色數據庫管理
.html ngs list css per title 。。 nfa from 本文使用springboot+mybatis+SpringSecurity 實現用戶權限數據庫管理 實現用戶和角色用數據庫存儲,而資源(url)和權限的對應采用硬編碼配置。 也就是角色可以訪問
springboot+mybatis+SpringSecurity 實現用戶角色數據庫管理(一)
lse level run filter attribute 用戶角色 tail nconf addview 本文使用springboot+mybatis+SpringSecurity 實現用戶權限數據庫管理 實現用戶和角色用數據庫存儲,而資源(url)和權限的對應采用硬
基於SpringBoot + Mybatis + webpack+VueJs + ElementUI編寫的管理系統(一)
寫在前面:第一篇主要寫Vue,第二篇主要寫SpringBoot(可能沒第二篇了。。) 一、基本思維 整個系統所採用的是前後端分離的理念,vue負責頁面展示,SpringBoot負責業務邏輯處理,這樣在編寫的過程中很容易發現問題的所在以及給後期維護減少了許
springBoot +mybatis 出現sql 語句在資料庫可以查詢到,但是賦值到實體類上就沒有的情況?
1.不要老是反覆檢視自己是否寫錯了,為啥有的能出來有的出不來? 可以檢視配置檔案中是否配置全: 如果在appli
IDEA+SpringBoot MyBatis Dynamic SQL的初體驗(一)
ybatis generator在2017年12月釋出了version 1.3.6,在該版本添加了新的TargetRuntime: MyBatis Dynamic SQL(mybatis 動態SQL) Mybatis Dynamic Sql與以前TargetRuntime相
IDEA+SpringBoot MyBatis Dynamic SQL的初體驗(一)
key dynamics table force exec tst ron annotate time ybatis generator在2017年12月發布了version 1.3.6,在該版本添加了新的TargetRuntime: MyBatis Dynamic S
springboot +mybatis 實現一對多,多對一,多對多 【註解版】
MyBatis中的一對多 ,多對一,多對多【註解】 以下的例子就是針對 前端框架中所實現的 省-市-區 選擇框的資料介面 前端需要的介面型別: 後臺程式碼: dao層: ProvinceDAO /** * * @author 鄔志斌
SpringBoot+mybatis+SpringSecurity+redis許可權管理系統原始碼
技術選型 後端 基礎框架:Spring Boot 2.0.4.RELEASE 持久層框架:Mybatis 3.4.5 安全框架: Spring Security 5.0.7 摸板引擎:Thymeleaf 3.0.9.RELEASE 資料庫連線池:阿里巴巴Druid 1.1
springboot mybatis 事務管理
private 測試 love cto frame update 數據源 ren jdbc 本文主要講述springboot提供的聲明式的事務管理機制。 一、一些概念 聲明式的事務管理是基於AOP的,在springboot中可以通過@Transactional註解的方式
企業分布式微服務雲SpringCloud SpringBoot mybatis (十六)Spring Boot中使用LDAP來統一管理用戶信息
數據庫表 repo on() intellij attr ads get 可選 mail LDAP簡介 LDAP(輕量級目錄訪問協議,Lightweight Directory Access Protocol)是實現提供被稱為目錄服務的信息服務。目錄服務是一種特殊的數據庫系
SpringBoot框架與MyBatis整合,連線Mysql資料庫
SpringBoot是一種用來簡化新Spring應用初始搭建及開發過程的框架,它使用特定方式來進行配置,使得開發人員不再需要定義樣板化的配置。MyBatis是一個支援普通SQL查詢、儲存和高階對映的持久層框架,它消除了幾乎所有的JDBC程式碼和引數的手工配置以及對結果集的檢索封裝,可以使用簡單的XML或註
使用SSM 或者 springboot +mybatis時,對資料庫的認證資訊(使用者名稱,密碼)進行加密。
通常情況下,為了提高安全性,我們需要對資料庫的認證資訊進行加密操作,然後在啟動專案的時候,會自動解密來核對資訊是否正確。下面介紹在SSM和springboot專案中分別是怎樣實現的。 無論是使用SSM還是springboot,首先我們需要一個加密工具,這裡我採用的是AES 高階加
springboot+mybatis+mysql+thymeleaf+jquery構建的小型圖書借閱管理系統
後端 1.springboot 2.mybatis資料庫 1.mysql前端 1.jquery 2.jquery-validate 3.html+css 專案架構 資料庫表結構設計 管理員執行介面 使用
1124——Vue+SpringBoot+Mybatis的簡單員工管理專案
本文專案參考自:https://github.com/boylegu/SpringBoot-vue https://www.cnblogs.com/wlovet/p/8317282.html 為了完成此專案你需要會springBoot,mybatis的一些
1112_Vue+SpringBoot+Mybatis的簡單員工管理專案
Vue+SpringBoot+Mybatis的簡單員工管理專案 本文專案參考自:https://github.com/boylegu/SpringBoot-vue https://www.cnblogs.com/wlovet/p/8317282.html 為了完成此專案你需要會sprin
【Springboot+mybatis】 解析Excel並批量匯入到資料庫
【Springboot+mybatis】 解析Excel並批量匯入到資料庫 置頂 2018年01月16日 20:05:52 冉野丶 閱讀數:4060 標籤: excel匯入資料庫 檔案上傳 excel解析 更多 個人分類: POI 工作問題歸納 版權宣告:本文為博主原創文章,未經博主允許不得
SpringBoot+mybatis+Shiro+redis許可權管理系統原始碼
演示地址: http://111.230.157.133/login 技術選型 後端 基礎框架:Spring Boot 2.0.4.RELEASE 持久層框架:Mybatis 3.4.5 安全框架:Apache Shiro 1.4.0 (店鋪裡面有 Spring Se
SpringBoot + mybatis + mysql應用過程中問題記錄-問題2(主從資料庫中從資料庫中也加了@Primary標籤的問題)
問題 Error starting ApplicationContext. To display the conditions report re-run your application with 'debug' enabled. 2018-09-18 17:38:51
02) SpringBoot 中Controller的使用、資料庫操作、事物管理、修改banner
1 Controller的使用 特點:程式設計技巧和SpringMVC幾乎完全一樣 注意:@RestController = @Controller + @ResponseBody 注意:讀取路徑引數和請求引數是利用的不通的註解實現,其中請求引數是可以設定預