
ExpandableListView使用解析(三級列表的實現)
ExpandableListView 使用解析(三級列表的實現)
在往常的設計中,往往有類似於QQ的二級列表的樣式,而使用ExpandableListView變可以實現這種類似的效果。
當然,如果ExpandableListView巢狀ExpandableListView便可以實現三級列表,甚至多級條目,而本部落格最終的實現效果便是三級條目。
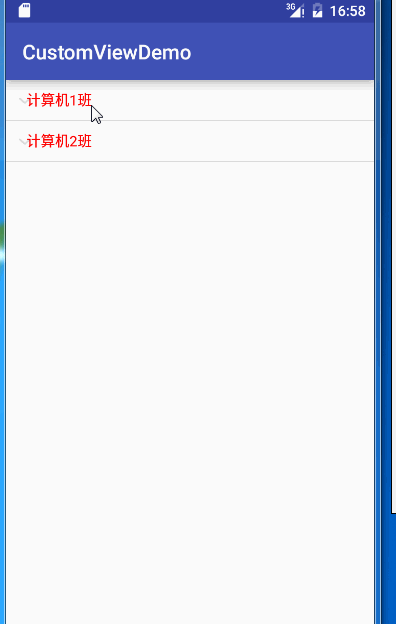
首先看一下效果:
當然樣式比較醜,這裡只實現基本的邏輯。具體的樣式可以根據自己的需要進行修改
ExpendableListView 的基本使用
萬丈高樓平地起,想要實現三級列表肯定要從最簡單的二級列表實現。下面就開始實現他的二級列表。
ExpendableListView的使用和ListView幾乎一樣:
- 編寫佈局檔案並查詢
ExpendableListView。 - 自定義介面卡繼承
BaseExpandableListAdapter setAdapter設定介面卡。
下面開始進行實現:
- 編寫佈局檔案並查詢控制元件
<?xml version="1.0" encoding="utf-8"?>
<LinearLayout xmlns:android="http://schemas.android.com/apk/res/android"
android:orientation="vertical" - 自定義
ClassesExpandableListViewAdapter繼承BaseExpandableListAdapter
在編寫該類之前,我們必須要有我們的實體類。看一下我們定義的班級實體類Classes
/**
 *
 * 班級實體類
 * Created by MH on 2016/6/16.
 */
public class Classes {


    // 班級名
    public String name;


    // 班級中的學生列表
    public List<String> students;

}
ok,直接上ClassesExpandableListViewAdapter的程式碼,後面解釋。
/**
 *
 * 班級的介面卡
 * Created by MH on 2016/6/16.
 */
public class ClassesExpandableListViewAdapter extends BaseExpandableListAdapter {


    // 班級的集合
    private List<Classes> classes;

    // 建立佈局使用
    private Activity activity;


    public ClassesExpandableListViewAdapter(List<Classes> classes, Activity activity) {
        this.classes = classes;
        this.activity = activity;
    }

    @Override
    public int getGroupCount() {
        // 獲取一級條目的數量  就是班級的大小
        return classes.size();
    }

    @Override
    public int getChildrenCount(int groupPosition) {
        // 獲取對應一級條目下二級條目的數量,就是各個班學生的數量
        return classes.get(groupPosition).students.size();
    }

    @Override
    public Object getGroup(int groupPosition) {
        // 獲取一級條目的對應資料  ,感覺沒什麼用
        return classes.get(groupPosition);
    }

    @Override
    public Object getChild(int groupPosition, int childPosition) {
        // 獲取對應一級條目下二級條目的對應資料  感覺沒什麼用
        return classes.get(groupPosition).students.get(childPosition);
    }

    @Override
    public long getGroupId(int groupPosition) {
        // 直接返回,沒什麼用
        return groupPosition;
    }

    @Override
    public long getChildId(int groupPosition, int childPosition) {
        // 直接返回,沒什麼用
        return childPosition;
    }

    @Override
    public boolean hasStableIds() {
        // 誰知道這個是幹什麼。。。。
        return false;
    }

    @Override
    public View getGroupView(int groupPosition, boolean isExpanded, View convertView, ViewGroup parent) {

        // 獲取對應一級條目的View  和ListView 的getView相似

        return getGenericView(classes.get(groupPosition).name);
    }

    @Override
    public View getChildView(int groupPosition, int childPosition, boolean isLastChild, View convertView, ViewGroup parent) {

        // 獲取對應二級條目的View  和ListView 的getView相似
        return getGenericView(classes.get(groupPosition).students.get(childPosition));
    }

    @Override
    public boolean isChildSelectable(int groupPosition, int childPosition) {
        // 根據方法名,此處應該表示二級條目是否可以被點選   先返回true 再講
        return true;
    }


    /**
     * 根據字串生成佈局,,因為我沒有寫layout.xml 所以用java 程式碼生成
     *
     *      實際中可以通過Inflate載入自己的自定義佈局檔案,設定資料之後並返回
     * @param string
     * @return
     */
    private TextView getGenericView(String string) {

        AbsListView.LayoutParams layoutParams = new AbsListView.LayoutParams(
                ViewGroup.LayoutParams.MATCH_PARENT,
                ViewGroup.LayoutParams.WRAP_CONTENT);

        TextView textView = new TextView(activity);
        textView.setLayoutParams(layoutParams);

        textView.setGravity(Gravity.CENTER_VERTICAL | Gravity.LEFT);

        textView.setPadding(40, 20, 0, 20);
        textView.setText(string);
        textView.setTextColor(Color.RED);
        return textView;
    }

}
程式碼貼完了,你以為我會解釋。。呵呵,我才不呢。
註釋很清楚,有幾個關鍵方法
getGroupCount():獲取一級條目的數量。getChildrenCount():獲取二級條目的數量。getGroupView():獲取一級條目的對應佈局。getChildView():獲取二級條目對應的佈局。setAdapter()設定介面卡
@Override
    protected void onCreate(@Nullable Bundle savedInstanceState) {
        super.onCreate(savedInstanceState);

        setContentView(R.layout.activity_tree_view_simple);

        initData();

        // 查詢控制元件
        listview = ((ExpandableListView) findViewById(R.id.tree_view_simple));


        //SimpleExpandableListViewAdapter adapter = new SimpleExpandableListViewAdapter(colleges,this);


        // 初始化資料
        List<Classes> classesList = new ArrayList<>();

        for(int i = 1 ;i<3;i++) {
            Classes classes = new Classes();

            classes.name = "計算機"+i+"班";

            List<String> list = new ArrayList<>();

            list.add("mm");
            list.add("dd");
            classes.students = list;

            classesList.add(classes);
        }

        // 構造介面卡
        ClassesExpandableListViewAdapter adapter = new ClassesExpandableListViewAdapter(classesList,this);


        // 設定介面卡
        listview.setAdapter(adapter);


    }
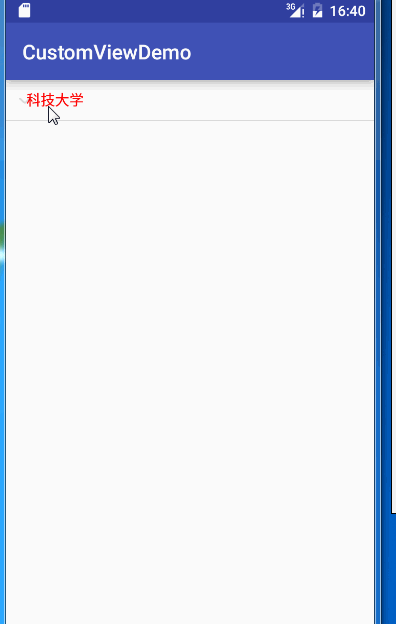
看一下效果:
實現三級列表
實現三級列表,從理解上來講,無非是在返回二級條目時,返回一個ExpandableListView物件即可,但想象往往比實現容易,其中很多坑。。。
首先我們先來搞資料:
在班級之外,在新增一個大學(College)
/**
 * 大學實體類
 * Created by MH on 2016/6/16.
 */
public class College {

    // 大學名
    public String name;

    // 班級列表
    public List<Classes> classList;
}
搞個數據
 /**
     * 初始化資料
     */
    private void initData() {


        College college = new College();

        college.name = "科技大學";

        List<Classes> classesList = new ArrayList<>();

        for(int i = 1 ;i<3;i++) {
            Classes classes = new Classes();

            classes.name = "計算機"+i+"班";

            List<String> list = new ArrayList<>();

            list.add("mm");
            list.add("dd");
            classes.students = list;

            classesList.add(classes);
        }

        college.classList = classesList;


        colleges = new ArrayList<>();
        colleges.add(college);

    }
那麼此時的資料應該是
- 科技大學
- 計算機1班
- mm
- dd
- 計算機2班
- mm
- dd
- 計算機1班
資料分析完之後,分析佈局
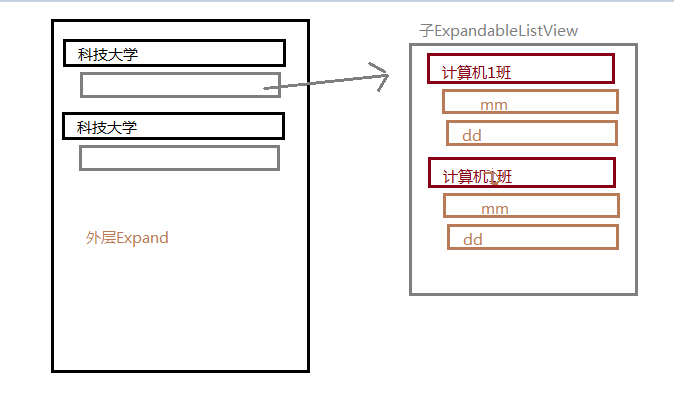
在這裡,有一個很關鍵的一點:
- 在外層
Expand中,他的所有二級條目都是一個,為什麼,因為他具體的顯示都交給了子ExpandableListView,二級條目的目的是為了把子ExpandableListView顯示出來。
關鍵的一點分析了,上程式碼
/**
 *
 * 外層ExpandListView 介面卡的實現
 * Created by MH on 2016/6/16.
 */
public class SimpleExpandableListViewAdapter extends BaseExpandableListAdapter {


    // 大學的集合
    private List<College> colleges;

    private Activity activity;


    public SimpleExpandableListViewAdapter(List<College> colleges, Activity activity) {
        this.colleges = colleges;
        this.activity = activity;
    }

    @Override
    public int getGroupCount() {
        return colleges.size();
    }

    @Override
    public int getChildrenCount(int groupPosition) {
        // 很關鍵,,一定要返回  1
        return 1;
    }

    @Override
    public Object getGroup(int groupPosition) {
        return colleges.get(groupPosition);
    }

    @Override
    public Object getChild(int groupPosition, int childPosition) {
        return colleges.get(groupPosition).classList.get(childPosition);
    }

    @Override
    public long getGroupId(int groupPosition) {
        return groupPosition;
    }

    @Override
    public long getChildId(int groupPosition, int childPosition) {
        return childPosition;
    }

    @Override
    public boolean hasStableIds() {
        return false;
    }

    @Override
    public View getGroupView(int groupPosition, boolean isExpanded, View convertView, ViewGroup parent) {

        return getGenericView(colleges.get(groupPosition).name);
    }

    @Override
    public View getChildView(int groupPosition, int childPosition, boolean isLastChild, View convertView, ViewGroup parent) {

        // 返回子ExpandableListView 的物件  此時傳入是該父條目,即大學的物件(有歧義。。)

        return getGenericExpandableListView(colleges.get(groupPosition));
    }

    @Override
    public boolean isChildSelectable(int groupPosition, int childPosition) {
        return true;
    }

    private TextView getGenericView(String string) {
        AbsListView.LayoutParams layoutParams = new AbsListView.LayoutParams(
                ViewGroup.LayoutParams.MATCH_PARENT,
                ViewGroup.LayoutParams.WRAP_CONTENT);

        TextView textView = new TextView(activity);
        textView.setLayoutParams(layoutParams);

        textView.setGravity(Gravity.CENTER_VERTICAL | Gravity.LEFT);

        textView.setPadding(40, 20, 0, 20);
        textView.setText(string);
        textView.setTextColor(Color.RED);
        return textView;
    }


    /**
     *  返回子ExpandableListView 的物件  此時傳入的是該大學下所有班級的集合。
     * @param college
     * @return
     */
    @TargetApi(Build.VERSION_CODES.JELLY_BEAN)
    public ExpandableListView getGenericExpandableListView(College college){
        AbsListView.LayoutParams layoutParams = new AbsListView.LayoutParams(
                ViewGroup.LayoutParams.MATCH_PARENT,
                ViewGroup.LayoutParams.WRAP_CONTENT);

        CustomExpandableListView view = new CustomExpandableListView(activity);

        // 載入班級的介面卡
        ClassesExpandableListViewAdapter adapter = new ClassesExpandableListViewAdapter(college.classList,activity);

        view.setAdapter(adapter);

        view.setPadding(20,0,0,0);
        return view;
    }
}
程式碼依然一大串,但其實和之前寫的ClassExpandableListViewAdapter都差不多一樣,主要有以下幾點區別:
getChildrenCount()返回1.getChildView()返回的是ExpandableListView物件。getGenericExpandableListView(): 添加了獲取ExpandableListView物件的方法。
可能在這裡,觀察仔細的會發現getGenericExpandableListView()中建立的是CustomExpandableListView物件,該物件是我自定義的。很多人可能都遇到過,ScrollView巢狀ListView,ListView顯示不全。同樣在這裡也出現了,子ExpandableListView同樣顯示不全,所以自定義解決這個問題。
/**
 *
 * 自定義ExpandableListView  解決巢狀之下顯示不全的問題
 * Created by MH on 2016/6/16.
 */
public class CustomExpandableListView extends ExpandableListView {


    public CustomExpandableListView(Context context) {
        super(context);
    }

    public CustomExpandableListView(Context context, AttributeSet attrs, int defStyleAttr) {
        super(context, attrs, defStyleAttr);
    }

    public CustomExpandableListView(Context context, AttributeSet attrs) {
        super(context, attrs);
    }

    @Override
    protected void onMeasure(int widthMeasureSpec, int heightMeasureSpec) {
        // 解決顯示不全的問題
        int expandSpec = MeasureSpec.makeMeasureSpec(Integer.MAX_VALUE >> 2
                , MeasureSpec.AT_MOST);
        super.onMeasure(widthMeasureSpec, expandSpec);
    }
}
ok ,告一段落。最後在看一下Main中的操作:
public class SimpleExpandListViewActivity extends AppCompatActivity {


    private ExpandableListView listview;

    private List<College> colleges;

    @Override
    protected void onCreate(@Nullable Bundle savedInstanceState) {
        super.onCreate(savedInstanceState);

        setContentView(R.layout.activity_tree_view_simple);

        initData();

        // 查詢控制元件
        listview = ((ExpandableListView) findViewById(R.id.tree_view_simple));


        SimpleExpandableListViewAdapter adapter = new SimpleExpandableListViewAdapter(colleges,this);

        // 設定介面卡
        listview.setAdapter(adapter);
/*
        // 初始化資料
        List<Classes> classesList = new ArrayList<>();

        for(int i = 1 ;i<3;i++) {
            Classes classes = new Classes();

            classes.name = "計算機"+i+"班";

            List<String> list = new ArrayList<>();

            list.add("mm");
            list.add("dd");
            classes.students = list;

            classesList.add(classes);
        }*/

        // 構造介面卡
       // ClassesExpandableListViewAdapter adapter = new ClassesExpandableListViewAdapter(classesList,this);


    }

    /**
     * 初始化資料
     */
    private void initData() {


        College college = new College();

        college.name = "科技大學";

        List<Classes> classesList = new ArrayList<>();

        for(int i = 1 ;i<3;i++) {
            Classes classes = new Classes();

            classes.name = "計算機"+i+"班";

            List<String> list = new ArrayList<>();

            list.add("mm");
            list.add("dd");
            classes.students = list;

            classesList.add(classes);
        }

        college.classList = classesList;


        colleges = new ArrayList<>();
        colleges.add(college);
    }
}
該專案原始碼已上傳github。有需要者請移步。