Flask【第十一章】:Flask中的CBV以及偏函式+執行緒安全
阿新 • • 發佈:2019-01-10
Flask中的CBV以及偏函式+執行緒安全
一、Flask中的CBV
之前我們是用檢視函式,Flask也有檢視類,就像Django一樣。看一看試圖類怎麼使用。
步驟:
1.先匯入我們的flask模組,以及之後我們所需要的模組
from flask import Flask
from flask import views,render_template
2.建立一個Flask例項
app = Flask(__name__,template_folder="templates")
3.建立一個檢視類
class Login(views.MethodView): methods= ["GET","POST"] decorators = ["be1","app.route"] def get(self): return render_template("login.html") def post(self): return "This is a post"
注意:methods以及一些配置可以當做欄位寫在檢視類中,也可以寫在app的路由設定中
4.建立url路由,注意一些配置,比如methods等等,可以在這裡面進行配置,類似檢視函式一樣設定。
注意:預設當沒有定義methods時,檢視類中所有的函式比如get、post,只要存在就都可以訪問,如果設定了methods,那麼就只能允許methods中的請求訪問。
app.add_url_rule("/",view_func=Login.as_view("my_login"))
5.啟動app
if __name__ == "__main__":
    app.run(debug=True)
看一下完整的程式碼:
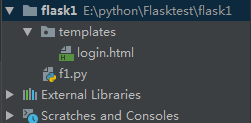
1.目錄結構:

2.f1.py內容:
from flask import Flask from flask import views,render_template app = Flask(__name__,template_folder="templates") class Login(views.MethodView): methods= ["GET","POST"] decorators = ["be1","app.route"] def get(self): return render_template("login.html") def post(self): return "This is a post" app.add_url_rule("/",view_func=Login.as_view("my_login")) if __name__ == "__main__": app.run(debug=True)
3.login.html程式碼
<!DOCTYPE html>
<html lang="en">
<head>
    <meta charset="UTF-8">
    <title>Title</title>
</head>
<body>
<form action="" method="post">
    使用者名稱:<input type="text" name="user">
    密碼:<input type="password" name="pwd">
    <input type="submit" value="登入">
</form>
</body>
</html>
4.訪問瀏覽器

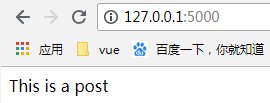
點選登入後:

二、偏函式+執行緒安全
1.偏函式
看一個例子:
def ab(a,b):
    return a+b

print(ab(1,2))


##結果為3
from functools import partial

def ab(a,b):
    return a+b

par_ab = partial(ab,5)
print(par_ab(6))

#結果是11
看出來了嗎,下面的那個例子就是偏函式的例子。引用了functools模組中的partial
解釋:將5傳值給a,然後在把ab函式賦給par_ab,這是par_ab(6)實際就是ab(5,6),所以等於11.這就是偏函式。
2.執行緒安全
看一個例子:我想要1秒內同時執行多多個任務
import time
import threading

class Foo(object):
    pass

foo = Foo()

def add(i):
    foo.num = i
    time.sleep(1)
    print(foo.num,i)

for i in range(20):
    th = threading.Thread(target=add,args=(i,))
    th.start()
結果:
D:\python3.6.6\python3.exe E:/python/Flasktest/flask1/f1.py
19 0
19 5
19 3
19 6
19 8
19 2
19 1
19 7
19 14
19 4
19 9
19 12
19 10
19 15
19 13
19 11
19 16
19 19
19 17
19 18

Process finished with exit code 0
會發現,原本應該是相對應的,結果全部都混亂了,都對應19了。這就是執行緒混亂。怎麼解決呢,繼續往下看
import time
import threading
from threading import local

class Foo(local):
    pass

foo = Foo()

def add(i):
    foo.num = i
    time.sleep(1)
    print(foo.num,i)

for i in range(20):
    th = threading.Thread(target=add,args=(i,))
    th.start()
結果:
D:\python3.6.6\python3.exe E:/python/Flasktest/flask1/f1.py
2 2
0 0
4 4
3 3
1 1
6 6
7 7
10 10
9 9
11 11
12 12
14 14
5 5
18 18
8 8
13 13
16 16
17 17
15 15
19 19

Process finished with exit code 0
這回就顯示正常了。這就是local所做的事情
