【劍指offer】面試題32:從上到下列印二叉樹
題目1:不分行從上到下列印二叉樹。從上往下打印出二叉樹的每個節點,同一層的節點從左到右的順序列印。
牛客網連結:https://www.nowcoder.com/questionTerminal/7fe2212963db4790b57431d9ed259701
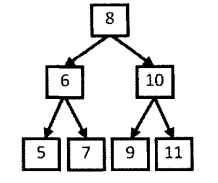
例如輸入下圖的二叉樹,則依次打印出:8,6,10,5,7,9,11。

這道題實質上考察的就是樹的遍歷演算法,只是這種遍歷不是我們熟悉的前序、中序或者後序遍歷。由於我們不太熟悉這種按層遍歷的方法,可能一下子也想不清楚遍歷的過程。
因為按層列印的順序決定應該先列印的根節點,所以我們從樹的根節點開始分析。為了接下來能夠列印8的結點的兩個子節點,我們應該在遍歷到該結點時把值為6和10的兩個結點儲存到一個容器中,現在容器內就有兩個結點了。按照從左到右列印的要求,我們先取出值為6的結點。打印出6後把它的值分別為5和7的兩個結點放入資料容器。此時資料容器中有3個結點,值分別為10,5,7。接下來我們從資料容器中取出值為10的結點。注意到值為10的結點比值為5、7的結點先放入容器,此時又比這兩個結點先取出,這就是我們通常說的**先入先出**,因此不難看出這個容器應該是一個**佇列**。由於值為5,7,9,11的結點都沒有子節點,因此只要依次列印即可。
通過分析具體例子,我們可以找到從上到下列印二叉樹的規律:每次列印一個結點的時候,如果該節點有子節點,把該節點的子節點放到一個佇列的末尾。接下來到佇列的頭部取出最早進入佇列的節點,重複前面列印操作,直到佇列中所有的節點都被打印出來。
程式碼實現:
package com.zju.offer.tree;
import java.util.ArrayList;

/**
 * 不分行從上到下列印二叉樹
 * 從上往下打印出二叉樹的每個節點,同一層的節點從左到右的順序列印
 */
public class PrintFromTopToBottom {

	public class TreeNode {
	    int val = 0;
	    TreeNode left = null;
	    TreeNode right = null;

	    public TreeNode(int val) {
	        this.val = val;
	    }
	}

	public ArrayList<Integer> printFromTopToBottom(TreeNode root){
		ArrayList<Integer> list = new ArrayList<>();
		// 模擬一個佇列,也可以用LinkedList
		ArrayList<TreeNode> queue = new ArrayList<>();

		if(root == null){
			return list;
		}

		queue.add(root);
		while(queue.size() != 0){
			// 將queue中第一個元素移除
			TreeNode temp = queue.remove(0);
			// 如果將要移除的節點有左子節點,則加入queue
			if(temp.left != null){
				queue.add(temp.left);
			}
			// 如果將要移除的節點有右子節點,則加入queue
			if(temp.right != null){
				queue.add(temp.right);
			}
			// 將temp的值加入list中
			list.add(temp.val);
		}
		return list;
	}
}
本題實現程式碼中用的是一個ArrayList集合去模擬的佇列,每次移除下標為0的元素即為佇列的頭元素,也符合佇列“先進先出的特點”。

本題擴充套件:如何廣度優先遍歷一幅有向圖?同樣也可以基於佇列實現。樹是圖的一種特殊退化形式,從上到下按層遍歷二叉樹,從本質上來說就是廣度優先遍歷二叉樹。
舉一反三:不管是廣度優先遍歷一幅有向圖還是一棵樹,都要用到佇列。首先把起始節點(對樹而言是根節點)放入佇列。接下來每次從佇列的頭部取出一個節點,遍歷這個節點之後把它能到達的節點(對樹而言是子節點)都依次放入到佇列。重複這個遍歷過程,直到佇列中的節點全部被遍歷為止。
題目2:分行從上到下列印二叉樹。從上到下按層列印二叉樹,同一層的節點按從左到右的順序列印,每一層列印到一行。
如下案例所示:

列印結果為:
8
6 10
5 7 9 11
這道題和前面的題類似,也可以用一個佇列來儲存將要列印的節點。為了把二叉樹的每一行單獨列印到一行裡,我們需要兩個變數:一個變量表示在當前層中還沒有列印的節點數;另外一個變量表示下一層節點的數目。
public class PrintFromTopToBottom {

	public class TreeNode {
	    int val = 0;
	    TreeNode left = null;
	    TreeNode right = null;

	    public TreeNode(int val) {
	        this.val = val;
	    }
	}

	public ArrayList<Integer> printFromTopToBottom_Method1(TreeNode root){
		ArrayList<Integer> list = new ArrayList<>();
		// 模擬一個佇列,也可以用LinkedList
		ArrayList<TreeNode> queue = new ArrayList<>();

		if(root == null){
			return list;
		}

		queue.add(root);
		int nextLevel = 0;
		int toBePrinted = 1;

		while(queue.size() != 0){
			// 將queue中第一個元素移除
			TreeNode temp = queue.remove(0);
			// 如果將要移除的節點有左子節點,則加入queue
			if(temp.left != null){
				queue.add(temp.left);
				nextLevel++;
			}
			// 如果將要移除的節點有右子節點,則加入queue
			if(temp.right != null){
				queue.add(temp.right);
				nextLevel++;
			}
			// 將temp的值加入list中
			list.add(temp.val);
			System.out.print(temp.val + "  ");
			--toBePrinted;

			if(toBePrinted == 0){
				System.out.println();
				toBePrinted = nextLevel;
				nextLevel = 0;
			}
		}
		return list;
	}

	// 測試
	public static void main(String[] args) {
		PrintFromTopToBottom p = new PrintFromTopToBottom();
		TreeNode root = p.new TreeNode(8);
		TreeNode node1 = p.new TreeNode(6);
		TreeNode node2 = p.new TreeNode(10);
		TreeNode node3 = p.new TreeNode(5);
		TreeNode node4 = p.new TreeNode(7);
		TreeNode node5 = p.new TreeNode(9);
		TreeNode node6 = p.new TreeNode(11);

		root.left = node1;
		root.right = node2;
		node1.left = node3;
	        node1.right = node4;
	        node2.left = node5;
	        node2.right = node6;

	        p.printFromTopToBottom_Method1(root);
	}
}
變數 toBePrinted 表示在當前層中還沒有列印的節點數,而變數 nextLevel 表示下一層的節點數。如果一個節點有子節點,則每把一個子節點加入佇列,同時把變數 nextLevel 加1。每列印一個節點,toBePrinted 減 1。當 toBePrinted 變成 0 時,表示當前層的所有節點已經列印完畢,可以繼續列印下一層。
題目3:之字形列印二叉樹。
請實現一個函式按照之字形列印二叉樹,即第一行按照從左到右的順序列印,第二層按照從右至左的順序列印,第三行按照從左到右的順序列印,其他行以此類推。
按之字形順序列印二叉樹需要兩個棧。我們在列印某一層的節點時,把下一層的子節點儲存到相應的棧裡。如果當前列印的是奇數層(第一層、第三層等),則先儲存左子節點再儲存右子節點到第一個棧裡(因為棧的後進先出特點);如果當前列印的是偶數層(第二層、第四層等),則先儲存右子節點再儲存左子節點到第二個棧裡。接下來逐個把位於棧頂的節點彈出棧並列印即可。
使用巢狀集合型別來儲存 stack1 和 stack2 中彈出的資料,每一個內層小集合中儲存一層的資料。
package com.zju.offer.tree;
import java.util.ArrayList;
import java.util.Stack;

public class PrintFromTopToBottom {

	public class TreeNode {
	    int val = 0;
	    TreeNode left = null;
	    TreeNode right = null;

	    public TreeNode(int val) {
	        this.val = val;
	    }
	}

	/**
	 * 之字形列印:奇數從左往右列印、偶數從右往左列印
	 */
	public ArrayList<ArrayList<Integer>> Print(TreeNode root){
		// 層數索引
		int layer = 1;
		// stack1 儲存奇數層節點
		Stack<TreeNode> stack1 = new Stack<TreeNode>();
		stack1.push(root);  // 因為根節點是奇數層,所以將根節點先儲存到stack1中
		// stack2 儲存偶數層節點
		Stack<TreeNode> stack2 = new Stack<TreeNode>();

		// 採用雙層集合,每一個內層集合儲存一層資料
		ArrayList<ArrayList<Integer>> list = new ArrayList<ArrayList<Integer>>();

		while(!stack1.empty() || !stack2.empty()){
			if(layer % 2 != 0){
				// 列印奇數層
				ArrayList<Integer> temp = new ArrayList<Integer>();
				while(!stack1.empty()){
					TreeNode node = stack1.pop();
					if(node != null){
						temp.add(node.val);
						System.out.print(node.val + "  ");
						// 由於當前層是奇數層,所以它的下一層是要從右往左列印
						// 因此按照棧的"後進先出"的特性,先儲存左子節點,再儲存右子節點
						stack2.push(node.left);
						stack2.push(node.right);
					}
				}
				if(!temp.isEmpty()){
					list.add(temp);
					layer++;
					System.out.println();
				}
			}else{
				// 列印偶數層
				ArrayList<Integer> temp = new ArrayList<Integer>();
				while(!stack2.isEmpty()){
					TreeNode node = stack2.pop();
					if(node != null){
						temp.add(node.val);
						System.out.print(node.val + "  ");
						// 由於當前層是偶數層,所以它的下一層是要從左往右列印
						// 因此按照棧的"後進先出"的特性,先儲存右子節點,再儲存左子節點
						stack1.push(node.right);
						stack1.push(node.left);
					}
				}
				if(!temp.isEmpty()){
					list.add(temp);
					layer++;
					System.out.println();
				}
			}
		}
		return list;
	}

	// 測試
	public static void main(String[] args) {
		PrintFromTopToBottom p = new PrintFromTopToBottom();
		TreeNode root = p.new TreeNode(8);
		TreeNode node1 = p.new TreeNode(6);
		TreeNode node2 = p.new TreeNode(10);
		TreeNode node3 = p.new TreeNode(5);
		TreeNode node4 = p.new TreeNode(7);
		TreeNode node5 = p.new TreeNode(9);
		TreeNode node6 = p.new TreeNode(11);

		root.left = node1;
		root.right = node2;
		node1.left = node3;
	        node1.right = node4;
	        node2.left = node5;
	        node2.right = node6;

	        p.Print(root);
	}
}
