
pyqt5——繪圖
繪圖
PyQt5繪圖系統能渲染向量影象、點陣圖影象和輪廓字型文字。一般會使用在修改或者提高現有元件的功能,或者建立自己的元件。使用PyQt5的繪圖API進行操作。
繪圖由paintEvent()方法完成,繪圖的程式碼要放在QPainter物件的begin()和end()方法之間。是低階介面。
文字塗鴉
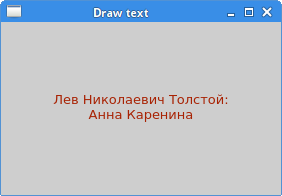
我們從畫一些Unicode文字開始。
#!/usr/bin/python3
# -*- coding: utf-8 -*-

"""
ZetCode PyQt5 tutorial
歡迎加入我的QQ群`923 414 804`與我一起學習
In this example, we draw text in Russian Cylliric.

Author: Jan Bodnar
Website: zetcode.com
Last edited: August 2017
"""

import sys
from PyQt5.QtWidgets import QWidget, QApplication
from PyQt5.QtGui import QPainter, QColor, QFont
from PyQt5.QtCore import Qt

class Example(QWidget):

    def __init__(self):
        super().__init__()

        self.initUI()


    def initUI(self):

        self.text = "Лев Николаевич Толстой\nАнна Каренина"

        self.setGeometry(300, 300, 280, 170)
        self.setWindowTitle('Drawing text')
        self.show()


    def paintEvent(self, event):

        qp = QPainter()
        qp.begin(self)
        self.drawText(event, qp)
        qp.end()


    def drawText(self, event, qp):

        qp.setPen(QColor(168, 34, 3))
        qp.setFont(QFont('Decorative', 10))
        qp.drawText(event.rect(), Qt.AlignCenter, self.text)


if __name__ == '__main__':

    app = QApplication(sys.argv)
    ex = Example()
    sys.exit(app.exec_())
寫了一些文字上下居中對齊的俄羅斯Cylliric語言的文字。
def paintEvent(self, event):
...
在繪畫事件內完成繪畫動作。
qp = QPainter()
qp.begin(self)
self.drawText(event, qp)
qp.end()QPainter是低階的繪畫類。所有的繪畫動作都在這個類的begin()和end()方法之間完成,繪畫動作都封裝在drawText()內部了。
qp.setPen(QColor(168, 34, 3))
qp.setFont(QFont('Decorative', 10))
為文字繪畫定義了筆和字型。
qp.drawText(event.rect(), Qt.AlignCenter, self.text)drawText()方法在窗口裡繪製文字,rect()方法返回要更新的矩形區域。
程式展示:
點的繪畫
點是最簡單的繪畫了。
#!/usr/bin/python3
# -*- coding: utf-8 -*-

"""
ZetCode PyQt5 tutorial

In the example, we draw randomly 1000 red points
on the window.

Author: Jan Bodnar
Website: zetcode.com
Last edited: August 2017
"""

from PyQt5.QtWidgets import QWidget, QApplication
from PyQt5.QtGui import QPainter
from PyQt5.QtCore import Qt
import sys, random

class Example(QWidget):

    def __init__(self):
        super().__init__()

        self.initUI()


    def initUI(self):

        self.setGeometry(300, 300, 300, 190)
        self.setWindowTitle('Points')
        self.show()


    def paintEvent(self, e):

        qp = QPainter()
        qp.begin(self)
        self.drawPoints(qp)
        qp.end()


    def drawPoints(self, qp):

        qp.setPen(Qt.red)
        size = self.size()

        for i in range(1000):
            x = random.randint(1, size.width()-1)
            y = random.randint(1, size.height()-1)
            qp.drawPoint(x, y)


if __name__ == '__main__':

    app = QApplication(sys.argv)
    ex = Example()
    sys.exit(app.exec_())
我們在窗口裡隨機的畫出了1000個點。
qp.setPen(Qt.red)設定筆的顏色為紅色,使用的是預定義好的顏色。
size = self.size()每次更改視窗大小,都會產生繪畫事件,從size()方法裡獲得當前視窗的大小,然後把產生的點隨機的分配到視窗的所有位置上。
qp.drawPoint(x, y)drawPoint()方法繪圖。
程式展示:

顏色
顏色是一個物體顯示的RGB的混合色。RBG值的範圍是0~255。我們有很多方式去定義一個顏色,最常見的方式就是RGB和16進製表示法,也可以使用RGBA,增加了一個透明度的選項,透明度值的範圍是0~1,0代表完全透明。
#!/usr/bin/python3
# -*- coding: utf-8 -*-

"""
ZetCode PyQt5 tutorial

This example draws three rectangles in three
#different colours.

Author: Jan Bodnar
Website: zetcode.com
Last edited: August 2017
"""

from PyQt5.QtWidgets import QWidget, QApplication
from PyQt5.QtGui import QPainter, QColor, QBrush
import sys

class Example(QWidget):

    def __init__(self):
        super().__init__()

        self.initUI()


    def initUI(self):

        self.setGeometry(300, 300, 350, 100)
        self.setWindowTitle('Colours')
        self.show()


    def paintEvent(self, e):

        qp = QPainter()
        qp.begin(self)
        self.drawRectangles(qp)
        qp.end()


    def drawRectangles(self, qp):

        col = QColor(0, 0, 0)
        col.setNamedColor('#d4d4d4')
        qp.setPen(col)

        qp.setBrush(QColor(200, 0, 0))
        qp.drawRect(10, 15, 90, 60)

        qp.setBrush(QColor(255, 80, 0, 160))
        qp.drawRect(130, 15, 90, 60)

        qp.setBrush(QColor(25, 0, 90, 200))
        qp.drawRect(250, 15, 90, 60)


if __name__ == '__main__':

    app = QApplication(sys.argv)
    ex = Example()
    sys.exit(app.exec_())
我們畫出了三個顏色的矩形。
color = QColor(0, 0, 0)
color.setNamedColor('#d4d4d4')
使用16進位制的方式定義一個顏色。
qp.setBrush(QColor(200, 0, 0))
qp.drawRect(10, 15, 90, 60)定義了一個筆刷,並畫出了一個矩形。筆刷是用來畫一個物體的背景。drawRect()有四個引數,分別是矩形的x、y、w、h。 然後用筆刷和矩形進行繪畫。
程式展示:

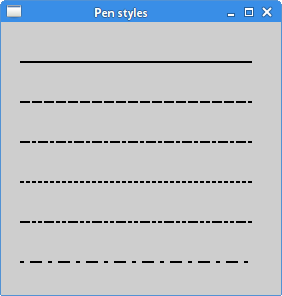
QPen
QPen是基本的繪畫物件,能用來畫直線、曲線、矩形框、橢圓、多邊形和其他形狀。
#!/usr/bin/python3
# -*- coding: utf-8 -*-

"""
ZetCode PyQt5 tutorial

In this example we draw 6 lines using
different pen styles.

Author: Jan Bodnar
Website: zetcode.com
Last edited: August 2017
"""

from PyQt5.QtWidgets import QWidget, QApplication
from PyQt5.QtGui import QPainter, QPen
from PyQt5.QtCore import Qt
import sys

class Example(QWidget):

    def __init__(self):
        super().__init__()

        self.initUI()


    def initUI(self):

        self.setGeometry(300, 300, 280, 270)
        self.setWindowTitle('Pen styles')
        self.show()


    def paintEvent(self, e):

        qp = QPainter()
        qp.begin(self)
        self.drawLines(qp)
        qp.end()


    def drawLines(self, qp):

        pen = QPen(Qt.black, 2, Qt.SolidLine)

        qp.setPen(pen)
        qp.drawLine(20, 40, 250, 40)

        pen.setStyle(Qt.DashLine)
        qp.setPen(pen)
        qp.drawLine(20, 80, 250, 80)

        pen.setStyle(Qt.DashDotLine)
        qp.setPen(pen)
        qp.drawLine(20, 120, 250, 120)

        pen.setStyle(Qt.DotLine)
        qp.setPen(pen)
        qp.drawLine(20, 160, 250, 160)

        pen.setStyle(Qt.DashDotDotLine)
        qp.setPen(pen)
        qp.drawLine(20, 200, 250, 200)

        pen.setStyle(Qt.CustomDashLine)
        pen.setDashPattern([1, 4, 5, 4])
        qp.setPen(pen)
        qp.drawLine(20, 240, 250, 240)


if __name__ == '__main__':

    app = QApplication(sys.argv)
    ex = Example()
    sys.exit(app.exec_())
在這個例子裡,我們用不同的筆畫了6條直線。PyQt5有五個預定義的筆,另外一個筆的樣式使我們自定義的。
pen = QPen(Qt.black, 2, Qt.SolidLine)新建一個QPen物件,設定顏色黑色,寬2畫素,這樣就能看出來各個筆樣式的區別。Qt.SolidLine是預定義樣式的一種。
pen.setStyle(Qt.CustomDashLine)
pen.setDashPattern([1, 4, 5, 4])
qp.setPen(pen)這裡我們自定義了一個筆的樣式。定義為Qt.CustomDashLine然後呼叫setDashPattern()方法。數字列表是線的樣式,要求必須是個數為奇數,奇數位定義的是空格,偶數位為線長,數字越大,空格或線長越大,比如本例的就是1畫素線,4畫素空格,5畫素線,4畫素空格。
程式展示:
QBrush
QBrush也是影象的一個基本元素。是用來填充一些物體的背景圖用的,比如矩形,橢圓,多邊形等。有三種類型:預定義、漸變和紋理。
#!/usr/bin/python3
# -*- coding: utf-8 -*-

"""
ZetCode PyQt5 tutorial

This example draws nine rectangles in different
brush styles.

Author: Jan Bodnar
Website: zetcode.com
Last edited: August 2017
"""

from PyQt5.QtWidgets import QWidget, QApplication
from PyQt5.QtGui import QPainter, QBrush
from PyQt5.QtCore import Qt
import sys

class Example(QWidget):

    def __init__(self):
        super().__init__()

        self.initUI()


    def initUI(self):

        self.setGeometry(300, 300, 355, 280)
        self.setWindowTitle('Brushes')
        self.show()


    def paintEvent(self, e):

        qp = QPainter()
        qp.begin(self)
        self.drawBrushes(qp)
        qp.end()


    def drawBrushes(self, qp):

        brush = QBrush(Qt.SolidPattern)
        qp.setBrush(brush)
        qp.drawRect(10, 15, 90, 60)

        brush.setStyle(Qt.Dense1Pattern)
        qp.setBrush(brush)
        qp.drawRect(130, 15, 90, 60)

        brush.setStyle(Qt.Dense2Pattern)
        qp.setBrush(brush)
        qp.drawRect(250, 15, 90, 60)

        brush.setStyle(Qt.DiagCrossPattern)
        qp.setBrush(brush)
        qp.drawRect(10, 105, 90, 60)

        brush.setStyle(Qt.Dense5Pattern)
        qp.setBrush(brush)
        qp.drawRect(130, 105, 90, 60)

        brush.setStyle(Qt.Dense6Pattern)
        qp.setBrush(brush)
        qp.drawRect(250, 105, 90, 60)

        brush.setStyle(Qt.HorPattern)
        qp.setBrush(brush)
        qp.drawRect(10, 195, 90, 60)

        brush.setStyle(Qt.VerPattern)
        qp.setBrush(brush)
        qp.drawRect(130, 195, 90, 60)

        brush.setStyle(Qt.BDiagPattern)
        qp.setBrush(brush)
        qp.drawRect(250, 195, 90, 60)


if __name__ == '__main__':

    app = QApplication(sys.argv)
    ex = Example()
    sys.exit(app.exec_())
我們畫了9個不同的矩形。
brush = QBrush(Qt.SolidPattern)
qp.setBrush(brush)
qp.drawRect(10, 15, 90, 60)建立了一個筆刷物件,新增筆刷樣式,然後呼叫drawRect()方法畫圖。
程式展示:

貝塞爾曲線
噩夢可以使用PyQt5的QPainterPath建立貝塞爾曲線。繪畫路徑是由許多構建圖形的物件,具體表現就是一些線的形狀,比如矩形,橢圓,線和曲線。
#!/usr/bin/python3
# -*- coding: utf-8 -*-

"""
ZetCode PyQt5 tutorial

This program draws a Bézier curve with
QPainterPath.

Author: Jan Bodnar
Website: zetcode.com
Last edited: August 2017
"""

from PyQt5.QtWidgets import QWidget, QApplication
from PyQt5.QtGui import QPainter, QPainterPath
from PyQt5.QtCore import Qt
import sys

class Example(QWidget):

    def __init__(self):
        super().__init__()

        self.initUI()


    def initUI(self):

        self.setGeometry(300, 300, 380, 250)
        self.setWindowTitle('Bézier curve')
        self.show()


    def paintEvent(self, e):

        qp = QPainter()
        qp.begin(self)
        qp.setRenderHint(QPainter.Antialiasing)
        self.drawBezierCurve(qp)
        qp.end()


    def drawBezierCurve(self, qp):

        path = QPainterPath()
        path.moveTo(30, 30)
        path.cubicTo(30, 30, 200, 350, 350, 30)

        qp.drawPath(path)


if __name__ == '__main__':

    app = QApplication(sys.argv)
    ex = Example()
    sys.exit(app.exec_())
這個示例中,我們畫出了一個貝塞爾曲線。
path = QPainterPath()
path.moveTo(30, 30)
path.cubicTo(30, 30, 200, 350, 350, 30)用QPainterPath路徑建立貝塞爾曲線。使用cubicTo()方法生成,分別需要三個點:起始點,控制點和終止點。
qp.drawPath(path)
drawPath()繪製最後的影象。