
ubuntu下搭建svn伺服器以及設定SVN
=======================================================================================
OS :Ubuntu 12.04.3 LTS
kernel :3.2.0-29-generic
server IP: 172.16.147.13
svnserve :version 1.6.17 (r1128011)
svn client :TortoiseSVN version 1.7
=======================================================================================
一. 安裝subversion配置
1.安裝
#apt-get install subversion2.新增svn管理使用者及subversion組
# adduser svnuser
# addgroup subversion
# addgroup svnuser subversion
# addgroup joe subversion            #把自己的賬號也加入
3.建立專案testpj目錄
#mkdir /home/svnroot && cd /home/svnroot
#mkdir testpj
#chown -R root:subversion testpj 4.建立SVN檔案倉庫
# svnadmin create /home/svnroot/testpj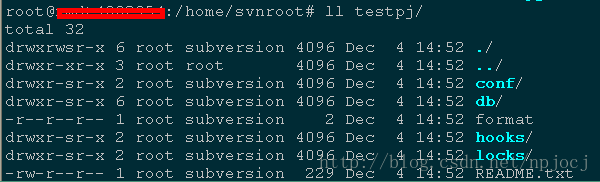
可以用以下命令來檢視svn的版本倉庫路徑以及服務是否開啟。
ps -aux |grep svn5.修改倉庫訪問許可權
#chmod 700 /home/svnroot/testpj6.配置倉庫的訪問許可權
建好倉庫可以通過修改 /home/svnroot/testpj/conf目錄下:svnserve.conf 、passwd 、authz三個檔案,來配置程式碼倉庫的訪問許可權。 注意:修改時6.1編輯svnserve.conf檔案
# vim svnserve.conf### This file controls the configuration of the svnserve daemon, if you
### use it to allow access to this repository. (If you only allow
### access through http: and/or file: URLs, then this file is
### irrelevant.)
### Visit http://subversion.tigris.org/ for more information.
[general]
### These options control access to the repository for unauthenticated
### and authenticated users. Valid values are "write", "read",
### and "none". The sample settings below are the defaults.
# anon-access = read read改為none
# auth-access = write
### The password-db option controls the location of the password
### database file. Unless you specify a path starting with a /,
### the file's location is relative to the directory containing
### this configuration file.
### If SASL is enabled (see below), this file will NOT be used.
### Uncomment the line below to use the default password file.
# password-db = passwd
### The authz-db option controls the location of the authorization
### rules for path-based access control. Unless you specify a path
### starting with a /, the file's location is relative to the the
### directory containing this file. If you don't specify an
### authz-db, no path-based access control is done.
### Uncomment the line below to use the default authorization file.
# authz-db = authz
### This option specifies the authentication realm of the repository.
### If two repositories have the same authentication realm, they should
### have the same password database, and vice versa. The default realm
### is repository's uuid.
# realm = My First Repository
[sasl]
### This option specifies whether you want to use the Cyrus SASL
### library for authentication. Default is false.
### This section will be ignored if svnserve is not built with Cyrus
### SASL support; to check, run 'svnserve --version' and look for a line
### reading 'Cyrus SASL authentication is available.'
# use-sasl = true
### These options specify the desired strength of the security layer
### that you want SASL to provide. 0 means no encryption, 1 means
### integrity-checking only, values larger than 1 are correlated
### to the effective key length for encryption (e.g. 128 means 128-bit
### encryption). The values below are the defaults.
# min-encryption = 0
# max-encryption = 256取消一下四行前面的# 取消註釋
anon-access = read
auth-access = write
password-db = password
authz-db = authz
並將anon-access = read的read改為none,禁止匿名使用者訪問。
password-db = password
authz-db = authz
6.2新增賬號編輯/home/svnroot/testpj/conf/authz如下
[groups]
admin = joe.chan
[/]
@admin=rw
*=r
6.3 設定賬號密碼/home/svnroot/testpj/conf/passwd 如下:
[users]
joe.chan = joe.chan
在windows下可以試著訪問看看。如圖
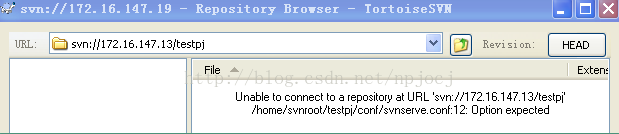
出現這個問題就是,沒有執行建立倉庫的操作
# svnadmin create /home/svnroot/testpj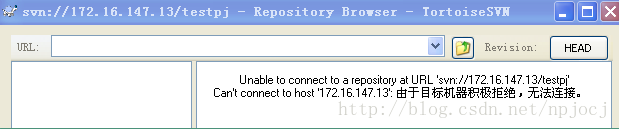
出現這種情況就是沒有新增賬號密碼,或者沒有啟動server
二.新增固定提交模板
三.新增SVN郵件服務
郵件服務有多種,總結起來如下
- 基於svnnotify
- 基於sendmail
apt-get install sendmail
apt-get install sendmail-cf安裝的過程有提示要在 /etc/mail/sendmail.mc /etc/mail/submit.mc 中新增 postfix: fatal: the postfix command is reserved for the superuser
start-stop-daemon: unable to stat /usr/sbin/sendmail-mta (No such file or directory)
/etc/init.d/sendmail: line 296: /usr/sbin/sendmail-msp: No such file or directory
./commit-email.pl /home/svnroot/DailyBuildScripts/ 1 [email protected] --from [email protected] ./commit-email.pl: SMTP Error: 5.7.4 Unrecognized authentication type
解壓安裝
tar -xvf svnmailer-1.0.9.tar.gz
cd svnmailer-1.0.9
python setup.py install
安裝前確定將setup.py 中 #/usr/bin/env python2.3修改為#!/usr/bin/python2.7
提示
SyntaxError: Non-ASCII character '\xc3' in file setup.py on line 36, but no encoding declared; see http://www.python.org/peps/pep-0263.html for detailsrunning install
running build
running build_py
creating build
creating build/lib.linux-x86_64-2.7
creating build/lib.linux-x86_64-2.7/svnmailer
copying src/lib/svnmailer/cli.py -> build/lib.linux-x86_64-2.7/svnmailer
copying src/lib/svnmailer/differ.py -> build/lib.linux-x86_64-2.7/svnmailer
copying src/lib/svnmailer/typedstruct.py -> build/lib.linux-x86_64-2.7/svnmailer
copying src/lib/svnmailer/settings.py -> build/lib.linux-x86_64-2.7/svnmailer
copying src/lib/svnmailer/browser.py -> build/lib.linux-x86_64-2.7/svnmailer
copying src/lib/svnmailer/stream.py -> build/lib.linux-x86_64-2.7/svnmailer
copying src/lib/svnmailer/subversion.py -> build/lib.linux-x86_64-2.7/svnmailer
copying src/lib/svnmailer/main.py -> build/lib.linux-x86_64-2.7/svnmailer
copying src/lib/svnmailer/util.py -> build/lib.linux-x86_64-2.7/svnmailer
copying src/lib/svnmailer/config.py -> build/lib.linux-x86_64-2.7/svnmailer
copying src/lib/svnmailer/struct_accessors.py -> build/lib.linux-x86_64-2.7/svnmailer
copying src/lib/svnmailer/__init__.py -> build/lib.linux-x86_64-2.7/svnmailer
creating build/lib.linux-x86_64-2.7/svnmailer/notifier
copying src/lib/svnmailer/notifier/_textmail.py -> build/lib.linux-x86_64-2.7/svnmailer/notifier
copying src/lib/svnmailer/notifier/stdout.py -> build/lib.linux-x86_64-2.7/svnmailer/notifier
copying src/lib/svnmailer/notifier/news.py -> build/lib.linux-x86_64-2.7/svnmailer/notifier
copying src/lib/svnmailer/notifier/_mail.py -> build/lib.linux-x86_64-2.7/svnmailer/notifier
copying src/lib/svnmailer/notifier/_multimail.py -> build/lib.linux-x86_64-2.7/svnmailer/notifier
copying src/lib/svnmailer/notifier/_base.py -> build/lib.linux-x86_64-2.7/svnmailer/notifier
copying src/lib/svnmailer/notifier/_textnews.py -> build/lib.linux-x86_64-2.7/svnmailer/notifier
copying src/lib/svnmailer/notifier/_text.py -> build/lib.linux-x86_64-2.7/svnmailer/notifier
copying src/lib/svnmailer/notifier/cia_xmlrpc.py -> build/lib.linux-x86_64-2.7/svnmailer/notifier
copying src/lib/svnmailer/notifier/mail.py -> build/lib.linux-x86_64-2.7/svnmailer/notifier
copying src/lib/svnmailer/notifier/selector.py -> build/lib.linux-x86_64-2.7/svnmailer/notifier
copying src/lib/svnmailer/notifier/__init__.py -> build/lib.linux-x86_64-2.7/svnmailer/notifier
running build_scripts
creating build/scripts-2.7
copying and adjusting src/svn-mailer -> build/scripts-2.7
changing mode of build/scripts-2.7/svn-mailer from 644 to 755
running install_lib
creating /usr/local/lib/python2.7/dist-packages/svnmailer
copying build/lib.linux-x86_64-2.7/svnmailer/cli.py -> /usr/local/lib/python2.7/dist-packages/svnmailer
copying build/lib.linux-x86_64-2.7/svnmailer/differ.py -> /usr/local/lib/python2.7/dist-packages/svnmailer
copying build/lib.linux-x86_64-2.7/svnmailer/typedstruct.py -> /usr/local/lib/python2.7/dist-packages/svnmailer
copying build/lib.linux-x86_64-2.7/svnmailer/settings.py -> /usr/local/lib/python2.7/dist-packages/svnmailer
copying build/lib.linux-x86_64-2.7/svnmailer/browser.py -> /usr/local/lib/python2.7/dist-packages/svnmailer
copying build/lib.linux-x86_64-2.7/svnmailer/stream.py -> /usr/local/lib/python2.7/dist-packages/svnmailer
copying build/lib.linux-x86_64-2.7/svnmailer/subversion.py -> /usr/local/lib/python2.7/dist-packages/svnmailer
copying build/lib.linux-x86_64-2.7/svnmailer/main.py -> /usr/local/lib/python2.7/dist-packages/svnmailer
copying build/lib.linux-x86_64-2.7/svnmailer/util.py -> /usr/local/lib/python2.7/dist-packages/svnmailer
copying build/lib.linux-x86_64-2.7/svnmailer/config.py -> /usr/local/lib/python2.7/dist-packages/svnmailer
copying build/lib.linux-x86_64-2.7/svnmailer/struct_accessors.py -> /usr/local/lib/python2.7/dist-packages/svnmailer
creating /usr/local/lib/python2.7/dist-packages/svnmailer/notifier
copying build/lib.linux-x86_64-2.7/svnmailer/notifier/_textmail.py -> /usr/local/lib/python2.7/dist-packages/svnmailer/notifier
copying build/lib.linux-x86_64-2.7/svnmailer/notifier/stdout.py -> /usr/local/lib/python2.7/dist-packages/svnmailer/notifier
copying build/lib.linux-x86_64-2.7/svnmailer/notifier/news.py -> /usr/local/lib/python2.7/dist-packages/svnmailer/notifier
copying build/lib.linux-x86_64-2.7/svnmailer/notifier/_mail.py -> /usr/local/lib/python2.7/dist-packages/svnmailer/notifier
copying build/lib.linux-x86_64-2.7/svnmailer/notifier/_multimail.py -> /usr/local/lib/python2.7/dist-packages/svnmailer/notifier
copying build/lib.linux-x86_64-2.7/svnmailer/notifier/_base.py -> /usr/local/lib/python2.7/dist-packages/svnmailer/notifier
copying build/lib.linux-x86_64-2.7/svnmailer/notifier/_textnews.py -> /usr/local/lib/python2.7/dist-packages/svnmailer/notifier
copying build/lib.linux-x86_64-2.7/svnmailer/notifier/_text.py -> /usr/local/lib/python2.7/dist-packages/svnmailer/notifier
copying build/lib.linux-x86_64-2.7/svnmailer/notifier/cia_xmlrpc.py -> /usr/local/lib/python2.7/dist-packages/svnmailer/notifier
copying build/lib.linux-x86_64-2.7/svnmailer/notifier/mail.py -> /usr/local/lib/python2.7/dist-packages/svnmailer/notifier
copying build/lib.linux-x86_64-2.7/svnmailer/notifier/selector.py -> /usr/local/lib/python2.7/dist-packages/svnmailer/notifier
copying build/lib.linux-x86_64-2.7/svnmailer/notifier/__init__.py -> /usr/local/lib/python2.7/dist-packages/svnmailer/notifier
copying build/lib.linux-x86_64-2.7/svnmailer/__init__.py -> /usr/local/lib/python2.7/dist-packages/svnmailer
byte-compiling /usr/local/lib/python2.7/dist-packages/svnmailer/cli.py to cli.pyc
byte-compiling /usr/local/lib/python2.7/dist-packages/svnmailer/differ.py to differ.pyc
byte-compiling /usr/local/lib/python2.7/dist-packages/svnmailer/typedstruct.py to typedstruct.pyc
byte-compiling /usr/local/lib/python2.7/dist-packages/svnmailer/settings.py to settings.pyc
byte-compiling /usr/local/lib/python2.7/dist-packages/svnmailer/browser.py to browser.pyc
byte-compiling /usr/local/lib/python2.7/dist-packages/svnmailer/stream.py to stream.pyc
byte-compiling /usr/local/lib/python2.7/dist-packages/svnmailer/subversion.py to subversion.pyc
byte-compiling /usr/local/lib/python2.7/dist-packages/svnmailer/main.py to main.pyc
byte-compiling /usr/local/lib/python2.7/dist-packages/svnmailer/util.py to util.pyc
byte-compiling /usr/local/lib/python2.7/dist-packages/svnmailer/config.py to config.pyc
byte-compiling /usr/local/lib/python2.7/dist-packages/svnmailer/struct_accessors.py to struct_accessors.pyc
byte-compiling /usr/local/lib/python2.7/dist-packages/svnmailer/notifier/_textmail.py to _textmail.pyc
byte-compiling /usr/local/lib/python2.7/dist-packages/svnmailer/notifier/stdout.py to stdout.pyc
byte-compiling /usr/local/lib/python2.7/dist-packages/svnmailer/notifier/news.py to news.pyc
byte-compiling /usr/local/lib/python2.7/dist-packages/svnmailer/notifier/_mail.py to _mail.pyc
byte-compiling /usr/local/lib/python2.7/dist-packages/svnmailer/notifier/_multimail.py to _multimail.pyc
byte-compiling /usr/local/lib/python2.7/dist-packages/svnmailer/notifier/_base.py to _base.pyc
byte-compiling /usr/local/lib/python2.7/dist-packages/svnmailer/notifier/_textnews.py to _textnews.pyc
byte-compiling /usr/local/lib/python2.7/dist-packages/svnmailer/notifier/_text.py to _text.pyc
byte-compiling /usr/local/lib/python2.7/dist-packages/svnmailer/notifier/cia_xmlrpc.py to cia_xmlrpc.pyc
byte-compiling /usr/local/lib/python2.7/dist-packages/svnmailer/notifier/mail.py to mail.pyc
byte-compiling /usr/local/lib/python2.7/dist-packages/svnmailer/notifier/selector.py to selector.pyc
byte-compiling /usr/local/lib/python2.7/dist-packages/svnmailer/notifier/__init__.py to __init__.pyc
byte-compiling /usr/local/lib/python2.7/dist-packages/svnmailer/__init__.py to __init__.pyc
running install_scripts
copying build/scripts-2.7/svn-mailer -> /usr/local/bin
changing mode of /usr/local/bin/svn-mailer to 755
running install_data
creating /usr/local/man/man1
copying docs/svn-mailer.1 -> /usr/local/man/man1
running install_egg_info
Writing /usr/local/lib/python2.7/dist-packages/svnmailer-1.0.9.egg-info#svn-mailer --version
svnmailer-1.0.9
with svn 1.6.17 (r1128011)以下是commit-email.pl 的提示
# ====================================================================
# This script is deprecated.  The Subversion developers recommend
# using mailer.py for post-commit and post-revprop change
# notifications.  If you wish to improve or add features to a
# post-commit notification script, please do that work on mailer.py.
# See http://svn.apache.org/repos/asf/subversion/trunk/tools/hook-scripts/mailer .
# ====================================================================
[email protected]:/home/share/temp# ./commit-email.pl /home/svnroot/testpj/ 1 [email protected] --from [email protected]
No SASL mechanism found
at /usr/share/perl5/Authen/SASL.pm line 77
at /usr/share/perl/5.14/Net/SMTP.pm line 143需要安裝 apt-get install libauthen-sasl-cyrus-perl libauthen-sasl-perl
./commit-email.pl /home/svnroot/DailyBuildScripts/ 1 [email protected] --from [email protected]
相關推薦
ubuntu下搭建svn伺服器以及設定SVN
======================================================================================= OS :Ubuntu 12.04.3 LTS kernel :3.2.0-29-generic s
Ubuntu下搭建Nginx伺服器+整合RTMP視訊直播流處理(邊做邊做更新)
簡介: 要求:做一個網頁獲取攝像頭的視訊流,然後將視訊流經過流伺服器推送到後臺視訊處理伺服器,再由後臺視訊處理伺服器推送到流伺服器,最終推送到頁面。如圖: 經過查閱資料,目前有red5以及nginx+nginx-rtmp-module實現,選擇第二種方式來實現。 準備工作:
Ubuntu下搭建web伺服器
一、開始安裝MySQL5 sudo apt-get install mysql-server mysql-client 二、安裝Apache2 Apache2的是作為一個Ubuntu的軟體包,因此我們可以直接用下面命令安裝它: sudo apt-get ins
【linux】ubuntu下搭建FTP伺服器
關於FTP File Transfer Protocol(檔案傳輸協議)搭建個人網站需要向自己的雲主機上傳(upload)寫好的網站模版,在Linux下就需要一個接收(download)檔案的伺服器。ubuntu 16.04 預設是沒有FTP的,就需要自己搭建環境。 搭建FTP伺服器流程
Linux ubuntu下搭建boa伺服器
如果對Linux檔案操作不熟悉的可以看文末的補充內容 學習Linux過程中,記錄配置boa伺服器詳細過程 一、官網下載boa原始碼 boa官網 http://www.boa.org/ 我這裡下的版本是boa-0.94.13 將檔案拷貝到虛擬機器上,這裡我直接放在了home使用者檔案根
Ubuntu下搭建Git伺服器
下面搭建的git伺服器的簡易網路拓撲圖如下所示: 一、安裝及配置所需軟體[Git伺服器,[email protected]] git-core是git版本控制核心軟體,而且git是通過ssh協議來在伺服器與客戶端之間傳輸檔案,故openssh-server、o
ubuntu下搭建lamp伺服器及安裝wordpress
下載wordpress包反到/var/www資料夾下: 如果這條命令不行的話可以採用直接在網頁上輸入以上網址下載到系統中然後採用 #cp wordpress.xxxx.tar.gz /var/www/ 命令下載完成。 然後解壓: #tar –zxvf latest.tar
Ubuntu下搭建ngrok伺服器及客戶端
記錄一下自己在Ubuntu下搭建ngrok服務的過程 前言 最近想要在校園網內搭建一個VPN服務,但是因為校園網,所以沒有公網IP,只好做內網穿透了,之前做了一些n2n以及ssh隧道的嘗試,這次使用ngrok反向代理嘗試一下: 由於最初沒有安裝
Linux(阿里雲Centos7)環境下搭建svn伺服器以及許可權配置詳細步驟
本篇文章主要介紹在CentOS7中採用yum安裝方式。優點:簡單,一鍵安裝,不用手動配置環境變數等。缺點:安裝位置為yum預設。本篇文章以阿里雲CentOS7為例。 詳細步驟: 一、yum安裝subversion 1. 安裝命令 yum install sub
linux下搭建SVN伺服器以及遇到的常見問題解決
server_group = server_pw client_group = client_pw test_group = test_pw 5,修改使用者訪問策略 /hom
Ubuntu下搭建SVN服務器
修改配置 停止 客戶 install 它的 svnserve 服務 配置 是否 SVN的介紹 SVN是Subversion的簡稱,是一個開放源代碼的版本控制系統,相較於RCS、CVS,它采用了分支管理系統,它的設計目標就是取代CVS。互聯網上很多版本控制服務已從CVS遷移
centos搭建svn伺服器以及hdwiki
SVN:直接參考百度經驗 注意以下兩點: 百度經驗中提到的vi authz中一定記得要加上:[/] 以及使用者的許可權 我伺服器重啟發現訪問不了一直在waiting for initialing
在Ubuntu下搭建Eclipse+SVN,涉及 Failed to load JavaHL Library的解決方法~
本篇文章獻給那些每做一步都會報錯的人。 首先,在終端執行sudo apt-get install subversion。 接著,在 下載完成以後,進入eclipse當年的安裝目錄,在此安裝目錄下建立一個新的資料夾links,將剛才
ubuntu下搭建svn環境及其使用
ubuntu下搭建svn環境 軟體下載安裝: 我選用的是apt-get install subversion 作業系統自帶的包管理工具安裝,採用此法安裝的軟體方便管理,可以用dpkg -L subversion命令檢視其所在安裝目錄
Ubuntu搭建VPN伺服器以及配置客戶端連線
伺服器環境:Ubuntu 16.0.4.2 客戶端環境:windows7 VPN伺服器搭建 一,解除安裝pptpd以及iptables(對於之前VPN配置錯誤的) #解除安裝pptpd sudo apt-get autoremove pptpd sudo apt-get
CentOS下連VisualSVN伺服器 (windows的svn伺服器)
CentOS/RHEL yum 安裝的 subversion 是 1.6.11 版本,連VisualSVN伺服器時會有”Key usage violation”的錯誤,如下 svn: OPTIONS of ‘https://…/server‘: SSL handshake f
虛擬機器Ubuntu下搭建Samba檔案訪問伺服器
主機win10+VMware Workstation+ubuntu14.04 1.設定VMware Workstation虛擬機器網路為橋接聯網模式,確保win10與ubuntu14.04相互ping通 在Ubuntu14.04下Alt + Ctrl + T鍵開啟一個終端 執行
Ubuntu 18.04.1 LTS下搭建git伺服器
sudo apt-get install git 安裝好git sudo adduser git 系統會提示設定密碼,此時請設定好你的密碼,還會要你設定email之類的此時可以按Enter回車預設為空 sudo vim /home/git/.ssh/authorized_keys 此時把你電腦裡
Ubuntu 搭建FTP伺服器以及解決530問題
ubuntu安裝ftp伺服器 1: 安裝vsftpd ~$ sudo apt-get install vsftpd ubuntu10.10自己裝了,這步省略。 2: 配置vsftpd 2.1 修改vsftpd的配置檔案。此類配置檔案通常位於 /etc 目錄下。 ~$ sudo gedit /etc/vsft
ubuntu 12.04下搭建web伺服器(MySQL+PHP+Apache) 教程
1.開始說明 下面很多可能參照網上其中以為前輩的,但有所改進吧。這些設定可能會有所不同,你需要根據不同情況進行修改。 安裝apache2 2.切換管理員身份 在ubuntu中需要用root身份進行操作,所以用下面的命令確保以root身份登入: sudo su