SpringBoot 開發使用thymeleaf模板開發html頁面
最近在和同事的聊天中得知同事在工作之餘想做一個個人網站,談到後臺問我使用什麼技術好,鑑於之前的經歷,脫口而出:“Springboot”。然後聊了一些之後就開始用了。後面同事反映說不行,使用html無法跳轉(後端無法做到)。當我聽到這個的時候是表示很震驚的。我自己就找了一寫相關資料。發現使用html的話就使用thymeleaf模板就好了。下面就詳細來說說如何使用thymeleaf開發html。
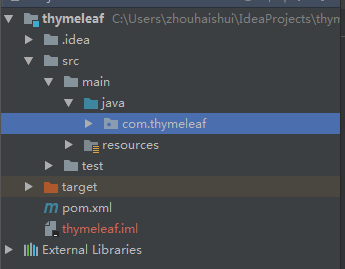
建立一個Springboot maven專案。檔案目錄就如下:
接下來呢就是pom檔案映入相關jar包了。一定要引入thymeleaf。(更多內容看文章最後的github連結,專案已上傳至github)
<properties>
        <project.build.sourceEncoding>UTF-8</project.build.sourceEncoding>

        <!--引入themeleaf-->
        <thymeleaf.version> 3.0.2.RELEASE </thymeleaf.version>
        <thymeleaf-layout-dialect.version> 2.1.1 </thymeleaf-layout-dialect.version>
    </properties>


    <dependencies>
        <dependency>
            <groupId>org.springframework.boot</groupId>
            <artifactId>spring-boot-starter-web</artifactId>
        </dependency>

        <dependency>
            <groupId>org.springframework.boot</groupId>
            <artifactId>spring-boot-starter-thymeleaf</artifactId>
            <version>1.0.2.RELEASE</version>
        </dependency>
    </dependencies>
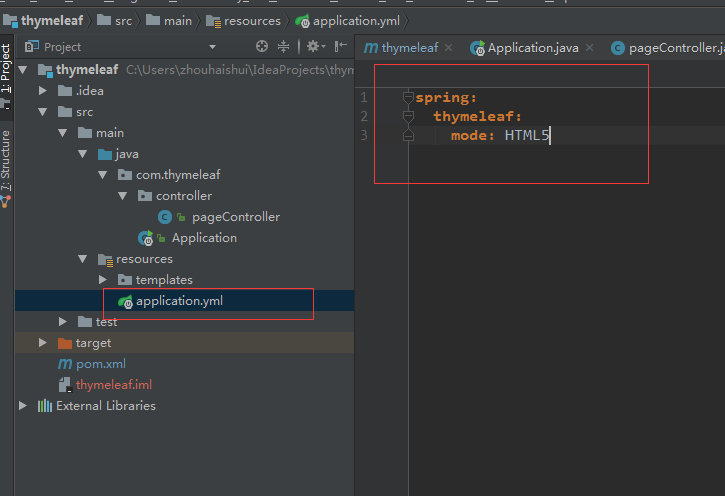
接下來就是配置了,在resource資料夾下建立一個application檔案配置thymeleaf
配置完成後開始程式碼的撰寫,首先是controller層,我寫了三個方法,首頁,跳轉,和檢視的三種。原始碼如下:
package com.thymeleaf.controller;

import org.springframework.stereotype.Controller;
import org.springframework.ui.Model;
import org.springframework.web.bind.annotation.RequestMapping;

/**
 * Created by zhouhaishui on 2017/5/2.
 */
@Controller
public class pageController {

    /**
     * 首頁
     * @return
     */
    @RequestMapping("/")
    public String page(){
        return "system/index";
    }


    /**
     * 跳轉
     * @return
     */
    @RequestMapping("/redirect")
    public String page2(){
        return "redirect/redirect";
    }


    /**
     *檢視
     * @param model
     * @return
     */
    @RequestMapping("/model")
    public String page3(Model model){
        model.addAttribute("name","seawater");
        return "hello";
    }
}
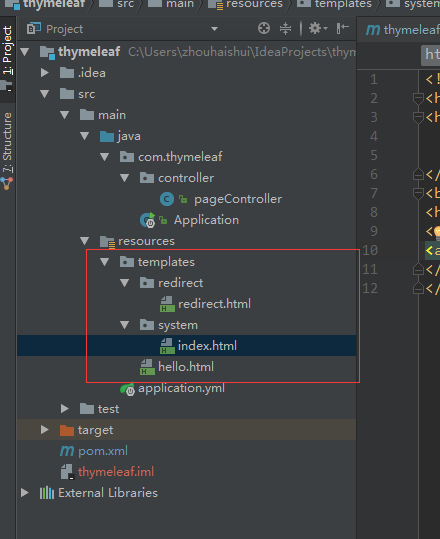
在resource資料夾下按照自己的需要建立資料夾html檔案。我這裡用改的就三個頁面所以就沒有那麼多啦,大家根據自己的需要去建立。
然後就執行就可以了。
頁面如下:
所謂的不可以跳轉是不存在的,只是沒有配置對呢。附上專案原始碼:有興趣的可以去github上看看這個thymeleaf專案。
當然html中一些寫法是需要參考thymeleaf的規則的,這裡就不詳細描述,可以到thymeleaf官方網站檢視。
相關推薦
SpringBoot HTML頁面使用thymeleaf模板開發(3)
1,新建一個專案pom檔案映入相關jar包了。一定要引入thymeleaf。 pox檔案主要是引入web和thymeleaf。 <?xml version="1.0" encoding="UTF-8"?> <project xmlns="http://maven
SpringBoot 開發使用thymeleaf模板開發html頁面
最近在和同事的聊天中得知同事在工作之餘想做一個個人網站,談到後臺問我使用什麼技術好,鑑於之前的經歷,脫口而出:“Springboot”。然後聊了一些之後就開始用了。後面同事反映說不行,使用html無法
SpringBoot---Web開發---Thymeleaf模板引擎
一、前言 1、JSP在內嵌的Servlet容器中執行有一些問題: 1.1 內嵌的Tomcat、Jetty不支援以jar形式執行JSP; 2.2 Undertow不支援JSP; 2、SpringBoot提供了大量的模板引擎,如Freemarker、Velocity、Groovy、
thymeleaf的靜態html頁面熱載入以及idea中springboot的熱載入
首先說一下thymeleaf的html頁面熱載入 1.加入thymeleaf依賴 <dependency> <groupId>org.springframework.boot</groupId> <artifactId>spring
springboot 使用 thymeleaf 模板引擎。在頁面寫隱藏域接收後臺的值。在頁面進行對話方塊提示。
場景: 當頁面 有個活動資訊的開啟按鈕,點選開啟按鈕,到後臺進行驗證,這個活動是否過期或者重複。如果有,頁面進行對話方塊提示。 1、後臺邏輯判斷 if else。當開啟狀態是 進入if。進行判斷,負責執行修改狀態。 2、通過 model 進行賦值傳到前臺的隱藏域 if(status
Springboot中使用thymeleaf模板引擎實現頁面跳轉
1、建立一個Springboot專案2、在pom.xml中加入thymeleaf模板引擎的依賴 <!-- springboot web開發thymeleaf模板 --> <depend
springboot用thymeleaf模板的paginate分頁
display source for charset lan 引擎 封裝 protected hiberna 本文根據一個簡單的user表為例,展示 springboot集成mybatis,再到前端分頁完整代碼(新手自學,不足之處歡迎糾正); 先看java部分 pom.xm
springboot mail+Thymeleaf模板
from ann () ria sage code pool color final compile ‘org.springframework.boot:spring-boot-starter-thymeleaf‘ compile ‘io.ratpack:rat
springboot的thymeleaf模板問題springboot的thymeleaf模板問題
fix pid source pen html5標簽 需要 嚴格 thymeleaf cef springboot項目引入thymeleaf模板時,默認thymeleaf模板對html5標簽是嚴格檢查的。要實現非嚴格檢查 1. 在項目中加NekoHTML庫 在Maven中添
SpringBoot 之Thymeleaf模板
視圖解析 web 應用 text true fix content return uuid ddr 閱讀目錄 一、前言二、集成 Thymeleaf 模板引擎三、使用 Thymeleaf 模板回到頂部一、前言Thymeleaf 的出現是為了取代 JSP,雖然 JSP 存在了很
3.SpringBoot整合Thymeleaf模板
一、前言 SrpingBoot支援如JSP、Thymeleaf、FreeMarker、Mustache、Velocity等各種模板引擎,同時還為開發者提供了自定義模板擴充套件的支援。 使用嵌入式Servlet容器時,請避免使用JSP,因為使用JSP打包後會存在一些限制。 在SpringBoot使用上述模
SpringBoot匯入thymeleaf模板,執行報錯。
報錯: SpringBoot匯入thymeleaf模板,執行報錯org.xml.sax.SAXParseException: 元素型別 “link” 必須由匹配的結束標記 終止。 1、新建SpringBoot MAVEN專案後 JAR型別的專案 2、新增pom.xml檔案
SpringBoot 之Thymeleaf模板.
一、前言 Thymeleaf 的出現是為了取代 JSP,雖然 JSP 存在了很長時間,並在 Java Web 開發中無處不在,但是它也存在一些缺陷: 1、JSP 最明顯的問題在於它看起來像HTML或XML,但它其實上並不是。大多數的JSP模板都是採用HTML的形式,但是又摻雜上了各種JSP標籤庫的
springboot使用thymeleaf完成資料的頁面展示
上一篇介紹了使用jsp完成資料的頁面展示 ,但是springboot並不推薦使用jsp,會產生很多問題。官方推薦使用thymeleaf,這裡我們將上一篇的jsp頁面展示修改為使用thymeleaf,通過對比來熟悉thymeleaf,其實改動的地方並不大。第一篇springbo
springboot 使用thymeleaf 模板引擎時報錯org.xml.sax.SAXParseException: 元素型別 "link" 必須由匹配的結束標記 "" 終止
當springboot 使用thymeleaf 模板引擎時報錯org.xml.sax.SAXParseException: 元素型別 “link” 必須由匹配的結束標記 “” 終止,org.xml.sax.SAXParseException: 元素型別 “met
SpringBoot-使用thymeleaf模板遇到的一些問題
使用springboot+thymeleaf遇到一些問題,主要歸為如下幾點:1.在/templates目錄下建立自定義目錄/my,並在該目錄下建立index.html,程式中如何訪問index.html2.如果不使用/templates目錄作為預設路徑,該如何配置問題1解決方
SpringBoot整合Thymeleaf模板
1、新增起步依賴: <dependency> <groupId>org.springframework.boot</groupId> <artifactId>spring-boot-starter-thymeleaf</artifactI
Springboot系列:Springboot與Thymeleaf模板引擎整合基礎教程(附原始碼)
前言 由於在開發My Blog專案時使用了大量的技術整合,針對於部分框架的使用和整合的流程沒有做詳細的介紹和記錄,導致有些朋友用起來有些吃力,因此打算在接下來的時間裡做一些基礎整合的介紹,當然,可能也不會特別的基礎,但是原始碼會開放給大家,方便大家學習,此次的原始碼地址為s
spring boot 使用velocity、freeMarker模板建立html頁面返回給前端
簡單幾步,實現在spring boot中使用velocity或freeMarker模板構造頁面後返回給前端:1、引入依賴和建立templates目錄: Velocity:http://blog.csdn.net/clementad/article/details/51819
Springboot用官方建議訪問Html頁面並接傳值
pom <!--新增static和templates的依賴--> <dependency> <groupId>org.springframework.boot</groupId>


